
 Web Front-end
H5 Tutorial
HTML5 canvas Canvas line segments, rectangles, arcs and Bezier curves and other simple graphics drawing
Web Front-end
H5 Tutorial
HTML5 canvas Canvas line segments, rectangles, arcs and Bezier curves and other simple graphics drawing
HTML5 canvas Canvas line segments, rectangles, arcs and Bezier curves and other simple graphics drawing

The most interesting thing in HTML5 is this canvas
Through it we can draw the graphics we want
It is also a very important technology
It is used in games, Charts, etc.
Or draw all kinds of cool things
Here I will share with you a website portal
It is all graphics drawn with canvas technology
Canvas creation
canvas is a tag of html
It is a graphics container
First, add a canvas element to the html page
<canvas id="myCanvas" width=500 height=500></canvas>
For our later use, I added the id
width and height are defined The size of the canvas
But please note that this is different from the width and height of the css style
For example, if I add such a style to the css style
#myCanvas { border: 1px solid black; width: 250px; height: 250px;}The border border is defined so that we Clear the position of the canvas
If the width and height of the css style are not set, then the canvas size is the width 500 and height 500 we defined on the canvas tag
But here I defined the style width and height, so our canvas is in The actual size of the web page is equivalent to being reduced by 1 times
(the maximum canvas coordinate of canvas is still 500×500)
All we have to do in the html document is to add a canvas tag
Next we Need to use scripts to draw graphics
Get elements and environment objects
Get elements We all know
var myCanvas = document.getElementById('myCanvas');
The following code is used to get context objects/environment objects
var ctx = myCanvas.getContext('2d');
getContext is used to specify a drawing environment
Here we use the most commonly used two-dimensional drawing
Use getContext('2d')
(getContext('webgl') is used for 3D drawing)
The obtained ctx is an object (CanvasRenderingContext2D object)
Used to use the two-bit drawing API
In layman terms, the canvas element object is our "canvas"
And through getContext('2d ') The environment object obtained is our "brush"
All our operations below need to use the "brush", which is the context object (here is the variable ctx)
Line segment drawing
Let’s draw the simplest graphic - line segment
Now there is a 500×500 canvas on the web page
Let’s draw a diagonal line first
ctx.moveTo(100, 100);ctx.lineTo(400, 400);ctx.stroke();
moveTo() Used to specify the starting point of drawing a line segment
lineTo() is used to specify the end point of drawing a line segment (or a passing point)
stroke() Let’s not talk about it for now, just know that it can’t be drawn without it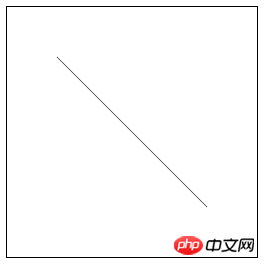
Understanding this, we can now draw a triangle
Just add two lines of code
ctx.moveTo(100, 100);ctx.lineTo(400, 400);ctx.lineTo(100, 400); //增ctx.lineTo(100, 100); //增ctx.stroke();
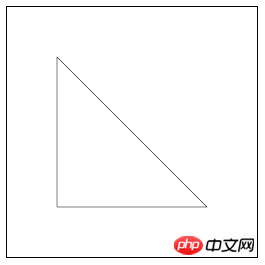
It looks good
Now I will teach you how to change the line width
Change lineWidth
ctx.lineWidth = 50;
//增ctx.moveTo(100, 100);ctx.lineTo(400, 400);ctx.lineTo(100, 400);ctx.lineTo(100, 100);ctx.stroke();
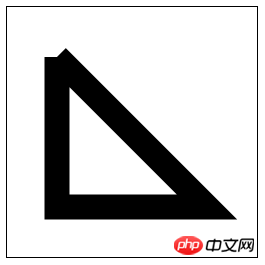
When we make the line thicker
The starting point and the end point cannot be well connected
At this time we need another function closePath()
ctx.lineWidth = 50;ctx.moveTo(100, 100);ctx.lineTo(400, 400);ctx.lineTo(100, 400);ctx.closePath(); //改ctx.stroke();
 ##closePath() is to solve the problem of closed graphics
It means drawing hollow graphics
In addition, there is fill()# for drawing solid graphics ##
ctx.lineWidth = 50;ctx.moveTo(100, 100);ctx.lineTo(400, 400);ctx.lineTo(100, 400);ctx.closePath();ctx.fill(); //改
Without one of them, we cannot draw graphics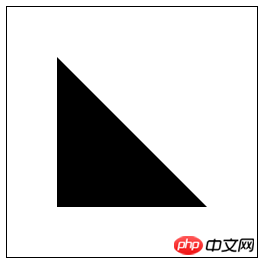 It can be understood that the previous ones are definition rules, and stroke() or fill() is the real The executive officer
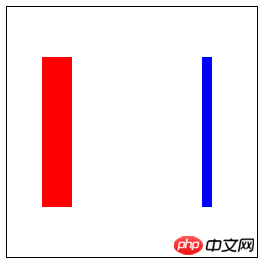
Another thing to note
If you want to start another path after completing one path Path
Must use beginPath() method
See the example below (strokeStyle/fillStyle is used to set the color of our line segments)
ctx.lineWidth = 60;
ctx.strokeStyle = 'red';
ctx.moveTo(100, 100);
ctx.lineTo(100, 400);
ctx.stroke();

ctx.lineWidth = 20;
ctx.strokeStyle = 'blue';
ctx.moveTo(400, 100);
ctx.lineTo(400, 400);
ctx.stroke();
The final result may be different from what you think
Because the engine thinks they are a path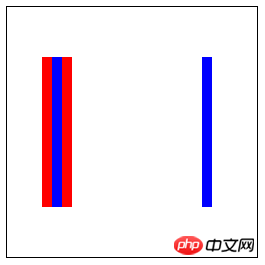 All the properties below overwrite the properties above
//一条路径ctx.lineWidth = 60;
ctx.strokeStyle = 'red';
ctx.moveTo(100, 100);
ctx.lineTo(100, 400);
ctx.stroke();

ctx.beginPath(); //增//另一条路径ctx.lineWidth = 20;
ctx.strokeStyle = 'blue';
ctx.moveTo(400, 100);
ctx.lineTo(400, 400);
ctx.stroke();
## Rectangle drawing
 Using the method we learned above can also easily realize a rectangle
ctx.moveTo(100, 100);ctx.lineTo(400, 100);ctx.lineTo(400, 400);ctx.lineTo(100, 400);ctx.closePath();ctx.stroke();
We have a simpler Method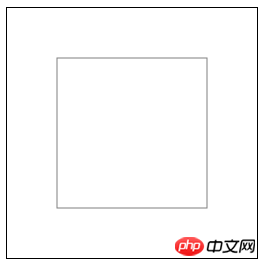
ctx.rect(100, 100, 300, 300);ctx.stroke();
But we also have a simpler one
ctx.strokeRect(100, 100, 300, 300);
ctx.fillRect(100, 100, 300, 300);
With strokeRect() and fillRect() we don’t need to use rect() at all
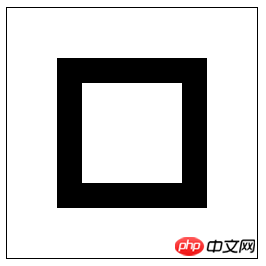
矩形擦除
clearRect()可以让我们擦除画布上的矩形区域
这就类似于我们的橡皮擦
比如说我在实心矩形中间挖走一块矩形区域
ctx.fillRect(100, 100, 300, 300);ctx.clearRect(150, 150, 200, 200);
现在我们可以利用这个方法实现一个矩形下落的效果
var width = 500,
    height = 500,
    y = 50;var timer = setInterval(function(){
    ctx.clearRect(0, 0, width, height);
    ctx.fillRect(100, y++, 50, 50);    if(y > 400){
        clearInterval(timer);
    }
}, 5);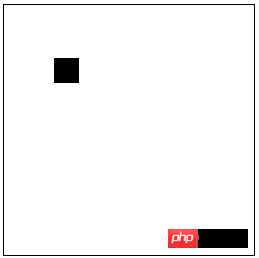
重点就是
每次更新矩形之前,清除一下画布
弧形绘制
绘制弧形使用方法
arc(x, y, r, 起始弧度, 结束弧度, 弧线方向)
这里要知道画布的坐标系和浏览器坐标系是一样的
x正半轴朝右
y正半轴朝下
参数中x,y表示弧心(或者理解为圆心)
r就是半径
弧线方向0为顺时针,1为逆时针
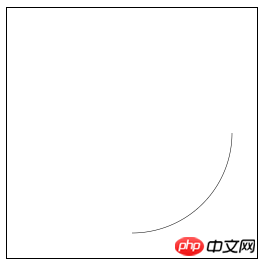
下面我们来使用这个方法
先来画一段弧
ctx.arc(250, 250, 200, 0, Math.PI/2, 0);ctx.stroke();
画一个圆
ctx.arc(250, 250, 200, 0, 2*Math.PI, 0);ctx.stroke();

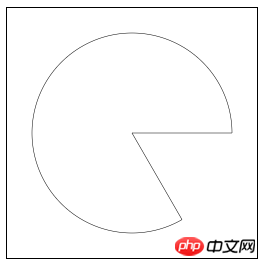
画一个吃豆人
ctx.moveTo(250, 250);ctx.lineTo(450, 250);ctx.arc(250, 250, 200, 0, Math.PI/3, 1);ctx.closePath();ctx.stroke();
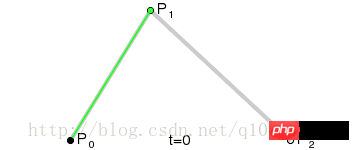
绘制弧形除此之外,还有一个方法
arcTo(x1, y1, x2, y2, r)
r是弧的半径
它的使用方法参照下面的图片 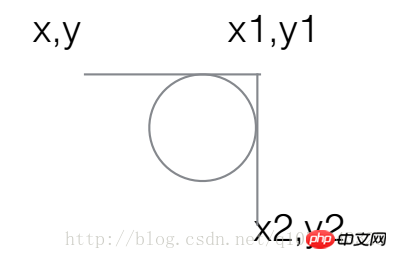
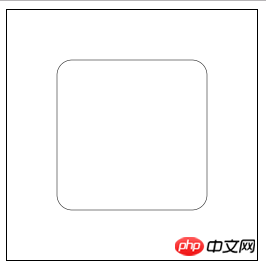
配合我们的线段绘制
可以画出圆角矩形
ctx.moveTo(250, 100);
ctx.arcTo(400, 100, 400, 400, 30);
ctx.arcTo(400, 400, 100, 400, 30);
ctx.arcTo(100, 400, 100, 100, 30);
ctx.arcTo(100, 100, 400, 100, 30);
ctx.closePath();
ctx.stroke();
贝塞尔曲线
还有更高级的方法就是可以绘制贝塞尔曲线
简单了解就好,不常用
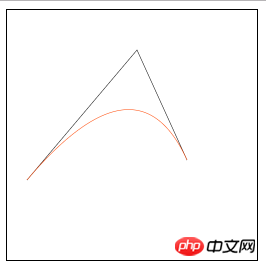
二次贝塞尔曲线 quadraticCurveTo(x1, y1, ex, ey)
三次贝塞尔曲线 bezierCurveTo(x1, y1, x2, y2, ex, ey)
其中x1,y1,x2,y2分别是第一个和第二个控制点的坐标
ex和ey是终点坐标
这里我就盗用网上大神做的图片了
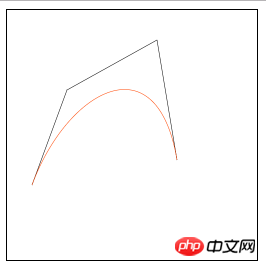
二次贝塞尔曲线: 
ctx.moveTo(40,340); ctx.lineTo(260,80); ctx.lineTo(360,300); ctx.stroke();
/*绘制二次贝塞尔曲线
*/
ctx.beginPath(); ctx.moveTo(40,340);
ctx.quadraticCurveTo(260,80,360,300);
ctx.strokeStyle = "#f40"; ctx.stroke();
三次贝塞尔曲线: 
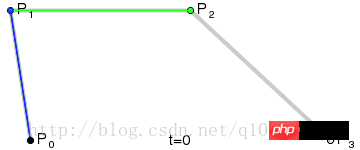
ctx.moveTo(50, 350);
ctx.lineTo(120, 160);
ctx.lineTo(300, 60);
ctx.lineTo(340, 300);
ctx.stroke();
/*绘制三次贝塞尔曲线 */
ctx.beginPath();
ctx.moveTo(50, 350);
ctx.bezierCurveTo(120, 160, 300, 60, 340, 300);
ctx.strokeStyle = "#f40";
ctx.stroke();
以上就是HTML5画布Canvas线段、矩形、弧形及贝塞尔曲线等简单图形绘制的内容,更多相关内容请关注PHP中文网(www.php.cn)!

Hot AI Tools

Undresser.AI Undress
AI-powered app for creating realistic nude photos

AI Clothes Remover
Online AI tool for removing clothes from photos.

Undress AI Tool
Undress images for free

Clothoff.io
AI clothes remover

Video Face Swap
Swap faces in any video effortlessly with our completely free AI face swap tool!

Hot Article
Hot Tools

Notepad++7.3.1
Easy-to-use and free code editor

SublimeText3 Chinese version
Chinese version, very easy to use

Zend Studio 13.0.1
Powerful PHP integrated development environment

Dreamweaver CS6
Visual web development tools

SublimeText3 Mac version
God-level code editing software (SublimeText3)
Hot Topics
 1387
1387
 52
52

 Table Border in HTML
Sep 04, 2024 pm 04:49 PM
Table Border in HTML
Sep 04, 2024 pm 04:49 PM
Guide to Table Border in HTML. Here we discuss multiple ways for defining table-border with examples of the Table Border in HTML.
 HTML margin-left
Sep 04, 2024 pm 04:48 PM
HTML margin-left
Sep 04, 2024 pm 04:48 PM
Guide to HTML margin-left. Here we discuss a brief overview on HTML margin-left and its Examples along with its Code Implementation.
 Nested Table in HTML
Sep 04, 2024 pm 04:49 PM
Nested Table in HTML
Sep 04, 2024 pm 04:49 PM
This is a guide to Nested Table in HTML. Here we discuss how to create a table within the table along with the respective examples.
 HTML Table Layout
Sep 04, 2024 pm 04:54 PM
HTML Table Layout
Sep 04, 2024 pm 04:54 PM
Guide to HTML Table Layout. Here we discuss the Values of HTML Table Layout along with the examples and outputs n detail.
 HTML Input Placeholder
Sep 04, 2024 pm 04:54 PM
HTML Input Placeholder
Sep 04, 2024 pm 04:54 PM
Guide to HTML Input Placeholder. Here we discuss the Examples of HTML Input Placeholder along with the codes and outputs.
 Moving Text in HTML
Sep 04, 2024 pm 04:45 PM
Moving Text in HTML
Sep 04, 2024 pm 04:45 PM
Guide to Moving Text in HTML. Here we discuss an introduction, how marquee tag work with syntax and examples to implement.
 HTML Ordered List
Sep 04, 2024 pm 04:43 PM
HTML Ordered List
Sep 04, 2024 pm 04:43 PM
Guide to the HTML Ordered List. Here we also discuss introduction of HTML Ordered list and types along with their example respectively
 HTML onclick Button
Sep 04, 2024 pm 04:49 PM
HTML onclick Button
Sep 04, 2024 pm 04:49 PM
Guide to HTML onclick Button. Here we discuss their introduction, working, examples and onclick Event in various events respectively.
