MySql installation and usage graphic tutorial
MySQL is a relational database management system developed by the Swedish MySQL AB company and currently belongs to Oracle. MySQL is a relational database management system. A relational database stores data in different tables instead of putting all data in one large warehouse, which increases speed and flexibility. The SQL language used by MySQL is the most commonly used standardized language for accessing databases. MySQL software adopts a dual authorization policy (this entry "Authorization Policy"), which is divided into community version and commercial version. Due to its small size, fast speed and low total cost of ownership, especially the characteristics of open source, it is generally used by small and medium-sized enterprises. For website development, MySQL is chosen as the website database. Due to the excellent performance of its community version, it can form a good development environment with PHP and Apache.
Below I will introduce the process of installing MySQL for reference only.
1. The first step is to download Windows (x86, 64-bit) from http://dev.mysql.com/downloads/mysql/.
2. After the download is complete, decompress it to the path you want to install. For example, I decompressed it to the path D:\MySql. After decompression, the files should be as shown below. Folder:
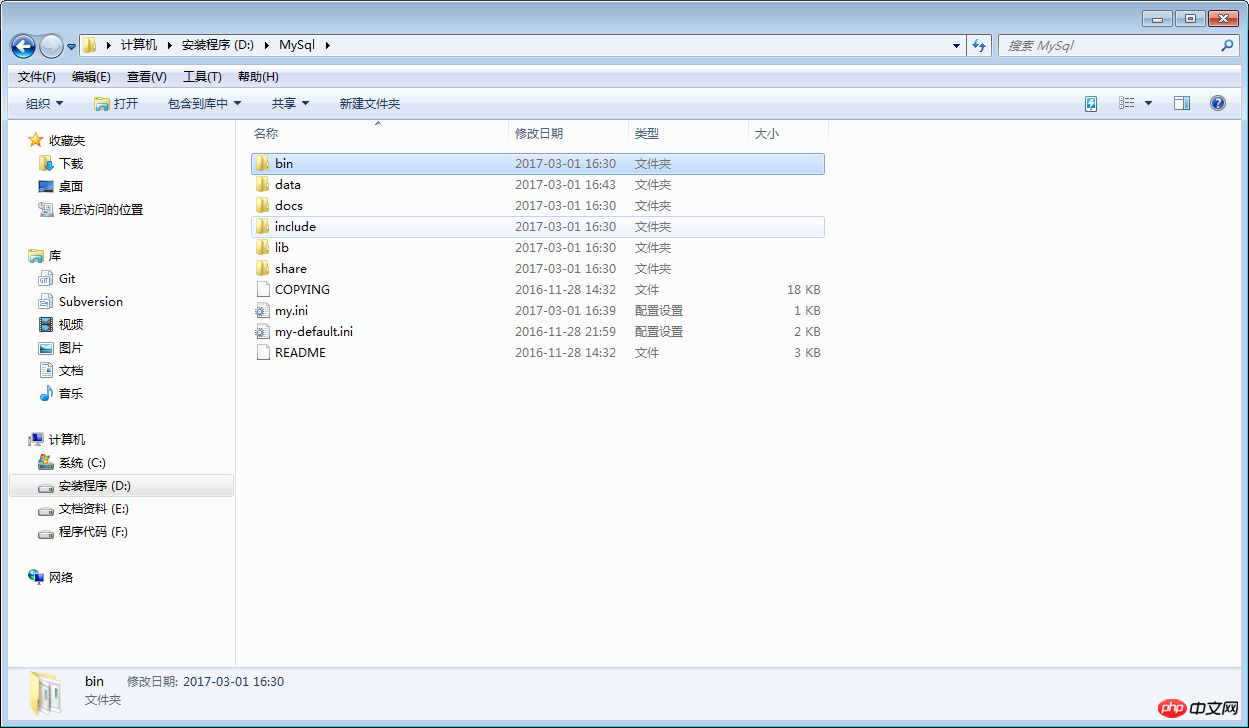
3. Create a new my.ini configuration file, which will be overwritten The my-default.ini file in the current folder. The display file suffix set in the previous step is to prepare for this step. Open this configuration file and add the following code to the file:
[mysql]# 设置mysql客户端默认字符集
default-character-set=utf8
[mysqld]#设置3306端口
port = 3306 # 设置mysql的安装目录
basedir=D:\MySql# 设置mysql数据库的数据的存放目录
datadir=D:\MySql\data
# 允许最大连接数
max_connections=200# 服务端使用的字符集默认为8比特编码的latin1字符集
character-set-server=utf8
# 创建新表时将使用的默认存储引擎
default-storage-engine=INNODB
4. Save after adding, and then create a new empty data file in this path folder, the data folder must be empty. The layout of the entire process should be as follows: 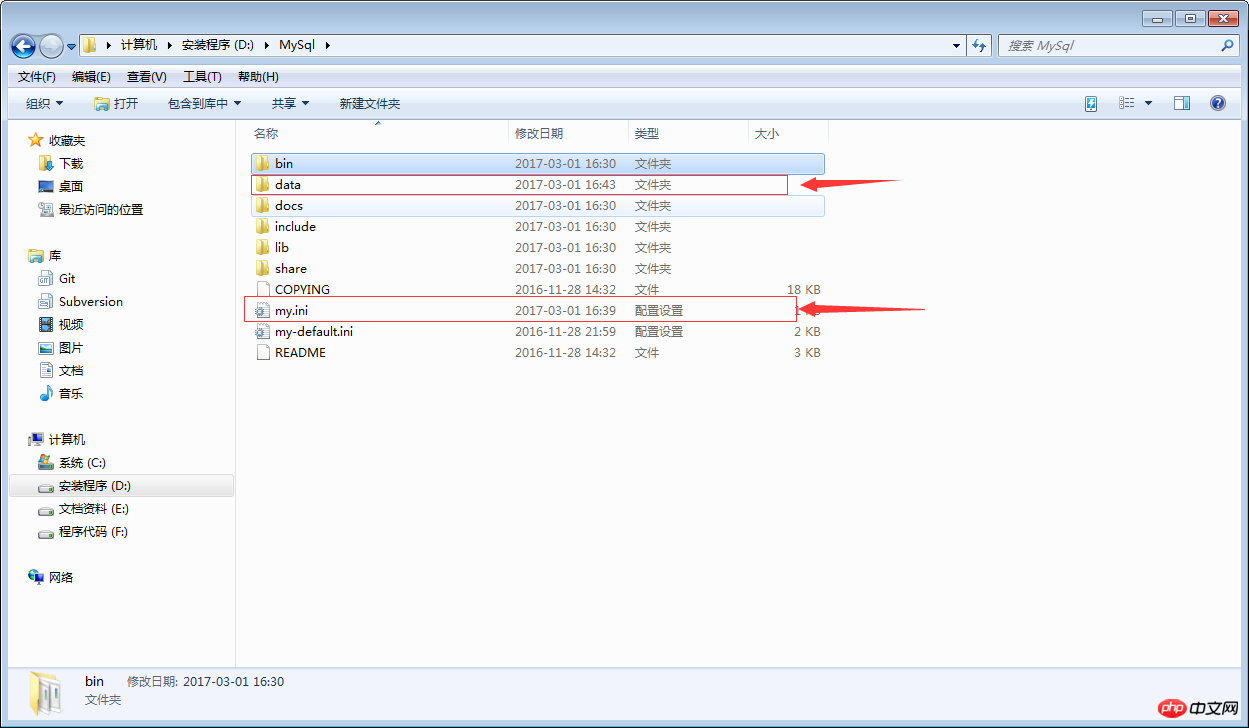
5. The preliminary preparations have been completed. The next step is to start installing the service. Run cmd.exe as an administrator. Remember to run it as an administrator and enter the bin directory of the installation. The most important and important commands are here. They are essential. Otherwise, the service cannot be started after installing the service. Enter the mysqld --initialize-insecure --user=mysql command and press Enter. 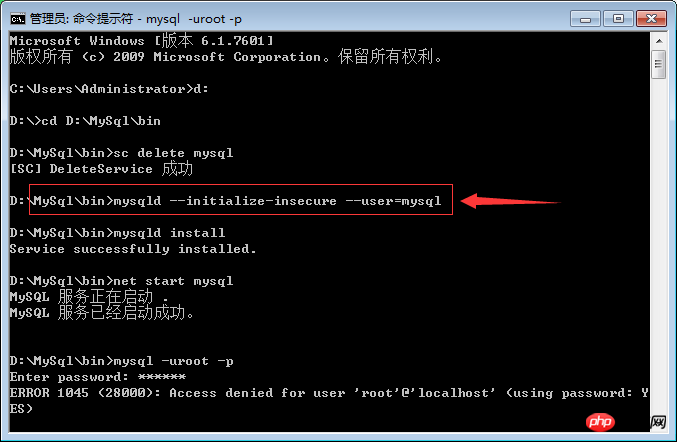
6. Then enter mysqld install to install the service. If the installation is successful, it will prompt that the installation is successful, and then start the MySQL service and it will be OK. .
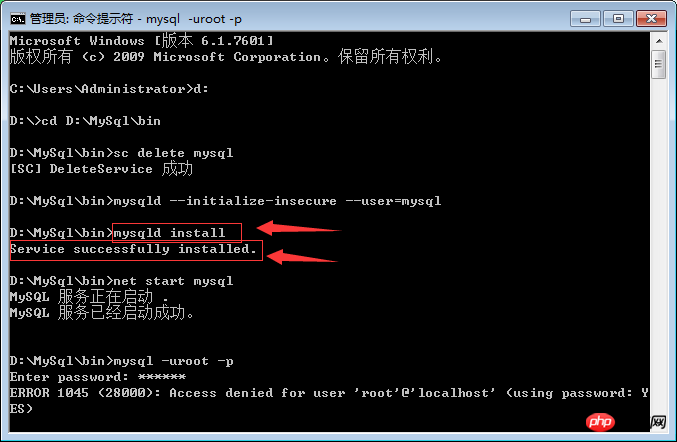
7. Configure environment variables——>Right-click on the computer and "Properties"——>"Advanced System Settings" ——>"Environment Variables"——>"path"——>Copy the path of the bin directory to the path environment variable.
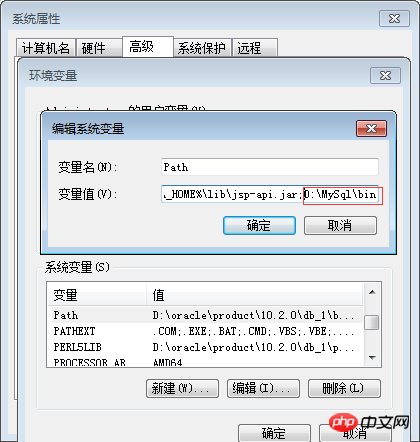
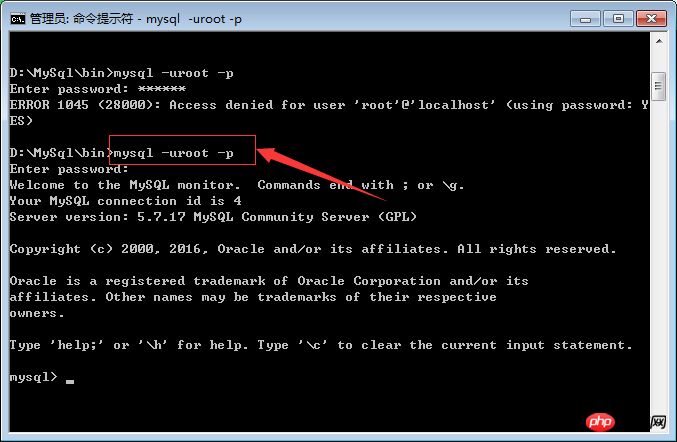
8. Open MySQL, open cmd.exe , enter mysql -uroot -p command, the default is no password, press Enter to enter. If some have already set a password, you need to enter the password to enter. If you have a password, you can mysql -uroot -p password, or mysql -uroot -p and press Enter to enter the password. The second option is recommended.
This concludes the tutorial on how to install and use mysql. Please forgive me if it’s not well written. You are welcome to make criticisms and suggestions!
The above is the content of the graphic tutorial on the installation and use of MySql. For more related content, please pay attention to the PHP Chinese website (www.php.cn)!

Hot AI Tools

Undresser.AI Undress
AI-powered app for creating realistic nude photos

AI Clothes Remover
Online AI tool for removing clothes from photos.

Undress AI Tool
Undress images for free

Clothoff.io
AI clothes remover

AI Hentai Generator
Generate AI Hentai for free.

Hot Article

Hot Tools

Notepad++7.3.1
Easy-to-use and free code editor

SublimeText3 Chinese version
Chinese version, very easy to use

Zend Studio 13.0.1
Powerful PHP integrated development environment

Dreamweaver CS6
Visual web development tools

SublimeText3 Mac version
God-level code editing software (SublimeText3)

Hot Topics
 PHP's big data structure processing skills
May 08, 2024 am 10:24 AM
Big data structure processing skills: Chunking: Break down the data set and process it in chunks to reduce memory consumption. Generator: Generate data items one by one without loading the entire data set, suitable for unlimited data sets. Streaming: Read files or query results line by line, suitable for large files or remote data. External storage: For very large data sets, store the data in a database or NoSQL.
 How to use MySQL backup and restore in PHP?
Jun 03, 2024 pm 12:19 PM
Backing up and restoring a MySQL database in PHP can be achieved by following these steps: Back up the database: Use the mysqldump command to dump the database into a SQL file. Restore database: Use the mysql command to restore the database from SQL files.
 How to optimize MySQL query performance in PHP?
Jun 03, 2024 pm 08:11 PM
MySQL query performance can be optimized by building indexes that reduce lookup time from linear complexity to logarithmic complexity. Use PreparedStatements to prevent SQL injection and improve query performance. Limit query results and reduce the amount of data processed by the server. Optimize join queries, including using appropriate join types, creating indexes, and considering using subqueries. Analyze queries to identify bottlenecks; use caching to reduce database load; optimize PHP code to minimize overhead.
 How to insert data into a MySQL table using PHP?
Jun 02, 2024 pm 02:26 PM
How to insert data into MySQL table? Connect to the database: Use mysqli to establish a connection to the database. Prepare the SQL query: Write an INSERT statement to specify the columns and values to be inserted. Execute query: Use the query() method to execute the insertion query. If successful, a confirmation message will be output.
 How to create a MySQL table using PHP?
Jun 04, 2024 pm 01:57 PM
Creating a MySQL table using PHP requires the following steps: Connect to the database. Create the database if it does not exist. Select a database. Create table. Execute the query. Close the connection.
 How to use MySQL stored procedures in PHP?
Jun 02, 2024 pm 02:13 PM
To use MySQL stored procedures in PHP: Use PDO or the MySQLi extension to connect to a MySQL database. Prepare the statement to call the stored procedure. Execute the stored procedure. Process the result set (if the stored procedure returns results). Close the database connection.
 How to fix mysql_native_password not loaded errors on MySQL 8.4
Dec 09, 2024 am 11:42 AM
One of the major changes introduced in MySQL 8.4 (the latest LTS release as of 2024) is that the "MySQL Native Password" plugin is no longer enabled by default. Further, MySQL 9.0 removes this plugin completely. This change affects PHP and other app
 The difference between oracle database and mysql
May 10, 2024 am 01:54 AM
Oracle database and MySQL are both databases based on the relational model, but Oracle is superior in terms of compatibility, scalability, data types and security; while MySQL focuses on speed and flexibility and is more suitable for small to medium-sized data sets. . ① Oracle provides a wide range of data types, ② provides advanced security features, ③ is suitable for enterprise-level applications; ① MySQL supports NoSQL data types, ② has fewer security measures, and ③ is suitable for small to medium-sized applications.


