

Complete HTML5 puzzle game code graphic introduction in 2 hours

When I first learned lufylegend.js, I used lufylegend.js to develop the first HTML5 mini-game - a jigsaw puzzle. I also wrote a blog post to show off: HTML5 mini-game "Intelligence Puzzle" "Published to challenge your thinking storm. However, I was new to game development at the time and had little experience, so I did not study the algorithm and code flaws in the game. As a result, there were many bugs in the game, and it was even possible that the puzzles could not be restored after being disrupted. Recently, friends often ask about this game. They hope that I can correct the bugs in the code to facilitate beginners to learn. By the way, I also plan to test my speed in writing such a small game, so I took some time to write this game from beginning to end. I re-wrote it and calculated the time. It took about 2 hours from preparation and modification of materials to final completion of the game.
The following is the game address:
http://yuehaowang.github.io/games/puzzle/
This is my game record, Welcome to challenge:
Next, let’s talk about how to develop and complete this game. (Press "Chronology")
Preparation Phase
Prepare the lufylegend game engine. You can download it from the official website:
lufylegend.com/lufylegend
Engine Document address:
lufylegend.com/lufylegend/api
It can be said that without the powerful lufylegend engine, it would take at least a day to make this HTML5 mini-game using native canvas.
0~30min
Prepare materials (10min) + modify materials (20min). Because I am really handicapped and not good at P-pictures, it took about 20 minutes to modify the pictures, embarrassing...
30~50min
Develop the start interface. The game cannot be without the start interface, so we implement this part of the code first. Before this is the code in index.html, the code is as follows:
<!DOCTYPE html>
<html>
<head>
    <title>Puzzle</title>
    <meta charset="utf-8">
    <meta name="viewport" content="width=device-width,initial-scale=1.0,minimum-scale=1.0,maximum-scale=1.0,user-scalable=no">
    <script type="text/javascript" src="./lib/lufylegend-1.10.1.simple.min.js"></script>
    <script type="text/javascript" src="./js/Main.js"></script>
</head>
<body style="margin: 0px; font-size: 0px; background: #F2F2F2;">
    <p id="mygame"></p>
</body>
</html>Mainly introduces some js files, not much to say. Then prepare a Main.js file, and add the initialization interface and resource loading code to this file:
/** 初始化游戏 */
LInit(60, "mygame", 390, 580, main);

var imgBmpd;
/** 游戏层 */
var stageLayer, gameLayer, overLayer;
/** 拼图块列表 */
var blockList;
/** 是否游戏结束 */
var isGameOver;
/** 用时 */
var startTime, time, timeTxt;
/** 步数 */
var steps, stepsTxt;

function main () {
    /** 全屏设置 */
    if (LGlobal.mobile) {
        LGlobal.stageScale = LStageScaleMode.SHOW_ALL;
    }
    LGlobal.screen(LGlobal.FULL_SCREEN);

    /** 添加加载提示 */
    var loadingHint = new LTextField();
    loadingHint.text = "资源加载中……";
    loadingHint.size = 20;
    loadingHint.x = (LGlobal.width - loadingHint.getWidth()) / 2;
    loadingHint.y = (LGlobal.height - loadingHint.getHeight()) / 2;
    addChild(loadingHint);

    /** 加载图片 */
    LLoadManage.load(
        [
            {path : "./js/Block.js"},
            {name : "img", path : "./images/img.jpg"}
        ],
        null,
        function (result) {
            /** 移除加载提示 */
            loadingHint.remove();

            /** 保存位图数据,方便后续使用 */
            imgBmpd = new LBitmapData(result["img"]);

            gameInit();
        }
    );
}

function gameInit (e) {
    /** 初始化舞台层 */
    stageLayer = new LSprite();
    stageLayer.graphics.drawRect(0, "", [0, 0, LGlobal.width, LGlobal.height], true, "#EFEFEF");
    addChild(stageLayer);

    /** 初始化游戏层 */
    gameLayer = new LSprite();
    stageLayer.addChild(gameLayer);

    /** 初始化最上层 */
    overLayer = new LSprite();
    stageLayer.addChild(overLayer);

    /** 添加Complete HTML5 puzzle game code graphic introduction in 2 hours */
    addBeginningUI();
}The above code has detailed comments, you can read it according to the engine documentation and comments. Some global variables will be used in future code, so you can ignore them for now. Next is the code in the addBeginningUI function, which is used to implement the start interface:
function addBeginningUI () {
    var beginningLayer = new LSprite();
    beginningLayer.graphics.drawRect(0, "", [0, 0, LGlobal.width, LGlobal.height], true, "#EDEDED");
    stageLayer.addChild(beginningLayer);

    /** 游戏标题 */
    var title = new LTextField();
    title.text = "拼图游戏";
    title.size = 50;
    title.weight = "bold";
    title.x = (LGlobal.width - title.getWidth()) / 2;
    title.y = 160;
    title.color = "#FFFFFF";
    title.lineWidth = 5;
    title.lineColor = "#000000";
    title.stroke = true;
    beginningLayer.addChild(title);

    /** 开始游戏提示 */
    var hint = new LTextField();
    hint.text = "- 点击屏幕开始游戏 -";
    hint.size = 25;
    hint.x = (LGlobal.width - hint.getWidth()) / 2;
    hint.y = 370;
    beginningLayer.addChild(hint);

    /** 开始游戏 */
    beginningLayer.addEventListener(LMouseEvent.MOUSE_UP, function () {
        beginningLayer.remove();

        startGame();
    });
}At this point, run the code and get our start interface:

When I saw this picture, I actually wanted to complain that it was too "simple", embarrassing...
But I am trying to show the production speed this time, so I hope you can read it. .
50~90min
These 40 minutes are the most critical period, during which we have to complete the main part of the entire game. First, we need to use code to implement the following process:
初始化游戏界面数据(如游戏时间、所用步数)和显示一些UI部件(如图样)
|
-> 获取随机的拼图块位置
|
-> 显示打乱后的拼图块
We make these steps into functions so that we can call them uniformly:
function startGame () {
    isGameOver = false;

    /** 初始化时间和步数 */
    startTime = (new Date()).getTime();
    time = 0;
    steps = 0;
    /** 初始化拼图块列表 */
    initBlockList();
    /** 打乱拼图 */
    getRandomBlockList();
    /** 显示拼图 */
    showBlock();
    /** 显示缩略图 */
    showThumbnail();
    /** 显示时间 */
    addTimeTxt();
    /** 显示步数 */
    addStepsTxt();

    stageLayer.addEventListener(LEvent.ENTER_FRAME, onFrame);
}At the beginning of the function, we put The isGameOver variable is set to false to indicate that the game is not over. In the later code, we will see the role of this variable. Then we initialized the two global variables time and steps used to represent time and steps. In addition, the value of the initialized variable startTime was used to calculate the game later. time.
Next, we will start to initialize the puzzle pieces. See the code in initBlockList:
function initBlockList () {
    blockList = new Array();

    for (var i = 0; i < 9; i++) {
        /** 根据序号计算拼图块图片显示位置 */
        var y = (i / 3) >>> 0, x = i % 3;

        blockList.push(new Block(i, x, y));
    }
}Here we use a Block class, which is used to display puzzle blocks and store puzzle block data, and provides Some methods to manipulate puzzle blocks, the following is the code of its constructor:
function Block (index, x, y) {
    LExtends(this, LSprite, []);

    var bmpd = imgBmpd.clone();
    bmpd.setProperties(x * 130, y * 130, 130, 130);
    this.bmp = new LBitmap(bmpd);
    this.addChild(this.bmp);

    var border = new LShape();
    border.graphics.drawRect(3, "#CCCCCC", [0, 0, 130, 130]);
    this.addChild(border);

    this.index = index;

    this.addEventListener(LMouseEvent.MOUSE_UP, this.onClick);
}Block class inherits from LSprite and belongs to a display object, so we are in this class A bitmap object is added to display the pictures corresponding to the puzzle pieces. In addition to this, we also added a border to the puzzle piece, which is used to separate the surrounding puzzle pieces when displayed. The Block class has an index attribute, which represents the correct position of the puzzle block in the puzzle block list blockList. Finally, we added a mouse down event to this class to handle moving the tile after the mouse is pressed.
Next we will also introduce a method of this classsetLocation:
Block.prototype.setLocation = function (x, y) {
    this.locationX = x;
    this.locationY = y;

    this.x = x * 130;
    this.y = y * 130;
};This method is used to set the display position of the puzzle piece object and the "array" to save the puzzle piece Location". What is "array position"? Readers can understand it through the following pictures:

# As you can see, the "array position" is similar to the element subscript in a two-dimensional array. The purpose of storing this location is to easily obtain other nearby puzzle blocks from blockList. This method is called when we display the puzzle. Before displaying the puzzle, we must first scramble the puzzle. See the following code:
function getRandomBlockList () {
    /** 随机打乱拼图 */
    blockList.sort(function () {
        return 0.5 - Math.random();
    });

    /** 计算逆序和 */
    var reverseAmount = 0;

    for (var i = 0, l = blockList.length, preBlock = null; i < l; i++) {
        if (!preBlock) {
            preBlock = blockList[0];

            continue;
        }

        var currentBlock = blockList[i];

        if (currentBlock.index < preBlock.index) {
            reverseAmount++;
        }

        preBlock = currentBlock;
    }

    /** 检测打乱后是否可还原 */
    if (reverseAmount % 2 != 0) {
        /** 不合格,重新打乱 */
        getRandomBlockList();
    }
}To disrupt the puzzle part, directly use the sort method of the array. Perform random shuffling:
blockList.sort(function () {
    return 0.5 - Math.random();
});其实打乱算法有很多种,我这里采用最粗暴的方法,也就是随机打乱。这种算法简单是简单,坏在可能出现无法复原的现象。针对这个问题,就有配套的检测打乱后是否可还原的算法,具体的算法理论我摘用lufy大神的评论:
此类游戏能否还原关键是看它打乱后的逆序次数之和是否为偶数
假设你打乱后的数组中的每一个小图块为obj0,obj1,obj2,…它们打乱之前的序号分别为obj0.num,obj1.num…
接下来循环数组,如果前者的序号比后者大,如obj0.num > obj1.num,这表示一个逆序
当全部的逆序之和为奇数时表示不可还原,重新打乱即可,打乱后重新检测,直到逆序之和为偶数为止
上面我给出的getRandomBlockList里的代码就是在实现打乱算法和检测是否可还原算法。
还有一种打乱方式,大家可以尝试尝试:和复原拼图一样,将空白块一步一步地与周围的拼图随机交换顺序。这个打乱算法较上一种而言,不会出现无法复原的现象,而且可以根据打乱的步数设定游戏难度。
在完成打乱拼图块后,如期而至的是显示拼图块:
function showBlock() {
    for (var i = 0, l = blockList.length; i < l; i++) {
        var b = blockList[i];

        /** 根据序号计算拼图块位置 */
        var y = (i / 3) >>> 0, x = i % 3;

        b.setLocation(x, y);

        gameLayer.addChild(b);
    }
}显示了拼图块后,我们要做的就是添加操作拼图块的功能。于是需要拓展Block类,为其添加事件监听器onClick方法:
Block.prototype.onClick = function (e) {
    var self = e.currentTarget;

    if (isGameOver) {
        return;
    }

    var checkList = new Array();

    /** 判断右侧是否有方块 */
    if (self.locationX > 0) {
        checkList.push(Block.getBlock(self.locationX - 1, self.locationY));
    }

    /** 判断左侧是否有方块 */
    if (self.locationX < 2) {
        checkList.push(Block.getBlock(self.locationX + 1, self.locationY));
    }

    /** 判断上方是否有方块 */
    if (self.locationY > 0) {
        checkList.push(Block.getBlock(self.locationX, self.locationY - 1));
    }

    /** 判断下方是否有方块 */
    if (self.locationY < 2) {
        checkList.push(Block.getBlock(self.locationX, self.locationY + 1));
    }

    for (var i = 0, l = checkList.length; i < l; i++) {
        var checkO = checkList[i];

        /** 判断是否是空白拼图块 */
        if (checkO.index == 8) {
            steps++;
            updateStepsTxt();

            Block.exchangePosition(self, checkO);

            break;
        }
    }
};首先,我们在这里看到了isGameOver全局变量的作用,即在游戏结束后,阻断点击拼图块后的操作。
在点击了拼图块后,我们先获取该拼图块周围的拼图块,并将它们装入checkList,再遍历checkList,当判断到周围有空白拼图块后,即周围有index属性等于8的拼图块后,先更新操作步数,然后将这两个拼图块交换位置。具体交换拼图块位置的方法详见如下代码:
Block.exchangePosition = function (b1, b2) {
    var b1x = b1.locationX, b1y = b1.locationY,
        b2x = b2.locationX, b2y = b2.locationY,
        b1Index = b1y * 3 + b1x,
        b2Index = b2y * 3 + b2x;

    /** 在地图块数组中交换两者位置 */
    blockList.splice(b1Index, 1, b2);
    blockList.splice(b2Index, 1, b1);

    /** 交换两者显示位置 */
    b1.setLocation(b2x, b2y);
    b2.setLocation(b1x, b1y);

    /** 判断游戏是否结束 */
    Block.isGameOver();
};还有就是Block.getBlock静态方法,用于获取给定的“数组位置”下的拼图块:
Block.getBlock = function (x, y) {
    return blockList[y * 3 + x];
};在Block.exchangePosition中,我们通过Block.isGameOver判断玩家是否已将拼图复原:
Block.isGameOver = function () {
    var reductionAmount = 0, l = blockList.length;

    /** 计算还原度 */
    for (var i = 0; i < l; i++) {
        var b = blockList[i];

        if (b.index == i) {
            reductionAmount++;
        }
    }

    /** 计算是否完全还原 */
    if (reductionAmount == l) {
        /** 游戏结束 */
        gameOver();
    }
};到这里,我们就实现了打乱和操作拼图块部分。
90~120min
最后30min用于细枝末节上的处理,如显示拼图缩略图、显示&更新时间和步数,以及添加游戏结束画面,这些就交给如下冗长而简单的代码来完成吧:
function showThumbnail() {
var thumbnail = new LBitmap(imgBmpd);
thumbnail.scaleX = 130 / imgBmpd.width;
thumbnail.scaleY = 130 / imgBmpd.height;
thumbnail.x = (LGlobal.width - 100) /2;
thumbnail.y = 410;
overLayer.addChild(thumbnail);
}
function addTimeTxt () {
timeTxt = new LTextField();
timeTxt.stroke = true;
timeTxt.lineWidth = 3;
timeTxt.lineColor = "#54D9EF";
timeTxt.color = "#FFFFFF";
timeTxt.size = 18;
timeTxt.x = 20;
timeTxt.y = 450;
overLayer.addChild(timeTxt);
updateTimeTxt();
}
function updateTimeTxt () {
timeTxt.text = "时间:" + getTimeTxt(time);
}
function getTimeTxt () {
var d = new Date(time);
return d.getMinutes() + " : " + d.getSeconds();
};
function addStepsTxt () {
stepsTxt = new LTextField();
stepsTxt.stroke = true;
stepsTxt.lineWidth = 3;
stepsTxt.lineColor = "#54D9EF";
stepsTxt.color = "#FFFFFF";
stepsTxt.size = 18;
stepsTxt.y = 450;
overLayer.addChild(stepsTxt);
updateStepsTxt();
}
function updateStepsTxt () {
stepsTxt.text = "步数:" + steps;
stepsTxt.x = LGlobal.width - stepsTxt.getWidth() - 20;
}
function onFrame () {
if (isGameOver) {
return;
}
/** 获取当前时间 */
var currentTime = (new Date()).getTime();
/** 计算使用的时间并更新时间显示 */
time = currentTime - startTime;
updateTimeTxt();
}
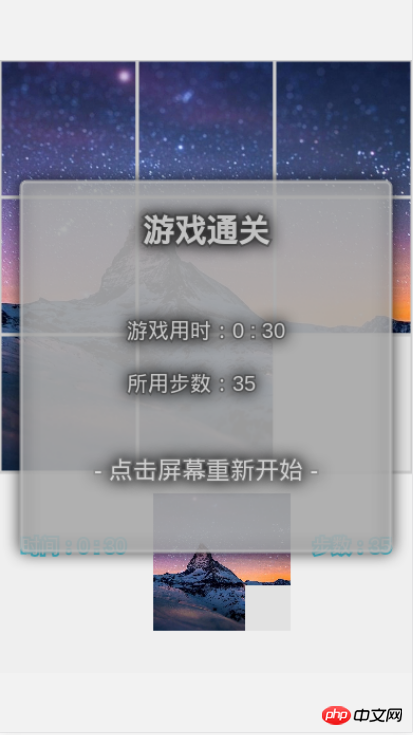
function gameOver () {
isGameOver = true;
var resultLayer = new LSprite();
resultLayer.filters = [new LDropShadowFilter()];
resultLayer.graphics.drawRoundRect(3, "#BBBBBB", [0, 0, 350, 350, 5], true,"#DDDDDD");
resultLayer.x = (LGlobal.width - resultLayer.getWidth()) / 2;
resultLayer.y = LGlobal.height / 2;
resultLayer.alpha = 0;
overLayer.addChild(resultLayer);
var title = new LTextField();
title.text = "游戏通关"
title.weight = "bold";
title.stroke = true;
title.lineWidth = 3;
title.lineColor = "#555555";
title.size = 30;
title.color = "#FFFFFF";
title.x = (resultLayer.getWidth() - title.getWidth()) / 2;
title.y = 30;
resultLayer.addChild(title);
var usedTimeTxt = new LTextField();
usedTimeTxt.text = "游戏用时:" + getTimeTxt(time);
usedTimeTxt.size = 20;
usedTimeTxt.stroke = true;
usedTimeTxt.lineWidth = 2;
usedTimeTxt.lineColor = "#555555";
usedTimeTxt.color = "#FFFFFF";
usedTimeTxt.x = (resultLayer.getWidth() - usedTimeTxt.getWidth()) / 2;
usedTimeTxt.y = 130;
resultLayer.addChild(usedTimeTxt);
var usedStepsTxt = new LTextField();
usedStepsTxt.text = "所用步数:" + steps;
usedStepsTxt.size = 20;
usedStepsTxt.stroke = true;
usedStepsTxt.lineWidth = 2;
usedStepsTxt.lineColor = "#555555";
usedStepsTxt.color = "#FFFFFF";
usedStepsTxt.x = usedTimeTxt.x;
usedStepsTxt.y = 180;
resultLayer.addChild(usedStepsTxt);
var hintTxt = new LTextField();
hintTxt.text = "- 点击屏幕重新开始 -";
hintTxt.size = 23;
hintTxt.stroke = true;
hintTxt.lineWidth = 2;
hintTxt.lineColor = "#888888";
hintTxt.color = "#FFFFFF";
hintTxt.x = (resultLayer.getWidth() - hintTxt.getWidth()) / 2;
hintTxt.y = 260;
resultLayer.addChild(hintTxt);
LTweenLite.to(resultLayer, 0.5, {
alpha : 0.7,
y : (LGlobal.height - resultLayer.getHeight()) / 2,
onComplete : function () {
/** 点击界面重新开始游戏 */
stageLayer.addEventListener(LMouseEvent.MOUSE_UP, function () {
gameLayer.removeAllChild();
overLayer.removeAllChild();
stageLayer.removeAllEventListener();
startGame();
});
}
});
}Ok,2h下来,整个游戏就搞定咯~不得不表扬一下lufylegend这个游戏引擎,实在是可以大幅提升开发效率。
以上就是2小时完成HTML5拼图小游戏代码图文介绍的内容,更多相关内容请关注PHP中文网(www.php.cn)!

Hot AI Tools

Undresser.AI Undress
AI-powered app for creating realistic nude photos

AI Clothes Remover
Online AI tool for removing clothes from photos.

Undress AI Tool
Undress images for free

Clothoff.io
AI clothes remover

AI Hentai Generator
Generate AI Hentai for free.

Hot Article
Hot Tools

Notepad++7.3.1
Easy-to-use and free code editor

SublimeText3 Chinese version
Chinese version, very easy to use

Zend Studio 13.0.1
Powerful PHP integrated development environment

Dreamweaver CS6
Visual web development tools

SublimeText3 Mac version
God-level code editing software (SublimeText3)
Hot Topics
 1377
1377
 52
52

 Table Border in HTML
Sep 04, 2024 pm 04:49 PM
Table Border in HTML
Sep 04, 2024 pm 04:49 PM
Guide to Table Border in HTML. Here we discuss multiple ways for defining table-border with examples of the Table Border in HTML.
 HTML margin-left
Sep 04, 2024 pm 04:48 PM
HTML margin-left
Sep 04, 2024 pm 04:48 PM
Guide to HTML margin-left. Here we discuss a brief overview on HTML margin-left and its Examples along with its Code Implementation.
 Nested Table in HTML
Sep 04, 2024 pm 04:49 PM
Nested Table in HTML
Sep 04, 2024 pm 04:49 PM
This is a guide to Nested Table in HTML. Here we discuss how to create a table within the table along with the respective examples.
 HTML Table Layout
Sep 04, 2024 pm 04:54 PM
HTML Table Layout
Sep 04, 2024 pm 04:54 PM
Guide to HTML Table Layout. Here we discuss the Values of HTML Table Layout along with the examples and outputs n detail.
 HTML Input Placeholder
Sep 04, 2024 pm 04:54 PM
HTML Input Placeholder
Sep 04, 2024 pm 04:54 PM
Guide to HTML Input Placeholder. Here we discuss the Examples of HTML Input Placeholder along with the codes and outputs.
 HTML Ordered List
Sep 04, 2024 pm 04:43 PM
HTML Ordered List
Sep 04, 2024 pm 04:43 PM
Guide to the HTML Ordered List. Here we also discuss introduction of HTML Ordered list and types along with their example respectively
 Moving Text in HTML
Sep 04, 2024 pm 04:45 PM
Moving Text in HTML
Sep 04, 2024 pm 04:45 PM
Guide to Moving Text in HTML. Here we discuss an introduction, how marquee tag work with syntax and examples to implement.
 HTML onclick Button
Sep 04, 2024 pm 04:49 PM
HTML onclick Button
Sep 04, 2024 pm 04:49 PM
Guide to HTML onclick Button. Here we discuss their introduction, working, examples and onclick Event in various events respectively.
