
 Web Front-end
H5 Tutorial
Detailed explanation of how to make various lists on H5 mobile terminal (4)
Web Front-end
H5 Tutorial
Detailed explanation of how to make various lists on H5 mobile terminal (4)
Detailed explanation of how to make various lists on H5 mobile terminal (4)

How to make various lists on H5 mobile terminal (4)
Previous review
《How to make various lists on H5 mobile terminal Production method (1)》
《How to produce various lists on H5 mobile terminal (2)》
《How to produce various lists on H5 mobile terminal (3)》
If you saw this article first, it is recommended that you go to the link above and read the corresponding content first, so that the context is coherent and it is easier to understand the content of this article.
The first three chapters all talk about how to implement an ordinary list. The difficulty ranges from easy to difficult, but in general, you can master it at a glance. In this chapter, we will make a graphic list.
Ordinary two-column picture (picture is a square) text list
Two-column picture and text list is very common. It is even more common in e-commerce mobile H5 terminals such as JD\TB. Here, we Let’s do the simplest one first. As shown in the figure below.
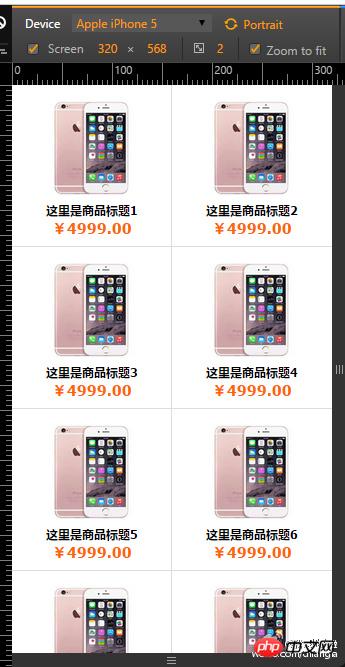
Here is a very simple two-column layout of pictures and texts. Each block contains pictures, names and Price. It is too simple to implement such a layout on the PC side. But since we are on the mobile side, the widths of different mobile phones are inconsistent. Therefore, the requirements are adaptive.
Here All pictures are of uniform specifications and are square. In actual projects, there are generally requirements for product pictures. If your product is not square, we will have relevant tutorials below.
html code
<!DOCTYPE html>
<html lang="en">
<head>
<meta charset="UTF-8">
<meta name="viewport" content="width=device-width, initial-scale=1.0, maximum-scale=1.0, user-scalable=0" />
<title>list 2</title>
<link rel="stylesheet" href="../style/style.css"></head><body><p class="list_2">
    <ul>
        <li>
            <a href="">
                <img class="goods_photo lazy"  src="/static/imghw/default1.png"  data-src="../image/goods.jpg"   alt="商品图片" >
                <h4 id="这里是商品标题">这里是商品标题1</h4>
                <em class="goods_price">¥4999.00</em>
            </a>
        </li>
        <li>
            <a href="">
                <img class="goods_photo lazy"  src="/static/imghw/default1.png"  data-src="../image/goods.jpg"   alt="商品图片" >
                <h4 id="这里是商品标题">这里是商品标题2</h4>
                <em class="goods_price">¥4999.00</em>
            </a>
        </li>
        <li>
            <a href="">
                <img class="goods_photo lazy"  src="/static/imghw/default1.png"  data-src="../image/goods.jpg"   alt="商品图片" >
                <h4 id="这里是商品标题">这里是商品标题3</h4>
                <em class="goods_price">¥4999.00</em>
            </a>
        </li>
        <li>
            <a href="">
                <img class="goods_photo lazy"  src="/static/imghw/default1.png"  data-src="../image/goods.jpg"   alt="商品图片" >
                <h4 id="这里是商品标题">这里是商品标题4</h4>
                <em class="goods_price">¥4999.00</em>
            </a>
        </li>
</ul></p></body></html>The code is relatively long, but it can still be seen clearly at a glance. We have added different classes to different elements. The purpose of this is to make it site-wide, The basic styles using these elements can be unified and CSS code reuse can be achieved.
SASS code
.list_2 {
ul {
@extend .cf; // 引用清理浮动代码片,看不懂请看本人scss相关教程
        li {
        width: 50%;float: left;padding: 1rem 0;
            outline: 1px solid #ddd;  // 使用 outline 模拟边框 (outline不占据盒子模型)
            background: #fff;  // 使用白色背景颜色,防止 outline 重叠造成 2px 线条
            a {                display: block;
                text-decoration: none; // 去除默认下划线
            }            .goods_title,.goods_price {
            padding: 0 1rem; // 加上左右内填充,防止文字和边框粘结
                text-align: center;
            }            .goods_photo {
            width: 60%;margin: .5rem auto;display: block;
            }
        }
    }
}// 全站范围内用到的图文基本样式.goods_title,.goods_price {
display: block;position: relative;
    @include ts(); // 引用文字描白边代码片
    @include online(1.8rem); // 引用文字超出一行省略号代码片}
    .goods_title {color:#000;font-size: 1.2rem;}
.goods_price {color:#f60;font-size: 1.5rem;font-weight: bold;}Let me emphasize again that the CSS part of this series of tutorials uses SASS syntax. If you don’t know SASS syntax, it is recommended to spend half an hour to an hour learning SASS.
Here, we will extract some common styles throughout the site. This will facilitate code reuse.
Summary
In this chapter, we use a simple two-column layout of graphic and text lists to focus on the following points
On mobile When using the left and right borders, try not to use
borderborders. In this example,outlineis used to simulate.When using
outlineto simulate borders, be sure to match the background color to avoid2pxborders.- ##CSS3 text strokes Implementation method.
text-shadow
- css3 Line of text title exceeds the implementation method of displaying ellipses
- sass introduces the code block The two methods, as well as the similarities and differences between them (please consider by yourself or refer to relevant tutorials)
a
tag inhtml5It is possible to nest block-level elements. However, inxhtmlor earlierhtmlversions, this is not recommended. Do not be confused here, or feel inappropriate. With Keep pace with the times.
The above is the detailed content of Detailed explanation of how to make various lists on H5 mobile terminal (4). For more information, please follow other related articles on the PHP Chinese website!

Hot AI Tools

Undresser.AI Undress
AI-powered app for creating realistic nude photos

AI Clothes Remover
Online AI tool for removing clothes from photos.

Undress AI Tool
Undress images for free

Clothoff.io
AI clothes remover

AI Hentai Generator
Generate AI Hentai for free.

Hot Article
Hot Tools

Notepad++7.3.1
Easy-to-use and free code editor

SublimeText3 Chinese version
Chinese version, very easy to use

Zend Studio 13.0.1
Powerful PHP integrated development environment

Dreamweaver CS6
Visual web development tools

SublimeText3 Mac version
God-level code editing software (SublimeText3)
Hot Topics
 1381
1381
 52
52

 Table Border in HTML
Sep 04, 2024 pm 04:49 PM
Table Border in HTML
Sep 04, 2024 pm 04:49 PM
Guide to Table Border in HTML. Here we discuss multiple ways for defining table-border with examples of the Table Border in HTML.
 HTML margin-left
Sep 04, 2024 pm 04:48 PM
HTML margin-left
Sep 04, 2024 pm 04:48 PM
Guide to HTML margin-left. Here we discuss a brief overview on HTML margin-left and its Examples along with its Code Implementation.
 Nested Table in HTML
Sep 04, 2024 pm 04:49 PM
Nested Table in HTML
Sep 04, 2024 pm 04:49 PM
This is a guide to Nested Table in HTML. Here we discuss how to create a table within the table along with the respective examples.
 HTML Table Layout
Sep 04, 2024 pm 04:54 PM
HTML Table Layout
Sep 04, 2024 pm 04:54 PM
Guide to HTML Table Layout. Here we discuss the Values of HTML Table Layout along with the examples and outputs n detail.
 HTML Input Placeholder
Sep 04, 2024 pm 04:54 PM
HTML Input Placeholder
Sep 04, 2024 pm 04:54 PM
Guide to HTML Input Placeholder. Here we discuss the Examples of HTML Input Placeholder along with the codes and outputs.
 HTML Ordered List
Sep 04, 2024 pm 04:43 PM
HTML Ordered List
Sep 04, 2024 pm 04:43 PM
Guide to the HTML Ordered List. Here we also discuss introduction of HTML Ordered list and types along with their example respectively
 Moving Text in HTML
Sep 04, 2024 pm 04:45 PM
Moving Text in HTML
Sep 04, 2024 pm 04:45 PM
Guide to Moving Text in HTML. Here we discuss an introduction, how marquee tag work with syntax and examples to implement.
 HTML onclick Button
Sep 04, 2024 pm 04:49 PM
HTML onclick Button
Sep 04, 2024 pm 04:49 PM
Guide to HTML onclick Button. Here we discuss their introduction, working, examples and onclick Event in various events respectively.
