
 Database
Mysql Tutorial
Detailed introduction to MySQL-Centos installation of multiple mysql database configuration examples
Database
Mysql Tutorial
Detailed introduction to MySQL-Centos installation of multiple mysql database configuration examples
Detailed introduction to MySQL-Centos installation of multiple mysql database configuration examples

Linux operating system: centOS6.5 64bit (system default development package installed)
Database one:
MYSQL version: mysql-5.0.56
PORT:3306
System directory :/usr/local/mysql3306
Database two:
MYSQL version:mysql-5.1.72
PORT:3307
System directory:/usr/local/mysql3307
1. Install the development package (use the default CENTOS update source):
<pre name="code" class="plain"># yum -y install wget gcc-c++ ncurses ncurses-devel cmake make perl bison openssl
openssl-devel gcc* libxml2 libxml2-devel curl-devel libjpeg* libpng* freetype*
2. Close iptables and SELINUX
# service iptables stop
# setenforce 0
# vi /etc/sysconfig/selinux
---------------
SELINUX=disabled
3. Install the mysql database instance
1 .Download the compilation package
# su -
# mkdir ~/src
# cd src
# wget http://www.php.cn/
# wget http://www.php.cn/
2. Initial configuration work before installation:
1).Create a Mysql user
# useradd mysql
2).Create data and log files under mysql Directory
# mkdir -p /usr/local/mysql{3306,3307}/data
# mkdir -p /usr/local/mysql{3306,3307}/log3). Modify the owner and group permissions of the directory
# chown -R mysql:mysql /usr/local/mysql{3306,3307}/data/
# chown -R mysql:mysql /usr/local/mysql{3306,3307}/log/
# chmod 750 /usr/local/mysql{3306,3307}/data
# chmod 750 /usr/local/mysql{3306,3307}/log4). Create mysql related directories and configure permissions
# mkdir -p /usr/local/mysql{3306,3307}/etc
# chown -R mysql.mysql /usr/local/mysql{3306,3307}/etc
# mkdir -p /var/run/mysqld{3306,3307}
# chown -R mysql.mysql /var/run/mysqld{3306,3307}
# mkdir -p /var/lib/mysqld{3306,3307}
# chown -R mysql.mysql /var/lib/mysqld{3306,3307}
# cp /etc/my.cnf /usr/local/mysql{3306,3307}/etc3. Unpack, compile and install
Compile database one:
# cd ~/src
# tar -zxvf mysql-5.0.56.tar.gz
# cd mysql-5.0.56
./configure --prefix=/usr/local/mysql3306 --with-mysqld-user=mysql --sysconfdir=/usr/local/mysql3306/etc
--localstatedir=/usr/local/mysql3306/data --with-tcp-port=3306 -enable-assembler --with-mysqld-ldflags=-all-static
--with-charset=utf8 --with-extra-charsets=utf-8 -with-extra-charsets=all --with-plugins=csv,innobase,myisam,heap
--with-unix-socket-path=/tmp/mysql3306.sock
# make
# make install
Compile database two:
# cd ~/src
# tar -zxvf mysql-5.1.71.tar.gz
# cd mysql-5.1.71
./configure --prefix=/usr/local/mysql3307 --with-mysqld-user=mysql --sysconfdir=/usr/local/mysql3307/etc
--localstatedir=/usr/local/mysql3307/data --with-tcp-port=3307 -enable-assembler --with-mysqld-ldflags=-all-static
--with-charset=utf8 --with-extra-charsets=utf-8 -with-extra-charsets=all --with-plugins=csv,innobase,myisam,heap
--with-unix-socket-path=/tmp/mysql3307.sock
# make
# make install
4. Write mysql configuration items:
Database one configuration:
# vi /usr/local/mysql3306/etc/my.cnf
-------------------------------------------------------
[mysqld]
datadir=/usr/local/mysql3306/data
socket=/tmp/mysql3306.sock
user=mysql
port=3306
pid-file=/var/lib/mysqld3306/mysql.pid
# Disabling symbolic-links is recommended to prevent assorted security risks
symbolic-links=0
max_connections= 16384
skip-name-resolve
skip-locking
key_buffer = 256M
max_allowed_packet = 32M
table_cache = 3072
thread_cache_size = 256
sort_buffer_size = 16M
read_buffer_size = 4M
read_rnd_buffer_size = 16M
net_buffer_length = 256M
thread_stack = 8M
query_cache_size = 128M
query_cache_limit = 2M
wait_timeout=7200
interactive_timeout=7200
#log
log-error=/usr/local/mysql3306/log/error.log
log=/usr/local/mysql3306/log/mysql.log
long_query_time=2
log-slow-queries= /usr/local/mysql3306/log/slowquery.log
log-bin= /usr/local/mysql3306/log/bin.log
expire_logs_days = 15
sync_binlog = 1
max_binlog_cache_size = 4294967295
local-infile=0
default-storage-engine=INNODB
[mysqld_safe]
log-error=/var/log/mysqld3306.log
pid-file=/var/run/mysqld3306/mysqld.pid
Database two configuration:
# vi /usr/local/mysql3307/etc/my.cnf
-------------------------------------------------------
[mysqld]
datadir=/usr/local/mysql3307/data
socket=/tmp/mysql3307.sock
user=mysql
port=3307
pid-file=/var/lib/mysqld3307/mysql.pid
# Disabling symbolic-links is recommended to prevent assorted security risks
symbolic-links=0
max_connections= 16384
skip-name-resolve
skip-locking
key_buffer = 256M
max_allowed_packet = 32M
table_cache = 3072
thread_cache_size = 256
sort_buffer_size = 16M
read_buffer_size = 4M
read_rnd_buffer_size = 16M
net_buffer_length = 256M
thread_stack = 8M
query_cache_size = 128M
query_cache_limit = 2M
wait_timeout=7200
interactive_timeout=7200
#log
log-error=/usr/local/mysql3307/log/error.log
log=/usr/local/mysql3307/log/mysql.log
long_query_time=2
log-slow-queries= /usr/local/mysql3307/log/slowquery.log
log-bin= /usr/local/mysql3307/log/bin.log
expire_logs_days = 15
sync_binlog = 1
max_binlog_cache_size = 4294967295
local-infile=0
default-storage-engine=INNODB
[mysqld_safe]
log-error=/var/log/mysqld3307.log
pid-file=/var/run/mysqld3307/mysqld.pid
-------------------------------------------------------
5. Add the mysql library file path to the system library file search path
Method 1: Make a soft link directly
# ln -s /usr/local/mysql3306/lib/mysql /usr/lib/mysql
Method Two: Use ldconfig to import the system library
# echo "/usr/local/mysql3306/lib" >> /etc/ld.so.conf.d/mysql.conf
# ldconfig
6. Output the mysql header file to the system header file
# ln -s /usr/local/mysql3306/include/mysql /usr/include/mysql
Note: Here you only need to add the library file of a mysql instance to the system library. No need to add multiple times
7. Enter the installation path of the corresponding instance and initialize the respective configuration script
Database one configuration:
# cd /usr/local/mysql3306
# scripts/mysql_install_db --user=mysql --datadir=/usr/local/mysql3306/data
Database two configuration:
# cd /usr/local/mysql3307
# scripts/mysql_install_db --user=mysql --datadir=/usr/local/mysql3307/data
8. Copy the mysql startup script to the system service directory, and change the script configuration
# cp /usr/local/mysql3306/support-files/mysql.server /etc/init.d/mysqld3306
# cp /usr/local/mysql3307/support-files/mysql.server /etc/init.d/mysqld3307
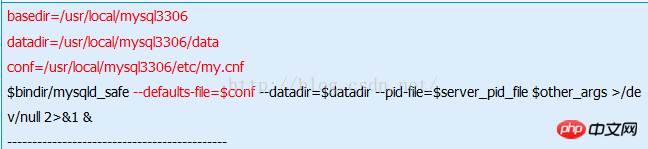
Database one configuration:
# vi /etc/init.d/mysqld3006
basedir=/usr/local/mysql3306
datadir=/usr/local/mysql3306/data
conf=/usr/local/mysql3306/etc/my.cnf
$bindir/mysqld_safe --defaults-file=$conf --datadir=$datadir --pid-file=$server_pid_file $other_args >/dev/null 2>&1 &
--------------------------------------------
The parameters marked in red in the figure below are the added parameters:
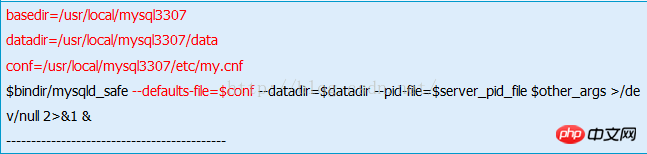
Database two configuration:
# vi /etc/init.d/mysqld3007
basedir=/usr/local/mysql3307
datadir=/usr/local/mysql3307/data
conf=/usr/local/mysql3307/etc/my.cnf
$bindir/mysqld_safe --defaults-file=$conf --datadir=$datadir --pid-file=$server_pid_file $other_args >/dev/null 2>&1 &
--------------------------------------------
The parameters marked in red in the figure below are the added parameters:
9. System startup item related configuration
Database one configuration:
# chkconfig --add mysqld3306  #添加开机启动服务
# chkconfig --level 35 mysqld3306 on  #设置mysql启动
Database two configuration:
# chkconfig --add mysqld3307
# chkconfig --level 35 mysqld3307 on
10.Start mysql
database First startup:
# service mysqld3306 start
Database second startup:
# service mysqld3307 start
11 Add the mysql command set to the system global variables
Note: If the mysql client has not been installed on the system before, you can compile it After importing the good mysql command set into the system global variables
, you can use the mysql command set directly without using the absolute path to access.
# echo "PATH=$PATH:/usr/local/mysql3306/bin;export PATH" >> /etc/profile
# source /etc/profile
12. Set up the initial account and log in to the backend:
Database one:
# /usr/local/mysql3306/bin/mysqladmin -u root password 123456   #设置超级管理员密码
# /usr/local/mysql3306/bin/mysql -P3306 -S/tmp/mysql3306.sock -uroot -p123456 #连接数据库
Database two:
# /usr/local/mysql3307/bin/mysqladmin -u root password 123456   #设置超级管理员密码
# /usr/local/mysql3307/bin/mysql -P3307 -S/tmp/mysql3307.sock -uroot -p123456 #连接数据库
Note: Because the mysql environment variable is added, the system background can directly use the mysql command to log in in the future. The absolute path is used here. Standard operation
# mysql -P3307 -S/tmp/mysql3307.sock -uroot -p123456
13. Port test:
#lsof -i:3306
#lsof -i:3307
OK, you’re done!
4. Question
1, -bash : ./scripts/mysql_install_db: No such file or directory
During the installation process, the error message reported is:
scripts/mysql_install_db --user=mysql --datadir=/usr/local/mysql3306/data
Indicates that in mysql There is no scripts directory in the installation directory. At this time, you can copy the script directory in the decompressed source code to the installation directory and re-execute the command.
2. cp: cannot stat `/usr/local/mysql3307/support-files/mysql.server': No such file or directory
Execute command during installation
-bash: ./scripts/mysql_install_db: No such file or directory
The error message is:
cp /usr/local/mysql/support-files/mysql.server /etc/init.d/mysqld3307
Copy the support-files directory in the decompressed source code to the installation directory, and re-execute the command
3, env : /etc/init.d/mysqld3307: Permission denied
When starting the database, execute the command
cp: cannot stat `/usr/local/mysql3307/support-files/mysql.server': No such file or directory
The error message is:
service mysqld3307 start
At this time, the corresponding For file authorization, execute the command
env: /etc/init.d/mysqld3307: Permission denied
and re-execute the command to start the MySQL database service service mysqld3307 start
The above is the detailed content of Detailed introduction to MySQL-Centos installation of multiple mysql database configuration examples. For more information, please follow other related articles on the PHP Chinese website!

Hot AI Tools

Undresser.AI Undress
AI-powered app for creating realistic nude photos

AI Clothes Remover
Online AI tool for removing clothes from photos.

Undress AI Tool
Undress images for free

Clothoff.io
AI clothes remover

AI Hentai Generator
Generate AI Hentai for free.

Hot Article
Hot Tools

Notepad++7.3.1
Easy-to-use and free code editor

SublimeText3 Chinese version
Chinese version, very easy to use

Zend Studio 13.0.1
Powerful PHP integrated development environment

Dreamweaver CS6
Visual web development tools

SublimeText3 Mac version
God-level code editing software (SublimeText3)
Hot Topics


 How to optimize MySQL query performance in PHP?
Jun 03, 2024 pm 08:11 PM
How to optimize MySQL query performance in PHP?
Jun 03, 2024 pm 08:11 PM
MySQL query performance can be optimized by building indexes that reduce lookup time from linear complexity to logarithmic complexity. Use PreparedStatements to prevent SQL injection and improve query performance. Limit query results and reduce the amount of data processed by the server. Optimize join queries, including using appropriate join types, creating indexes, and considering using subqueries. Analyze queries to identify bottlenecks; use caching to reduce database load; optimize PHP code to minimize overhead.
 How to use MySQL backup and restore in PHP?
Jun 03, 2024 pm 12:19 PM
How to use MySQL backup and restore in PHP?
Jun 03, 2024 pm 12:19 PM
Backing up and restoring a MySQL database in PHP can be achieved by following these steps: Back up the database: Use the mysqldump command to dump the database into a SQL file. Restore database: Use the mysql command to restore the database from SQL files.
 How to insert data into a MySQL table using PHP?
Jun 02, 2024 pm 02:26 PM
How to insert data into a MySQL table using PHP?
Jun 02, 2024 pm 02:26 PM
How to insert data into MySQL table? Connect to the database: Use mysqli to establish a connection to the database. Prepare the SQL query: Write an INSERT statement to specify the columns and values to be inserted. Execute query: Use the query() method to execute the insertion query. If successful, a confirmation message will be output.
 How to fix mysql_native_password not loaded errors on MySQL 8.4
Dec 09, 2024 am 11:42 AM
How to fix mysql_native_password not loaded errors on MySQL 8.4
Dec 09, 2024 am 11:42 AM
One of the major changes introduced in MySQL 8.4 (the latest LTS release as of 2024) is that the "MySQL Native Password" plugin is no longer enabled by default. Further, MySQL 9.0 removes this plugin completely. This change affects PHP and other app
 How to use MySQL stored procedures in PHP?
Jun 02, 2024 pm 02:13 PM
How to use MySQL stored procedures in PHP?
Jun 02, 2024 pm 02:13 PM
To use MySQL stored procedures in PHP: Use PDO or the MySQLi extension to connect to a MySQL database. Prepare the statement to call the stored procedure. Execute the stored procedure. Process the result set (if the stored procedure returns results). Close the database connection.
 How to create a MySQL table using PHP?
Jun 04, 2024 pm 01:57 PM
How to create a MySQL table using PHP?
Jun 04, 2024 pm 01:57 PM
Creating a MySQL table using PHP requires the following steps: Connect to the database. Create the database if it does not exist. Select a database. Create table. Execute the query. Close the connection.
 The difference between oracle database and mysql
May 10, 2024 am 01:54 AM
The difference between oracle database and mysql
May 10, 2024 am 01:54 AM
Oracle database and MySQL are both databases based on the relational model, but Oracle is superior in terms of compatibility, scalability, data types and security; while MySQL focuses on speed and flexibility and is more suitable for small to medium-sized data sets. . ① Oracle provides a wide range of data types, ② provides advanced security features, ③ is suitable for enterprise-level applications; ① MySQL supports NoSQL data types, ② has fewer security measures, and ③ is suitable for small to medium-sized applications.
 How to delete data from MySQL table using PHP?
Jun 05, 2024 pm 12:40 PM
How to delete data from MySQL table using PHP?
Jun 05, 2024 pm 12:40 PM
PHP provides the following methods to delete data in MySQL tables: DELETE statement: used to delete rows matching conditions from the table. TRUNCATETABLE statement: used to clear all data in the table, including auto-incremented IDs. Practical case: You can delete users from the database using HTML forms and PHP code. The form submits the user ID, and the PHP code uses the DELETE statement to delete the record matching the ID from the users table.
