 Backend Development
 C#.Net Tutorial
 Detailed explanation of sample code for creating Excel files and exporting data to Excel files in C# (picture)
Detailed explanation of sample code for creating Excel files and exporting data to Excel files in C# (picture)
Tool materials:
Windows 7, Visual Studio 2010, Microsoft Office 2007
Create solution
Menu》New》Project》Windows Forms Application:
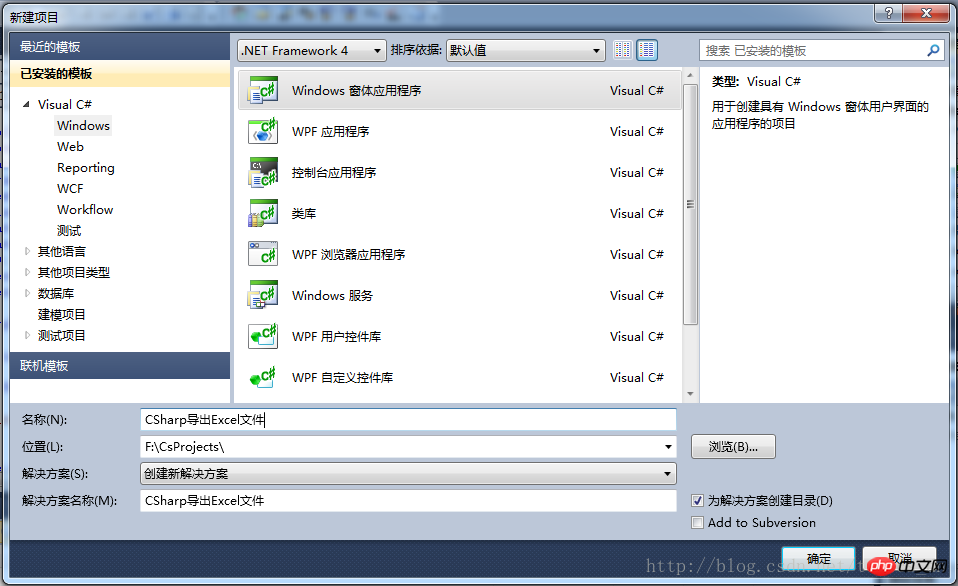
Add related components:
Add two DataGridView, one TextBox, and two buttons, as shown below:
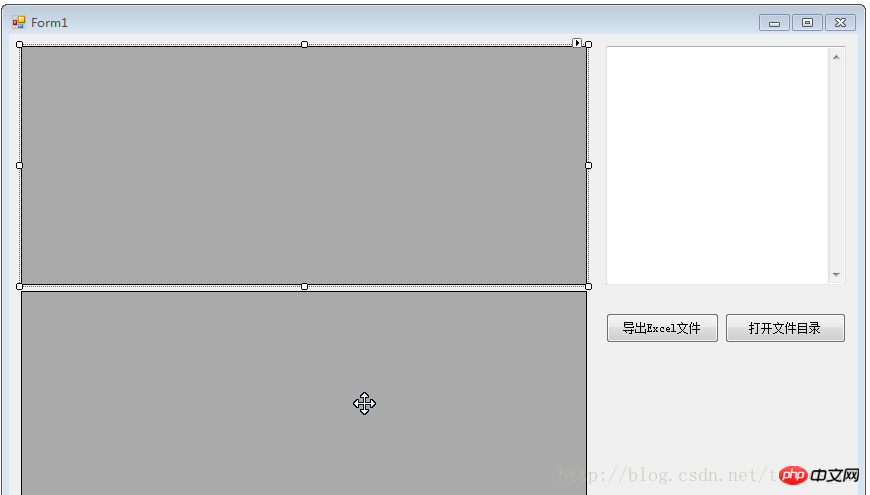
Add Excel resource:
C#Create an Excel file. Here, a pre-created Excel file is actually extracted from the resource. The file extraction is successful. Finally, use the OleDb method to connect to Excel and write data to the Excel file.
First create a new Excel file in the folder, and set the column name in the first row of Sheet1:
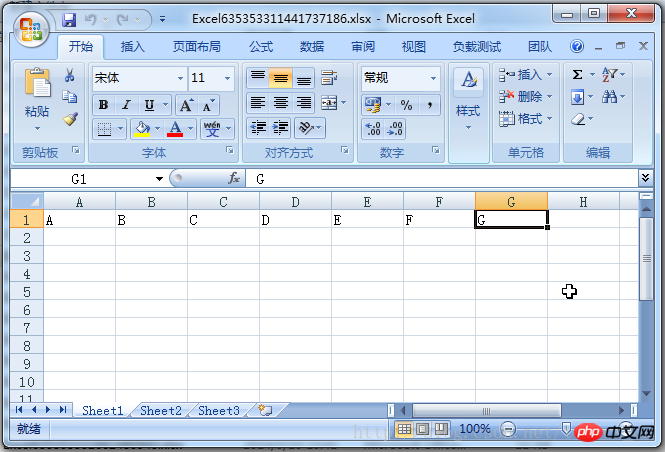
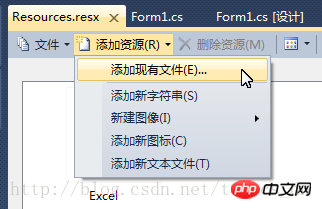
Double-click " Resources.resx" file to open the resource file view:
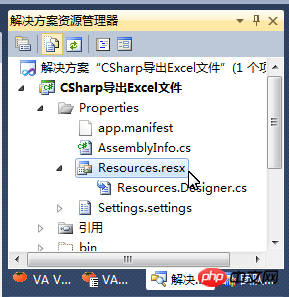
#Add an existing file and select the Excel file just created
Extract Excel files from resources
            string excelPath = AppDomain.CurrentDomain.BaseDirectory + "Excel" + DateTime.Now.Ticks + ".xlsx";
            if (System.IO.File.Exists(excelPath))
            {
                textBox1.Text += ("文件已经存在!");
                return;
            }

            try
            {
                //从资源中提取Excel文件
                System.IO.FileStream fs = new System.IO.FileStream(excelPath, FileMode.OpenOrCreate);
                fs.SetLength(0);
                fs.Write(Properties.Resources.Excel, 0, Properties.Resources.Excel.Length);
                fs.Close();
                fs.Dispose();
                textBox1.Text = "提取Excel文件成功!" + "\r\n";
            }
            catch (System.Exception ex)
            {
                excelPath = string.Empty;
                textBox1.Text += ("提取Excel文件失败:" + ex.Message);
                textBox1.Text += ("\r\n");
                Application.DoEvents();
                return;
}Define the connection string
//定义OleDB连接字符串
            string strConn = "Provider=Microsoft.Ace.OleDb.12.0;Persist Security Info=False;" + "data source=" + @excelPath + ";
            Extended Properties='Excel 12.0; HDR=yes; IMEX=10'";
            OleDbConnection conn = new OleDbConnection();
conn.ConnectionString = strConn;Note: The value of IMEX in the connection string is 10, if it is 1 or 2 , when executing the Insert Into statement, the error " operation must use an updateable query " will be reported.
Display the information of all tables in the Excel file in dataGridView1
                DataTable oleDt = conn.GetOleDbSchemaTable(OleDbSchemaGuid.Tables, null);
                dataGridView1.DataSource = oleDt;
dataGridView1.Show();Insert several pieces of data into the "Sheet1" table. When accessing the Excel table, you need to add "$ after the table name. " symbol, the Insert statement does not need to specify a column name
                OleDbCommand cmd = null;
                try
                {
                    //向"Sheet1"表中插入几条数据,访问Excel的表的时候需要在表名后添加"$"符号,Insert语句可以不指定列名
                    cmd = new OleDbCommand("Insert Into [Sheet1$] Values('abc', 'bac', '0', '123456', 'test','测试','aa')", conn);//(A,B,C,D,E,F,G)
                    cmd.ExecuteNonQuery();
                    cmd.ExecuteNonQuery();
                    cmd.ExecuteNonQuery();
                    cmd.ExecuteNonQuery();
                    cmd.ExecuteNonQuery();
                }
                catch (System.Exception ex)
                {
                    textBox1.Text += ("插入数据失败:" + ex.Message);
                    textBox1.Text += ("\r\n");
}Display the contents of the table "Sheet1" in dataGridView2. When accessing the Excel table, you need to add the "$" symbol after the table name
                cmd = new OleDbCommand("Select * From [Sheet1$]", conn);
                OleDbDataAdapter adp = new OleDbDataAdapter(cmd);
                DataSet ds = new DataSet();
                adp.Fill(ds);
dataGridView2.DataSource = ds.Tables[0];Traverse the contents of Schema
                DataTable dt = conn.GetSchema();
                for (int i = 0; i < dt.Columns.Count; i++)
                {
                    textBox1.Text += dt.Columns[i].Caption;
                    if (i + 1 < dt.Columns.Count)
                    {
                        textBox1.Text += ",";
                    }
                }

                for (int j = 0; j < dt.Rows.Count; j++)
                {
                    for (int i = 0; i < dt.Columns.Count; i++)
                    {
                        if (dt.Rows[j][dt.Columns[i]] != null)
                        {
                            textBox1.Text += dt.Rows[j][dt.Columns[i]].ToString();
                        }
                        else
                        {
                            textBox1.Text += "null";
                        }

                        if (i + 1 < dt.Columns.Count)
                        {
                            textBox1.Text += ",";
                        }
                    }
                    textBox1.Text += ("\r\n");
}Close the Excel data connection
                if (conn.State != ConnectionState.Closed)
                {
                    try
                    {
                        conn.Close();
                    }
                    catch (System.Exception ex)
                    {
                        textBox1.Text += ("关闭Excel数据连接:" + ex.Message);
                        textBox1.Text += ("\r\n");
                    }
}Open the file directory
System.Diagnostics.Process.Start("explorer.exe", AppDomain.CurrentDomain.BaseDirectory);The above is the detailed content of Detailed explanation of sample code for creating Excel files and exporting data to Excel files in C# (picture). For more information, please follow other related articles on the PHP Chinese website!

Hot AI Tools

Undresser.AI Undress
AI-powered app for creating realistic nude photos

AI Clothes Remover
Online AI tool for removing clothes from photos.

Undress AI Tool
Undress images for free

Clothoff.io
AI clothes remover

AI Hentai Generator
Generate AI Hentai for free.

Hot Article

Hot Tools

Notepad++7.3.1
Easy-to-use and free code editor

SublimeText3 Chinese version
Chinese version, very easy to use

Zend Studio 13.0.1
Powerful PHP integrated development environment

Dreamweaver CS6
Visual web development tools

SublimeText3 Mac version
God-level code editing software (SublimeText3)

Hot Topics
 1359
1359
 52
52
 Active Directory with C#
Sep 03, 2024 pm 03:33 PM
Guide to Active Directory with C#. Here we discuss the introduction and how Active Directory works in C# along with the syntax and example.
 Random Number Generator in C#
Sep 03, 2024 pm 03:34 PM
Guide to Random Number Generator in C#. Here we discuss how Random Number Generator work, concept of pseudo-random and secure numbers.
 Access Modifiers in C#
Sep 03, 2024 pm 03:24 PM
Guide to the Access Modifiers in C#. We have discussed the Introduction Types of Access Modifiers in C# along with examples and outputs.
 C# Data Grid View
Sep 03, 2024 pm 03:32 PM
Guide to C# Data Grid View. Here we discuss the examples of how a data grid view can be loaded and exported from the SQL database or an excel file.
 C# Serialization
Sep 03, 2024 pm 03:30 PM
Guide to C# Serialization. Here we discuss the introduction, steps of C# serialization object, working, and example respectively.
 Patterns in C#
Sep 03, 2024 pm 03:33 PM
Guide to Patterns in C#. Here we discuss the introduction and top 3 types of Patterns in C# along with its examples and code implementation.
 Prime Numbers in C#
Sep 03, 2024 pm 03:35 PM
Guide to Prime Numbers in C#. Here we discuss the introduction and examples of prime numbers in c# along with code implementation.
 Factorial in C#
Sep 03, 2024 pm 03:34 PM
Guide to Factorial in C#. Here we discuss the introduction to factorial in c# along with different examples and code implementation.


