Detailed introduction to file upload in HTML5 applications
This article mainly introduces the file upload of HTML5 applications. The editor thinks it is quite good, so I will share it with you now and give it as a reference. Let’s follow the editor to take a look.
For a long time, developers have been troubled by this problem. Most of them have adopted flash as a solution to solve this problem. However, flash is not a panacea because the flash version is divided into The resulting problems sometimes turn into nightmares. Some websites use the enctype=multipart/form-data attribute of the form tag, but this attribute requires the server to make special settings to display progress, and it is also complex. Complexity means errors are prone to occur. This is not what we want.
Now let’s take a look at why Html5 can solve this problem and how well it can do it.
Uploading files with HTML5
In the HTML5 standard, the XMLHttpRequest object is redefined and is called "XMLHttpRequest Level 2", which contains The following 5 new features have been added:
1. Support uploading and downloading byte streams, such as files, blobs and form data
2. Added progress events in uploading and downloading
3. Support for cross-domain requests
4. Allow sending anonymous requests (that is, do not send the Referer part of HTTP)
5. Allow setting the timeout of the request
In this tutorial, we will focus on the first and second features, especially the second one - which provides the upload progress we want. Unlike the previous solution, this solution does not require special server settings, so you can try it out while watching the tutorial.


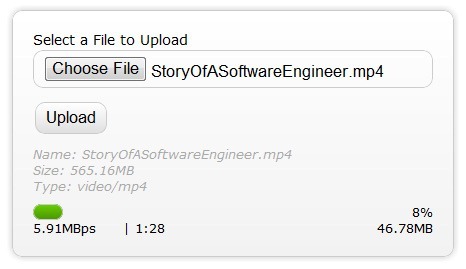
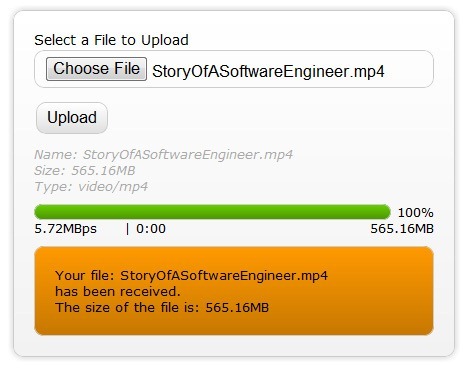
The above diagram shows what we can achieve:
1. Display the uploaded file information, such as File name, type, size
2, a progress bar that can show the real progress
3, upload speed
4, estimate of remaining time
5. The amount of uploaded data
6. The response returned by the server after the upload is completed
In addition, with XMLHttpRequest, our entire upload process is asynchronous, so the user is uploading the file At this time, you can still operate other elements in the web page, and there is no need to wait for the upload to be completed. After the upload is completed, we can get the response sent back by the server, so the entire upload process seems quite logical.
HTML5’s progress event
HTML5 has added a new progress event (Progress Events). This event provides us with the following information:
1. total – file size
2. loaded – uploaded size
3. lengthComputable – whether the progress can be calculated
Not much information , but it is sufficient for calculating file progress. Of course, there are a lot of things that it doesn't give directly, which is a pity.
HTML
is not much different from ordinary file upload code. However, note that the input tag is associated with a JavaScript function on change.
 <!DOCTYPE html>
<html>
<head>
    <title>使用XMLHttpRequest上传文件</title>
</head>
<body>
<form id="form1" enctype="multipart/form-data" method="post" action="upload.php">
<p class="row">
      <label for="fileToUpload">Select a File to Upload</label>
<input type="file" name="fileToUpload" id="fileToUpload" onchange="fileSelected();"/>
    </p>
<p id="fileName"></p>
<p id="fileSize"></p>
<p id="fileType"></p>
<p class="row">
<input type="button" onclick="uploadFile()" value="Upload" />
    </p>
<p id="progressNumber"></p>
</form>

</body>
</html>JavaScript
Once we use input in HTML, we can get a FileList object in JS code . This object is part of the newly added file API in HTML5. Each FileList object is a collection of file objects, and the file objects have the following attributes:
1, name – file name (not Contains the path)
2. type – the MIME type of the file (lowercase)
3. size – the size of the file (in bytes)
This is what we needs. Of course, there is a FileReader object in HTML5, but we don't use it here. Now, through the above three contents, we have been able to control the file size and file type uploaded by users, so as to reduce the pressure on the server when detecting again and improve the security factor.
 function fileSelected() {
  var file = document.getElementById('fileToUpload').files[0];
  if (file) {
    var fileSize = 0;
    if (file.size > 1024 * 1024)
      fileSize = (Math.round(file.size * 100 / (1024 * 1024)) / 100).toString() + 'MB';
    else
      fileSize = (Math.round(file.size * 100 / 1024) / 100).toString() + 'KB';

    document.getElementById('fileName').innerHTML = 'Name: ' + file.name;
    document.getElementById('fileSize').innerHTML = 'Size: ' + fileSize;
    document.getElementById('fileType').innerHTML = 'Type: ' + file.type;
  }
}So what happens when the user selects the file and clicks to upload it?
 function uploadFile() {
  var xhr = new XMLHttpRequest();
  var fd = document.getElementById('form1').getFormData();

  /* event listners */
  xhr.upload.addEventListener("progress", uploadProgress, false);
  xhr.addEventListener("load", uploadComplete, false);
  xhr.addEventListener("error", uploadFailed, false);
  xhr.addEventListener("abort", uploadCanceled, false);
  /* Be sure to change the url below to the url of your upload server side script */
  xhr.open("POST", "upload.php");
  xhr.send(fd);
}

function uploadProgress(evt) {
  if (evt.lengthComputable) {
    var percentComplete = Math.round(evt.loaded * 100 / evt.total);
    document.getElementById('progressNumber').innerHTML = percentComplete.toString() + '%';
  }
  else {
    document.getElementById('progressNumber').innerHTML = 'unable to compute';
  }
}

function uploadComplete(evt) {
  /* This event is raised when the server send back a response */
  alert(evt.target.responseText);
}

function uploadFailed(evt) {
  alert("There was an error attempting to upload the file.");
}

function uploadCanceled(evt) {
  alert("The upload has been canceled by the user or the browser dropped the connection.");
}In the second line of code, our JS code uses another new object introduced by HTML5-FormData. The FormData object is a collection of user form data. It stores form data in the form of key-value pairs, and its values can include numbers, strings, and files. We submit data to the server by tossing this object.
Of course, we can also construct this object manually in the code, for example like this:
var fd = new FormData();
fd.append("author", "Shiv Kumar");
fd.append("name", "Html 5 File API/FormData");
fd.append("fileToUpload", document.getElementById('fileToUpload').files[0]);Back to the topic. Looking back at the previous code, we added many event listeners related to XMLHttpRequest, the purpose of which is to obtain the real situation of file upload. It is particularly important to note that what we are hooking is not XMLHttpRequest itself, but its attributes, such as uploadProgress.
Complete code
Finally, let’s take a look at the complete code.
<!DOCTYPE html>
<html>
<head>
<title>Upload Files using XMLHttpRequest - Minimal</title>
<script type="text/javascript">
function fileSelected() {
var file = document.getElementById('fileToUpload').files[0];
if (file) {
var fileSize = 0;
if (file.size > 1024 * 1024)
fileSize = (Math.round(file.size * 100 / (1024 * 1024)) / 100).toString() + 'MB';
else
fileSize = (Math.round(file.size * 100 / 1024) / 100).toString() + 'KB';
document.getElementById('fileName').innerHTML = 'Name: ' + file.name;
document.getElementById('fileSize').innerHTML = 'Size: ' + fileSize;
document.getElementById('fileType').innerHTML = 'Type: ' + file.type;
}
}
function uploadFile() {
var fd = new FormData();
fd.append("fileToUpload", document.getElementById('fileToUpload').files[0]);
var xhr = new XMLHttpRequest();
xhr.upload.addEventListener("progress", uploadProgress, false);
xhr.addEventListener("load", uploadComplete, false);
xhr.addEventListener("error", uploadFailed, false);
xhr.addEventListener("abort", uploadCanceled, false);
xhr.open("POST", "UploadMinimal.aspx");
xhr.send(fd);
}
function uploadProgress(evt) {
if (evt.lengthComputable) {
var percentComplete = Math.round(evt.loaded * 100 / evt.total);
document.getElementById('progressNumber').innerHTML = percentComplete.toString() + '%';
}
else {
document.getElementById('progressNumber').innerHTML = 'unable to compute';
}
}
function uploadComplete(evt) {
/* This event is raised when the server send back a response */
alert(evt.target.responseText);
}
function uploadFailed(evt) {
alert("There was an error attempting to upload the file.");
}
function uploadCanceled(evt) {
alert("The upload has been canceled by the user or the browser dropped the connection.");
}
</script>
</head>
<body>
<form id="form1" enctype="multipart/form-data" method="post" action="upload.php">
<p class="row">
<label for="fileToUpload">Select a File to Upload</label>
<input type="file" name="fileToUpload" id="fileToUpload" onchange="fileSelected();"/>
</p>
<p id="fileName"></p>
<p id="fileSize"></p>
<p id="fileType"></p>
<p class="row">
<input type="button" onclick="uploadFile()" value="Upload" />
</p>
<p id="progressNumber"></p>
</form>
</body>
</html>我们的任务完成了吗?可以说完成了,因为这段代码已经能够完成上传文件的任务,而且也能够显示上传的进度;但是理应说我们没有,因为除了这个骨架HTML之外,我们还有很多没有做的事情,比如CSS的美化等等。不过这就不是我们这篇文章的主题了。
最后,提醒一下,教程的代码应当在支持新特性的浏览器之上运行,如果你不清楚自己的浏览器是否支持,可以在这里查询。
相关文章:
JavaScript进阶(九)JS实现本地文件上传至阿里云服务器
The above is the detailed content of Detailed introduction to file upload in HTML5 applications. For more information, please follow other related articles on the PHP Chinese website!

Hot AI Tools

Undresser.AI Undress
AI-powered app for creating realistic nude photos

AI Clothes Remover
Online AI tool for removing clothes from photos.

Undress AI Tool
Undress images for free

Clothoff.io
AI clothes remover

Video Face Swap
Swap faces in any video effortlessly with our completely free AI face swap tool!

Hot Article

Hot Tools

Notepad++7.3.1
Easy-to-use and free code editor

SublimeText3 Chinese version
Chinese version, very easy to use

Zend Studio 13.0.1
Powerful PHP integrated development environment

Dreamweaver CS6
Visual web development tools

SublimeText3 Mac version
God-level code editing software (SublimeText3)

Hot Topics
 1386
1386
 52
52
 Table Border in HTML
Sep 04, 2024 pm 04:49 PM
Guide to Table Border in HTML. Here we discuss multiple ways for defining table-border with examples of the Table Border in HTML.
 HTML margin-left
Sep 04, 2024 pm 04:48 PM
Guide to HTML margin-left. Here we discuss a brief overview on HTML margin-left and its Examples along with its Code Implementation.
 Nested Table in HTML
Sep 04, 2024 pm 04:49 PM
This is a guide to Nested Table in HTML. Here we discuss how to create a table within the table along with the respective examples.
 HTML Table Layout
Sep 04, 2024 pm 04:54 PM
Guide to HTML Table Layout. Here we discuss the Values of HTML Table Layout along with the examples and outputs n detail.
 HTML Input Placeholder
Sep 04, 2024 pm 04:54 PM
Guide to HTML Input Placeholder. Here we discuss the Examples of HTML Input Placeholder along with the codes and outputs.
 HTML Ordered List
Sep 04, 2024 pm 04:43 PM
Guide to the HTML Ordered List. Here we also discuss introduction of HTML Ordered list and types along with their example respectively
 Moving Text in HTML
Sep 04, 2024 pm 04:45 PM
Guide to Moving Text in HTML. Here we discuss an introduction, how marquee tag work with syntax and examples to implement.
 HTML onclick Button
Sep 04, 2024 pm 04:49 PM
Guide to HTML onclick Button. Here we discuss their introduction, working, examples and onclick Event in various events respectively.


