

Build the best LAMP environment under CentOS5.5

This article elaborates on setting up a PHP environment in a Linux system. Since PHP is written in C language and originally ran on a Linux system, Linux is the best environment for PHP.
The author of this article tested CentOS 5.5 installed on a virtual machine (VMware). Detailed installation instructions are as follows
1. Preparation work
1. Please first confirm whether the Linux system you are installing has been installed. Apache, MySQL, and PHP are installed. If installed, please uninstall them first.
Check whether it is installed (Apache is an example)
[root@gamejzy Linux]# rpm -qa|grep httpd
Note: rpm -qa is to check all software that has been installed on the machine. grep httpd is to filter out software related to httpd (apache). Note: grep php is to view PHP; grep mysql is to view MySQL
If nothing appears after executing the command, it means that the Apache software is not installed on the machine. If something like the following appears, it means it has been installed.
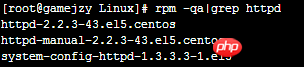
If it is as shown in the picture above, then you need to uninstall all three software.
The uninstall command is as follows:
[root@gamejzy Linux]# rpm -e httpd-2.2.3-43.el5.centos --nodeps
Note: --nodeps is a forced uninstall
2. Please ensure that the gcc and g++ compilers are installed in your Linux system
Checking whether it is installed is very simple. Type "gc" or "g+" in the command line, press the tab key, and see if there is a command displayed below.
It doesn’t matter if you don’t have it, the method to install gcc and g++ is very simple
Install gcc:
yum -y install gcc
Install g++:
yum install gcc-c++
3. Copy all software (mostly tar packages) packages to /tmp/lamp and decompress them.
Decompress tar.gz command (php software as an example): tar zxvf php -5.2.6.tar.gz
After executing this command, a php-5.2.6 folder will be created in the current directory, and all decompressed files will be placed in php-5.2 .6 folder
Please follow the same method to decompress all packages and delete all *.tar.gz files
[root@gamejzy lamp]# rm -rf *.gz
The above command deletes all .gz files
4. Introduction to compiling and installing software packages
The process of installing each source code software package in the Linux system is as follows:
△Configure(configure)
△ Compile (make)
△ Install (make install)
2. Build a LAMP environment (please install it in the order given below)
All the software here is installed under /usr/local
1. Install libxml
Installation sequence : 1. Enter the libxml directory; 2. Configuration parameters (including installation path; dependent software; installation functions, etc.); 3. Compile; 4. Installation. Note: All software package installations are similar to
[root@gamejzy lamp]# cd libxml2-2.6.30/
[root@gamejzy libxml2-2.6.30]# ./configure --prefix=/usr/local/libxml2
./configure. Configure parameter commands for software packages. --prefix indicates the specified installation directory. Most directories will be automatically created if they do not exist. Some of them will not and we need to create them manually.
[root@gamejzy libxml2-2.6.30]# make && make install
The above commands are compiled and installed together. Since the software is small, the installation speed is relatively fast. If the software is large, it may take a long time.
2. Install libmcrypt
[root@gamejzy lamp]# cd libmcrypt-2.5.8/
[root@gamejzy libmcrypt-2.5.8]# ./configure --prefix=/usr/local/libmcrypt
[root@gamejzy libmcrypt-2.5.8]# make && make install
3. Install zlib
[root@gamejzy lamp]# cd zlib-1.2.3/
[root@gamejzy zlib-1.2.3]# ./configure
[root@gamejzy zlib-1.2.3]# make && make install
./configure Do not follow the --prefix parameter , let it be installed in the default directory, because zlib will be used when installing libpng.
4. Install libpng
[root@gamejzy lamp]# cd libpng-1.2.31/
[root@gamejzy libpng-1.2.31]# ./configure --prefix=/usr/local/libpng
[root@gamejzy libpng-1.2.31]# make && make install
5. Install jpeg6
This software will not automatically create a directory when configuring it. We need to manually create
[root@gamejzy libpng-1.2.31]# mkdir /usr/local/jpeg6
[root@gamejzy libpng-1.2.31]# mkdir /usr/local/jpeg6/bin
[root@gamejzy libpng-1.2.31]# mkdir /usr/local/jpeg6/lib
[root@gamejzy libpng-1.2.31]# mkdir /usr/local/jpeg6/include
[root@gamejzy libpng-1.2.31]# mkdir -p  /usr/local/jpeg6/man/man1
The generated directory is complete!
[root@gamejzy lamp]# cd jpeg-6b/
[root@gamejzy jpeg-6b]# ./configure --prefix=/usr/local/jpeg6/ --enable-shared --enable-static
[root@gamejzy jpeg-6b]# make && make install
./configure Parameter description:
--enable-shared libtool of GNU used to create shared libraries
--enable-static GNU used to create static libraries libtool
6. Install freetype
[root@gamejzy lamp]# cd freetype-2.3.5/
[root@gamejzy freetype-2.3.5]# ./configure --prefix=/usr/local/freetype
[root@gamejzy freetype-2.3.5]# make && make install
7. Install autoconf
[root@gamejzy lamp]# cd autoconf-2.61/
[root@gamejzy autoconf-2.61]# ./configure
[root@gamejzy autoconf-2.61]# make && make install
This software is installed directly in the default directory .
8. Install GD
[root@gamejzy lamp]# cd gd-2.0.35/
[root@gamejzy gd-2.0.35]# ./configure --prefix=/usr/local/gd2 --with-jpeg=/usr/local/jpeg6/ --with-png=/usr/local/libpng/ --with-freetype=/usr/local/freetype/
[root@gamejzy gd-2.0.35]# make && make install
./configure parameter description:
--with-jpeg=/usr/local/jpeg6/ specified Where to find the location of the jpeg library file
--with-png=/usr/local/libpng/ Specify where to find the location of the png library file
--with-freetype=/usr/local/freetype / Specify where to find the location of the freetype 2.x font library
Note The following errors may occur when installing this package, as shown in the figure below:
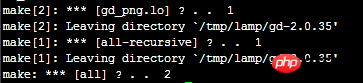
If such an error occurs, the solution:
[root@gamejzy gd-2.0.35]# vi gd_png.c
Find the keyword "png.h" command: /png.h and press Enter
Replace with:/usr/local/libpng/include/png.h
The effect is as shown below:

保存退出,继续执行"make && make install" 执行即可安装成功。
九、安装Apache(关键)
[root@gamejzy lamp]# cd httpd-2.2.9/
[root@gamejzy httpd-2.2.9]# ./configure --prefix=/usr/local/apache2 --sysconfdir=/etc/httpd --with-included-apr --enable-so --enable-deflate=shared --enable-expires=shared --enable-rewrite=shared --enable-static-support
[root@gamejzy httpd-2.2.9]# make && make install
./configure 中的参数说明:
--sysconfdir=/etc/httpd 指定Apache服务器的配置文件(httpd.conf等文件)存放位置
--with-included-apr 使用捆绑APR/APR-Util的副本
--enable-so 以动态共享对象(DSO)编译
--enable-deflate=shared 缩小传输编码的支持
--enable-expires=shared 期满头控制
--enable-rewrite=shared 基于规则的URL操控
--enable-static-support 建立一个静态链接版本的支持
测试 Apache 服务器
1、检查 /usr/local/ 下是否出现 apache2 目录;
2、检查 /etc/ 目录下面是否出现 httpd 目录,即里面是否有 httpd.conf 文件、extra目录等内容
3、开启 apache 服务器
[root@gamejzy httpd]# /usr/local/apache2/bin/apachectl start
stop(关闭)、restart(重启)
4、查看 apache 服务器是否启动,即查看 80 端口是否启动
[root@gamejzy httpd]# netstat -tnl|grep 80
执行完命令,出现如下所示,表示已经启动
tcp 0 0 :::80 :::* LISTEN
5、在浏览器中访问
如果在本机的话,请在浏览器地址栏中输入:localhost 或127.0.0.1
如果是远程连接的话,比如:SSH连接,那么请在浏览器地址栏中输入 Linux 的 ip 地址。比如:192.168.1.233
若网页中出现大字“
It works!
”说明 Apache 安装成功。
测试完毕!
添加 Apache 每次开机自动启动
[root@gamejzy /]# echo "/usr/local/apache2/bin/apachectl start" >> /etc/rc.d/rc.local
十、安装MySQL(重要)
安装 MySQL 之前先建立一个专门管理 MySQL 的组和用户名
建立一个组名叫“mysql”
[root@gamejzy /]# groupadd mysql
建立一个用户名叫“mysql”,让他属于“mysql”组
[root@gamejzy /]# useradd -g mysql mysql
[root@gamejzy lamp]# cd mysql-5.0.41/
[root@gamejzy mysql-5.0.41]# ./configure --prefix=/usr/local/mysql --with-extra-charsets=all
[root@gamejzy mysql-5.0.41]# make && make install
./configure 参数说明:
--with-extra-charsets=all 安装MySQL 所有的字符集
注意 在 ./configure 的时候如果出现如下错误

原因:缺少ncurses安装包。
解决方法:下载安装相应软件包
yum list|grep ncurses
yum -y install ncurses-devel
ncurses安装完成之后,再进行 ./configure 配置!
MySQL安装完成之后,设置一些内容,这些内容非常繁琐,但是又非常关键的,希望大家耐心学习。
1、设置配置文件 my.cnf,放在 /etc/ 目录下
[root@gamejzy mysql-5.0.41]# cp support-files/my-medium.cnf /etc/my.cnf
2、初始化数据库文件,安装完 MySQL 之后,并不会出现 MySQL 的数据文件及数据存放位置
首先切换到 MySQL 的安装目录下
[root@gamejzy mysql-5.0.41]# cd /usr/local/mysql/
使用 bin 目录下的 mysql_install_db 进行初始化数据库文件,并使用上面建的 mysql 用户
[root@gamejzy mysql]# bin/mysql_install_db --user=mysql
运行完之后,会发现 MySQL 安装目录中会多一个 var 目录,里面放置的就是数据库文件,包括我们已经建的数据库都会放置在这个目录里面。
3、设置 MySQL 安装目录权限
改变目录下的所有文件和目录的拥有者为 root
[root@gamejzy mysql]# chown -R root .
改变 var 目录的拥有者为 mysql 用户
[root@gamejzy mysql]# chown -R mysql ./var/
改变所有目录和文件的用户组为 mysql 组
[root@gamejzy mysql]# chgrp -R mysql .
4、启动 MySQL
[root@gamejzy mysql]# /usr/local/mysql/bin/mysqld_safe --user=mysql &
& 表示在后台启动
这时,使用 netstat -tnl,如果看见 3306 端口,那么说明启动成功
tcp 0 0 0.0.0.0:3306 0.0.0.0:* LISTEN
5、设置权限,如果我们现在直接使用 bin 目录下的 mysql 命令,那么就能登录
[root@gamejzy mysql]# bin/mysql
这样就太危险了!因此需要设置权限。
先登录进 MySQL 中,使用 SQL 命令删除主机不是“localhost” 的用户名(MySQL 中的用户都mysql库中的user表),只留允许本机登录的账号。
mysql> delete from mysql.user where Host != 'localhost';
刷新授权表
mysql> flush privileges;
设置允许本机进入 MySQL 的 root 用户的密码
mysql> set password for 'root'@'localhost'=password('123456');
注:设置的密码必须记住,不然就进不去 MySQL 数据库了。
到这步的时候,我们的 root 用户,就已经设置了密码(密码为“123456”),我们可以测试一下,键入“exit”退出MySQL
这时登录 MySQL 数据库的命令不能是 bin/mysql 那么简单,应该如下
[root@gamejzy mysql]# bin/mysql -h 127.0.0.1 -u root -p123456
-h 指定主机名
-u 用户名
-p 密码
6、关闭 MySQL 数据库服务器
[root@gamejzy mysql]# bin/mysqladmin -u root -p shutdown
这里的是 root 用户是 MySQL 中的用户,执行后会提示你输入密码,Enter password:
输入密码,回车即可关闭数据库。
启动命令,请看本节4
7、加入到开机默认启动
[root@gamejzy mysql]# echo "/usr/local/mysql/bin/mysqld_safe --user=mysql &" >> /etc/rc.d/rc.local
十一、安装PHP(重要)
这里我们安装 PHP 的高版本 php-5.3.19,安装参数比较多,请一定注意。
[root@gamejzy lamp]# cd php-5.3.19/
[root@gamejzy php-5.3.19]# ./configure \
> --prefix=/usr/local/php \
> --with-config-file-path=/usr/local/php/etc \
> --with-apxs2=/usr/local/apache2/bin/apxs \
> --with-mysql=/usr/local/mysql/ \
> --with-libxml-dir=/usr/local/libxml2/ \
> --with-png-dir=/usr/local/libpng/ \
> --with-jpeg-dir=/usr/local/jpeg6/ \
> --with-freetype-dir=/usr/local/freetype/ \
> --with-gd=/usr/local/gd2/ \
> --with-mcrypt=/usr/local/libmcrypt/ \
> --with-mysqli=/usr/local/mysql/bin/mysql_config \
> --enable-soap \
> --enable-mbstring=all \
> --enable-sockets
./configure 参数说明:
--with-config-file-path=/usr/local/php/etc 指定PHP5配置文件存入的路径
--with-apxs2=/usr/local/apache2/bin/apxs 告诉PHP查找Apache 2的地方
--with-mysql=/usr/local/mysql/ 指定MySQL的安装目录
--with-libxml-dir=/usr/local/libxml2/ 告诉PHP放置libxml2库的地方
--with-png-dir=/usr/local/libpng/ 告诉PHP放置libpng库的地方
--with-jpeg-dir=/usr/local/jpeg6/ 告诉PHP放置jpeg库的地方
--with-freetype-dir=/usr/local/freetype/ 告诉PHP放置freetype库的地方
--with-gd=/usr/local/gd2/ 告诉PHP放置gd库的地方
--with-mcrypt=/usr/local/libmcrypt/ 告诉PHP放置libmcrypt库的地方
--with-mysqli=/usr/local/mysql/bin/mysql_config 变量激活新增加的MySQLi功能
--enable-soap 变量激活SOAP和Web services支持
--enable-mbstring=all 使多字节字符串支持
--enable-sockets 变量激活socket通讯特性
编译可能出现的问题:
出现如下报错:

解决方法:
cd /usr/local/mysql/lib/mysql/
ln -s libmysqlclient.so.15.0.0 libmysqlclient_r.so
编译OK后,出现“Thank you for using PHP.”,说明配置成功。
[root@gamejzy php-5.3.19]# make && make install
编译和安装,时间会比较长,耐心等待吧!
编译完成后,需要以下配置
1、设置 php.ini 配置文件
[root@gamejzy php-5.3.19]# cp php.ini-development /usr/local/php/etc/php.ini
注:/usr/local/php/etc 是在配置的时候指定的位置
2、和 Apache 整合
先打开 Apache 的配置文件 httpd.conf
[root@gamejzy php-5.3.19]# vi /etc/httpd/httpd.conf
会发现文件中有这么条内容
LoadModule php5_module modules/libphp5.so
这就说明 PHP 已经加载到 Apache 服务器中了,我们所要做的是告诉 Apache 服务器,哪些后缀名使用 PHP 解析
在 vi 编辑器中搜索“AddType application/x-compress .Z”
在后面添加一条:AddType application/x-httpd-php .php
修改后的效果如下图

保存并退出,重启 Apache
[root@gamejzy php-5.3.19]# /usr/local/apache2/bin/apachectl stop
[root@gamejzy php-5.3.19]# /usr/local/apache2/bin/apachectl start
3、测试 Apache 服务器是否可以解析 PHP
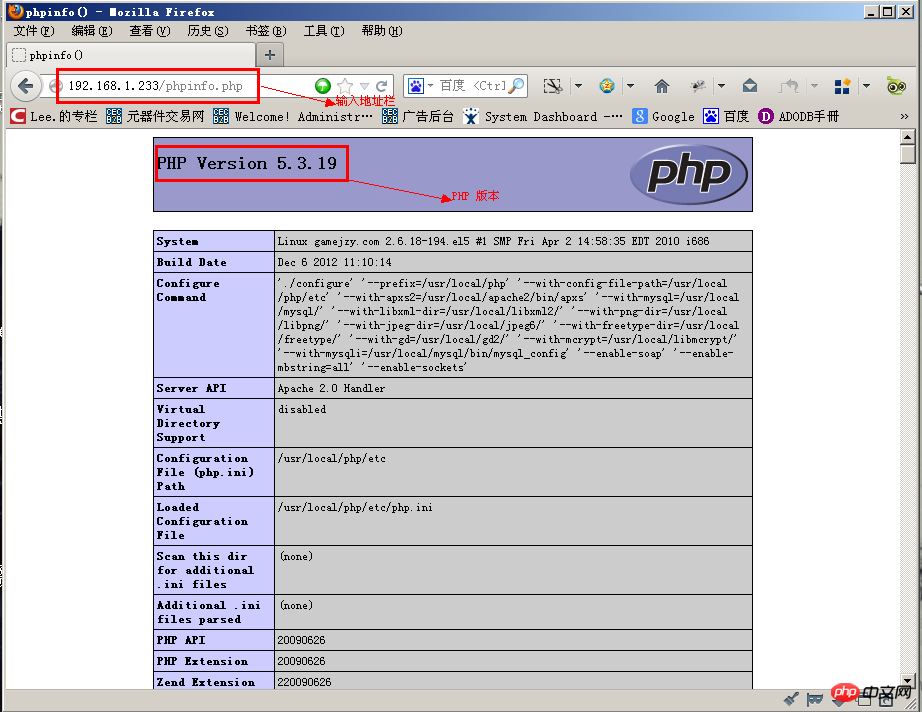
往 /usr/local/apache2/htdocs 目录下添加一个phpinfo.php 文件,键入以下代码:
<?php
header("Content-Type:text/html;Charset=utf-8");
phpinfo();
?>打开浏览器,访问该文件,看到如下图所示,说明 PHP 安装成功,并且和 Apache 服务器整合成功。
到此,CentOS 下的 LAMP 环境就搭建完毕了,虽然步骤繁琐,但是“工欲善其事,必先利其器”,花些时间,搭建一个完美的环境是值得的。
The above is the detailed content of Build the best LAMP environment under CentOS5.5. For more information, please follow other related articles on the PHP Chinese website!

Hot AI Tools

Undresser.AI Undress
AI-powered app for creating realistic nude photos

AI Clothes Remover
Online AI tool for removing clothes from photos.

Undress AI Tool
Undress images for free

Clothoff.io
AI clothes remover

AI Hentai Generator
Generate AI Hentai for free.

Hot Article
Hot Tools

Notepad++7.3.1
Easy-to-use and free code editor

SublimeText3 Chinese version
Chinese version, very easy to use

Zend Studio 13.0.1
Powerful PHP integrated development environment

Dreamweaver CS6
Visual web development tools

SublimeText3 Mac version
God-level code editing software (SublimeText3)
Hot Topics
 1378
1378
 52
52

 PHP 8.4 Installation and Upgrade guide for Ubuntu and Debian
Dec 24, 2024 pm 04:42 PM
PHP 8.4 Installation and Upgrade guide for Ubuntu and Debian
Dec 24, 2024 pm 04:42 PM
PHP 8.4 brings several new features, security improvements, and performance improvements with healthy amounts of feature deprecations and removals. This guide explains how to install PHP 8.4 or upgrade to PHP 8.4 on Ubuntu, Debian, or their derivati
 How To Set Up Visual Studio Code (VS Code) for PHP Development
Dec 20, 2024 am 11:31 AM
How To Set Up Visual Studio Code (VS Code) for PHP Development
Dec 20, 2024 am 11:31 AM
Visual Studio Code, also known as VS Code, is a free source code editor — or integrated development environment (IDE) — available for all major operating systems. With a large collection of extensions for many programming languages, VS Code can be c
 How do you parse and process HTML/XML in PHP?
Feb 07, 2025 am 11:57 AM
How do you parse and process HTML/XML in PHP?
Feb 07, 2025 am 11:57 AM
This tutorial demonstrates how to efficiently process XML documents using PHP. XML (eXtensible Markup Language) is a versatile text-based markup language designed for both human readability and machine parsing. It's commonly used for data storage an
 PHP Program to Count Vowels in a String
Feb 07, 2025 pm 12:12 PM
PHP Program to Count Vowels in a String
Feb 07, 2025 pm 12:12 PM
A string is a sequence of characters, including letters, numbers, and symbols. This tutorial will learn how to calculate the number of vowels in a given string in PHP using different methods. The vowels in English are a, e, i, o, u, and they can be uppercase or lowercase. What is a vowel? Vowels are alphabetic characters that represent a specific pronunciation. There are five vowels in English, including uppercase and lowercase: a, e, i, o, u Example 1 Input: String = "Tutorialspoint" Output: 6 explain The vowels in the string "Tutorialspoint" are u, o, i, a, o, i. There are 6 yuan in total
 Explain JSON Web Tokens (JWT) and their use case in PHP APIs.
Apr 05, 2025 am 12:04 AM
Explain JSON Web Tokens (JWT) and their use case in PHP APIs.
Apr 05, 2025 am 12:04 AM
JWT is an open standard based on JSON, used to securely transmit information between parties, mainly for identity authentication and information exchange. 1. JWT consists of three parts: Header, Payload and Signature. 2. The working principle of JWT includes three steps: generating JWT, verifying JWT and parsing Payload. 3. When using JWT for authentication in PHP, JWT can be generated and verified, and user role and permission information can be included in advanced usage. 4. Common errors include signature verification failure, token expiration, and payload oversized. Debugging skills include using debugging tools and logging. 5. Performance optimization and best practices include using appropriate signature algorithms, setting validity periods reasonably,
 7 PHP Functions I Regret I Didn't Know Before
Nov 13, 2024 am 09:42 AM
7 PHP Functions I Regret I Didn't Know Before
Nov 13, 2024 am 09:42 AM
If you are an experienced PHP developer, you might have the feeling that you’ve been there and done that already.You have developed a significant number of applications, debugged millions of lines of code, and tweaked a bunch of scripts to achieve op
 Explain late static binding in PHP (static::).
Apr 03, 2025 am 12:04 AM
Explain late static binding in PHP (static::).
Apr 03, 2025 am 12:04 AM
Static binding (static::) implements late static binding (LSB) in PHP, allowing calling classes to be referenced in static contexts rather than defining classes. 1) The parsing process is performed at runtime, 2) Look up the call class in the inheritance relationship, 3) It may bring performance overhead.
 What are PHP magic methods (__construct, __destruct, __call, __get, __set, etc.) and provide use cases?
Apr 03, 2025 am 12:03 AM
What are PHP magic methods (__construct, __destruct, __call, __get, __set, etc.) and provide use cases?
Apr 03, 2025 am 12:03 AM
What are the magic methods of PHP? PHP's magic methods include: 1.\_\_construct, used to initialize objects; 2.\_\_destruct, used to clean up resources; 3.\_\_call, handle non-existent method calls; 4.\_\_get, implement dynamic attribute access; 5.\_\_set, implement dynamic attribute settings. These methods are automatically called in certain situations, improving code flexibility and efficiency.
