Simple code example to implement JavaScript MVC style framework
Introduction
People who have used JavaScriptframeworks (such as AngularJS, Backbone or Ember) are familiar with the UI (user interface) , front-end) working mechanism of mvc. These frameworks implement MVC, making it easier to change the View as needed in a single page, and the Model-View-Controller (mvc) The core concepts are: controllers that handle incoming requests, views that display information, and models that represent business rules and data access.
Therefore, when we need to create such an application that needs to switch out different content in a single page, we usually choose to use one of the above frameworks. However, if we only need a framework that implements view switching in a URL without additional bundled functions, there is no need to use complex frameworks such as Angular and Ember. This article is an attempt to use simple and effective methods to solve the same problem.
Concept
The code in the application uses the "#" in urls to implement the navigation of the MVC pattern. The application starts with a default url, hash-based code that loads the application view and applies the object-model to the view template.
The url format is as follows:
http://Domain Name/index.html#/Route Name
The view content must be bound to the object model's value and property in a {{Property-Name}} way. The code looks for this specialized template format and replaces the property values in the object model.
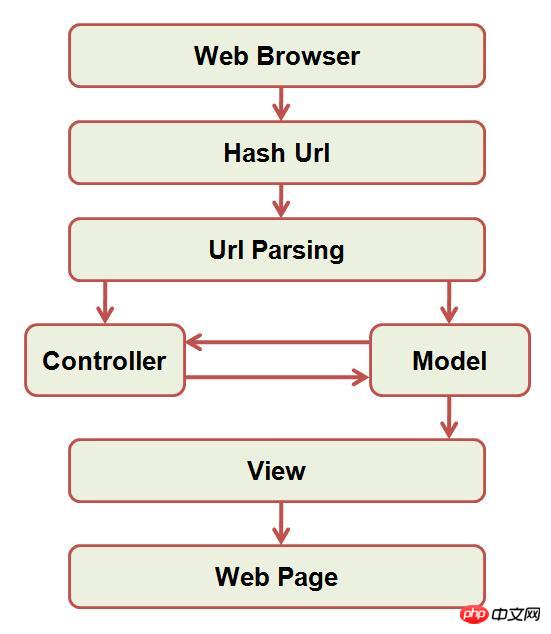
The view loaded asynchronously via ajax will be placed in the placeholder of the page. The view placeholder can be any element (ideally p), but it must have a special attribute, and the code locates it based on this special attribute, which also helps the implementation of the code. When the url changes, the scenario is repeated and another view is loaded. Sounds simple? The flow diagram below explains the message jumps in this particular implementation.
Write code
We start with the basic moduleDesign pattern, And finally use the facade design pattern to expose our libs to the global scope.
; (function (w, d, undefined) { //rest of the code })(window, document);We need to store the view elements into a variable so that they can be used multiple times.
var _viewElement = null; //element that will be used to render the view
We need a default routing to deal with the situation where there is no routing information in the url, so that the default view can be loaded instead of displaying a blank page.
var _defaultRoute = null;
Now let’s create the constructor method of our main MVC object. We will store the routing information in "_routeMap"
var jsMvc = function () {
    //mapping object for the routes
    this._routeMap = {};
}It's time to create the routing object. We will store the routing, template, and controller information in this object.
var routeObj = function (c, r, t) {
    this.controller = c;
    this.route = r;
    this.template = t;
}Each URL will have a dedicated routing object routeObj. All these objects will be added to the _routeMap object, so that we can obtain them later through key-value.
In order to add routing information to MVC libs, we need to expose a method in the libs. So let's create a method that can be used by the respective controller to add new routes.
jsMvc.prototype.AddRoute = function (controller, route, template) {
    this._routeMap[route] = new routeObj(controller, route, template);
}The method AddRoute receives 3 parameters: controller, route and template (contoller, route and template). They are:
controller: The function of the controller is to access specific routes.
route: Route route. This is the part after # in the url.
template: This is the external html file that is loaded as a view for this route. Now our libs need an entry point to parse the url and serve the associated html template page. To accomplish this, we need a method.
The Initialize method does the following:
1) Get the initialization of view-related elements. The code requires an element with a view attribute, which can be used to find in the HTML page:
2) Set the default route
3) Verify that the view element is reasonable
4)绑定窗口哈希变更事件,当url不同哈希值发生变更时视图可以被及时更新
5)最后,启动mvc
//Initialize the Mvc manager object to start functioning
jsMvc.prototype.Initialize = function () {
    var startMvcDelegate = startMvc.bind(this);

    //get the html element that will be used to render the view
    _viewElement = d.querySelector('[view]');
    if (!_viewElement) return; //do nothing if view element is not found

    //Set the default route
    _defaultRoute = this._routeMap[Object.getOwnPropertyNames(this._routeMap)[0]];

    //start the Mvc manager
    w.onhashchange = startMvcDelegate;
    startMvcDelegate();
}在上面的代码中,我们从startMvc 方法中创建了一个代理方法startMvcDelegate 。当哈希值变化时,这个代理都会被调用。下面就是当哈希值变化时我们做的操作的先后顺序:
1)获取哈希值
2)从哈希中获取路由值
3)从路由map对象_routeMap中获取路由对象routeObj
4)如果url中没有路由信息,需要获取缺省的路由对象
5)最后,调用跟这个路由有关的控制器并且为这个视图元素的视图提供服务
上面的所有步骤都被下面的startMvc方法所实现
//function to start the mvc support
function startMvc() {
    var pageHash = w.location.hash.replace('#', ''),
        routeName = null,
        routeObj = null;

    routeName = pageHash.replace('/', ''); //get the name of the route from the hash
    routeObj = this._routeMap[routeName]; //get the route object

    //Set to default route object if no route found
    if (!routeObj)
        routeObj = _defaultRoute;

    loadTemplate(routeObj, _viewElement, pageHash); //fetch and set the view of the route
}下一步,我们需要使用XML HTTP请求异步加载合适的视图。为此,我们会传递路由对象的值和视图元素给方法loadTemplate。
//Function to load external html data
function loadTemplate(routeObject, view) {
    var xmlhttp;
    if (window.XMLHttpRequest) {
        // code for IE7+, Firefox, Chrome, Opera, Safari
        xmlhttp = new XMLHttpRequest();
    }
    else {
        // code for IE6, IE5
        xmlhttp = new ActiveXObject('Microsoft.XMLHTTP');
    }
    xmlhttp.onreadystatechange = function () {
        if (xmlhttp.readyState == 4 && xmlhttp.status == 200) {
            loadView(routeObject, view, xmlhttp.responseText);
        }
    }
    xmlhttp.open('GET', routeObject.template, true);
    xmlhttp.send();
}当前只剩加载视图和将对象模型与视图模板绑定了。我们会创建一个空的模型对象,然后传递与方法相关的模型来唤醒路由控制器。更新后的模型对象会与先前已经加载的XHR调用中的HTML模板绑定。
loadView 方法被用于调用控制器方法,以及准备模型对象。
replaceToken方法被用于与HTML模板一起绑定模型
//Function to load the view with the template
function loadView(routeObject, viewElement, viewHtml) {
    var model = {};

    //get the resultant model from the controller of the current route
    routeObject.controller(model);

    //bind the model with the view
    viewHtml = replaceToken(viewHtml, model);

    //load the view into the view element
    viewElement.innerHTML = viewHtml;
}

function replaceToken(viewHtml, model) {
    var modelProps = Object.getOwnPropertyNames(model),

    modelProps.forEach(function (element, index, array) {
        viewHtml = viewHtml.replace('{{' + element + '}}', model[element]);
    });
    return viewHtml;
}最后,我们将插件曝光于js全局范围外
//attach the mvc object to the window
w['jsMvc'] = new jsMvc();
现在,是时候在我们单页应用中使用这个MVC插件。在下一个代码段中,下面这些会实现:
1)在web页面中引入这个代码
2)用控制器添加路由信息和视图模板信息
3)创建控制器功能
4)最后,初始化lib。
除了上面我们需要的链接让我们导航到不同的路径外,一个容器元素的视图属性包含着视图模板html。
<!DOCTYPE html>
<html>
<head>
<title>JavaScript Mvc</title>
<script src="jsMvc.js"></script>
<!--[if lt IE 9]> <script src="jsMvc-ie8.js"></script> <![endif]-->
<style type="text/css">
.NavLinkContainer {
padding: 5px;
background-color: lightyellow;
}
.NavLink {
background-color:black;
color: white;
font-weight:800;
text-decoration:none;
padding:5px;
border-radius:4px;
}
.NavLink:hover {
background-color:gray;
}
</style>
</head>
<body>
<h3>Navigation Links</h3>
<p class="NavLinkContainer">
<a class="NavLink" href="index.html#/home">Home</a>
<a class="NavLink" href="index.html#/contact">Contact</a>
<a class="NavLink" href="index.html#/admin">Admin</a>
</p>
<br />
<br />
<h3>View</h3>
<p view></p>
<script>
jsMvc.AddRoute(HomeController, 'home', 'Views/home.html');
jsMvc.AddRoute(ContactController, 'contact', 'Views/contact.html');
jsMvc.AddRoute(AdminController, 'admin', 'Views/admin.html');
jsMvc.Initialize();
function HomeController(model) {
model.Message = 'Hello World';
}
function ContactController(model) {
model.FirstName = "John";
model.LastName = "Doe";
model.Phone = '555-123456';
}
function AdminController(model) {
model.UserName = "John";
model.Password = "MyPassword";
}
</script>
</body>
</html>上面的代码有一段包含一个为IE的条件注释。
<!--[if lt IE 9]> <script src="jsMvc-ie8.js"></script> <![endif]-->
如果IE的版本低于9,那么function.bind,Object.getOwnPropertyNames和Array.forEach属性将不会被支持。因此我们要通过判断浏览器是否低于IE9来反馈代码是否支持。
其中的内容有home.html, contact.html 和 admin.html 请看下面:
home.html:
{{Message}}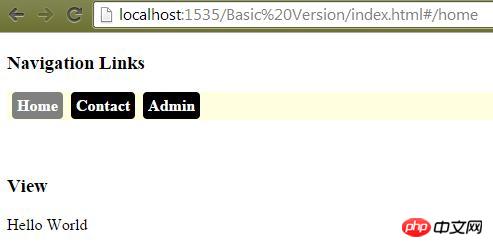
contact.html:
{{FirstName}} {{LastName}}
<br />
{{Phone}}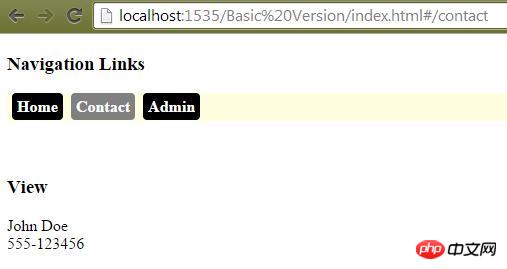
admin.html:
<p style="padding:2px;margin:2px;text-align:left;">
    <label for="txtUserName">User Name</label>
    <input type="text" id="txtUserName" value="{{UserName}}" />
</p>
<p style="padding:2px;margin:2px;text-align:left;">
    <label for="txtPassword">Password</label>
    <input type="password" id="txtPassword" value="{{Password}}" />
</p>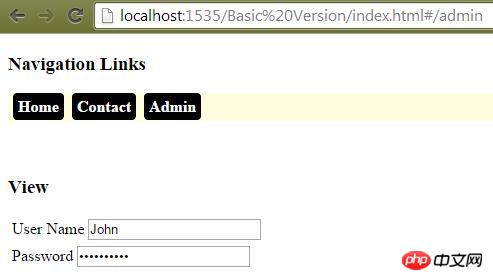
完整的代码可以从给定的下载链接中得到。
如何运行代码
运行该代码比较简单,需要在你喜欢的Web服务器上创建一个Web应用,下面以IIS为例来说明。
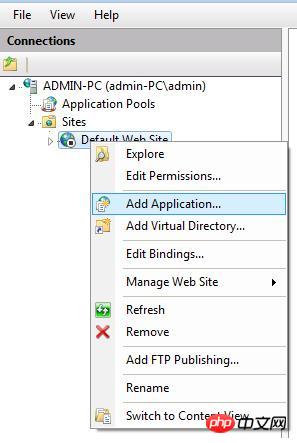
首先在默认站点中新增一个Web应用.
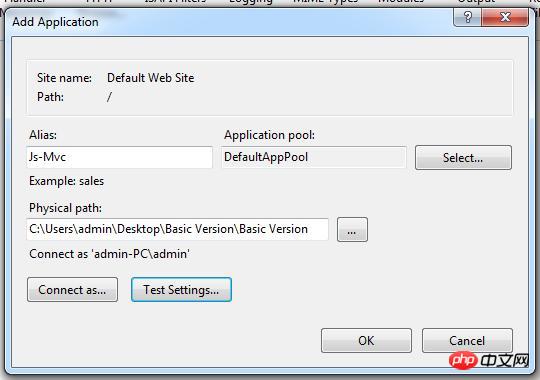
然后设置必填信息:别名,物理路径,应用池,用户认证信息,点击OK。
最后定位到Web应用的内容目录,浏览你想打开的HTML页面即可。
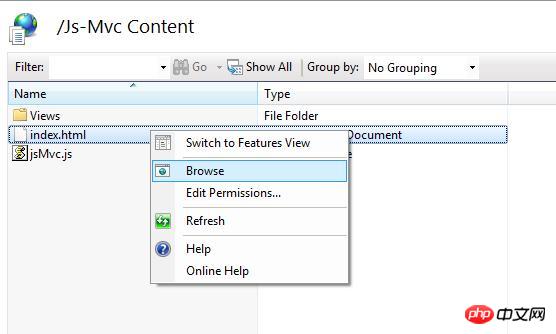
跑在服务器里是必要的,因为代码加载从存储于外部文件中的视图,浏览器不会允许我们的代码在非宿主服务器环境下执行。当然如果你使用Visual Studio那么直接在目标html文件上右键,选择‘View In Browser’即可。
浏览器支持
大部分的现代浏览器都支持本代码。针对IE8及以下的浏览器,有一份单独的代码来支持,但很不幸,这份代码远多于100行。因此这代码不是百分百跨浏览器兼容的,所以当你决定在项目中使用时需要对代码进行微调。
Points of Interest
This example demonstratesThis example shows us that for very clear requirements, it is not necessary to use all js libraries and frameworks to achieve them. Web applications are resource-intensive, and it's best to use only the necessary code and throw away the rest.
That's all the current code can do. There are no functions such as Web service calling and dynamic event binding. Soon I will provide an upgraded version that supports more features.
Download JavaScript-Mvc.zip – 4.6 KB JavaScript Mvc on Github Live Demo
The above is the detailed content of Simple code example to implement JavaScript MVC style framework. For more information, please follow other related articles on the PHP Chinese website!

Hot AI Tools

Undresser.AI Undress
AI-powered app for creating realistic nude photos

AI Clothes Remover
Online AI tool for removing clothes from photos.

Undress AI Tool
Undress images for free

Clothoff.io
AI clothes remover

AI Hentai Generator
Generate AI Hentai for free.

Hot Article

Hot Tools

Notepad++7.3.1
Easy-to-use and free code editor

SublimeText3 Chinese version
Chinese version, very easy to use

Zend Studio 13.0.1
Powerful PHP integrated development environment

Dreamweaver CS6
Visual web development tools

SublimeText3 Mac version
God-level code editing software (SublimeText3)

Hot Topics
 How to implement an online speech recognition system using WebSocket and JavaScript
Dec 17, 2023 pm 02:54 PM
How to use WebSocket and JavaScript to implement an online speech recognition system Introduction: With the continuous development of technology, speech recognition technology has become an important part of the field of artificial intelligence. The online speech recognition system based on WebSocket and JavaScript has the characteristics of low latency, real-time and cross-platform, and has become a widely used solution. This article will introduce how to use WebSocket and JavaScript to implement an online speech recognition system.
 WebSocket and JavaScript: key technologies for implementing real-time monitoring systems
Dec 17, 2023 pm 05:30 PM
WebSocket and JavaScript: Key technologies for realizing real-time monitoring systems Introduction: With the rapid development of Internet technology, real-time monitoring systems have been widely used in various fields. One of the key technologies to achieve real-time monitoring is the combination of WebSocket and JavaScript. This article will introduce the application of WebSocket and JavaScript in real-time monitoring systems, give code examples, and explain their implementation principles in detail. 1. WebSocket technology
 How to implement an online reservation system using WebSocket and JavaScript
Dec 17, 2023 am 09:39 AM
How to use WebSocket and JavaScript to implement an online reservation system. In today's digital era, more and more businesses and services need to provide online reservation functions. It is crucial to implement an efficient and real-time online reservation system. This article will introduce how to use WebSocket and JavaScript to implement an online reservation system, and provide specific code examples. 1. What is WebSocket? WebSocket is a full-duplex method on a single TCP connection.
 How to use JavaScript and WebSocket to implement a real-time online ordering system
Dec 17, 2023 pm 12:09 PM
Introduction to how to use JavaScript and WebSocket to implement a real-time online ordering system: With the popularity of the Internet and the advancement of technology, more and more restaurants have begun to provide online ordering services. In order to implement a real-time online ordering system, we can use JavaScript and WebSocket technology. WebSocket is a full-duplex communication protocol based on the TCP protocol, which can realize real-time two-way communication between the client and the server. In the real-time online ordering system, when the user selects dishes and places an order
 PHP MVC Architecture: Building Web Applications for the Future
Mar 03, 2024 am 09:01 AM
Introduction In today's rapidly evolving digital world, it is crucial to build robust, flexible and maintainable WEB applications. The PHPmvc architecture provides an ideal solution to achieve this goal. MVC (Model-View-Controller) is a widely used design pattern that separates various aspects of an application into independent components. The foundation of MVC architecture The core principle of MVC architecture is separation of concerns: Model: encapsulates the data and business logic of the application. View: Responsible for presenting data and handling user interaction. Controller: Coordinates the interaction between models and views, manages user requests and business logic. PHPMVC Architecture The phpMVC architecture follows the traditional MVC pattern, but also introduces language-specific features. The following is PHPMVC
 JavaScript and WebSocket: Building an efficient real-time weather forecasting system
Dec 17, 2023 pm 05:13 PM
JavaScript and WebSocket: Building an efficient real-time weather forecast system Introduction: Today, the accuracy of weather forecasts is of great significance to daily life and decision-making. As technology develops, we can provide more accurate and reliable weather forecasts by obtaining weather data in real time. In this article, we will learn how to use JavaScript and WebSocket technology to build an efficient real-time weather forecast system. This article will demonstrate the implementation process through specific code examples. We
 Simple JavaScript Tutorial: How to Get HTTP Status Code
Jan 05, 2024 pm 06:08 PM
JavaScript tutorial: How to get HTTP status code, specific code examples are required. Preface: In web development, data interaction with the server is often involved. When communicating with the server, we often need to obtain the returned HTTP status code to determine whether the operation is successful, and perform corresponding processing based on different status codes. This article will teach you how to use JavaScript to obtain HTTP status codes and provide some practical code examples. Using XMLHttpRequest
 How to use insertBefore in javascript
Nov 24, 2023 am 11:56 AM
Usage: In JavaScript, the insertBefore() method is used to insert a new node in the DOM tree. This method requires two parameters: the new node to be inserted and the reference node (that is, the node where the new node will be inserted).


