

Detailed code explanation of HTML5 canvas advanced code (picture)

1) Use path to draw :
beginPath()——Start a new path;
closePath()——Try to close the existing path by drawing a line connecting the end point of the last line and the initial coordinate;
fill()——Fill with sub The shape described by the path;
isPointInPath(x,y) - Returns true if the specified point is within the shape described by the current path;
lineTo(x,y)——Draw a subpath to the specified coordinates;
moveTo(x,y)——Move to the specified coordinates without drawing a subpath ;
rect(x,y,w,h)——Draw a rectangle with its upper left corner at (x,y), width w, and height h;
stroke()——Draw an outline for the shape described by the sub-path;
<style type="text/css">
        canvas{
            border:thin solid black;
            margin: 4px;
        }
        body > *{
            float: left;
        }
</style><canvas id="canvas1" width="500" height="140">
您的浏览器不支持<code>canvas</code>!
</canvas> <script>
//由直线创建路径
var ctx=document.getElementById("canvas1").getContext("2d");
ctx.fillStyle="#136455";
ctx.strokeStyle="blue";
ctx.lineWidth=4;
ctx.beginPath();
ctx.moveTo(10,10);
ctx.lineTo(110,10);
ctx.lineTo(110,120);
ctx.closePath();
ctx.fill();
ctx.beginPath();
ctx.moveTo(150,10);
ctx.lineTo(200,10);
ctx.lineTo(200,120);
ctx.lineTo(190,120);
ctx.fill();
ctx.stroke();
ctx.beginPath();
ctx.moveTo(250,10);
ctx.lineTo(250,120);
ctx.stroke();
</script>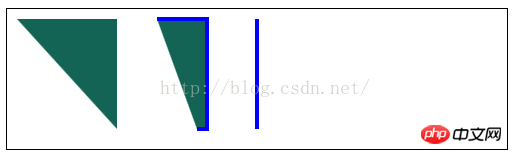
lineCap——Set the style of the end of the line when drawing a line or closed shape;
    <canvas id="canvas2" width="500" height="140">
        您的浏览器不支持<code>canvas</code>!
</canvas> <script>
//设置lineCap属性
var ctx2=document.getElementById("canvas2").getContext("2d");
ctx2.strokeStyle="red";
ctx2.lineWidth=2;
ctx2.beginPath();
ctx2.moveTo(0,50);
ctx2.lineTo(200,50);
ctx2.stroke();
ctx2.strokeStyle="black";
ctx2.lineWidth=40;
var xpos=50;
var styles=["butt","round","square"];
for(var i=0;i<styles.length;i++){
ctx2.beginPath();
ctx2.lineCap=styles[i];
ctx2.moveTo(xpos,50);
ctx2.lineTo(xpos,150);
ctx2.stroke();
xpos+=50;
}
</script>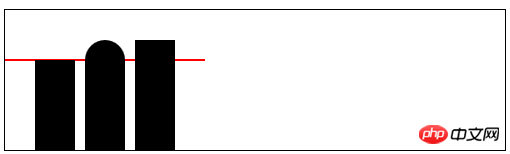
    <canvas id="canvas3" width="500" height="140">
        您的浏览器不支持<code>canvas</code>!
</canvas> <script>
//用Rect方法绘制矩形
var ctx3=document.getElementById("canvas3").getContext("2d");
ctx3.fillStyle="yellow";
ctx3.strokeStyle="black";
ctx3.lineWidth=4;
ctx3.beginPath();
ctx3.moveTo(110,10);
ctx3.lineTo(110,100);
ctx3.lineTo(10,10);
ctx3.closePath();
ctx3.rect(110,10,100,90);
ctx3.rect(110,100,130,30);
ctx3.fill();
ctx3.stroke();
</script>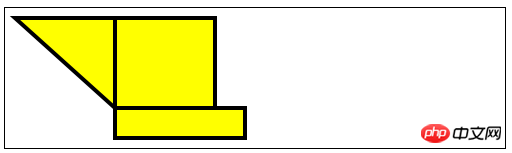
2) Draw an arc:
arc(x,y,rad,startAngle,end Angle,direction)——Draw an arc to (x, y), the radius is rad, the starting angle is startAngle, and the end angle is endAngle. The optional parameter direction specifies the direction of the arc;
arcTo(x1,y1,x2,y2,rad)——Drawing An arc with a radius of rad, passing through (x1, y1) and ending at (x2, y2);
    <canvas id="canvas4" width="500" height="140">
        您的浏览器不支持<code>canvas</code>!
</canvas> <script>
//使用arcTo方法
var ctx4=document.getElementById("canvas4").getContext("2d");
var point1=[100,10];
var point2=[200,10];
var point3=[200,110];
ctx4.fillStyle="yellow";
ctx4.strokeStyle="black";
ctx4.lineWidth=4;
ctx4.beginPath();
ctx4.moveTo(point1[0],point1[1]);
ctx4.arcTo(point2[0],point2[1],point3[0],point3[1],100);
ctx4.stroke();
drawPoint(point1[0],point1[1]);
drawPoint(point2[0],point2[1]);
drawPoint(point3[0],point3[1]);
ctx4.beginPath();
ctx4.moveTo(point1[0],point1[1]);
ctx4.lineTo(point2[0],point2[1]);
ctx4.lineTo(point3[0],point3[1]);
ctx4.stroke();
function drawPoint(x,y){
ctx4.lineWidth=1;
ctx4.strokeStyle="red";
ctx4.strokeRect(x-2,y-2,4,4);
}
</script>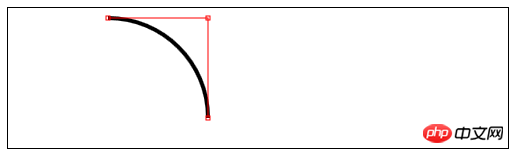
    <canvas id="canvas5" width="500" height="140">
        您的浏览器不支持<code>canvas</code>!
</canvas> <script>
//响应鼠标移动绘制圆弧
var canvasElem = document.getElementById("canvas5");
var ctx5 = canvasElem.getContext("2d");
var point1 = [100, 10];
var point2 = [200, 10];
var point3 = [200, 110];
draw();
canvasElem.onmousemove = function (e) {
if (e.ctrlKey) {
point1 = [e.clientX, e.clientY];
} else if(e.shiftKey) {
point2 = [e.clientX, e.clientY];
} else {
point3 = [e.clientX, e.clientY];
}
ctx5.clearRect(0, 0, 540, 140);
draw();
}
function draw() {
ctx5.fillStyle = "yellow";
ctx5.strokeStyle = "black";
ctx5.lineWidth = 4;
ctx5.beginPath();
ctx5.moveTo(point1[0], point1[1]);
ctx5.arcTo(point2[0], point2[1], point3[0], point3[1], 50);
ctx5.stroke();
drawPoint(point1[0], point1[1]);
drawPoint(point2[0], point2[1]);
drawPoint(point3[0], point3[1]);
ctx5.beginPath();
ctx5.moveTo(point1[0], point1[1]);
ctx5.lineTo(point2[0], point2[1]);
ctx5.lineTo(point3[0], point3[1]);
ctx5.stroke();
}
function drawPoint(x, y) {
ctx5.lineWidth = 1;
ctx5.strokeStyle = "red";
ctx5.strokeRect(x -2, y-2, 4, 4);
}
</script>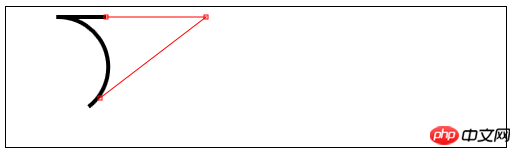
    <canvas id="canvas6" width="500" height="140">
        您的浏览器不支持<code>canvas</code>!
</canvas> <script>
//使用arc方法
var ctx6=document.getElementById("canvas6").getContext("2d");
ctx6.fillStyle="yellow";
ctx6.lineWidth=3;
ctx6.beginPath();
ctx6.arc(70,70,60,0,Math.PI,true);
ctx6.stroke();
ctx6.beginPath();
ctx6.arc(200,70,60,Math.PI/2,Math.PI/4,false);
ctx6.fill();
ctx6.stroke();
ctx6.beginPath();
var val=0;
for(var i=0;i<4;i++){
ctx6.arc(350,70,60,val,val+Math.PI/4,false);
val+=Math.PI/2;
}
ctx6.closePath();
ctx6.fill();
ctx6.stroke();
</script>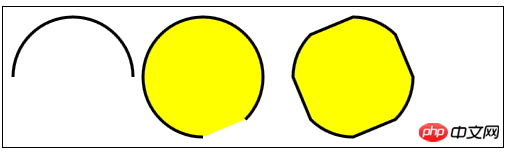
3) Draw Bezier curve
bezierCurveTo(cx1,cy1,cx2, cy2,x,y)——Draw a Bezier curve to point (x,y), the control points are (cx1,cy1) and (cx2,cy2);
quadraticCurveTo(cx,xy,x,y)——Draw a quadratic Bezier curve to point (x,y), the control point is (cx,cy);
<canvas id="canvas" width="500" height="140">
Your browser doesn't support the <code>canvas</code> element
</canvas> <script>
var canvasElem = document.getElementById("canvas");
var ctx = canvasElem.getContext("2d");
var startPoint = [50, 100];
var endPoint = [400, 100];
var cp1 = [250, 50];
var cp2 = [350, 50];
canvasElem.onmousemove = function(e) {
if (e.shiftKey) {
cp1 = [e.clientX, e.clientY];
} else if (e.ctrlKey) {
cp2 = [e.clientX, e.clientY];
}
ctx.clearRect(0, 0, 500, 140);
draw();
}
draw();
function draw() {
ctx.lineWidth = 3;
ctx.strokeStyle = "black";
ctx.beginPath();
ctx.moveTo(startPoint[0], startPoint[1]);
ctx.bezierCurveTo(cp1[0], cp1[1], cp2[0], cp2[1],
endPoint[0], endPoint[1]);
ctx.stroke();
ctx.lineWidth = 1;
ctx.strokeStyle = "red";
var points = [startPoint, endPoint, cp1, cp2];
for (var i = 0; i < points.length; i++) {
drawPoint(points[i]);
}
drawLine(startPoint, cp1);
drawLine(endPoint, cp2);
}
function drawPoint(point) {
ctx.beginPath();
ctx.strokeRect(point[0] -2, point[1] -2, 4, 4);
}
function drawLine(from, to) {
ctx.beginPath();
ctx.moveTo(from[0], from[1]);
ctx.lineTo(to[0], to[1]);
ctx.stroke();
}
</script>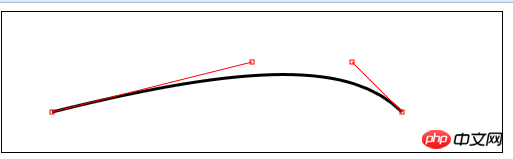
<canvas id="canvas" width="500" height="140">
Your browser doesn't support the <code>canvas</code> element
</canvas> <script>
//绘制二次贝塞尔曲线
var canvasElem = document.getElementById("canvas");
var ctx = canvasElem.getContext("2d");
var startPoint = [50, 100];
var endPoint = [400, 100];
var cp1 = [250, 50];
canvasElem.onmousemove = function(e) {
if (e.shiftKey) {
cp1 = [e.clientX, e.clientY];
}
ctx.clearRect(0, 0, 500, 140);
draw();
}
draw();
function draw() {
ctx.lineWidth = 3;
ctx.strokeStyle = "black";
ctx.beginPath();
ctx.moveTo(startPoint[0], startPoint[1]);
ctx.quadraticCurveTo(cp1[0], cp1[1], endPoint[0], endPoint[1]);
ctx.stroke();
ctx.lineWidth = 1;
ctx.strokeStyle = "red";
var points = [startPoint, endPoint, cp1];
for (var i = 0; i < points.length; i++) {
drawPoint(points[i]);
}
drawLine(startPoint, cp1);
drawLine(endPoint, cp1);
}
function drawPoint(point) {
ctx.beginPath();
ctx.strokeRect(point[0] -2, point[1] -2, 4, 4);
}
function drawLine(from, to) {
ctx.beginPath();
ctx.moveTo(from[0], from[1]);
ctx.lineTo(to[0], to[1]);
ctx.stroke();
}
</script>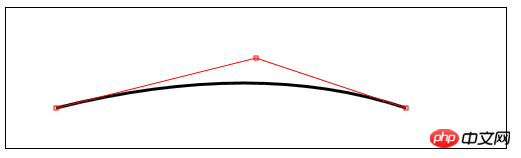
4) Create a clipping area
clip()——Create a new clipping area;
##
    <canvas id="canvas7" width="500" height="140">
        您的浏览器不支持<code>canvas</code>!
</canvas>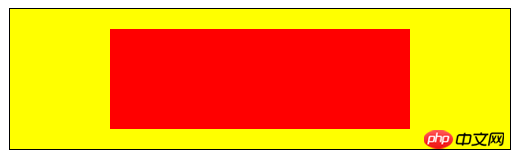 5) Draw text:
fillText(
strokeText(
font——设置绘制文本时使用的字体;
textAlign——设置文本的对齐方式:start、end、left、right、center;
textBaseline——设置文本的基线:top、hanging、middle、alphabetic、ideographic、bottom;
6)使用特效和转换:
6.1)使用阴影:
shadowBlur——设置阴影的模糊程度;
shadowColor——设置阴影的颜色;
shadowOffsetX——设置阴影的水平偏移量;
shadowOffsetY——设置阴影的垂直偏移量;
   <canvas id="canvas8" width="500" height="140">
        您的浏览器不支持<code>canvas</code>!
</canvas> <script>
//给图形和文本应用阴影
var ctx8=document.getElementById("canvas8").getContext("2d");
ctx8.fillStyle="lightgrey";
ctx8.strokeStyle="black";
ctx8.lineWidth=3;
ctx8.shadowOffsetX=5;
ctx8.shadowOffsetY=5;
ctx8.shadowBlur=5;
ctx8.shadowColor="grey";
ctx8.beginPath();
ctx8.arc(420,70,50,0,Math.PI,true);
ctx8.stroke();
ctx8.beginPath();
ctx8.arc(420,80,40,0,Math.PI,false);
ctx8.fill();
ctx8.font="100px sans-serif";
ctx8.fillText("hello",50,100);
ctx8.strokeText("hello",50,100);
</script>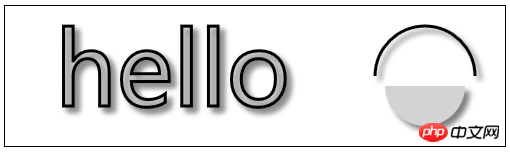
6.2)使用透明度:
globalAlpha——给文本和图形设置透明度(从0到1);
    <canvas id="canvas9" width="300" height="120">
        您的浏览器不支持<code>canvas</code>!
</canvas> <script>
//使用globalAlpha属性,设置透明度
var ctx9=document.getElementById("canvas9").getContext("2d");
ctx9.fillStyle="lightgrey";
ctx9.strokeStyle="black";
ctx9.lineWidth=3;
ctx9.font="100px sans-serif";
ctx9.fillText("hello",10,100);
ctx9.strokeText("hello",10,100);
ctx9.fillStyle="red";
ctx9.globalAlpha=0.5;
ctx9.fillRect(10,10,240,100);
</script>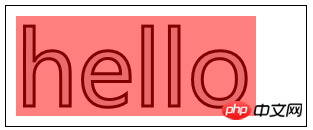
6.3)使用合成:
globalCompositeOperation——与透明度属性结合使用,来控制图形和文本在画布上绘制的方式;
globalCompositeOperation允许的值:
=copy——将来源绘制于目标之上,忽略一切透明度设置;
=source-atop——在两个图像都不透明处显示来源图像,
目标图像不透明但来源图像透明处显示目标图像,其它位置显示为透明;
=source-in——来源图像和目标图像都不透明处显示来源图像。其它位置显示为透明;
=source-out——来源图像不透明但目标图像透明处显示来源图像。其它位置显示为透明;
=source-over——来源图像不透明处显示来源图像。其它位置显示目标图像;
=destination-atop——与source-atop相同,但用目标图像替代来源图像,反之亦然;
=destination-in——与source-in相同,但用目标图像替代来源图像,反之亦然;
=destination-over——与source-over相同,但用目标图像替代来源图像,反之亦然;
=destination-out——与source-out相同,但用目标图像替代来源图像,反之亦然;
=lighter——显示来源图像与目标图像的总和,颜色值限制最高255(100%);
=xor——对来源图像和目标图像执行异或运算;
    <canvas id="canvas10" width="300" height="120">
        您的浏览器不支持<code>canvas</code>!
    </canvas>
    <label>Comosition Value:</label>
    <select id="list">
        <option>copy</option>
        <option>destination-atop</option>
        <option>destination-in</option>
        <option>destination-over</option>
        <option>destination-out</option>
        <option>lighter</option>
        <option>source-atop</option>
        <option>source-in</option>
        <option>source-out</option>
        <option>source-over</option>
        <option>xor</option>
</select> <script>
//使用globalCompositeOperation属性
var ctx10=document.getElementById("canvas10").getContext("2d");
ctx10.fillStyle="lightgrey";
ctx10.strokeStyle="black";
ctx10.lineWidth=3;
var compVal="copy";
document.getElementById("list").onchange=function(e){
compVal= e.target.value;
draw();
}
draw();
function draw(){
ctx10.clearRect(0,0,300,120);
ctx10.globalAlpha=1.0;
ctx10.font="100px sans-serif";
ctx10.fillText("hello",10,100);
ctx10.strokeText("hello",10,100);
ctx10.globalCompositeOperation=compVal;
ctx10.fillStyle="red";
ctx10.globalAlpha=0.5;
ctx10.fillRect(100,10,150,100);
}
</script>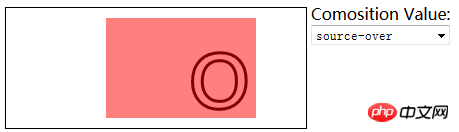
6.4)使用变换:
scale(
rotate(
translate(
transform(a,b,c,d,e,f)——合并现有的变换和a-f值所指定的矩阵;
setTansform(a,b,c,d,e,f)——用a-f值所指定的矩阵替换现有的变换;
    <canvas id="canvas11" width="400" height="200">
        您的浏览器不支持<code>canvas</code>!
</canvas> <script>
//使用变换
var ctx11=document.getElementById("canvas11").getContext("2d");
ctx11.fillStyle="lightgrey";
ctx11.strokeStyle="black";
ctx11.lineWidth=3;
ctx11.clearRect(0,0,300,120);
ctx11.globalAlpha=1.0;
ctx11.font="100px sans-serif";
ctx11.fillText("hello",10,100);
ctx11.strokeText("hello",10,100);
ctx11.scale(1.3,1.3);
ctx11.translate(100,-50);
ctx11.rotate(0.5);
ctx11.fillStyle="red";
ctx11.globalAlpha=0.5;
ctx11.fillRect(100,10,150,100);
ctx11.strokeRect(0,0,300,200);
</script>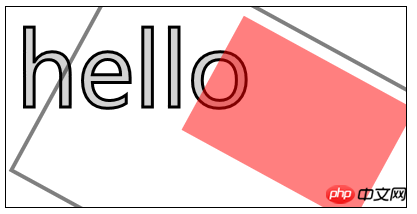
The above is the detailed content of Detailed code explanation of HTML5 canvas advanced code (picture). For more information, please follow other related articles on the PHP Chinese website!

Hot AI Tools

Undresser.AI Undress
AI-powered app for creating realistic nude photos

AI Clothes Remover
Online AI tool for removing clothes from photos.

Undress AI Tool
Undress images for free

Clothoff.io
AI clothes remover

Video Face Swap
Swap faces in any video effortlessly with our completely free AI face swap tool!

Hot Article
Hot Tools

Notepad++7.3.1
Easy-to-use and free code editor

SublimeText3 Chinese version
Chinese version, very easy to use

Zend Studio 13.0.1
Powerful PHP integrated development environment

Dreamweaver CS6
Visual web development tools

SublimeText3 Mac version
God-level code editing software (SublimeText3)
Hot Topics
 1392
1392
 52
52

 Table Border in HTML
Sep 04, 2024 pm 04:49 PM
Table Border in HTML
Sep 04, 2024 pm 04:49 PM
Guide to Table Border in HTML. Here we discuss multiple ways for defining table-border with examples of the Table Border in HTML.
 Nested Table in HTML
Sep 04, 2024 pm 04:49 PM
Nested Table in HTML
Sep 04, 2024 pm 04:49 PM
This is a guide to Nested Table in HTML. Here we discuss how to create a table within the table along with the respective examples.
 HTML margin-left
Sep 04, 2024 pm 04:48 PM
HTML margin-left
Sep 04, 2024 pm 04:48 PM
Guide to HTML margin-left. Here we discuss a brief overview on HTML margin-left and its Examples along with its Code Implementation.
 HTML Table Layout
Sep 04, 2024 pm 04:54 PM
HTML Table Layout
Sep 04, 2024 pm 04:54 PM
Guide to HTML Table Layout. Here we discuss the Values of HTML Table Layout along with the examples and outputs n detail.
 HTML Input Placeholder
Sep 04, 2024 pm 04:54 PM
HTML Input Placeholder
Sep 04, 2024 pm 04:54 PM
Guide to HTML Input Placeholder. Here we discuss the Examples of HTML Input Placeholder along with the codes and outputs.
 Moving Text in HTML
Sep 04, 2024 pm 04:45 PM
Moving Text in HTML
Sep 04, 2024 pm 04:45 PM
Guide to Moving Text in HTML. Here we discuss an introduction, how marquee tag work with syntax and examples to implement.
 HTML Ordered List
Sep 04, 2024 pm 04:43 PM
HTML Ordered List
Sep 04, 2024 pm 04:43 PM
Guide to the HTML Ordered List. Here we also discuss introduction of HTML Ordered list and types along with their example respectively
 HTML onclick Button
Sep 04, 2024 pm 04:49 PM
HTML onclick Button
Sep 04, 2024 pm 04:49 PM
Guide to HTML onclick Button. Here we discuss their introduction, working, examples and onclick Event in various events respectively.
