
 Web Front-end
H5 Tutorial
Detailed explanation of code examples for getting started with HTML5 canvas (picture)
Web Front-end
H5 Tutorial
Detailed explanation of code examples for getting started with HTML5 canvas (picture)
Detailed explanation of code examples for getting started with HTML5 canvas (picture)

1) HTMLCanvasElement Members of object :
# #height——corresponds to the height attribute of the canvas element;
##width—— Corresponds to the width attribute of the canvas element;
# getContext(
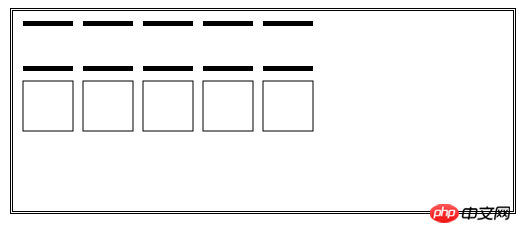
##2) Draw the rectangle:
## fillRect(x,y,w,h)——Draw a solid rectangle;# strokeRect(x,y,w,h)——Draw a hollow rectangle;
clear
Rect(x,y,w,h)——Clear the specified rectangle;canvas{
border:medium double black;
margin: 4px;
}
body > *{
float: left;
}<canvas id="canvas1" width="500" height="200">
您的浏览器不支持<code>canvas</code>!
</canvas><script>
//绘制矩形
var ctx=document.getElementById("canvas1").getContext("2d");
//ctx.fillRect(10,10,50,50);
var offset=10;
var size=50;
var count=5;
for(var i=0;i<count;i++){
ctx.fillRect(i*(offset+size)+offset,offset,size,size);
ctx.strokeRect(i*(offset+size)+offset,(2*offset)+size,size,size);
ctx.clearRect(i*(offset+size)+offset,offset+5,size,size-10);
}
</script>
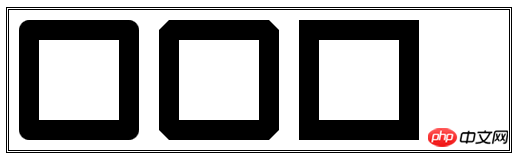
li neWidth——Get or set the width of the line (default value is 1.0);
lineJoin——Get or set The style when the line is connected to the graphic (default value is miter);
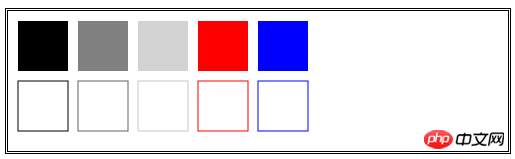
fillStyle——Get or set for solid The style of the graphic (default value is black);
strokeStyle - Gets or sets the style used for lines (default value is black );
# <canvas id="canvas2" width="500" height="70">
您的浏览器不支持<code>canvas</code>!
</canvas> <script>
//在执行操作前绘制设置状态
var ctx=document.getElementById("canvas2").getContext("2d");
ctx.lineWidth=2;
ctx.strokeRect(10,10,50,50);
ctx.lineWidth=4;
ctx.strokeRect(70,10,50,50);
ctx.lineWidth=6;
ctx.strokeRect(130,10,50,50);
ctx.lineWidth=8;
ctx.strokeRect(200,10,50,50);
</script><canvas id="canvas3" width="500" height="140">
您的浏览器不支持<code>canvas</code>!
</canvas> <script>
//设置lineJoin属性
var ctx=document.getElementById("canvas3").getContext("2d");
ctx.lineWidth=20;
ctx.lineJoin="round";
ctx.strokeRect(20,20,100,100);
ctx.lineJoin="bevel";
ctx.strokeRect(160,20,100,100);
ctx.lineJoin="miter";
ctx.strokeRect(300,20,100,100);
</script>
    <canvas id="canvas4" width="500" height="140">
        您的浏览器不支持<code>canvas</code>!
</canvas> <script>
//设置填充和笔触样式
var ctx=document.getElementById("canvas4").getContext("2d");
var offset=10;
var size=50;
var count=5;
var lineWidth=3;
var fillColors=["black","grey","lightgrey","red","blue"];
var strokeColors=["rgb(0,0,0)","rgb(100,100,100)","rgb(200,200,200)","rgb(255,0,0)","rgb(0,0,255)"];
for(var i=0;i<count;i++){
ctx.fillStyle=fillColors[i];
ctx.strokeStyle=strokeColors[i];
ctx.fillRect(i*(offset+size)+offset,offset,size,size);
ctx.strokeRect(i*(offset+size)+offset,(2*offset)+size,size,size);
}
</script>
4) Use gradient
createRadialGradient(x0,y0,r0,x1,y1,r1 )——Create a radial gradient and return a CanvasGradient object;
CanvasGradient object
Methods: ## addColorStop(<position>,
## <canvas id="canvas5" width="500" height="140">
您的浏览器不支持<code>canvas</code>!
</canvas>
    <canvas id="canvas6" width="500" height="140">
        您的浏览器不支持<code>canvas</code>!
</canvas> <script>
//使用径向渐变
var ctx=document.getElementById("canvas6").getContext("2d");
var grad=ctx.createRadialGradient(250,70,20,200,60,100);
grad.addColorStop(0,"red");
grad.addColorStop(0.5,"white");
grad.addColorStop(1,"black");
ctx.fillStyle=grad;
ctx.fillRect(0,0,500,140);
</script>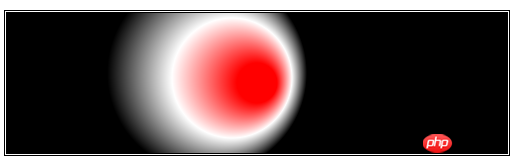
    <canvas id="canvas7" width="500" height="140">
        您的浏览器不支持<code>canvas</code>!
</canvas> <script>
//使用较小的图形和径向渐变
var ctx=document.getElementById("canvas7").getContext("2d");
var grad=ctx.createRadialGradient(250,70,20,200,60,100);
grad.addColorStop(0,"red");
grad.addColorStop(0.5,"white");
grad.addColorStop(1,"black");
ctx.fillStyle=grad;
ctx.fillRect(150,20,75,50);
ctx.lineWidth=8;
ctx.strokeStyle=grad;
ctx.strokeRect(250,20,75,50);
</script>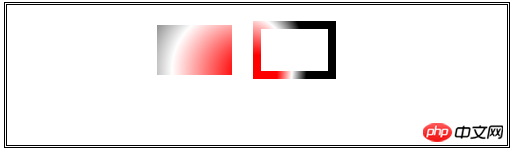
5)使用图案
createPattern(
int2的值是指定重复样式:分别有repeat、repeat-x、repeat-y、no-repeat;
    <canvas id="canvas8" width="500" height="150">
        您的浏览器不支持<code>canvas</code>!
    </canvas>
<img id="banana" hidden src="images/banana-small.png"/> <script>
//使用图像类的图案
var ctx=document.getElementById("canvas8").getContext("2d");
var imageElem=document.getElementById("banana");
var pattern=ctx.createPattern(imageElem,"repeat");
ctx.fillStyle=pattern;
ctx.fillRect(0,0,500,148);
</script>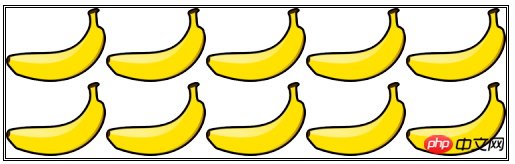
6)保存和恢复状态
save()——保存绘制状态属性的值,并把它们推入状态栈;
restore()——取出状态栈的第一组值,用它们来设置绘制状态;
    <canvas id="canvas9" width="500" height="150" preload="auto">
        您的浏览器不支持<code>canvas</code>!
    </canvas>
    <p>
        <button>Save</button>
        <button>Restore</button>
</p> <script>
//保存和恢复状态
var ctx=document.getElementById("canvas9").getContext("2d");
var grad=ctx.createLinearGradient(500,0,500,140);
grad.addColorStop(0,"red");
grad.addColorStop(0.5,"white");
grad.addColorStop(1,"black");
var colors=["black",grad,"red","green","yellow","black","grey"];
var cIndex=0;
ctx.fillStyle=colors[cIndex];
draw();
var buttons=document.getElementsByTagName("button");
for(var i=0;i<buttons.length;i++){
buttons[i].onclick=handleButtonPress;
}
function handleButtonPress(e){
switch(e.target.innerHTML){
case 'Save':
ctx.save();
cIndex=(cIndex+1)%colors.length;
ctx.fillStyle=colors[cIndex];
draw();
break;
case 'Restore':
cIndex=Math.max(0,cIndex-1);
ctx.restore();
draw();
break;
}
}
function draw(){
ctx.fillRect(0,0,500,140);
}
</script>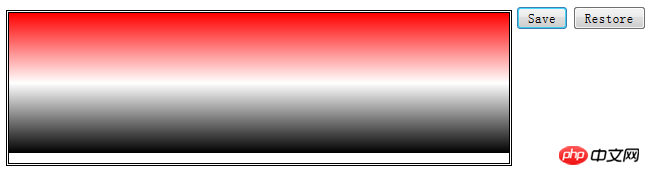
7)绘制图像
drawImage方法——在画布上绘制图像,指定一个img、canvas或video元素作为来源;
    <canvas id="canvas10" width="500" height="150" preload="auto">
        您的浏览器不支持<code>canvas</code>!
    </canvas>
<img id="banana2" hidden src="images/banana-small.png"/> <script>
//使用drawImage方法
var ctx2=document.getElementById("canvas10").getContext("2d");
var imageElement=document.getElementById("banana2");
ctx2.drawImage(imageElement,10,10);
ctx2.drawImage(imageElement,120,10,100,120);
ctx2.drawImage(imageElement,20,20,100,50,250,10,100,120);
</script>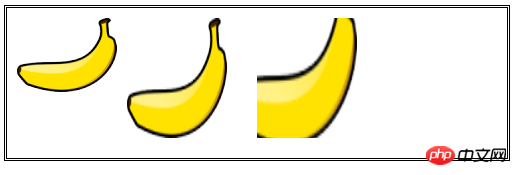
    <video id="vid" src="raw/timessquare.webm" controls preload="auto" width="360" height="240">
        您的浏览器不支持;
    </video>
    <canvas id="canvas11" width="360" height="240">
        您的浏览器不支持;
    </canvas>
    <p>
        <button id="pressme">Snapshot</button>
        <button id="pressme2">PressMe</button>
    </p>
    <canvas id="canvas12" width="360" height="240">
        您的浏览器不支持;
</canvas> <script>
//使用视频作为drawImage方法的来源
var ctx3=document.getElementById("canvas11").getContext("2d");
var imageElement3=document.getElementById("vid");
document.getElementById("pressme").onclick=function(e){
ctx3.drawImage(imageElement3,0,0,360,240);
}
var width=100;
var height=10;
ctx3.lineWidth=5;
ctx3.strokeStyle="red";
setInterval(function(){
ctx3.drawImage(imageElement3,0,0,360,240);
ctx3.strokeRect(180-(width/2),120-(height/2),width,height);
},25);
setInterval(function(){
width=(width-1)%200;
height=(height+3)%200;
},100);
</script>
<script>
//将画布作为drawImage方法的来源
var srcCanvasElement=document.getElementById("canvas11");
var ctx4=srcCanvasElement.getContext("2d");
var ctx5=document.getElementById("canvas12").getContext("2d");
var imageElement4=document.getElementById("vid");
document.getElementById("pressme2").onclick=takeSnapshot;
var width=100;
var height=10;
ctx4.lineWidth=5;
ctx4.strokeStyle="red";
ctx5.lineWidth=30;
ctx5.strokeStyle="black";
setInterval(function(){
ctx4.drawImage(imageElement4,0,0,360,240);
ctx4.strokeRect(180-(width/2),120-(height/2),width,height);
},25);
setInterval(function(){
width=(width+1)%200;
height=(height+3)%200;
},100);
function takeSnapshot(){
ctx5.drawImage(srcCanvasElement,0,0,360,240);
ctx5.strokeRect(0,0,360,240);
}
</script>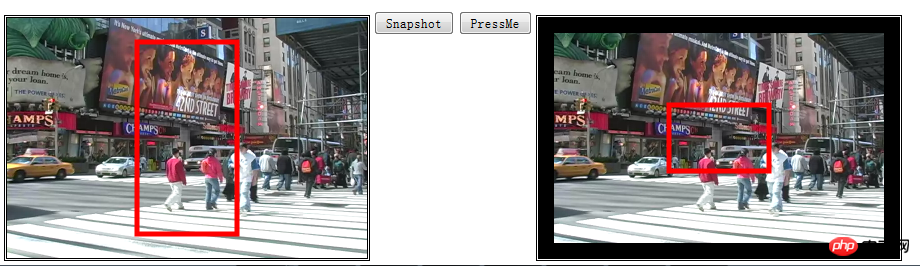
The above is the detailed content of Detailed explanation of code examples for getting started with HTML5 canvas (picture). For more information, please follow other related articles on the PHP Chinese website!

Hot AI Tools

Undresser.AI Undress
AI-powered app for creating realistic nude photos

AI Clothes Remover
Online AI tool for removing clothes from photos.

Undress AI Tool
Undress images for free

Clothoff.io
AI clothes remover

Video Face Swap
Swap faces in any video effortlessly with our completely free AI face swap tool!

Hot Article
Hot Tools

Notepad++7.3.1
Easy-to-use and free code editor

SublimeText3 Chinese version
Chinese version, very easy to use

Zend Studio 13.0.1
Powerful PHP integrated development environment

Dreamweaver CS6
Visual web development tools

SublimeText3 Mac version
God-level code editing software (SublimeText3)
Hot Topics
 1386
1386
 52
52

 Table Border in HTML
Sep 04, 2024 pm 04:49 PM
Table Border in HTML
Sep 04, 2024 pm 04:49 PM
Guide to Table Border in HTML. Here we discuss multiple ways for defining table-border with examples of the Table Border in HTML.
 HTML margin-left
Sep 04, 2024 pm 04:48 PM
HTML margin-left
Sep 04, 2024 pm 04:48 PM
Guide to HTML margin-left. Here we discuss a brief overview on HTML margin-left and its Examples along with its Code Implementation.
 Nested Table in HTML
Sep 04, 2024 pm 04:49 PM
Nested Table in HTML
Sep 04, 2024 pm 04:49 PM
This is a guide to Nested Table in HTML. Here we discuss how to create a table within the table along with the respective examples.
 HTML Table Layout
Sep 04, 2024 pm 04:54 PM
HTML Table Layout
Sep 04, 2024 pm 04:54 PM
Guide to HTML Table Layout. Here we discuss the Values of HTML Table Layout along with the examples and outputs n detail.
 HTML Input Placeholder
Sep 04, 2024 pm 04:54 PM
HTML Input Placeholder
Sep 04, 2024 pm 04:54 PM
Guide to HTML Input Placeholder. Here we discuss the Examples of HTML Input Placeholder along with the codes and outputs.
 HTML Ordered List
Sep 04, 2024 pm 04:43 PM
HTML Ordered List
Sep 04, 2024 pm 04:43 PM
Guide to the HTML Ordered List. Here we also discuss introduction of HTML Ordered list and types along with their example respectively
 Moving Text in HTML
Sep 04, 2024 pm 04:45 PM
Moving Text in HTML
Sep 04, 2024 pm 04:45 PM
Guide to Moving Text in HTML. Here we discuss an introduction, how marquee tag work with syntax and examples to implement.
 HTML onclick Button
Sep 04, 2024 pm 04:49 PM
HTML onclick Button
Sep 04, 2024 pm 04:49 PM
Guide to HTML onclick Button. Here we discuss their introduction, working, examples and onclick Event in various events respectively.
