Home Web Front-end H5 Tutorial Detailed introduction of HTML5+CSS3 to realize drag-and-drop upload of images without plug-in (supports preview and batch)

Detailed introduction of HTML5+CSS3 to realize drag-and-drop upload of images without plug-in (supports preview and batch)

Mar 15, 2017 pm 04:33 PM

This article mainly introduces HTML5+CSS3 to implement plug-in drag and dropUploading images (supports preview and batch), now html5 provides API and File, FileReader, XMLHttpRequest and other powerful APIs provide the possibility for us to drag and drop to upload. Those who are interested can find out.

Uploading is basically something that often occurs in projects, generally using:

1, formsubmission

2, flash

3, HTML5

form submission will refresh the page, making it difficult to upload asynchronously; flash may be used more because it can take into account almost all For browsers, I have always used jQuery's uploadify as the upload tool in the project. Uploadify is also based on Html5 and seems to be charged. You can go to the official website to take a look; of course , now html5 provides API and powerful APIs such as File, FileReader, XMLHttpRequest, etc., making it possible for us to drag and drop uploads.
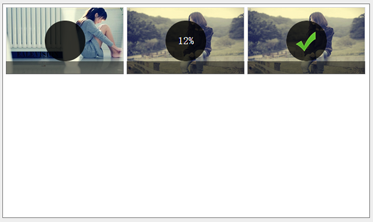
Rendering 1:

Detailed introduction of HTML5+CSS3 to realize drag-and-drop upload of images without plug-in (supports preview and batch)

##Rendering 2:

Detailed introduction of HTML5+CSS3 to realize drag-and-drop upload of images without plug-in (supports preview and batch)

Because the local upload is too fast , I recorded an 80M gif, and I can finally see the detailed effect of the upload. Isn’t it still very good?

Due to a lot of code:

This piece mainly talks about HTML and CSS:

HTML code:


<!DOCTYPE html>  
<html>  
<head>  
    <title></title>  
    <meta charset="utf-8"/>  
    <link href="reset.css" type="text/css" rel="stylesheet"/>  
    <link href="01.css" type="text/css" rel="stylesheet"/>  
  
</head>  
<body>  
  
  
<p id="uploadBox">  
    <ul>  
        <li>  
            <img src="images/pic1.jpg"/>  
            <span class="progress"></span>  
            <span class="percentage"></span>  
        </li>  
  
  
        <li>  
            <img src="images/pic2.jpg"/>  
            <span class="progress"></span>  
            <span class="percentage">12%</span>  
        </li>  
  
  
        <li class="done">  
            <img src="images/pic2.jpg"/>  
            <span class="progress"></span>  
            <span class="percentage"></span>  
        </li>  
  
        <p class="clearfix"></p>  
    </ul>  
  
</p>  
  
</body>  
</html>
Copy after login

It’s still very simple:

a, a p#uploadBox, in which ul li represents each uploaded image unit

b, li img image

c, li span. progress is used to display progress, with the effect of rising water, from

height:0% -100%;

d, li span.percentage is used to display 1% to 100 in the center of the picture % number, when it reaches 100%, display a correct picture

CSS:


body  
{  
    background: #eee;  
}  
  
#uploadBox  
{  
    width: 622px;  
    height: 362px;  
    background-color: #fff;  
    border: 1px solid #777;  
    margin: 120px auto;  
}  
  
#uploadBox ul li  
{  
    float: left;  
    position: relative;  
    margin-left: 5px;  
    margin-top: 5px;  
}  
  
#uploadBox  li img  
{  
    border: 1px solid #D1D1D1;  
    width: 198px;  
    height: 112px;  
    vertical-align: middle;  
}  
  
#uploadBox  li  .percentage  
{  
    width: 69px;  
    height: 69px;  
    position: absolute;  
    left: 50%;  
    top: 50%;  
    margin-left: -34.5px;  
    margin-top: -34.5px;  
    text-align: center;  
    font-size: 18px;  
    line-height: 69px;  
    color: #fff;  
    border-radius: 34.5px;  
    background: rgba(0, 0, 0, .8);  
}  
  
#uploadBox  li.done .percentage  
{  
    background: url("images/done.png") no-repeat 0 0;  
    text-indent: -1000em;  
}  
  
#uploadBox li .progress  
{  
    position: absolute;  
    height: 22.4px;  
    bottom: 0px;  
    width: 200px;  
    background: #000;  
    opacity: .5;  
}  
  
.clearfix  
{  
    clear: both;  
}
Copy after login

are relatively simple, basically a simple use of positioning ~Please take a look for yourself~

Final rendering:

Detailed introduction of HTML5+CSS3 to realize drag-and-drop upload of images without plug-in (supports preview and batch)

The above is the detailed content of Detailed introduction of HTML5+CSS3 to realize drag-and-drop upload of images without plug-in (supports preview and batch). For more information, please follow other related articles on the PHP Chinese website!

Statement of this Website
The content of this article is voluntarily contributed by netizens, and the copyright belongs to the original author. This site does not assume corresponding legal responsibility. If you find any content suspected of plagiarism or infringement, please contact admin@php.cn

Hot AI Tools

Undresser.AI Undress

Undresser.AI Undress

AI-powered app for creating realistic nude photos

AI Clothes Remover

AI Clothes Remover

Online AI tool for removing clothes from photos.

Undress AI Tool

Undress AI Tool

Undress images for free

Clothoff.io

Clothoff.io

AI clothes remover

AI Hentai Generator

AI Hentai Generator

Generate AI Hentai for free.

Hot Article

R.E.P.O. Energy Crystals Explained and What They Do (Yellow Crystal)
3 weeks ago By 尊渡假赌尊渡假赌尊渡假赌
R.E.P.O. Best Graphic Settings
3 weeks ago By 尊渡假赌尊渡假赌尊渡假赌
R.E.P.O. How to Fix Audio if You Can't Hear Anyone
3 weeks ago By 尊渡假赌尊渡假赌尊渡假赌

Hot Tools

Notepad++7.3.1

Notepad++7.3.1

Easy-to-use and free code editor

SublimeText3 Chinese version

SublimeText3 Chinese version

Chinese version, very easy to use

Zend Studio 13.0.1

Zend Studio 13.0.1

Powerful PHP integrated development environment

Dreamweaver CS6

Dreamweaver CS6

Visual web development tools

SublimeText3 Mac version

SublimeText3 Mac version

God-level code editing software (SublimeText3)

Table Border in HTML Table Border in HTML Sep 04, 2024 pm 04:49 PM

Guide to Table Border in HTML. Here we discuss multiple ways for defining table-border with examples of the Table Border in HTML.

Nested Table in HTML Nested Table in HTML Sep 04, 2024 pm 04:49 PM

This is a guide to Nested Table in HTML. Here we discuss how to create a table within the table along with the respective examples.

HTML margin-left HTML margin-left Sep 04, 2024 pm 04:48 PM

Guide to HTML margin-left. Here we discuss a brief overview on HTML margin-left and its Examples along with its Code Implementation.

HTML Table Layout HTML Table Layout Sep 04, 2024 pm 04:54 PM

Guide to HTML Table Layout. Here we discuss the Values of HTML Table Layout along with the examples and outputs n detail.

HTML Ordered List HTML Ordered List Sep 04, 2024 pm 04:43 PM

Guide to the HTML Ordered List. Here we also discuss introduction of HTML Ordered list and types along with their example respectively

Moving Text in HTML Moving Text in HTML Sep 04, 2024 pm 04:45 PM

Guide to Moving Text in HTML. Here we discuss an introduction, how marquee tag work with syntax and examples to implement.

HTML Input Placeholder HTML Input Placeholder Sep 04, 2024 pm 04:54 PM

Guide to HTML Input Placeholder. Here we discuss the Examples of HTML Input Placeholder along with the codes and outputs.

HTML onclick Button HTML onclick Button Sep 04, 2024 pm 04:49 PM

Guide to HTML onclick Button. Here we discuss their introduction, working, examples and onclick Event in various events respectively.

See all articles