Home > WeChat Applet > WeChat Development > About the WeChat public account payment implementation code of WeChat payment PHP SDK

About the WeChat public account payment implementation code of WeChat payment PHP SDK

高洛峰
Release: 2017-03-16 15:27:41
Original
3499 people have browsed it

This article mainly introduces the relevant information about the WeChat public account payment implementation code of WeChat payment PHP SDK. Friends in need can refer to it

It is assumed that you have already applied for WeChat payment

1. WeChat background configuration As shown in the figure

关于微信支付PHP SDK之微信公众号支付实现代码

We will test first, so first put the test authorization directory and Test whitelist added. The test authorization directory is the directory where the file you want to initiate a WeChat request is located.

For examplejsapi The request is usually made to the directory where jsapi.php is located, which is the test directory. The test whitelist is the developer's WeChat ID.

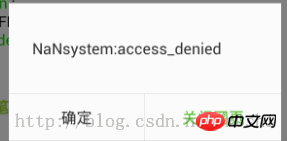
The official payment authorization directory cannot be the same as the one tested, otherwise an error will be reported. Failure to fill in or fill in the wrong authorization directory and test whitelist will result in an error.

Error report example:

NaNsystem:access_denied
关于微信支付PHP SDK之微信公众号支付实现代码

## is not in the test whitelist

关于微信支付PHP SDK之微信公众号支付实现代码

2. Configure the lib/WxPay.Config.php file

The most important configuration is the following four items:


const APPID = '';

const MCHID = '';
const
KEY = '';const APPSECRET = '';
APPID and APPSECRET can both be found in the WeChat backend .
MCHID can be found in the email sent after applying for WeChat payment. KEY can be configured on the merchant platform according to the email prompt

关于微信支付PHP SDK之微信公众号支付实现代码

.

3. Access the starting index.php

First access index.php and you can see the interface

关于微信支付PHP SDK之微信公众号支付实现代码

The first thing we need is JSAPI payment. But look at the link at the bottom of the code index.php. It defaults to a demo link. You can change it to our customized one


<ul>
  <li style="background-color:#FF7F24"><a href="<?php echo &#39;http://&#39;.$_SERVER[&#39;HTTP_HOST&#39;].$_SERVER[&#39;REQUEST_URI&#39;].&#39;example/jsapi.php&#39;;?>">JSAPI支付</a></li>
  <li style="background-color:#698B22"><a href="<?php echo &#39;http://&#39;.$_SERVER[&#39;HTTP_HOST&#39;].$_SERVER[&#39;REQUEST_URI&#39;].&#39;example/micropay.php&#39;;?>">刷卡支付</a></li>
  <li style="background-color:#8B6914"><a href="<?php echo &#39;http://&#39;.$_SERVER[&#39;HTTP_HOST&#39;].$_SERVER[&#39;REQUEST_URI&#39;].&#39;example/native.php&#39;;?>">扫码支付</a></li>
  <li style="background-color:#CDCD00"><a href="<?php echo &#39;http://&#39;.$_SERVER[&#39;HTTP_HOST&#39;].$_SERVER[&#39;REQUEST_URI&#39;].&#39;example/orderquery.php&#39;;?>">订单查询</a></li>
  <li style="background-color:#CD3278"><a href="<?php echo &#39;http://&#39;.$_SERVER[&#39;HTTP_HOST&#39;].$_SERVER[&#39;REQUEST_URI&#39;].&#39;example/refund.php&#39;;?>">订单退款</a></li>
  <li style="background-color:#848484"><a href="<?php echo &#39;http://&#39;.$_SERVER[&#39;HTTP_HOST&#39;].$_SERVER[&#39;REQUEST_URI&#39;].&#39;example/refundquery.php&#39;;?>">退款查询</a></li>
  <li style="background-color:#8EE5EE"><a href="<?php echo &#39;http://&#39;.$_SERVER[&#39;HTTP_HOST&#39;].$_SERVER[&#39;REQUEST_URI&#39;].&#39;example/download.php&#39;;?>">下载订单</a></li>
</ul>
Copy after login

Of course, you can also directly write it as your own access link.

4. JSAPI payment

Necessary code analysis:


$logHandler= new CLogFileHandler("../logs/".date(&#39;Y-m-d&#39;).&#39;.log&#39;);
$log = Log::Init($logHandler, 15);
Copy after login

Call

Log class You can print debugging information through $log->DEBUG('test');. In fact, you can also use $Log::DEBUG('test'); directly to debug


$tools = new JsApiPay();
$openId = $tools->GetOpenid();
Copy after login

Mainly to get openid Among them, GetOpenid()

Function Defined in the file WxPay.JsApiPay.php file


public function GetOpenid()
 {
 //通过code获得openid
 if (!isset($_GET[&#39;code&#39;])){
  //触发微信返回code码
  $baseUrl = urlencode(&#39;http://&#39;.$_SERVER[&#39;HTTP_HOST&#39;].$_SERVER[&#39;PHP_SELF&#39;].$_SERVER[&#39;QUERY_STRING&#39;]);
  $url = $this->CreateOauthUrlForCode($baseUrl);
  Header("Location: $url");
  exit();
 } else {
  //获取code码,以获取openid
   $code = $_GET[&#39;code&#39;];
  $openid = $this->getOpenidFromMp($code);
  return $openid;
 }
 }
Copy after login

$baseUrl is actually to jump back to this page. You can continue to track the function CreateOauthUrlForCode(). In fact, you can obtain Openid through WeChat’s Auth2.0

Reference link: http://mp.weixin.qq.com/wiki/17/c0f37d5704f0b64713d5d2c37b468d75.html

This requires you to set up WeChat’s web authorization

interface.

After obtaining the Openid, you can call the unified ordering interface of WeChat Pay. Go back to the file jsapi.php and the following code


$input = new WxPayUnifiedOrder();
$input->SetBody("test");
$input->SetAttach("test");
$input->SetOut_trade_no(WxPayConfig::MCHID.date("YmdHis"));
$input->SetTotal_fee("1");
$input->SetTime_start(date("YmdHis"));
$input->SetTime_expire(date("YmdHis", time() + 600));
$input->SetGoods_tag("test");
$input->SetNotify_url("http://paysdk.weixin.qq.com/example/notify.php");
$input->SetTrade_type("JSAPI");
$input->SetOpenid($openId);
$order = WxPayApi::unifiedOrder($input);
echo &#39;<font color="#f00"><b>统一下单支付单信息</b></font><br/>&#39;;
printf_info($order);
$jsApiParameters = $tools->GetJsApiParameters($order);
Copy after login

The code inside:

##

$input->SetAttach("test");
Copy after login
Copy after login

If you change the value to $input->SetAttach("test this is attach"); There will be a bug. I will talk about it later. In fact, this parameter is not necessary and can be simply removed.

Code:

$input->SetNotify_url(http://paysdk.weixin.qq.com/example/notify.php);
Copy after login

is the Url set to receive payment result notifications. Here is the default demo link. We can set it to ours:


$input->SetNotify_url(dirname(&#39;http://&#39;.$_SERVER[&#39;HTTP_HOST&#39;].$_SERVER[&#39;REQUEST_URI&#39;]).&#39;/notify.php&#39;);
Copy after login

当然你也可以选择直接写死。
其中的函数 unifiedOrder($input) 可以到WxPay.Api.php 中文件跟踪,其实就是调用统一下单接口。

在 WxPay.Api.php 中需要更改的一处代码是:


//异步通知url未设置,则使用配置文件中的url
    if(!$inputObj->IsNotify_urlSet()){
      $inputObj->SetNotify_url(WxPayConfig::NOTIFY_URL);//异步通知url
    }
Copy after login

就是当没设置 notifyUrl 的时候回去配置文件中找,但是配置文件中根本没有设置。

所以你可以选择在 配置文件WxPay.Config.php 中加上这个配置,也可以直接写一个默认的notify链接。

函数 GetJsApiParameters() 是获取jsApi支付的参数给变量 $jsApiParameters 方便在下面的Js中调用

jsapi.php 中js的代码:


function jsApiCall()
 {
 WeixinJSBridge.invoke(
  &#39;getBrandWCPayRequest&#39;,
  <?php echo $jsApiParameters; ?>,
  function(res){
  WeixinJSBridge.log(res.err_msg);
  alert(res.err_code+res.err_desc+res.err_msg);
  }
 );
 }
 function callpay()
 {
 if (typeof WeixinJSBridge == "undefined"){
   if( document.addEventListener ){
     document.addEventListener(&#39;WeixinJSBridgeReady&#39;, jsApiCall, false);
   }else if (document.attachEvent){
     document.attachEvent(&#39;WeixinJSBridgeReady&#39;, jsApiCall); 
     document.attachEvent(&#39;onWeixinJSBridgeReady&#39;, jsApiCall);
   }
 }else{
   jsApiCall();
 }
 }
Copy after login

其中点击立即支付按钮调用的就是 callpay() 函数,他有会调用jsApiCall() 函数打开支付程序。
此后输入密码完成支付。

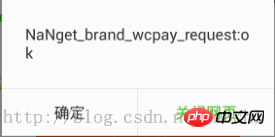
在完成支付页面点击完成会回到这个支付页面,并弹出 支付成功的提示框
关于微信支付PHP SDK之微信公众号支付实现代码

这个其实就是 js函数 jsApiCall 里面的alter 弹出的对话框

其中 res.err_msg 为get_brand_wcpay_request:ok 表明前端判断的支付成功,我们可以根据这个将支付跳转到成功页面。

但是这个并不可信。确认是否支付成功还是应当 通过notify.php 处理业务逻辑。

5. 支付结果通知 notify.php

其实这个页面最主要的代码就两行


$notify = new PayNotifyCallBack();
$notify->Handle(false);
Copy after login

其中大部分逻辑在 Handle 函数中处理 文件 WxPay.Notify.php


final public function Handle($needSign = true)
 {
 $msg = "OK";
 //当返回false的时候,表示notify中调用NotifyCallBack回调失败获取签名校验失败,此时直接回复失败
 $result = WxpayApi::notify(array($this, &#39;NotifyCallBack&#39;), $msg);
 if($result == false){
  $this->SetReturn_code("FAIL");
  $this->SetReturn_msg($msg);
  $this->ReplyNotify(false);
  return;
 } else {
  //该分支在成功回调到NotifyCallBack方法,处理完成之后流程
  $this->SetReturn_code("SUCCESS");
  $this->SetReturn_msg("OK");
 }
 $this->ReplyNotify($needSign);
 }
Copy after login

主要代码:


$result = WxpayApi::notify(array($this, &#39;NotifyCallBack&#39;), $msg);
Copy after login

跟踪函数 notify 文件WxPay.Api.php


public static function notify($callback, &$msg)
 {
 //获取通知的数据
 $xml = $GLOBALS[&#39;HTTP_RAW_POST_DATA&#39;];
 //如果返回成功则验证签名
 try {
  $result = WxPayResults::Init($xml);
 } catch (WxPayException $e){
  $msg = $e->errorMessage();
  return false;
 }
 
 return call_user_func($callback, $result);
 }
Copy after login

通过 $GLOBALS[‘HTTP_RAW_POST_DATA‘]; 获取同志数据 然后 Init 函数验证签名等。验签成功运行代码


return call_user_func($callback, $result);
Copy after login

即调用了一个回调函数,NotifyCallBack() 函数并传递参数 $result 在NotifyCallBack函数中会调用我们重写的NotifyProcess()函数(此函数在notify.php 中被重写)

NotifyProcess() 判断也没有问题就会 设置返回 success的xml信息


$this->SetReturn_code("SUCCESS");
$this->SetReturn_msg("OK");
Copy after login

并最终调用函数 $this->ReplyNotify($needSign); echo success的结果

函数ReplyNotify 需要修改一处代码:


final private function ReplyNotify($needSign = true)
 {
 //如果需要签名
 if($needSign == true && 
  $this->GetReturn_code($return_code) == "SUCCESS")
 {
  $this->SetSign();
 }
 WxpayApi::replyNotify($this->ToXml());
 }

$this->GetReturn_code($return_code) == "SUCCESS")
Copy after login

改为


$this->GetReturn_code() == "SUCCESS")
Copy after login

即可。

这样整个流程就结束了。上面提到了 传递订单参数


$input->SetAttach("test");
Copy after login
Copy after login

如果我设置 值为 test this is attach (其实只要有空格就会存在bug)
如图 传递的订单信息

关于微信支付PHP SDK之微信公众号支付实现代码

可以看到 attach 信息正常,当然支付也是正常的没有任何问题。

但是发现总是会收到notify 通知,即意味着没有返回给微信服务器正确的结果通知。

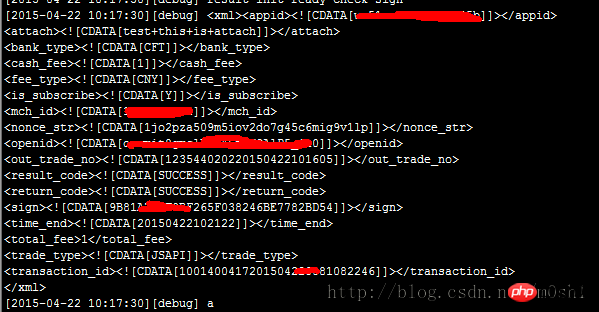
打印服务器发来的通知数据
关于微信支付PHP SDK之微信公众号支付实现代码

可以看到 attach 是 test+this+is+attach 即空格被转化为加号

打印接收到的签名和程序算出来的签名发现 签名不同,即认为接收结果异常。

所以我们要是想使用attach 这个值就不能有空格,要么干脆不使用这个参数

(等待微信修复这个bug, 也可能是我这边有哪个地方不会? - -#)

这样 微信支付的 JsApi支付就大致分析完成了。

The above is the detailed content of About the WeChat public account payment implementation code of WeChat payment PHP SDK. For more information, please follow other related articles on the PHP Chinese website!

Related labels:
source:php.cn
Statement of this Website
The content of this article is voluntarily contributed by netizens, and the copyright belongs to the original author. This site does not assume corresponding legal responsibility. If you find any content suspected of plagiarism or infringement, please contact admin@php.cn
Popular Tutorials
More>
Latest Downloads
More>
Web Effects
Website Source Code
Website Materials
Front End Template