 Backend Development
 C#.Net Tutorial
 Detailed introduction to the method of using C# to implement Windows Form calling R for drawing and display (picture)
Detailed introduction to the method of using C# to implement Windows Form calling R for drawing and display (picture)
It is well known that R software is very powerful and can perform various statistics and output graphics. The following introduces a method for communication between R language and C#, and a method for displaying R drawing results on the WinForm UI interface. The article introduces It's very detailed, friends in need can refer to it.
1. Prerequisite preparation
#To install R software, you need to install 32-bit R software, and an error will be reported if you call 64-bit. The other thing is to add R to the computer environment variables.
Open the R software and install the scatterplot3d package. This R package is required for the demonstration.
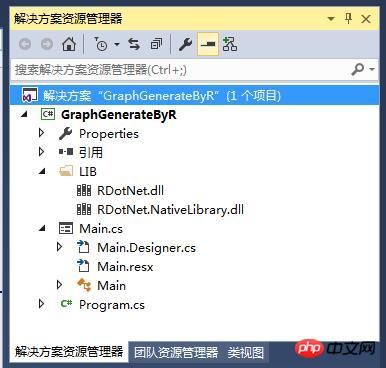
2. Create the projectGraphGenerateByR, the project structure is as follows:

##Note: You need to introduce RDotNet class library here, you can download it yourself: http://rdotnet.codeplex.com/
3. Main form code
using System;
using System.Collections.Generic;
using System.ComponentModel;
using System.Data;
using System.Drawing;
using System.Linq;
using System.Text;
using System.Windows.Forms;
namespace GraphGenerateByR
{
using RDotNet;
public partial class Main : Form
{
public Main()
{
InitializeComponent();
}
REngine engine = null;
string Rcode = "";
private void btnPlot_Click(object sender, EventArgs e)
{
try
{
if(this.txtRcode.Text=="")
{
Rcode = @"library('scatterplot3d')
z <- seq(-10, 10, 0.01)
x <- cos(z)
y <- sin(z)
scatterplot3d(x, y, z, highlight.3d=TRUE, col.axis='blue', col.grid='lightblue',main='3d绘图',pch=20)
";
}
else
{
Rcode = this.txtRcode.Text;
}
//R.3.2.4
engine = REngine.GetInstance();
engine.Initialize();
//图片加入GUID,防止重名(还有一种就是先删除后保存)
string rnd = System.Guid.NewGuid().ToString().Replace("-", "");
string filename ="i"+ rnd+ "Rimage.png";
engine.Evaluate(string.Format("png(file='{0}',bg ='transparent',width={1},height={2})", filename, this.ptbGraphic.Width, this.ptbGraphic.Height));
//engine.Evaluate(@"x <- (0:12) * pi / 12
// y <- cos(x)
// plot(x,y);
// ");
engine.Evaluate(Rcode);
engine.Evaluate("dev.off()");
string path = System.IO.Path.GetFullPath(filename);
Bitmap image = new Bitmap(path);
ptbGraphic.Image = image;
}
catch(Exception ex)
{
MessageBox.Show(ex.Message);
}
}
private void Main_FormClosing(object sender, FormClosingEventArgs e)
{
if(engine!=null)
{
//clean up
engine.Dispose();
}
}
}
}4. Run:
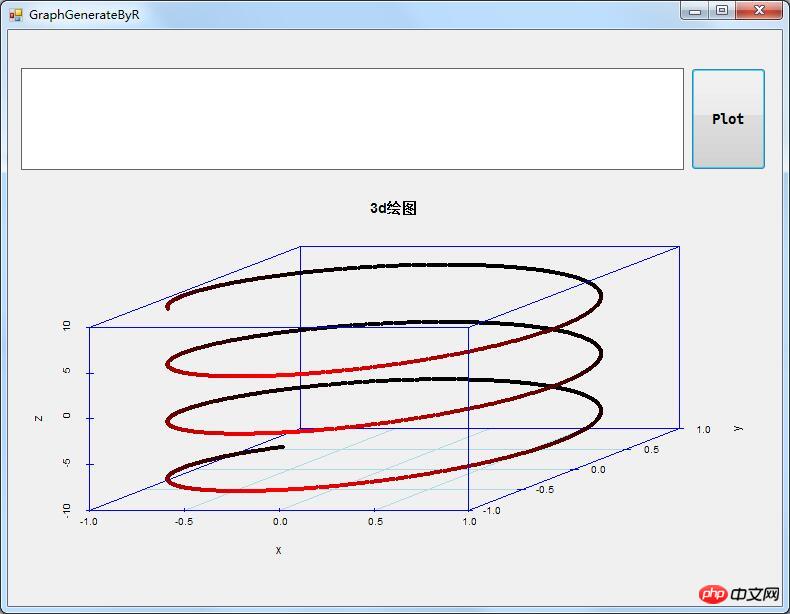
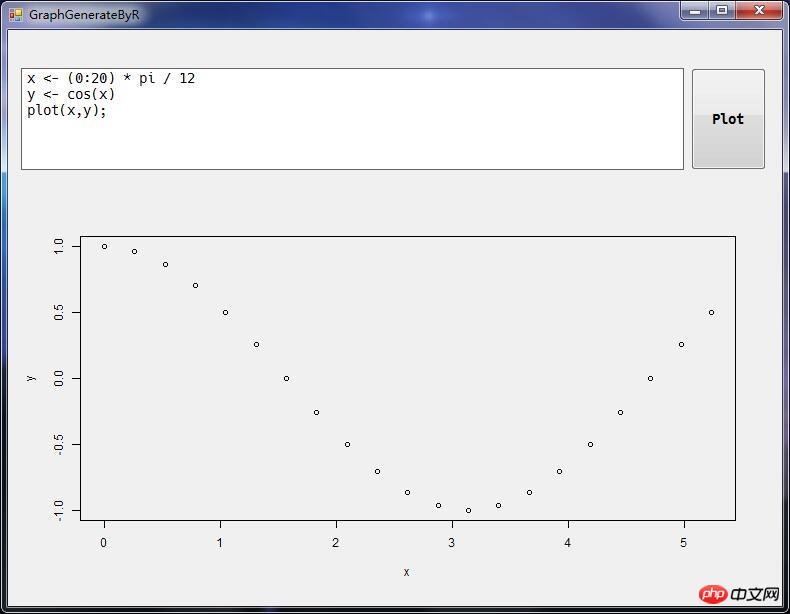
After clicking plot, call the default R code, the structure is as follows:

##Summarize
The above is the detailed content of Detailed introduction to the method of using C# to implement Windows Form calling R for drawing and display (picture). For more information, please follow other related articles on the PHP Chinese website!

Hot AI Tools

Undresser.AI Undress
AI-powered app for creating realistic nude photos

AI Clothes Remover
Online AI tool for removing clothes from photos.

Undress AI Tool
Undress images for free

Clothoff.io
AI clothes remover

AI Hentai Generator
Generate AI Hentai for free.

Hot Article

Hot Tools

Notepad++7.3.1
Easy-to-use and free code editor

SublimeText3 Chinese version
Chinese version, very easy to use

Zend Studio 13.0.1
Powerful PHP integrated development environment

Dreamweaver CS6
Visual web development tools

SublimeText3 Mac version
God-level code editing software (SublimeText3)

Hot Topics
 1377
1377
 52
52
 The difference between multithreading and asynchronous c#
Apr 03, 2025 pm 02:57 PM
The difference between multithreading and asynchronous is that multithreading executes multiple threads at the same time, while asynchronously performs operations without blocking the current thread. Multithreading is used for compute-intensive tasks, while asynchronously is used for user interaction. The advantage of multi-threading is to improve computing performance, while the advantage of asynchronous is to not block UI threads. Choosing multithreading or asynchronous depends on the nature of the task: Computation-intensive tasks use multithreading, tasks that interact with external resources and need to keep UI responsiveness use asynchronous.
 How to open xml format
Apr 02, 2025 pm 09:00 PM
Use most text editors to open XML files; if you need a more intuitive tree display, you can use an XML editor, such as Oxygen XML Editor or XMLSpy; if you process XML data in a program, you need to use a programming language (such as Python) and XML libraries (such as xml.etree.ElementTree) to parse.
 Four ways to implement multithreading in C language
Apr 03, 2025 pm 03:00 PM
Multithreading in the language can greatly improve program efficiency. There are four main ways to implement multithreading in C language: Create independent processes: Create multiple independently running processes, each process has its own memory space. Pseudo-multithreading: Create multiple execution streams in a process that share the same memory space and execute alternately. Multi-threaded library: Use multi-threaded libraries such as pthreads to create and manage threads, providing rich thread operation functions. Coroutine: A lightweight multi-threaded implementation that divides tasks into small subtasks and executes them in turn.
 What are the differences and connections between c and c#?
Apr 03, 2025 pm 10:36 PM
Although C and C# have similarities, they are completely different: C is a process-oriented, manual memory management, and platform-dependent language used for system programming; C# is an object-oriented, garbage collection, and platform-independent language used for desktop, web application and game development.
 C# multi-threaded method to prevent jamming
Apr 03, 2025 pm 02:54 PM
The following ways to avoid "stuck" multithreading in C#: avoid time-consuming operations on UI threads. Use Task and async/await to perform time-consuming operations asynchronously. Update the UI on the UI thread via Application.Current.Dispatcher.Invoke. Use the CancellationToken to control task cancellation. Make rational use of thread pools to avoid excessive creation of threads. Pay attention to code readability and maintainability, making it easy to debug. Logs are recorded in each thread for easy debugging.
 How to convert xml into word
Apr 03, 2025 am 08:15 AM
There are three ways to convert XML to Word: use Microsoft Word, use an XML converter, or use a programming language.
 Advanced C# .NET: Concurrency, Parallelism, and Multithreading Explained
Apr 03, 2025 am 12:01 AM
C#.NET provides powerful tools for concurrent, parallel and multithreaded programming. 1) Use the Thread class to create and manage threads, 2) The Task class provides more advanced abstraction, using thread pools to improve resource utilization, 3) implement parallel computing through Parallel.ForEach, 4) async/await and Task.WhenAll are used to obtain and process data in parallel, 5) avoid deadlocks, race conditions and thread leakage, 6) use thread pools and asynchronous programming to optimize performance.
 How to change the format of xml
Apr 03, 2025 am 08:42 AM
There are several ways to modify XML formats: manually editing with a text editor such as Notepad; automatically formatting with online or desktop XML formatting tools such as XMLbeautifier; define conversion rules using XML conversion tools such as XSLT; or parse and operate using programming languages such as Python. Be careful when modifying and back up the original files.


