
 Database
Mysql Tutorial
Detailed explanation of MySQL installation tutorial in Linux centos7 environment (picture)
Database
Mysql Tutorial
Detailed explanation of MySQL installation tutorial in Linux centos7 environment (picture)
Detailed explanation of MySQL installation tutorial in Linux centos7 environment (picture)

This article mainly introduces the MySQL installation tutorial in the Linux centos7 environment in detail. It has certain reference value. Interested friends can refer to the detailed steps of installing MySQL in the Linux centos7 environment.
Introduction
Installing MySQL
Mysql has two differences from windows
1), save my.ini to /etc/ my.ini
2), user permissions, single user execution
1. Find whether mysql has been installed before, use the following command:
rpm –qa | grep -i mysql
If the following package is displayed, it means mysql has been installed
mysql-4.1.12-3.RHEL4.1
mysqlclient10-3.23.58-4.RHEL4.1
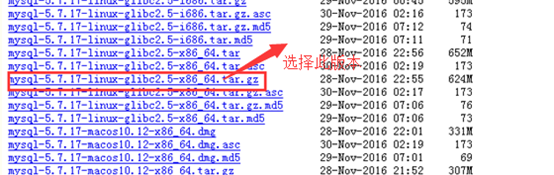
2. Download the mysql decompression package
mysql-5.7.17-linux-glibc2.5-x86_64 .tar (go to http://mirrors.sohu.com to download)
URL: http://mirrors.sohu.com/mysql/MySQL-5.7/
You can also download it under the Linux operating system. Enter the following command
wget http://mirrors.sohu.com/mysql/MySQL-5.7/mysql-5.7.17-linux-glibc2.5-x86_64.tar.gz
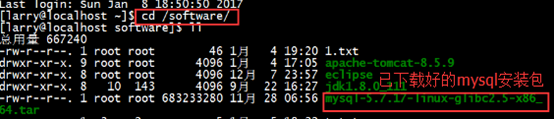
Create the directory software to store the mysql package we will download later. First go to the directory and enter the command: cd /software
After the download is completed, you will see an extra mysql installation package file in the software directory
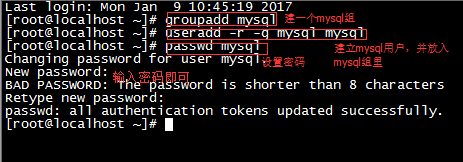
3. Create a user and mysql directory
1. groupadd mysql #Create a mysql group
2. useradd -r -g mysqlmysql #Create a mysql user and put the user in the mysql group
3, passwd mysql #Set a password for the mysql user
4. Unzip the mysql installation package
1. First move the tar.gz package to the /usr/local directory and enter the command
mv /software/MySQL/mysql-5.7.17-linux-glibc2.5-x86_64.tar.gz/usr/local

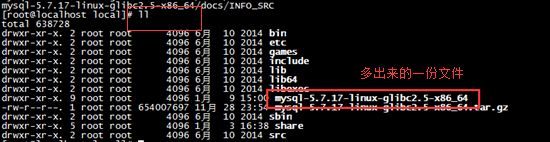
2. Decompress the tar.gz package
First go to the /usr/local directory and enter the command cd /usr/local
Decompression command tarzxvfmysql-5.7.17-linux-glibc2.5-x86_64.tar.gz

Enter the view directory command ll
and you will find that there are more Directorymysql-5.7.17-linux-glibc2.5-x86_64
##Note: No data directory, the my.ini file is in the support-files directory
3. Change the directory name to /usr/local/mysql (This is the default installation directory for mysql under Linux) Change the name of the decompressed file to mysqlEnter the command: mv mysql-5.7.17-linux-glibc2.5-x86_64 mysql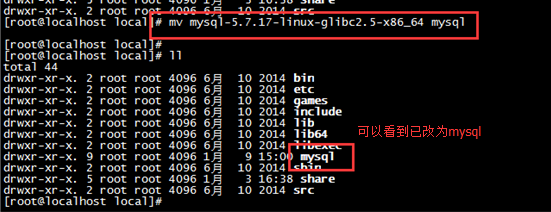
5. Configure related startup configuration files
First go to the support-files/file directoryEnter the command: cd support- files/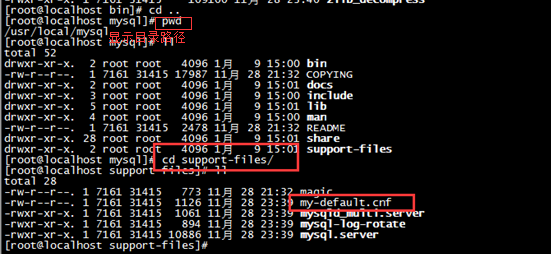
cpmy -default.cnf /etc/my.cnf


vi /etc/my.cnf (Enter editable state)
Change: [mysql]default-character-set=utf8 (Indicating solving the problem of garbled characters on the client side) [mysqld]default-storage-engine=INNODBcharacter_set_server=utf8 (Indicating solving the problem of garbled characters on the server side)

cp mysql.server /etc/init.d/mysql (mysql is the service name)
Note: /etc/init.d/ directory, equivalent to the registry HKEY_LOCAL_MACHINE\SYSTEM\ControlSet001 \services records which services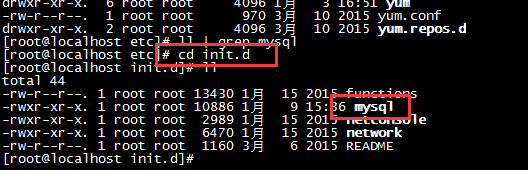
vi /etc/init. d/mysql
Give two directory locationsbasedir=/usr/local/mysqldatadir=/usr/local/mysql/data
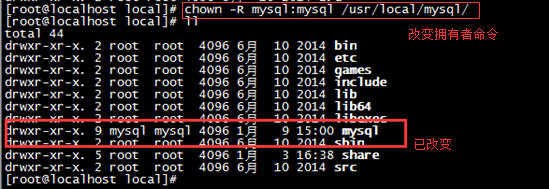
chown -R mysql:mysql /usr/local/mysql/
六、初始化mysql的数据库
1、初始化mysql
mysql_install_db (老版本的做法)
新版本: 初始化
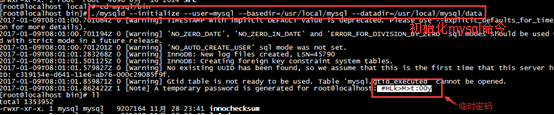
输入命令 ./mysqld --initialize --user=mysql--basedir=/usr/local/mysql --datadir=/usr/local/mysql/data
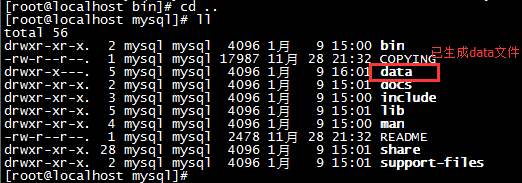
生成出一个data目录,代表数据库已经初始化成功
并且mysql的root用户生成一个临时密码:(记录下临时密码XXX)
2、给数据库加密
输入命令 ./mysql_ssl_rsa_setup --datadir=/usr/local/mysql/data

3、启动mysql
输入命令 ./mysqld_safe --user=mysql & (&符表示提交到后台运行mysql服务)

七、进入客户端
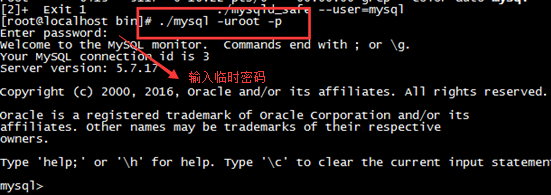
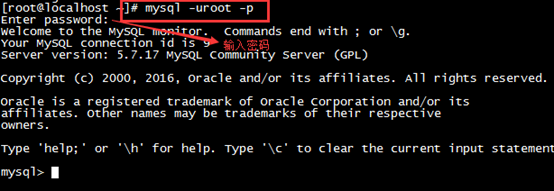
1、登录
输入命令 ./mysql -uroot -p
然后再输入你的临时密码
2、修改密码
输入命令 set password=password(‘xxxx')

八、window远程访问Linux虚拟机的mysql
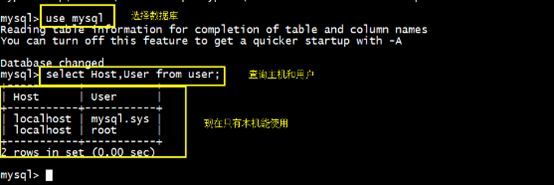
先来看看数据库结构
1、关闭防火墙 (或者给防火墙开放端口),这样window才能连接上
输入命令 systemctl stop firewalld.service

2、给Windows授权
输入命令 mysql>grant all privileges on *.* toroot@'%' identified by '123456';

mysql>use mysql;
mysql>select host,user from user;
【多出一条远程登录用户记录】
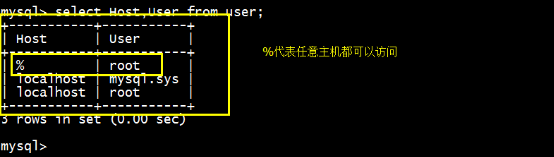
mysql>flush privileges;
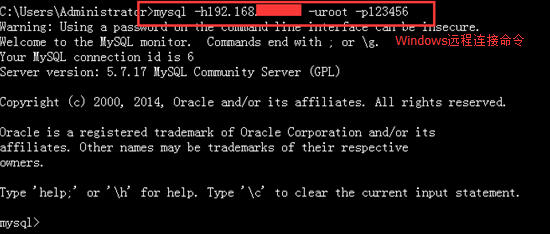
3、远程链接数据库,或者重启(init 6)。
输入命令:mysql –hIP地址 -uroot -p123456
九、设置开机自动启动mysql服务
1、添加mysql服务
输入命令 chkconfig --add mysql 【mysqld -install】

2、设置mysql服务为自动
输入命令 chkconfig mysql on

3、重启检查
init 6

ps –ef | grep mysql
十、设置path
输入命令 vi /etc/profile
输入命令 exportPATH=$JAVA_HOME/bin:/usr/local/mysql/bin:$PATH

配置好mysql环境变量后,我们往后登录mysql就不用再去到/usr/local/mysql/bin目录才能登录了,现在可以在任意目录下登录mysql了
到了这里我们就成功在Linux centos7环境下安装MySQL了。
The above is the detailed content of Detailed explanation of MySQL installation tutorial in Linux centos7 environment (picture). For more information, please follow other related articles on the PHP Chinese website!

Hot AI Tools

Undresser.AI Undress
AI-powered app for creating realistic nude photos

AI Clothes Remover
Online AI tool for removing clothes from photos.

Undress AI Tool
Undress images for free

Clothoff.io
AI clothes remover

AI Hentai Generator
Generate AI Hentai for free.

Hot Article
Hot Tools

Notepad++7.3.1
Easy-to-use and free code editor

SublimeText3 Chinese version
Chinese version, very easy to use

Zend Studio 13.0.1
Powerful PHP integrated development environment

Dreamweaver CS6
Visual web development tools

SublimeText3 Mac version
God-level code editing software (SublimeText3)
Hot Topics
 1378
1378
 52
52

 How to start nginx in Linux
Apr 14, 2025 pm 12:51 PM
How to start nginx in Linux
Apr 14, 2025 pm 12:51 PM
Steps to start Nginx in Linux: Check whether Nginx is installed. Use systemctl start nginx to start the Nginx service. Use systemctl enable nginx to enable automatic startup of Nginx at system startup. Use systemctl status nginx to verify that the startup is successful. Visit http://localhost in a web browser to view the default welcome page.
 How to start nginx server
Apr 14, 2025 pm 12:27 PM
How to start nginx server
Apr 14, 2025 pm 12:27 PM
Starting an Nginx server requires different steps according to different operating systems: Linux/Unix system: Install the Nginx package (for example, using apt-get or yum). Use systemctl to start an Nginx service (for example, sudo systemctl start nginx). Windows system: Download and install Windows binary files. Start Nginx using the nginx.exe executable (for example, nginx.exe -c conf\nginx.conf). No matter which operating system you use, you can access the server IP
 How to solve nginx403 error
Apr 14, 2025 pm 12:54 PM
How to solve nginx403 error
Apr 14, 2025 pm 12:54 PM
The server does not have permission to access the requested resource, resulting in a nginx 403 error. Solutions include: Check file permissions. Check the .htaccess configuration. Check nginx configuration. Configure SELinux permissions. Check the firewall rules. Troubleshoot other causes such as browser problems, server failures, or other possible errors.
 How to check whether nginx is started
Apr 14, 2025 pm 01:03 PM
How to check whether nginx is started
Apr 14, 2025 pm 01:03 PM
How to confirm whether Nginx is started: 1. Use the command line: systemctl status nginx (Linux/Unix), netstat -ano | findstr 80 (Windows); 2. Check whether port 80 is open; 3. Check the Nginx startup message in the system log; 4. Use third-party tools, such as Nagios, Zabbix, and Icinga.
 How to check whether nginx is started?
Apr 14, 2025 pm 12:48 PM
How to check whether nginx is started?
Apr 14, 2025 pm 12:48 PM
In Linux, use the following command to check whether Nginx is started: systemctl status nginx judges based on the command output: If "Active: active (running)" is displayed, Nginx is started. If "Active: inactive (dead)" is displayed, Nginx is stopped.
 How to solve nginx403
Apr 14, 2025 am 10:33 AM
How to solve nginx403
Apr 14, 2025 am 10:33 AM
How to fix Nginx 403 Forbidden error? Check file or directory permissions; 2. Check .htaccess file; 3. Check Nginx configuration file; 4. Restart Nginx. Other possible causes include firewall rules, SELinux settings, or application issues.
 How to solve nginx304 error
Apr 14, 2025 pm 12:45 PM
How to solve nginx304 error
Apr 14, 2025 pm 12:45 PM
Answer to the question: 304 Not Modified error indicates that the browser has cached the latest resource version of the client request. Solution: 1. Clear the browser cache; 2. Disable the browser cache; 3. Configure Nginx to allow client cache; 4. Check file permissions; 5. Check file hash; 6. Disable CDN or reverse proxy cache; 7. Restart Nginx.
 How to clean nginx error log
Apr 14, 2025 pm 12:21 PM
How to clean nginx error log
Apr 14, 2025 pm 12:21 PM
The error log is located in /var/log/nginx (Linux) or /usr/local/var/log/nginx (macOS). Use the command line to clean up the steps: 1. Back up the original log; 2. Create an empty file as a new log; 3. Restart the Nginx service. Automatic cleaning can also be used with third-party tools such as logrotate or configured.
