
 Database
Mysql Tutorial
Detailed introduction to mysql5.7.17 winx64 installation and configuration tutorial (picture)
Database
Mysql Tutorial
Detailed introduction to mysql5.7.17 winx64 installation and configuration tutorial (picture)
Detailed introduction to mysql5.7.17 winx64 installation and configuration tutorial (picture)

This article mainly introduces in detail the mysql 5.7.17 winx64 installation and configuration tutorial, which has certain reference value. Interested friends can refer to it
Today we have another Install the MySQL database on your computer once. Every time you reinstall the system, you have to reinstall the database, but every time you have to refer to Baidu's installation and configuration tutorial. So I decided to write a blog post to introduce the MySQL installation tutorial when I have nothing to do. This is my first time writing a blog post. I hope you can forgive me if I have any mistakes!
Let’s start with my installation introduction:
My computer is win764, so this blog post also introduces the 64-bit installation.
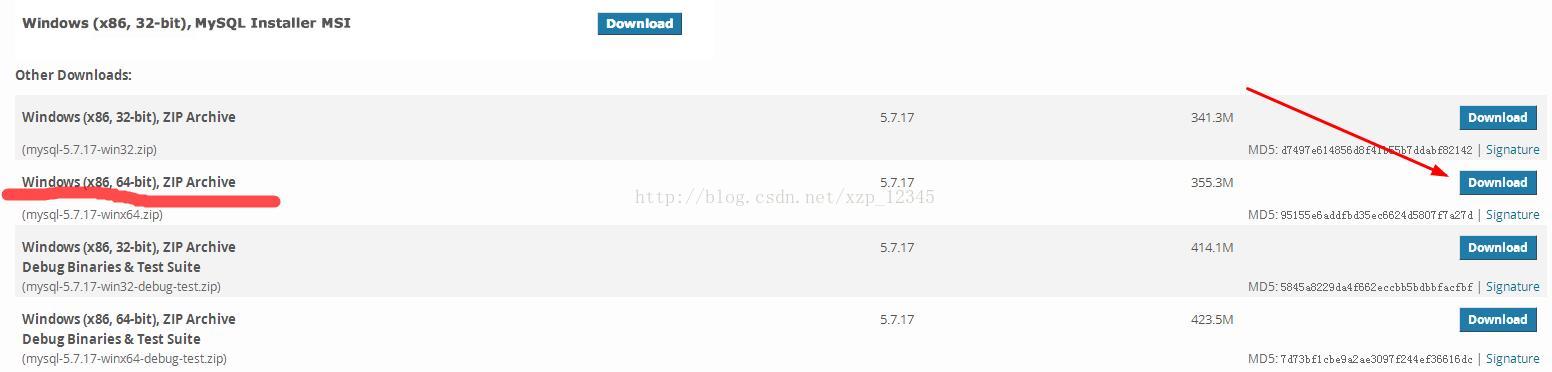
1. So the first step is to download Windows (x86, 64-bit), ZIP Archive
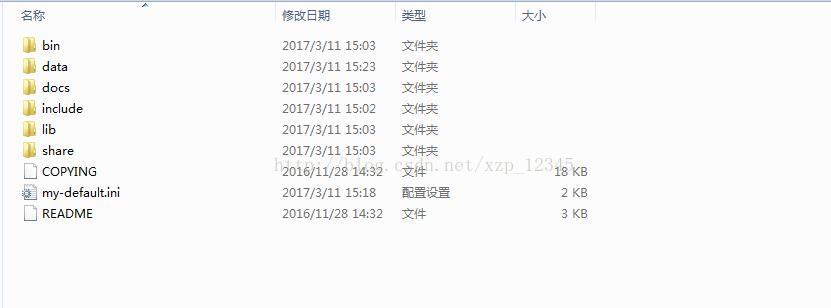
2. Download After completion, unzip it to the path you want to install . For example, I unzipped it to the path D:\MySQL\mysql-5.7.17-winx64. After unzipping, it should be the following folders:
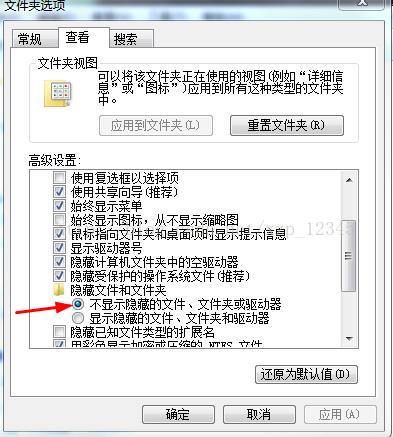
3. This step is to start the configuration . If your file suffix is not displayed, it is recommended that you set your own file suffix display. , because we need to use when adding config file: Steps to set file suffix display: win7 selects double-click "Computer" -> click "Organization" under the navigation bar -> select "Folder" and search options" -> Click "View" -> Uncheck "Hide extensions for known file types".
4.Create a new my.ini configuration file. This configuration file will overwrite the my-default.ini file in the current folder. , setting the display file suffix in the previous step is to prepare for this step. Open this configuration file and add the following code to the file:
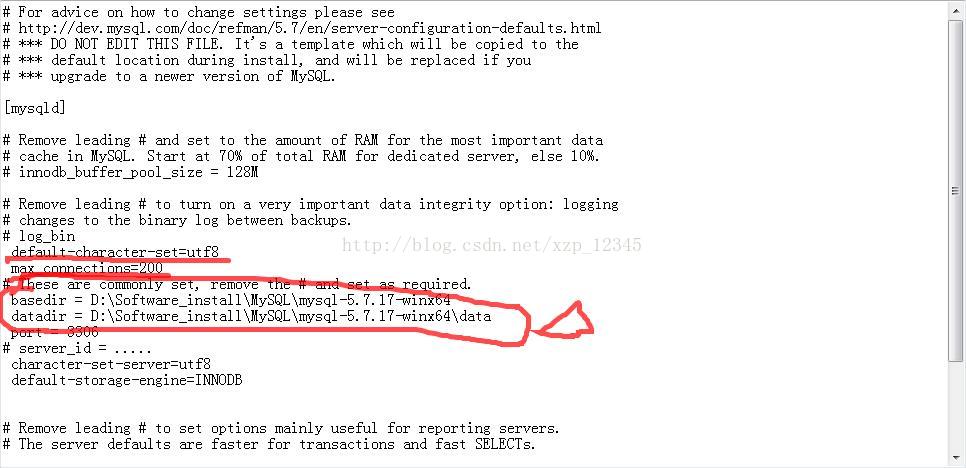
Among them, we want Create a new empty folder of data in our installation directory:

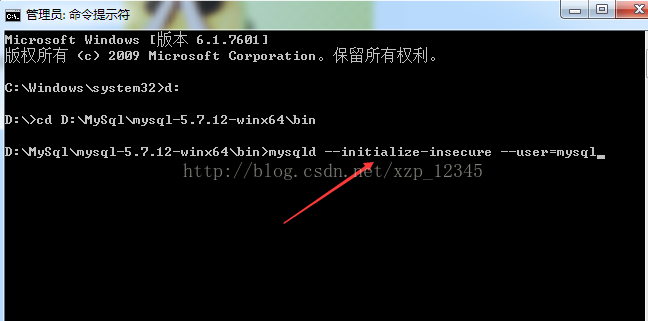
5. The preliminary preparations have been made, and then we will start installing the service as an administrator. Run cmd.exe, remember to run it as an administrator, enter the installation bin directory, the most important and important command is here, it is essential, otherwise the service cannot be started after the service is installed, enter mysqld --initialize -insecure --user=mysql command, then press Enter,
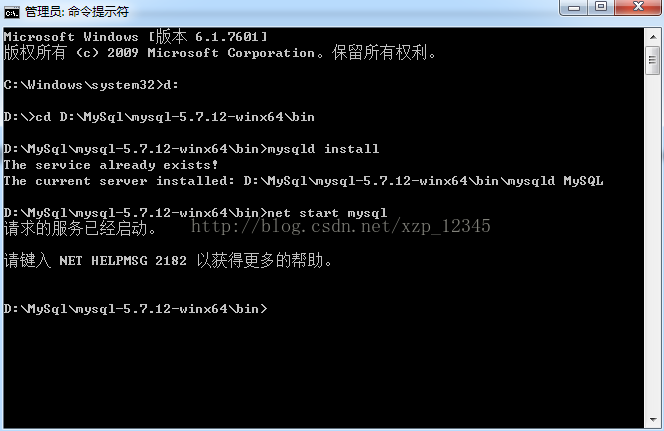
6. Then enter mysqld install to install the service. If the installation is successful, it will prompt that the installation is successful, and then start MySQL The service is OK,
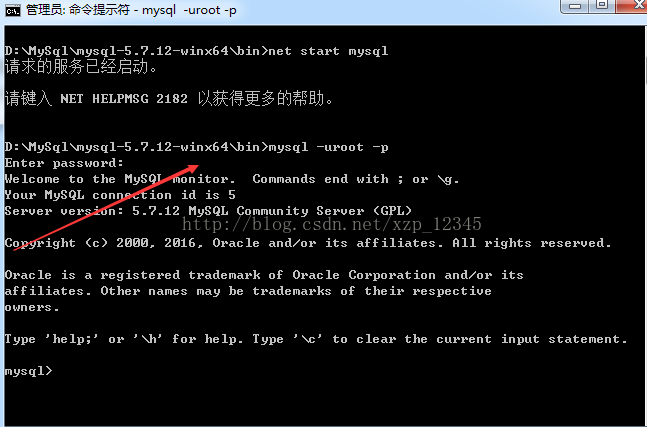
7. Configure environment variables——>Right-click the computer and "Properties"——>"Advanced System Settings"——> "Environment variable" -> "path" -> Copy the path of the bin directory to the path environment variable. It is best to copy it to the front, and then add a semicolon after it. 8. Open MySQL, open cmd.exe, enter the mysql -uroot -p command, there is no password by default, press Enter to enter. If some have already set a password, you need to enter the password to enter. If you have a password, you can use mysql -uroot -p password, or mysql -uroot -p and press Enter to enter the password. The second option is recommended.
Now you’re done! Enter exit to exit mysql.
The above is the detailed content of Detailed introduction to mysql5.7.17 winx64 installation and configuration tutorial (picture). For more information, please follow other related articles on the PHP Chinese website!

Hot AI Tools

Undresser.AI Undress
AI-powered app for creating realistic nude photos

AI Clothes Remover
Online AI tool for removing clothes from photos.

Undress AI Tool
Undress images for free

Clothoff.io
AI clothes remover

Video Face Swap
Swap faces in any video effortlessly with our completely free AI face swap tool!

Hot Article
Hot Tools

Notepad++7.3.1
Easy-to-use and free code editor

SublimeText3 Chinese version
Chinese version, very easy to use

Zend Studio 13.0.1
Powerful PHP integrated development environment

Dreamweaver CS6
Visual web development tools

SublimeText3 Mac version
God-level code editing software (SublimeText3)
Hot Topics
 1387
1387
 52
52

 Getting Started with Pygame: Comprehensive Installation and Configuration Tutorial
Feb 19, 2024 pm 10:10 PM
Getting Started with Pygame: Comprehensive Installation and Configuration Tutorial
Feb 19, 2024 pm 10:10 PM
Learn Pygame from scratch: complete installation and configuration tutorial, specific code examples required Introduction: Pygame is an open source game development library developed using the Python programming language. It provides a wealth of functions and tools, allowing developers to easily create a variety of type of game. This article will help you learn Pygame from scratch, and provide a complete installation and configuration tutorial, as well as specific code examples to get you started quickly. Part One: Installing Python and Pygame First, make sure you have
 PyCharm Community Edition Installation Guide: Simple installation and setup even if you don't have any foundation
Jan 27, 2024 am 10:32 AM
PyCharm Community Edition Installation Guide: Simple installation and setup even if you don't have any foundation
Jan 27, 2024 am 10:32 AM
PyCharm Community Edition is a very powerful and widely used Python integrated development environment (IDE). It provides a wealth of functions and tools to help developers improve efficiency. This article will provide you with a detailed installation tutorial for PyCharm Community Edition. Whether you have programming experience or not, you can easily install and configure PyCharm. 1. Download PyCharm Community Edition First, we need to download the installation package of PyCharm Community Edition. You can visit JetBrains official website (h
 Learn the basics of Python web development easily: a comprehensive guide to Flask installation and configuration
Feb 24, 2024 pm 06:33 PM
Learn the basics of Python web development easily: a comprehensive guide to Flask installation and configuration
Feb 24, 2024 pm 06:33 PM
Flask installation and configuration guide: Easily master the cornerstone of Python Web development Introduction: With the rapid development of Python, more and more developers are paying attention to Python Web development. In Python Web development, Flask, as a lightweight Web framework, is loved by the majority of developers. This article will introduce you to the installation and configuration process of Flask, and provide specific code examples to help you easily master the cornerstone of Python Web development. 1. Environment
 Comprehensive installation and configuration guide for the Java Virtual Machine
Jan 05, 2024 pm 02:03 PM
Comprehensive installation and configuration guide for the Java Virtual Machine
Jan 05, 2024 pm 02:03 PM
Starting from scratch: Detailed explanation of Java virtual machine installation and configuration [Introduction] Java is a cross-platform programming language, and its execution platform depends on the Java Virtual Machine (JavaVirtualMachine, JVM). By installing and configuring the Java virtual machine, you can run Java programs on different operating systems. This article will take you from scratch, detail how to install and configure a Java virtual machine, and provide some commonly used Java code examples. Let’s start learning! [Part 1: J
 Simple and practical: Ubuntu VNC installation and setup tutorial
Dec 29, 2023 am 11:20 AM
Simple and practical: Ubuntu VNC installation and setup tutorial
Dec 29, 2023 am 11:20 AM
Get started easily: UbuntuVNC installation and configuration guide Introduction: Ubuntu is a powerful and popular operating system, and VNC is a remote desktop protocol that allows users to control remote computers over the network. This article will take you through the installation and configuration process of VNC in Ubuntu system in detail, including specific code examples. Step 1: Install VNCServer Open Terminal and enter the following command to install VNCServer: sudoapt-g
 Step by step guide to install and configure golang on Ubuntu
Jan 20, 2024 am 09:40 AM
Step by step guide to install and configure golang on Ubuntu
Jan 20, 2024 am 09:40 AM
Teach you step by step how to install and configure golang on Ubuntu. Specific code examples are required. In the field of computer programming, Golang is a programming language that has attracted much attention in recent years. It is simple, efficient and has excellent concurrency performance, so it is favored by more and more developers. In this article, we will teach you step by step how to install and configure Golang on the Ubuntu operating system, and provide some practical code examples for you to practice. The first step is to install Golang. In order to install Golan on Ubuntu
 Golang Beginner's Guide: Complete Guide to Installation and Configuration under Mac System
Feb 20, 2024 pm 06:36 PM
Golang Beginner's Guide: Complete Guide to Installation and Configuration under Mac System
Feb 20, 2024 pm 06:36 PM
Golang Beginner's Guide: Complete Guide to Installation and Configuration on Mac System Go language (also known as Golang) is an open source programming language developed by Google. It has the characteristics of fast compilation, efficient execution and lightweight, and is suitable for building high-performance s application. This article will provide a detailed installation and configuration guide for Golang novices on Mac systems to help them easily get started with this emerging programming language. 1. Install Golang Step 1: Download the Golang installation package. First, open the official website
 Redis installation and setup operation guide on CentOS7
Jan 08, 2024 am 11:41 AM
Redis installation and setup operation guide on CentOS7
Jan 08, 2024 am 11:41 AM
Installation settings Download the tar package: wget-c http://download.redis.io/releases/redis-3.2.4.tar.gz Unzip and install tarzxvfredis-3.2.4.tar.gzmkdir/usr/local/redismakePREFIX=/usr/ local/redisinstall sets the environment variable vim/etc/profileexportREDIS_HOME=/usr/local/redisexportPATH=$PATH:$REDIS_HOME/bin:wqsource/e
