In the current panoramic H5 environment on the market, there are many ways to achieve panoramic views. You can use css3 to build it directly or use a library based on threeJs to achieve it. There are many other production methods. Panorama software usage
This tutorial is suitable for engineering lions who have not developed 3D panorama
If you feel that the content is too boring, you can jump directly to the end
Download code
I won’t go into details about the relevant theories used in the entire 3D panorama. Let’s talk a little bit about the relevant theories used in this case.
I believe programmers will pay more attention to the content of code implementation
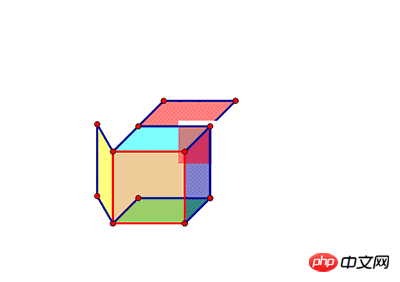
The demo explained this time is to use css3DRender to build a cube panoramic scene
Imagine that all we need to do is to build a cube box
Then put the lens on the following
Each face in the cube box is pasted with a face of our scene, then when the camera rotates, what you see is the panoramic view of the scene
Detailed theoretical stuff Let’s talk about it later, let’s run a simple demo this time
This tutorial uses two libraries:
threeJS and CSS3DRender.js based on it
The code is taken from the sample on the official website and made some adjustments.
<!DOCTYPE html>
<html>
<head>
    <title>three.js css3d - panorama</title>
    <meta charset="utf-8">
    <meta name="viewport" content="width=device-width, user-scalable=no, minimum-scale=1.0, maximum-scale=1.0">
    <style>
        body {
            background-color: #000000;
            margin: 0;
            cursor: move;
            overflow: hidden;
        }
        .surface { width: 1026px; height: 1026px; background-size: cover; position: absolute; }
        .surface .bg { position: absolute; width: 1026px; height: 1026px; }
    </style>
</head>
<body>
<p>
    <p id="surface_0" class="surface">
        <img class="bg" src="images/posx.jpg" alt="">
    </p>
    <p id="surface_1" class="surface">
        <img class="bg" src="images/negx.jpg" alt="">
    </p>
    <p id="surface_2" class="surface">
        <img class="bg" src="images/posy.jpg" alt="">
    </p>
    <p id="surface_3" class="surface">
        <img class="bg" src="images/negy.jpg" alt="">
    </p>
    <p id="surface_4" class="surface">
        <img class="bg" src="images/posz.jpg" alt="">
    </p>
    <p id="surface_5" class="surface">
        <img class="bg" src="images/negz.jpg" alt="">
    </p>
</p>
<script src="js/three.min.js"></script>
<script src="js/CSS3DRenderer.min.js"></script>
<script src="js/index.js"></script>
</body>
</html>htmlThere is nothing special here. First put each side in, and use p to put the picture of each side.
The implementation method of not using the official website demo is because the official website creates an img and inserts it into the page. It is not convenient for us to add elements to each face.
Define the six faces first. , if you want to add some interactive elements to each surface, just add dom directly to the html.
A total of 3 js are introduced. Except for index, the other two are compressed js. No need Care, take a look at the implementation of index.js
camera = new THREE.PerspectiveCamera( 75, window.innerWidth / window.innerHeight, 1, 1000 );

scene = new THREE.Scene();
Then it is obvious that these two lines of code literally create a camera and create a scene.
Here is a brief explanation of these two classes
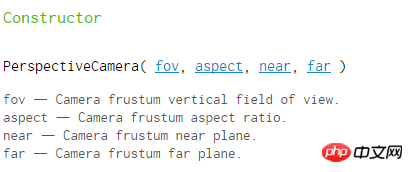
The following is the explanation from the official website
The general meaning:
This is A projection mode that mimics the human eye, it is the most common projection mode used for rendering 3D scenes.
In short, this class is a new lens
The following is the sample code
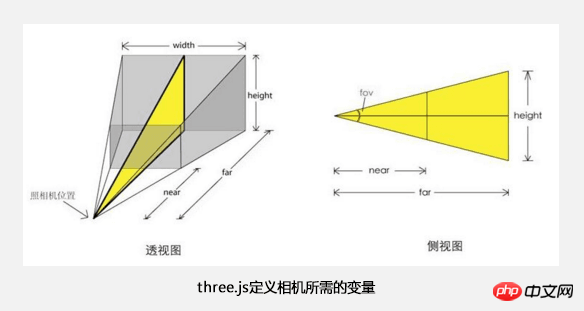
The constructor of this class accepts four parameters
So what exactly are these four parameters? 
Respectively represent the
lens angle, aspect ratio, minimum focal length, and farthest focal length
Next, use Scene Class creation scene
The following official description
This thing creates a scene. This scene allows you to create a certain thing and a certain position through threeJs rendering scene
After knowing the scene and camera, we need to put the cube mentioned before into the scene
First define the data of the six faces, the position of each face, and the rotation angle of the 3D rotation.
The three position parameters correspond to the positions of the x, y, and z axes respectively
Because the width of the face I selected is 1024px
, the position is based on the plus or minus of the center point 1024/2
The three parameters of rotation, decibels, correspond to the rotation angle of the xyz axis
Math.PI/2 represents 90 degrees
var sides = [
    {
        position: [ -512, 0, 0 ],//位置
        rotation: [ 0, Math.PI / 2, 0 ]//角度
    },
    {
        position: [ 512, 0, 0 ],
        rotation: [ 0, -Math.PI / 2, 0 ]
    },
    {
        position: [ 0,  512, 0 ],
        rotation: [ Math.PI / 2, 0, Math.PI ]
    },
    {
        position: [ 0, -512, 0 ],
        rotation: [ - Math.PI / 2, 0, Math.PI ]
    },
    {
        position: [ 0, 0,  512 ],
        rotation: [ 0, Math.PI, 0 ]
    },
    {
        position: [ 0, 0, -512 ],
        rotation: [ 0, 0, 0 ]
    }
];

/**
 * 根据六个面的信息,new出六个对象放入场景中
 */
for ( var i = 0; i < sides.length; i ++ ) {

    var side = sides[ i ];

    var element = document.getElementById("surface_"+i);
    element.width = 1026; // 2 pixels extra to close the gap.多余的2像素用于闭合正方体

    var object = new THREE.CSS3DObject( element );
    object.position.fromArray( side.position );
    object.rotation.fromArray( side.rotation );
    scene.add( object );

}So here is a new class CSS3DObject
However, this class does not belong to the official class, but the class in the 3DRender library we referenced
There is no documentation. Let’s take a look at the code
THREE.CSS3DObject = function (element) {
    THREE.Object3D.call(this);
    this.element = element;
    this.element.style.position = 'absolute';
    this.addEventListener('removed', function (event) {
        if (this.element.parentNode !== null) {
            this.element.parentNode.removeChild(this.element);
            for (var i = 0, l = this.children.length; i < l; i++) {
                this.children[i].dispatchEvent(event)
            }
        }
    })
}
;
THREE.CSS3DObject.prototype = Object.create(THREE.Object3D.prototype);We can see that this is a class inherited from THREE.Object3D The class
changes the postion of the incoming element to absolute positioning, and then adds an event when it is removed.
Nothing special is defined, so let’s check the official Object3D class

This class is a basic class that defines objects, among which The new object contains the following two attributes
.position

The object's local position.

.rotation

Object's local rotation (see Euler angles), in radians.
which represent the position and rotation angle of the object respectively.
Then the for loop is to define six objects and add them to the scene
Okay, let’s continue
renderer = new THREE.CSS3DRenderer();
renderer.setSize( window.innerWidth, window.innerHeight );
document.body.appendChild( renderer.domElement );
This is the class in the library we referenced
This class The main function is to render it based on the scene and lens related information in three
Using dom elements and css3D attributes
Here we just create a new class and set the width and height
But CSS3DRender is The rendering of the page has not started yet
document.addEventListener( 'mousedown', onDocumentMouseDown, false );
document.addEventListener( 'wheel', onDocumentMouseWheel, false );

document.addEventListener( 'touchstart', onDocumentTouchStart, false );
document.addEventListener( 'touchmove', onDocumentTouchMove, false );

window.addEventListener( 'resize', onWindowResize, false );
The event binding here will not be explained in detail
Next, let’s analyze the rendering code
animate();
function animate() {

    requestAnimationFrame( animate );

    // lat +=  0.1;
    lat = Math.max( - 85, Math.min( 85, lat ) );
    phi = THREE.Math.degToRad( 90 - lat );
    theta = THREE.Math.degToRad( lon );

    target.x = Math.sin( phi ) * Math.cos( theta );
    target.y = Math.cos( phi );
    target.z = Math.sin( phi ) * Math.sin( theta );

    camera.lookAt( target );
    /**
     * 通过传入的scene和camera
     * 获取其中object在创建时候传入的element信息
     * 以及后面定义的包括位置,角度等信息
     * 根据场景中的obj创建dom元素
     * 插入render本身自己创建的场景p中
     * 达到渲染场景的效果
     */
    renderer.render( scene, camera );

}requestAnimationFrame(animate);
This Method can trigger the animate method based on the frame rate.
lat = Math.max( - 85, Math.min( 85, lat ) );
    phi = THREE.Math.degToRad( 90 - lat );
    theta = THREE.Math.degToRad( lon );

    target.x = Math.sin( phi ) * Math.cos( theta );
    target.y = Math.cos( phi );
    target.z = Math.sin( phi ) * Math.sin( theta );

camera.lookAt( target );This code adjusts the position of the camera lens based on the existing attribute values (updated in real time through finger sliding or mouse sliding)
renderer.render( scene, camera );
然后渲染........
因为render里面的代码比较多,这里就不贴代码了,大概总结一下render做的事情就是
首先render自己创建一个作为场景的p
通过传入的scene和camera
获取其中object在创建时候传入的element信息
以及后面定义的包括位置,角度等信息
根据场景中的obj创建dom元素(就是通过dom实现本应在canvas里的东西)
插入render本身自己创建的场景p中
当镜头方向变了,获取到的参数就变了,通过传入的对象身上带有的变化的参数改变页面上dom元素的位置。
达到渲染场景的效果
The above is the detailed content of HTML5 development example-3D panorama (ThreeJs panorama Demo) detailed explanation (picture). For more information, please follow other related articles on the PHP Chinese website!
 What are the production methods of html5 animation production?
 The difference between HTML and HTML5
 What can TikTok friends do?
 How to solve operation timed out
 How to upload html
 Convert text to numeric value
 Solutions to Chinese garbled characters
 How to create a WeChat clone
 What types of files can be identified based on


