 WeChat Applet
 Mini Program Development
 Introduction to the method of developing a pop-up page using WeChat applet
Introduction to the method of developing a pop-up page using WeChat applet
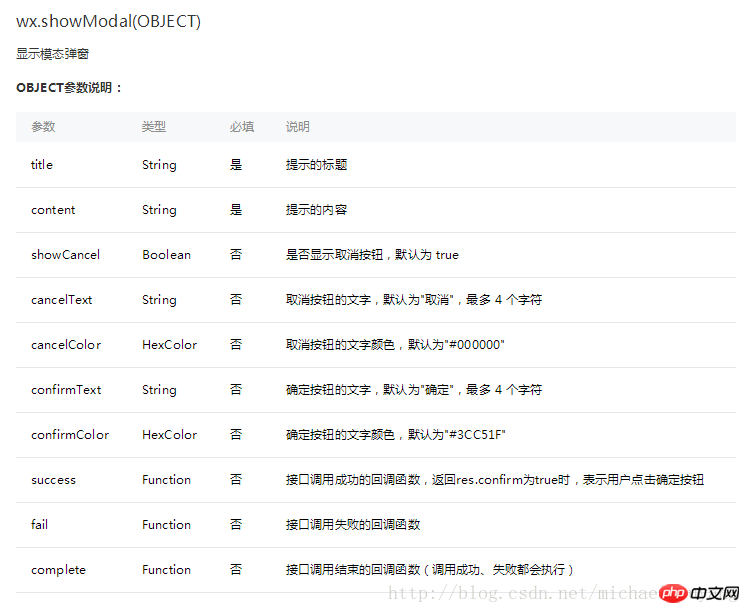
During the development process of the mini program, we will definitely encounter the situation of developing a pop-up page. Let’s first take a look at the official explanation of the pop-up page of the mini program. The interface of the API is as follows 
Judging from the official code example, if you think it is simple, just like an assert, you cannot see the real needs of the pop-up window. . So today HTML51.COM has written a pop-up applet tutorial for your reference.
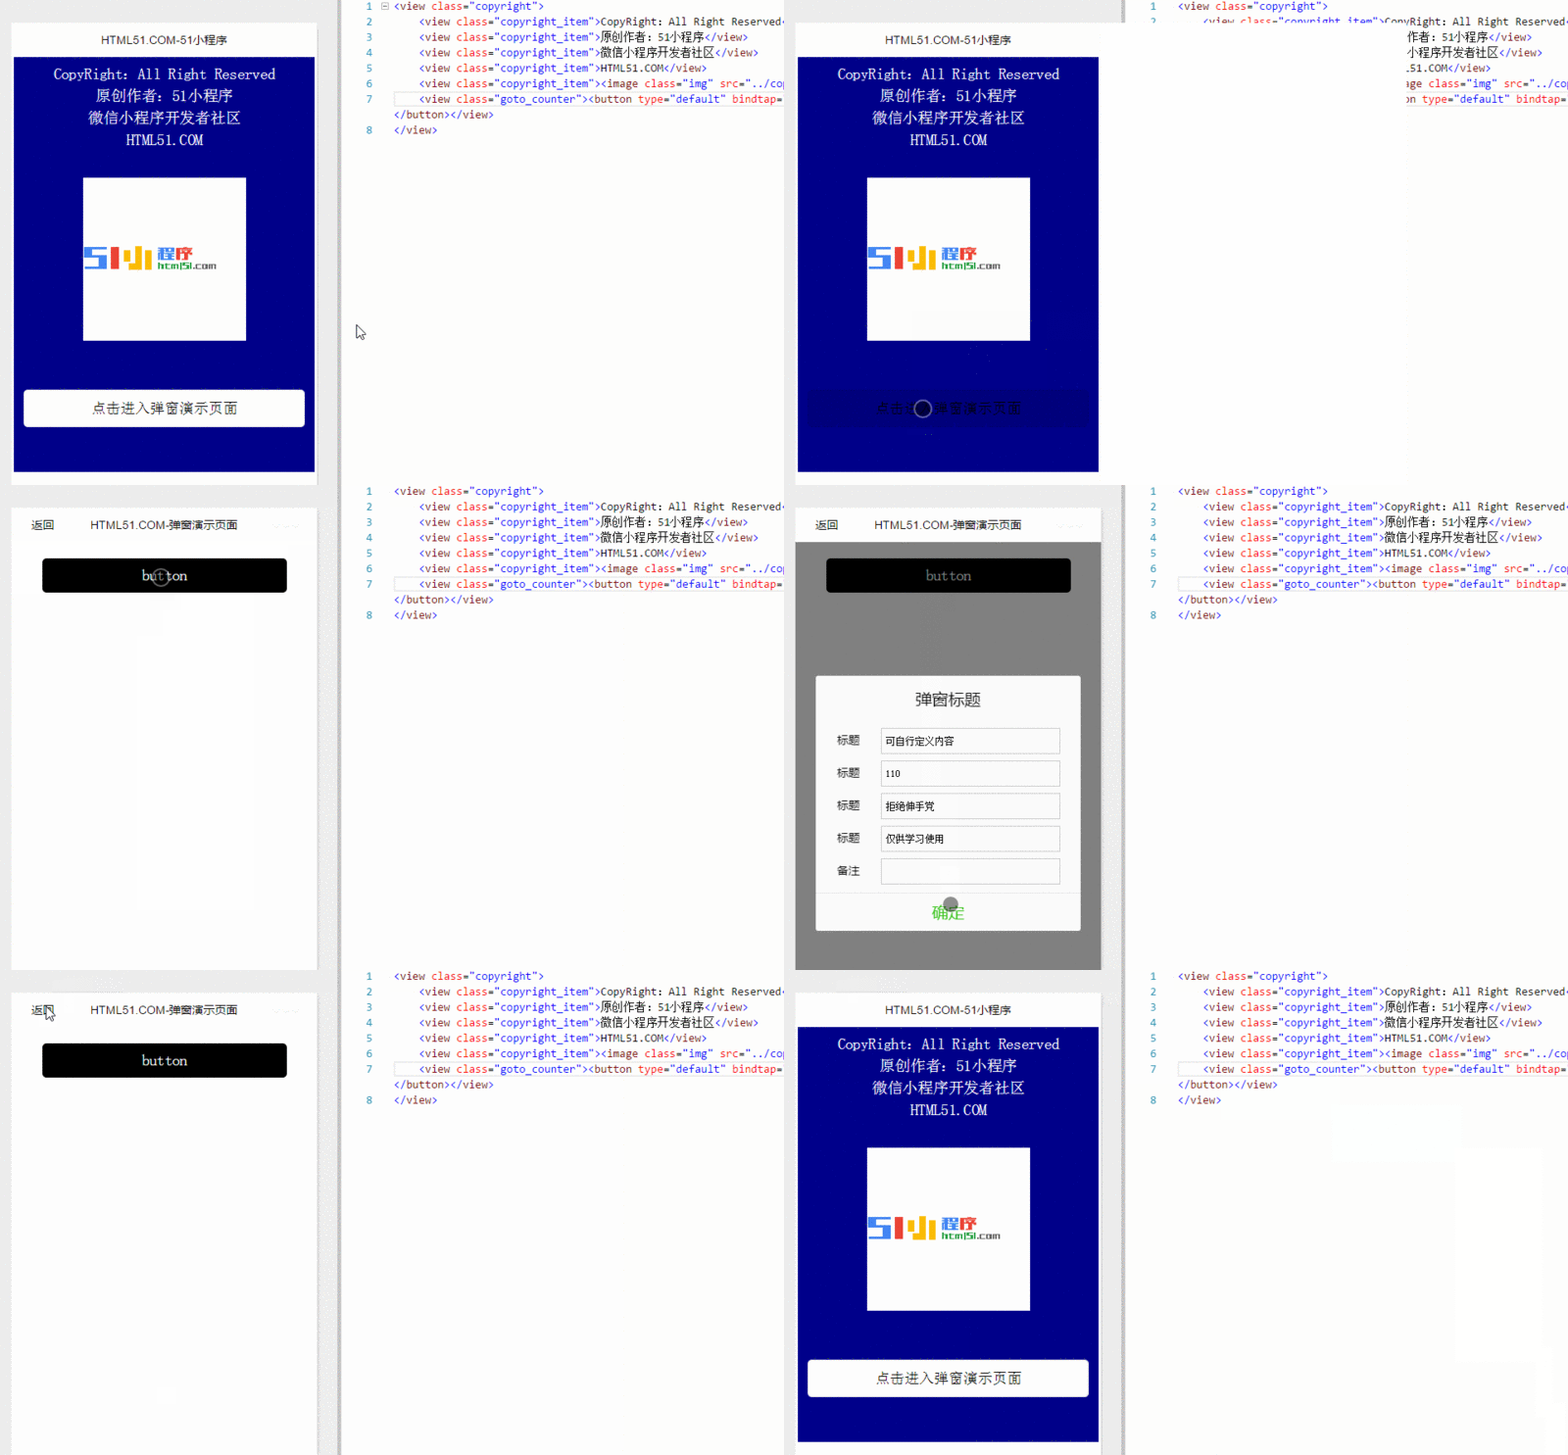
Let’s take a look at the dynamic renderings of the homepage first: 
The first thing we see is the homepage code:
<view class="copyright">
    <view class="copyright_item">CopyRight:All Right Reserved</view>
    <view class="copyright_item">原创作者:51小程序</view>
    <view class="copyright_item">微信小程序开发者社区</view>
    <view class="copyright_item">HTML51.COM</view>
    <view class="copyright_item"><image class="img" src="../copyright/image/logo.png"/></view>
    <view class="goto_counter"><button type="default" bindtap="goto_counter">点击进入弹窗演示页面</button></view>
</view>Of course, the point is not this. The code of
index.wxml is as follows: The code of
<!--使用animation属性指定需要执行的动画-->
<view animation="{{animationData}}" class="drawer_box" wx:if="{{showModalStatus}}">

  <!--drawer content-->
  <view class="drawer_title">弹窗标题</view>
  <view class="drawer_content">
    <view class="top grid">
      <label class="title col-0">标题</label>
      <input class="input_base input_h30 col-1" name="rName" value="可自行定义内容"></input>
    </view>
    <view class="top grid">
      <label class="title col-0">标题</label>
      <input class="input_base input_h30 col-1" name="mobile" value="110"></input>
    </view>
    <view class="top grid">
      <label class="title col-0">标题</label>
      <input class="input_base input_h30 col-1" name="phone" value="拒绝伸手党"></input>
    </view>
    <view class="top grid">
      <label class="title col-0">标题</label>
      <input class="input_base input_h30 col-1" name="Email" value="仅供学习使用"></input>
    </view>
    <view class="top bottom grid">
      <label class="title col-0">备注</label>
      <input class="input_base input_h30 col-1" name="bz"></input>
    </view>
  </view>
  <view class="btn_ok" bindtap="powerDrawer" data-statu="close">确定</view>
</view>index.wxss is as follows: The code of
.btn {
  width: 80%;
  padding: 20rpx 0;
  border-radius: 10rpx;
  text-align: center;
  margin: 40rpx 10%;
  background: #000;
  color: #fff;
}

/*mask*/
.drawer_screen {
  width: 100%;
  height: 100%;
  position: fixed;
  top: 0;
  left: 0;
  z-index: 1000;
  background: #000;
  opacity: 0.5;
  overflow: hidden;
}

/*content*/
.drawer_box {
  width: 650rpx;
  overflow: hidden;
  position: fixed;
  top: 50%;
  left: 0;
  z-index: 1001;
  background: #FAFAFA;
  margin: -150px 50rpx 0 50rpx;
  border-radius: 3px;
}

.drawer_title{
  padding:15px;
  font: 20px "microsoft yahei";
  text-align: center;
}
.drawer_content {
  height: 210px;
  overflow-y: scroll; /*超出父盒子高度可滚动*/
}

.btn_ok{
  padding: 10px;
  font: 20px "microsoft yahei";
  text-align: center;
  border-top: 1px solid #E8E8EA;
  color: #3CC51F;
}

.top{
    padding-top:8px;
}
.bottom {
    padding-bottom:8px;
}
.title {
    height: 30px;
    line-height: 30px;
    width: 160rpx;
    text-align: center;
    display: inline-block;
    font: 300 28rpx/30px "microsoft yahei";
}

.input_base {
    border: 2rpx solid #ccc;
    padding-left: 10rpx;
    margin-right: 50rpx;
}
.input_h30{
    height: 30px;
    line-height: 30px;
}
.input_h60{
    height: 60px;
}
.input_view{
    font: 12px "microsoft yahei";
    background: #fff;
    color:#000;
    line-height: 30px;
}

input {
    font: 12px "microsoft yahei";
    background: #fff;
    color:#000 ;
}
radio{
    margin-right: 20px;
}
.grid { display: -webkit-box; display: box; }
.col-0 {-webkit-box-flex:0;box-flex:0;}
.col-1 {-webkit-box-flex:1;box-flex:1;}
.fl { float: left;}
.fr { float: right;}index.js is as follows:
Page({
  data: {
    showModalStatus: false
  },
  powerDrawer: function (e) {
    var currentStatu = e.currentTarget.dataset.statu;
    this.util(currentStatu)
  },
  util: function(currentStatu){
    /* 动画部分 */
    // 第1步:创建动画实例
    var animation = wx.createAnimation({
      duration: 200,  //动画时长
      timingFunction: "linear", //线性
      delay: 0  //0则不延迟
    });

    // 第2步:这个动画实例赋给当前的动画实例
    this.animation = animation;

    // 第3步:执行第一组动画
    animation.opacity(0).rotateX(-100).step();

    // 第4步:导出动画对象赋给数据对象储存
    this.setData({
      animationData: animation.export()
    })

    // 第5步:设置定时器到指定时候后,执行第二组动画
    setTimeout(function () {
      // 执行第二组动画
      animation.opacity(1).rotateX(0).step();
      // 给数据对象储存的第一组动画,更替为执行完第二组动画的动画对象
      this.setData({
        animationData: animation
      })

      //关闭
      if (currentStatu == "close") {
        this.setData(
          {
            showModalStatus: false
          }
        );
      }
    }.bind(this), 200)

    // 显示
    if (currentStatu == "open") {
      this.setData(
        {
          showModalStatus: true
        }
      );
    }
  }

})The above is the detailed content of Introduction to the method of developing a pop-up page using WeChat applet. For more information, please follow other related articles on the PHP Chinese website!

Hot AI Tools

Undresser.AI Undress
AI-powered app for creating realistic nude photos

AI Clothes Remover
Online AI tool for removing clothes from photos.

Undress AI Tool
Undress images for free

Clothoff.io
AI clothes remover

AI Hentai Generator
Generate AI Hentai for free.

Hot Article

Hot Tools

Notepad++7.3.1
Easy-to-use and free code editor

SublimeText3 Chinese version
Chinese version, very easy to use

Zend Studio 13.0.1
Powerful PHP integrated development environment

Dreamweaver CS6
Visual web development tools

SublimeText3 Mac version
God-level code editing software (SublimeText3)

Hot Topics
 1378
1378
 52
52
 Table Border in HTML
Sep 04, 2024 pm 04:49 PM
Guide to Table Border in HTML. Here we discuss multiple ways for defining table-border with examples of the Table Border in HTML.
 HTML margin-left
Sep 04, 2024 pm 04:48 PM
Guide to HTML margin-left. Here we discuss a brief overview on HTML margin-left and its Examples along with its Code Implementation.
 Nested Table in HTML
Sep 04, 2024 pm 04:49 PM
This is a guide to Nested Table in HTML. Here we discuss how to create a table within the table along with the respective examples.
 HTML Table Layout
Sep 04, 2024 pm 04:54 PM
Guide to HTML Table Layout. Here we discuss the Values of HTML Table Layout along with the examples and outputs n detail.
 HTML Input Placeholder
Sep 04, 2024 pm 04:54 PM
Guide to HTML Input Placeholder. Here we discuss the Examples of HTML Input Placeholder along with the codes and outputs.
 HTML Ordered List
Sep 04, 2024 pm 04:43 PM
Guide to the HTML Ordered List. Here we also discuss introduction of HTML Ordered list and types along with their example respectively
 Moving Text in HTML
Sep 04, 2024 pm 04:45 PM
Guide to Moving Text in HTML. Here we discuss an introduction, how marquee tag work with syntax and examples to implement.
 HTML onclick Button
Sep 04, 2024 pm 04:49 PM
Guide to HTML onclick Button. Here we discuss their introduction, working, examples and onclick Event in various events respectively.


