 Backend Development
 Python Tutorial
 Detailed explanation of how Zabbix3.0.2 uses external python scripts to implement email alarms
Detailed explanation of how Zabbix3.0.2 uses external python scripts to implement email alarms
1, find the default path where the script is stored (I put it under the default path, if you want to change to another path, modify the zabbix_server.conf configuration file)
/usr/local/zabbix-server/ share/zabbix/alertscripts script storage path
2, create a mail.py file in the directory, script reference:
cd /usr/local/zabbix-server/share/zabbix/alertscripts
vim mail.py
#!/usr/bin/python
#coding:utf-8
#author: itnihao
#mail: itnihao@qq.com
#url:https://github.com/itnihao/zabbix-book/edit/master/06-chapter/zabbix_sendmail_v2.py Script can be directly down modified and copied Format problems will occur~
import smtplib
from email.mime.text import MIMEText
import os
import argparse
import logging
import datetime
#QQ enterprise
#smtp_server = 'smtp.exmail.qq.com'
#smtp_port = 25
#smtp_user = 'itnihao_zabbix@itnihao.com'
#smtp_pass = '1234567890'
#163 Mail
#smtp_server = 'smtp.163.com'
#smtp_port = 25
#smtp_user = 'itnihao_zabbix@163.com'
#smtp_pass = '1234567890'
#QQ Mail
smtp_server ='smtp.qq.com'
smtp_port = 25
smtp_user ='itnihao_zabbix@qq.com'
smtp_pass ='1234567890'
def send_mail(mail_to,subject,content):
msg = MIMEText(content,_subtype='plain', _charset='utf-8')
msg['Subject'] = unicode(subject,'UTF-8')
msg['From'] = smtp_user
msg['to'] = mail_to
global sendstatus
global senderr
try:
if smtp_port == 465:
smtp = smtplib.SMTP_SSL()
else:
smtp = smtplib.SMTP()
smtp.connect(smtp_server,smtp_port)
smtp.login(smtp_user,smtp_pass)
smtp.send mail(smtp_user,mail_to ,msg.as_string())
smtp.close()
print 'send ok'
sendstatus = True
except Exception,e:
senderr=str(e)
print senderr
sendstatus = False
def logwrite(sendstatus,mail_to,content):
logpath='/var/log/zabbix/alert'
if not sendstatus:
content = senderr
if not os.path.isdir(logpath):
os.makedirs(logpath)
t=datetime.datetime.now()
daytime=t.strftime('%Y-%m-%d')
daylogfile=logpath+'/'+str(daytime)+'.log'
logging.basicConfig(filename=daylogfile,level=logging.DEBUG)
os.system( 'chown zabbix.zabbix {0}'.format(daylogfile))
logging.info('*'*130)
logging.debug(str(t)+' mail send to {0},content is :\n {1}'.format(mail_to,content))
if __name__ == "__main__":
parser = argparse.ArgumentParser(description=' Send mail to user for zabbix alerting')
parser.add_argument('mail_to',action="store", help='The address of the E-mail that send to user ')
parser.add_argument('subject',action="store", help='The subject of the E-mail')
parser.add_argument('content',action="store", help=' The content of the E-mail')
args = parser.parse_args()
mail_to=args.mail_to
subject=args.subject
content=args.content
send _mail(mail_to,subject,content)
logwrite(sendstatus,mail_to,content)
3, modify the permissions of the script
# chown zabbix.zabbix mail.py
# chmod 775 mail.py
4, zabbix web configuration
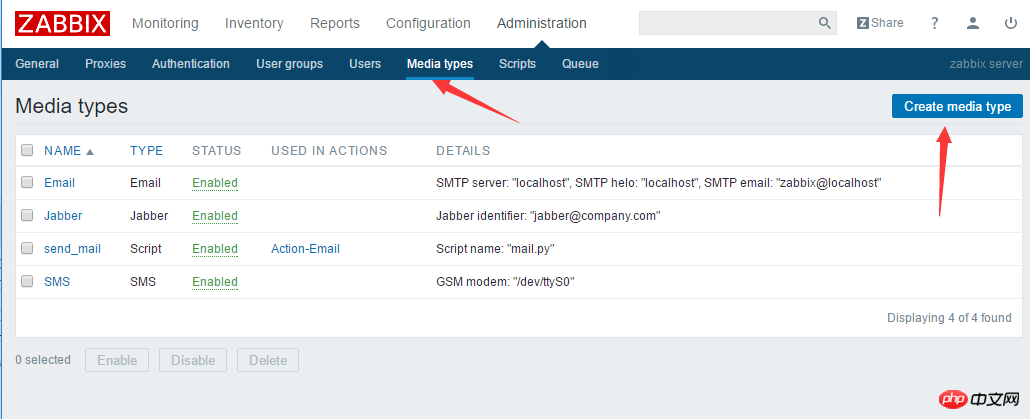
Select the media type in the configuration and create a media type
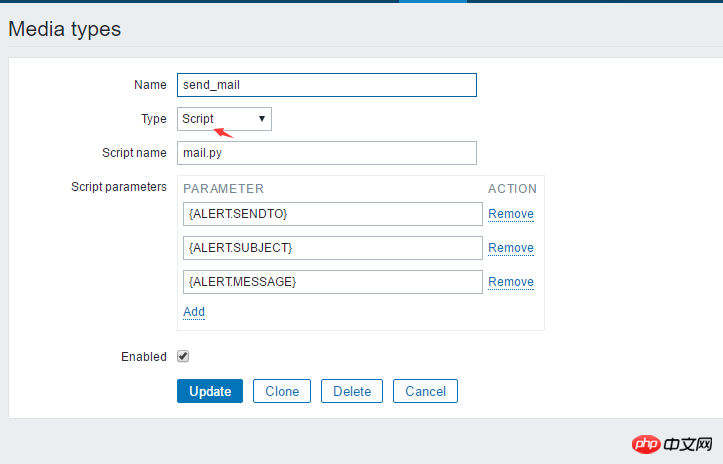
Fill in the following information, type selection script, you need to fill in the following 3 parameters for zabbix3.0.
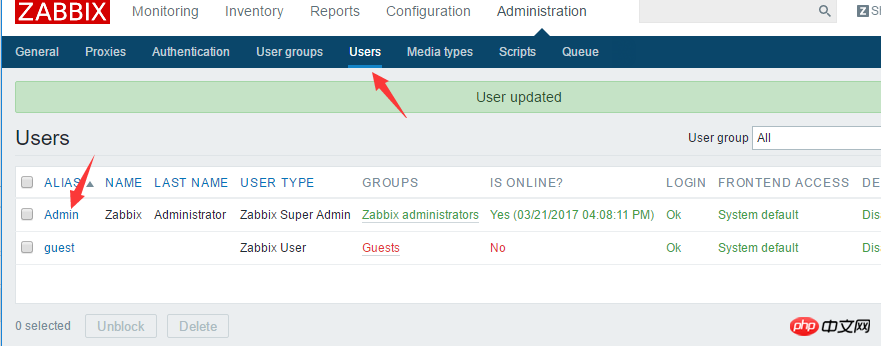
Create a user or set an alarm in the admin user
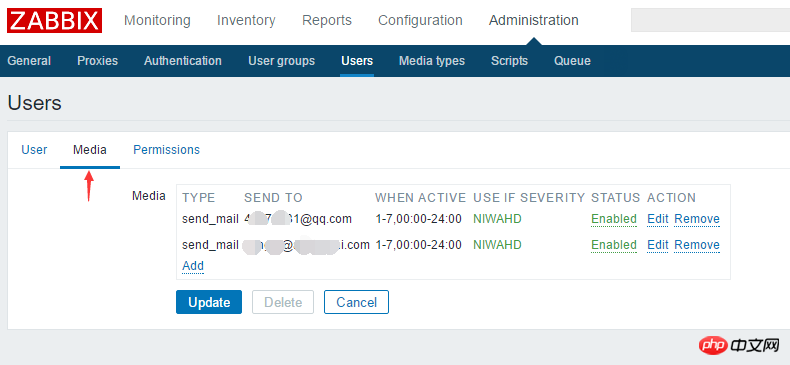
What is added here is after a failure occurs The email to which the email is notified is the recipient.
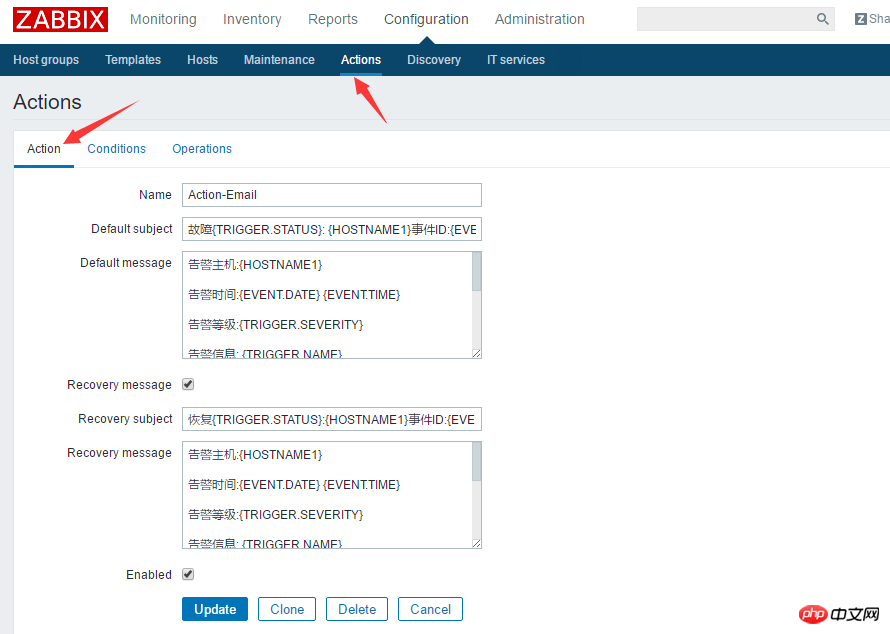
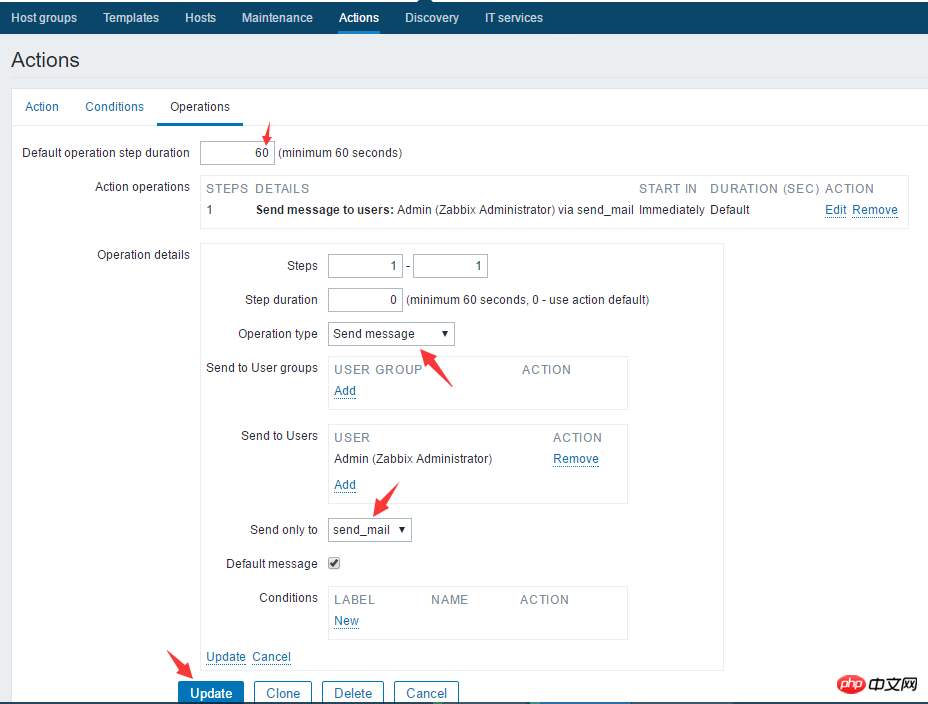
Create an action to implement email alarm, in the configuration-Action-create action
(My picture is different from the template given below, it is recommended Using a template, because the server I use is not in China, all email titles will be garbled. So I shortened the title in this picture)
.
Action-EmailDefault subject: Fault {TRIGGER.STATUS}, Server: {HOSTNAME1} Occurred: {TRIGGER.NAME} fault!Default message : Alarm host: {HOSTNAME1}Alarm time: {EVENT.DATE} {EVENT.TIME}Alarm level: {TRIGGER.SEVERITY}Alarm information: {TRIGGER.NAME}Alarm item:{TRIGGER.KEY1}Problem details:{ITEM.NAME}:{ITEM.VALUE} Current status: {TRIGGER.STATUS}:{ITEM.VALUE1}Event ID:{EVENT.ID}Please go to Montoring-Events to view details. Recovery subject: Recover {TRIGGER.STATUS}, server: {HOSTNAME1}: {TRIGGER.NAME} has been recovered! Recovery message: Alarm host: {HOSTNAME1}Alarm time: {EVENT.DATE} {EVENT.TIME}Alarm level: {TRIGGER.SEVERITY}Alarm information: { TRIGGER.NAME}Alarm item:{TRIGGER.KEY1}Problem details:{ITEM.NAME}:{ITEM.VALUE}Current status:{TRIGGER. STATUS}:{ITEM.VALUE1}Event ID:{EVENT.ID}The alarm has been restored, please relax.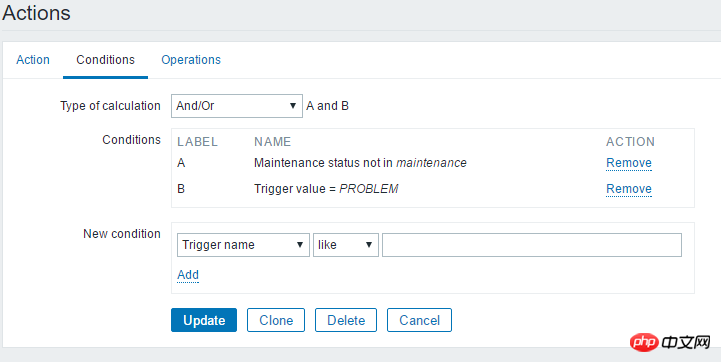
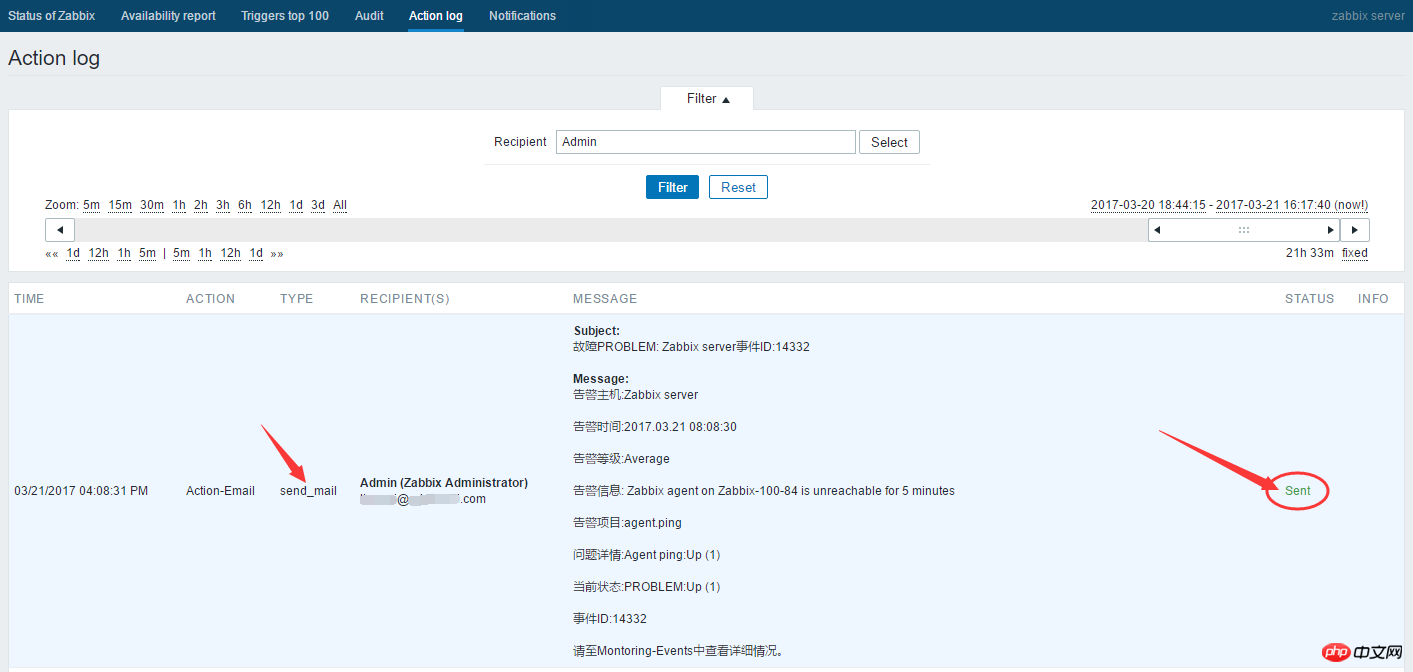

Correct posture: centos+zabbix+corporate mailbox. If you have the opportunity to write a follow-up article, wechat alarm in zabbix.
The above is the detailed content of Detailed explanation of how Zabbix3.0.2 uses external python scripts to implement email alarms. For more information, please follow other related articles on the PHP Chinese website!

Hot AI Tools

Undresser.AI Undress
AI-powered app for creating realistic nude photos

AI Clothes Remover
Online AI tool for removing clothes from photos.

Undress AI Tool
Undress images for free

Clothoff.io
AI clothes remover

Video Face Swap
Swap faces in any video effortlessly with our completely free AI face swap tool!

Hot Article

Hot Tools

Notepad++7.3.1
Easy-to-use and free code editor

SublimeText3 Chinese version
Chinese version, very easy to use

Zend Studio 13.0.1
Powerful PHP integrated development environment

Dreamweaver CS6
Visual web development tools

SublimeText3 Mac version
God-level code editing software (SublimeText3)

Hot Topics
 1387
1387
 52
52
 Do you know some reasons why crontab scheduled tasks are not executed?
Mar 09, 2024 am 09:49 AM
Summary of some reasons why crontab scheduled tasks are not executed. Update time: January 9, 2019 09:34:57 Author: Hope on the field. This article mainly summarizes and introduces to you some reasons why crontab scheduled tasks are not executed. For everyone Solutions are given for each of the possible triggers, which have certain reference and learning value for colleagues who encounter this problem. Students in need can follow the editor to learn together. Preface: I have encountered some problems at work recently. The crontab scheduled task was not executed. Later, when I searched on the Internet, I found that the Internet mainly mentioned these five incentives: 1. The crond service is not started. Crontab is not a function of the Linux kernel, but relies on a cron.
 Python script to create random jokes using pyjokes
Sep 13, 2023 pm 08:25 PM
Do you want to add some humor to your Python script or application? Whether you're building a chatbot, developing a command line tool, or just want to entertain yourself with random jokes, the pyjokes library can help. With pyjokes you can easily generate jokes in various categories and customize them to your liking. In this blog post, we will explore how to create random jokes in Python using the pyjokes library. We'll cover the installation process, generating different categories of jokes, customizing jokes, displaying them in a console application or web page, and handling any potential errors that may occur. Install pyjokes Before we start using pyjokes to create random jokes, we need
 PyCharm Advanced Tutorial: Use PyInstaller to package code into EXE format
Feb 20, 2024 am 09:34 AM
PyCharm is a powerful Python integrated development environment that provides a wealth of functions and tools to help developers improve efficiency. Among them, PyInstaller is a commonly used tool that can package Python code into an executable file (EXE format) to facilitate running on machines without a Python environment. In this article, we will introduce how to use PyInstaller in PyCharm to package Python code into EXE format, and provide specific
 Exploring Orange3: Opening up a new world of data mining and machine learning!
Mar 04, 2024 pm 08:16 PM
Orange3 is a powerful open source data visualization and machine learning tool. It has rich data processing, analysis and modeling functions, providing users with simple and fast data mining and machine learning solutions. This article will briefly introduce the basic functions and usage of Orange3, and combine it with actual application scenarios and Python code cases to help readers better master the usage skills of Orange3. The basic functions of Orange3 include data loading, data preprocessing, feature selection, model establishment and evaluation, etc. Users can use the intuitive interface to drag and drop components to easily build data processes. At the same time, more complex data processing and modeling tasks can also be completed through Python scripts. Below we will go through a practical
 How to read excel data in pycharm
Apr 03, 2024 pm 08:42 PM
How to read Excel data using PyCharm? The steps are as follows: install the openpyxl library; import the openpyxl library; load the Excel workbook; access a specific worksheet; access cells in the worksheet; traverse rows and columns.
 How to repeat a string in python_python repeating string tutorial
Apr 02, 2024 pm 03:58 PM
1. First open pycharm and enter the pycharm homepage. 2. Then create a new python script, right-click - click new - click pythonfile. 3. Enter a string, code: s="-". 4. Then you need to repeat the symbols in the string 20 times, code: s1=s*20. 5. Enter the print output code, code: print(s1). 6. Finally run the script and you will see our return value at the bottom: - repeated 20 times.
 Flask installation and configuration tutorial: a tool to easily build Python web applications
Feb 20, 2024 pm 11:12 PM
Flask installation and configuration tutorial: A tool to easily build Python Web applications, specific code examples are required. Introduction: With the increasing popularity of Python, Web development has become one of the necessary skills for Python programmers. To carry out web development in Python, we need to choose a suitable web framework. Among the many Python Web frameworks, Flask is a simple, easy-to-use and flexible framework that is favored by developers. This article will introduce the installation of Flask framework,
 What are the website subdomain query tools?
Mar 07, 2024 am 09:49 AM
Website subdomain query tools include: 1. Whois Lookup: can query the registration information of a domain name, including subdomain names; 2. Sublist3r: can automatically scan the subdomain name of a domain name with the help of search engines and other tools; 3. DNSdumpster: can query Information such as the subdomain name, IP address and DNS record of the domain name; 4. Fierce: You can query the subdomain name information of the domain name through the DNS server: 5. Nmap; 6. Recon-ng; 7. Google Hacking.


