
 Web Front-end
H5 Tutorial
HTML5/CSS3 sample code sharing to implement beautiful step-by-step registration and login form
Web Front-end
H5 Tutorial
HTML5/CSS3 sample code sharing to implement beautiful step-by-step registration and login form
HTML5/CSS3 sample code sharing to implement beautiful step-by-step registration and login form

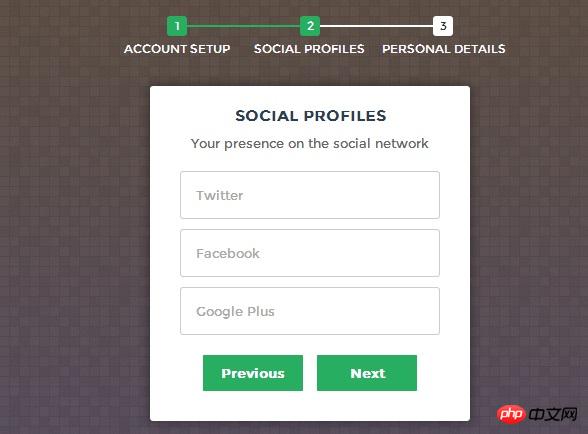
There are now many step-by-step login and registration forms, mainly to improve the user experience. Users can selectively fill in the corresponding form information, so that users will not be deterred by seeing a bunch of forms. What I share with you today is a step-by-step registration and login form based on HTML5 and CSS3. Needless to say, it looks very beautiful. You will know just by looking at the DEMO.
Next we will take a look at the implementation process. The code is a bit complicated, mainly composed of HTML code, CSS3 code and Javascript code.
HTML code:
<form id="msform">
    <!-- progressbar -->
    <ul id="progressbar">
        <li>Account Setup</li>
        <li>Social Profiles</li>
        <li>Personal Details</li>
    </ul>
    <!-- fieldsets -->
    <fieldset>
        <h2 id="Create-nbsp-your-nbsp-account">Create your account</h2>
        <h3 id="This-nbsp-is-nbsp-step-nbsp">This is step 1</h3>
        <input type="text" name="email" placeholder="Email" />
        <input type="password" name="pass" placeholder="Password" />
        <input type="password" name="cpass" placeholder="Confirm Password" />
        <input type="button" name="next" value="Next" />
    </fieldset>
    <fieldset>
        <h2 id="Social-nbsp-Profiles">Social Profiles</h2>
        <h3 id="Your-nbsp-presence-nbsp-on-nbsp-the-nbsp-social-nbsp-network">Your presence on the social network</h3>
        <input type="text" name="twitter" placeholder="Twitter" />
        <input type="text" name="facebook" placeholder="Facebook" />
        <input type="text" name="gplus" placeholder="Google Plus" />
        <input type="button" name="previous" value="Previous" />
        <input type="button" name="next" value="Next" />
    </fieldset>
    <fieldset>
        <h2 id="Personal-nbsp-Details">Personal Details</h2>
        <h3 id="We-nbsp-will-nbsp-never-nbsp-sell-nbsp-it">We will never sell it</h3>
        <input type="text" name="fname" placeholder="First Name" />
        <input type="text" name="lname" placeholder="Last Name" />
        <input type="text" name="phone" placeholder="Phone" />
        <textarea name="address" placeholder="Address"></textarea>
        <input type="button" name="previous" value="Previous" />
        <input type="submit" name="submit" value="Submit" />
</fieldset></form>The HTML code looks like a lot, but it is very simple. It mainly describes a form.
CSS code:
/*form styles*/#msform {
    width: 400px;
    margin: 50px auto;
    text-align: center;
    position: relative;
}#msform fieldset {
    background: white;
    border: 0 none;
    border-radius: 3px;
    box-shadow: 0 0 15px 1px rgba(0, 0, 0, 0.4);
    padding: 20px 30px;

    box-sizing: border-box;
    width: 80%;
    margin: 0 10%;    /*stacking fieldsets above each other*/
    position: absolute;
}/*Hide all except first fieldset*/#msform fieldset:not(:first-of-type) {
    display: none;
}/*inputs*/#msform input, #msform textarea {
    padding: 15px;
    border: 1px solid #ccc;
    border-radius: 3px;
    margin-bottom: 10px;
    width: 100%;
    box-sizing: border-box;
    font-family: montserrat;
    color: #2C3E50;
    font-size: 13px;
}/*buttons*/#msform .action-button {
    width: 100px;
    background: #27AE60;
    font-weight: bold;
    color: white;
    border: 0 none;
    border-radius: 1px;
    cursor: pointer;
    padding: 10px 5px;
    margin: 10px 5px;
}#msform .action-button:hover, #msform .action-button:focus {
    box-shadow: 0 0 0 2px white, 0 0 0 3px #27AE60;
}/*headings*/.fs-title {
    font-size: 15px;
    text-transform: uppercase;
    color: #2C3E50;
    margin-bottom: 10px;
}.fs-subtitle {
    font-weight: normal;
    font-size: 13px;
    color: #666;
    margin-bottom: 20px;
}/*progressbar*/#progressbar {
    margin-bottom: 30px;
    overflow: hidden;    /*CSS counters to number the steps*/
    counter-reset: step;
}#progressbar li {
    list-style-type: none;
    color: white;
    text-transform: uppercase;
    font-size: 9px;
    width: 33.33%;
    float: left;
    position: relative;
}#progressbar li:before {
    content: counter(step);
    counter-increment: step;
    width: 20px;
    line-height: 20px;
    display: block;
    font-size: 10px;
    color: #333;
    background: white;
    border-radius: 3px;
    margin: 0 auto 5px auto;
}/*progressbar connectors*/#progressbar li:after {
    content: '';
    width: 100%;
    height: 2px;
    background: white;
    position: absolute;
    left: -50%;
    top: 9px;
    z-index: -1;
    /*put it behind the numbers*/}
    #progressbar li:first-child:after {
    /*connector not needed before the first step*/
    content: none;
}
/*marking active/completed steps green*/
/*The number of the step and the connector before it = green*/
#progressbar li.active:before,
#progressbar li.active:after{
    background: #27AE60;
    color: white;
}Here we just posted the CSS code for rendering the form, which makes our form look very fresh and natural. Another point to note is that here we use the :before attribute of CSS3.
The last is the Javascript code, which can realize the step jump of the registration form.
Javascript code:
var current_fs, next_fs, previous_fs; //fieldsets
var left, opacity, scale; //fieldset properties which we will animate
var animating; //flag to prevent quick multi-click glitches

$(".next").click(function(){
    if(animating) return false;
    animating = true;

    current_fs = $(this).parent();
    next_fs = $(this).parent().next();

    //activate next step on progressbar using the index of next_fs
    $("#progressbar li").eq($("fieldset").index(next_fs)).addClass("active");

    //show the next fieldset
    next_fs.show();
    //hide the current fieldset with style
    current_fs.animate({opacity: 0}, {
        step: function(now, mx) {
            //as the opacity of current_fs reduces to 0 - stored in "now"
            //1. scale current_fs down to 80%
            scale = 1 - (1 - now) * 0.2;
            //2. bring next_fs from the right(50%)
            left = (now * 50)+"%";
            //3. increase opacity of next_fs to 1 as it moves in
            opacity = 1 - now;
            current_fs.css({'transform': 'scale('+scale+')'});
            next_fs.css({'left': left, 'opacity': opacity});
        },
        duration: 800,
        complete: function(){
            current_fs.hide();
            animating = false;
        },
        //this comes from the custom easing plugin
        easing: 'easeInOutBack'
    });
});

$(".previous").click(function(){
    if(animating) return false;
    animating = true;

    current_fs = $(this).parent();
    previous_fs = $(this).parent().prev();

    //de-activate current step on progressbar
    $("#progressbar li").eq($("fieldset").index(current_fs)).removeClass("active");

    //show the previous fieldset
    previous_fs.show();
    //hide the current fieldset with style
    current_fs.animate({opacity: 0}, {
        step: function(now, mx) {
            //as the opacity of current_fs reduces to 0 - stored in "now"
            //1. scale previous_fs from 80% to 100%
            scale = 0.8 + (1 - now) * 0.2;
            //2. take current_fs to the right(50%) - from 0%
            left = ((1-now) * 50)+"%";
            //3. increase opacity of previous_fs to 1 as it moves in
            opacity = 1 - now;
            current_fs.css({'left': left});
            previous_fs.css({'transform': 'scale('+scale+')', 'opacity': opacity});
        },
        duration: 800,
        complete: function(){
            current_fs.hide();
            animating = false;
        },
        //this comes from the custom easing plugin
        easing: 'easeInOutBack'
    });
});

$(".submit").click(function(){
    return false;
})Here we can see that using jQuery code becomes very simple. There are mainly 3 events: next, previous, and submit. At the same time, jQuery is used to achieve the animation effect of fading in and out during next and previous. Isn’t it very charming? Finally you can also download the source code.
The above is the detailed content of HTML5/CSS3 sample code sharing to implement beautiful step-by-step registration and login form. For more information, please follow other related articles on the PHP Chinese website!

Hot AI Tools

Undresser.AI Undress
AI-powered app for creating realistic nude photos

AI Clothes Remover
Online AI tool for removing clothes from photos.

Undress AI Tool
Undress images for free

Clothoff.io
AI clothes remover

Video Face Swap
Swap faces in any video effortlessly with our completely free AI face swap tool!

Hot Article
Hot Tools

Notepad++7.3.1
Easy-to-use and free code editor

SublimeText3 Chinese version
Chinese version, very easy to use

Zend Studio 13.0.1
Powerful PHP integrated development environment

Dreamweaver CS6
Visual web development tools

SublimeText3 Mac version
God-level code editing software (SublimeText3)
Hot Topics
 1390
1390
 52
52

 Table Border in HTML
Sep 04, 2024 pm 04:49 PM
Table Border in HTML
Sep 04, 2024 pm 04:49 PM
Guide to Table Border in HTML. Here we discuss multiple ways for defining table-border with examples of the Table Border in HTML.
 Nested Table in HTML
Sep 04, 2024 pm 04:49 PM
Nested Table in HTML
Sep 04, 2024 pm 04:49 PM
This is a guide to Nested Table in HTML. Here we discuss how to create a table within the table along with the respective examples.
 HTML margin-left
Sep 04, 2024 pm 04:48 PM
HTML margin-left
Sep 04, 2024 pm 04:48 PM
Guide to HTML margin-left. Here we discuss a brief overview on HTML margin-left and its Examples along with its Code Implementation.
 HTML Table Layout
Sep 04, 2024 pm 04:54 PM
HTML Table Layout
Sep 04, 2024 pm 04:54 PM
Guide to HTML Table Layout. Here we discuss the Values of HTML Table Layout along with the examples and outputs n detail.
 HTML Input Placeholder
Sep 04, 2024 pm 04:54 PM
HTML Input Placeholder
Sep 04, 2024 pm 04:54 PM
Guide to HTML Input Placeholder. Here we discuss the Examples of HTML Input Placeholder along with the codes and outputs.
 Moving Text in HTML
Sep 04, 2024 pm 04:45 PM
Moving Text in HTML
Sep 04, 2024 pm 04:45 PM
Guide to Moving Text in HTML. Here we discuss an introduction, how marquee tag work with syntax and examples to implement.
 HTML Ordered List
Sep 04, 2024 pm 04:43 PM
HTML Ordered List
Sep 04, 2024 pm 04:43 PM
Guide to the HTML Ordered List. Here we also discuss introduction of HTML Ordered list and types along with their example respectively
 HTML onclick Button
Sep 04, 2024 pm 04:49 PM
HTML onclick Button
Sep 04, 2024 pm 04:49 PM
Guide to HTML onclick Button. Here we discuss their introduction, working, examples and onclick Event in various events respectively.
