 Backend Development
 Python Tutorial
 Detailed explanation of using DBGPavim to debug PHP/Python programs in Vim
Detailed explanation of using DBGPavim to debug PHP/Python programs in Vim
This article mainly introduces how to use VIM + XDebugDebugPHP program, although there are many articles introducing how to use Eclipse + XDebug to debug PHP on the developer's work machine, there are still relatively few articles on how to configure VIM + The setting articles all use an older plug-in. Here we mainly introduce a new plug-in, DBGPavim, which has many advantages over some old plug-ins. At the same time, this plug-in can be perfectly used for debugging Python programs. VIM + XDebug also has many advantages over Eclipse + XDebug, which will be described in the article
Implementation principle

- ##Installation
zend_extension=/path/to/xdebug.so
 xdebug.remote_enable=1
Copy after loginEdit your httpd.conf and add the following lines:
php_value xdebug.remote_autostart 1
Copy after login- Note: This line is not necessary. If you do not add this line, you need to add XDEBUG_ SESSION
- XDebug can be found at http://xdebug.org/docs/install. ##Edit php.ini and add the following two lines:
- ##If multiple developers need to debug different VirtualHosts at the same time, they can Add the following lines to your VirtualHost section: Note: 9009 here is the port that VIM should listen to as a DBGp server. Different developers use different port numbers in different VirtualHosts. This port number must be consistent with the dbgPavimPort mentioned in the next section. Without this line, the default port number is 9000. Finally, you can check whether your XDebug configuration is correct through phpinfo
php_value xdebug.remote_port 9009
Copy after login.php. You must be able to see the values of the following lines as follows (mainly the first two columns):
xdebug.remote_autostart	On	Off
 xdebug.remote_enable	On	On
 xdebug.remote_handler	dbgp	dbgp
 xdebug.remote_host	127.0.0.1	127.0.0.1
 xdebug.remote_port	9009	9000
<?php
     phpinfo();
?>Configuring VIM + DBGPavim
The DBGPavim plug-in itself is implemented in Python, so your VIM needs to support Python 2.7. Open your VIM and enter the command
:version
- Compile VIM with the following command:
- Note: The /usr/lib/python2.7/config here depends on where you installed Python2.7. Download DBGPavim from here or here, put it in your ~/.vim directory, and edit your ~/.vimrc, add the following two lines:
- Note: here 9009 must be consistent with 9009 in the previous section. If xdebug.remote_port was not configured in the previous section, there is no need to configure it here, because they will use the default 9000. dbgPavimBreakAtEntry=0 tells VIM not to stop at the entry, so it will only stop at the breakpoint. You can restart VIM and press F5 to check whether your DBGPavim configuration is correct. If you configure it successfully, you will see the following prompt information in the lower right corner of the VIM window:
 ./configure --prefix=/opt/vim --enable-pythoninterp --with-python-config-dir=/usr/lib/python2.7/config
 make
 make install
let g:dbgPavimPort = 9009
let g:dbgPavimBreakAtEntry = 0
bap-LISN-9009
<bae|bap>-<LISN|PENDn|CONN|CLSD>
Status
bae Break At Entry,在入口处停下
bap Break only At breakPoints,只在断点处停下
LISN	调试器已启动,正处于监听状态。
PEND-n	调试器已捕捉到连接请求,可以按F5进入调试模式了。
CONN	VIM正处于调试模式中。
CLSD	调试器已停止。
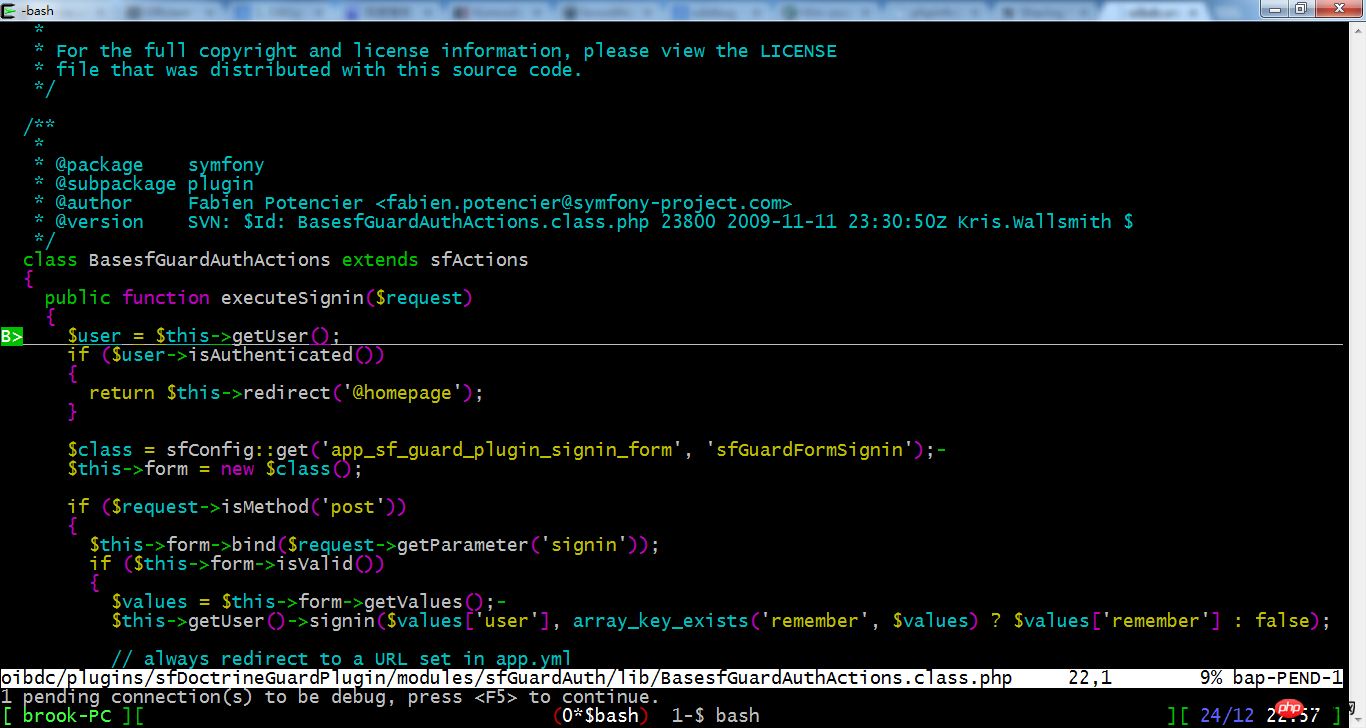
用浏览器访问会调用相应PHP文件的URL,你会看到VIM状态栏里的的提示信息变成:
bap-PEND-1
它告诉你已经有一个连接被拦截,可以按F5开始调试了。

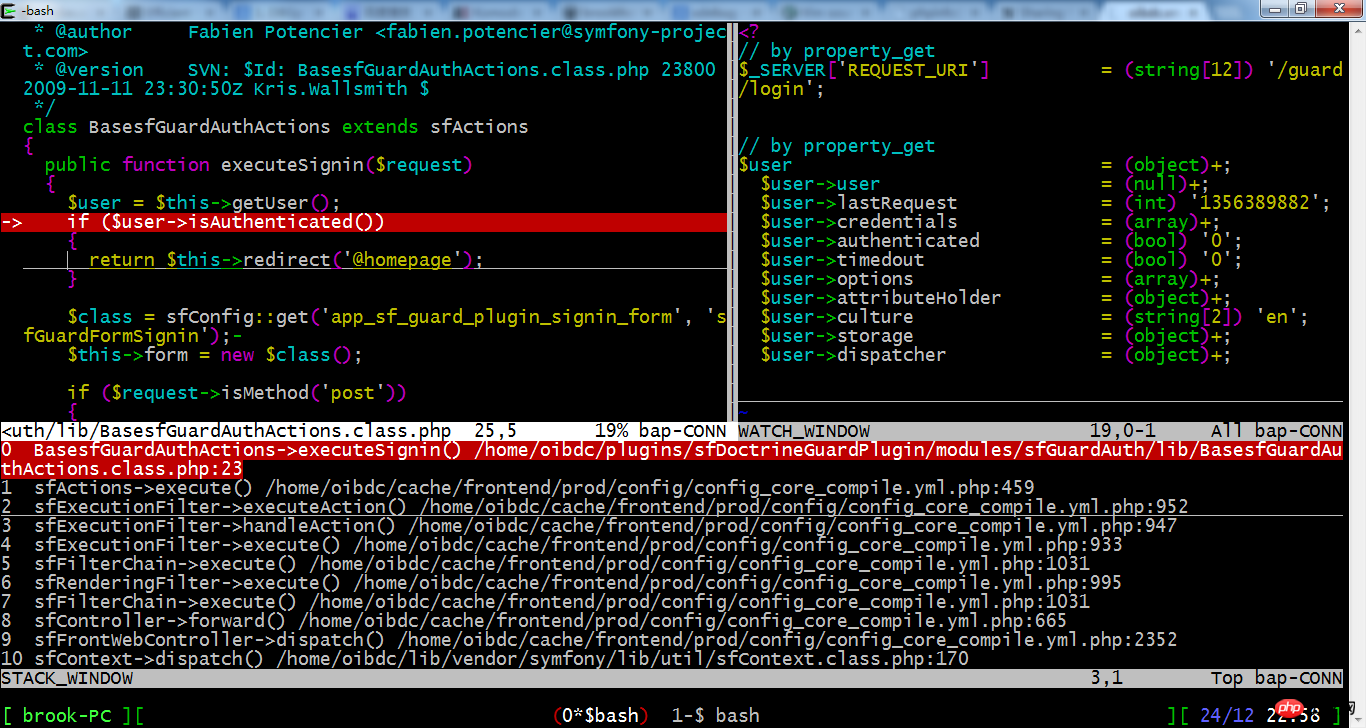
按F5进入调试模式,你会看到VIM窗口被分成三部分:左上为源码窗口,右上为变量查看窗口,下方为调用堆栈窗口。
 在源码窗口里,把光标定位到某一个变量上面按F12,在变量查看窗口就能看到该变量的值,如果该变量不是简单变量,其成员也会显示出来。如果该变量的某个成员仍不是简单变量,该行后面会出现一个加号,在该行按回车键,该成员的值将被继续展开。如果你想直接查看某个变量的成员变量,可以按v切换到visual模式,选中该成员再按F12,比如$this->login。在堆栈窗口,当你在某一行按回车,将跳到该层。最上面一行是最底层,最下面一行是最顶层。切换调用堆栈的层次,可以帮助你查看各个层次的变量,比如有些全局变量只有在最顶层才能看到。对于源码中没有出现的变量,你可以通过命令:Pg来查看,比如:
g $this->memberShip
Copy after login
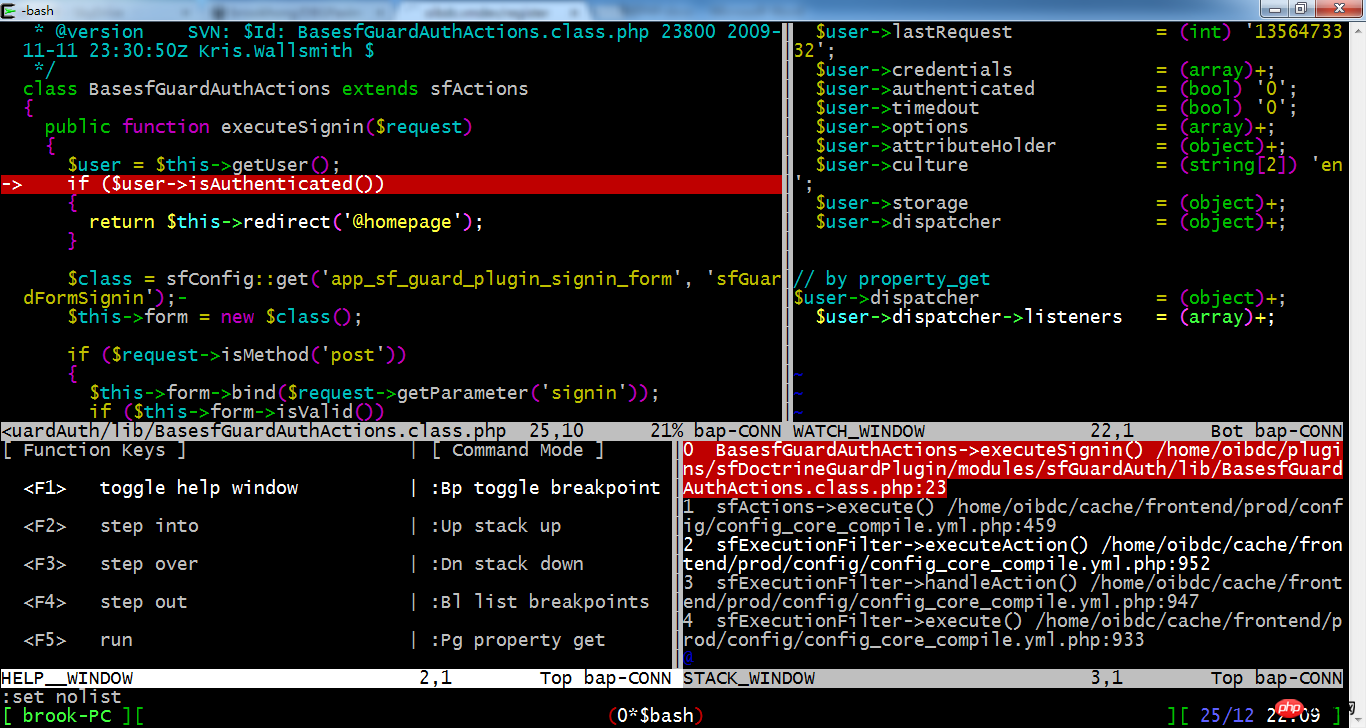
你可以开始你的调试了,随时按F1可调出帮助窗口,再次F1就关闭帮助窗口。

调试命令行启动的PHP程序
如果你需要调试命令行启动的PHP程序,也需要保证PHP程序端的设置是正确的。这些设置可以像前面一样在php.ini中设定,也可以通过命令行参数来设定。比如:
php -dxdebug.remote_autostart=1 -dxdebug.remote_port=9009 test.php
如果你的命令行使用的ini和apache中php5_module使用的ini是一样的(通常情况是这样的),你不需要在参数中再来做这些设置。但如果你在ini中的设置是放在某个virtualhost段里,你仍然需要加上这些设置。 你可以通过命令行:
php --ini
来查看你的命令行用的是哪个ini。
接着你可以使用命令:
php -r "phpinfo();"|grep xdebug.remote_
来检查你的XDebug设置。
基本步骤如下:
用VIM打开你需要调试的PHP文件,F10设置断点,F5启动调试监听。
从命令行运行php程序如上。
回到你的VIM窗口,将看到提示信息为PEND-1。
按F5进入调试模式。
DBGPavim提供一个:Dp命令简化命令行程序的调试。只需打开你的PHP文件,输入命令:Dp即可。
调试Python程序
前面说过VIM + DBGPavim作为DBGp协议的服务器,可以与XDebug协同工作,也可以与ActiveState提供的Komodo Python Remote Debugging Client协同工作,实现Python程序的调试,具体步骤如下:
从这里下载安装Komodo Python Remote Debugging Client,把解压后的bin目录加到你的PATH路径中,注意bin目录下的pydbgp文件。
用VIM打开你需要调试的Python文件,F10设置断点,F5启动调试监听。
通过pydbgp运行你的Python程序,如
pydbgp -d 127.0.0.1:9009 test.py
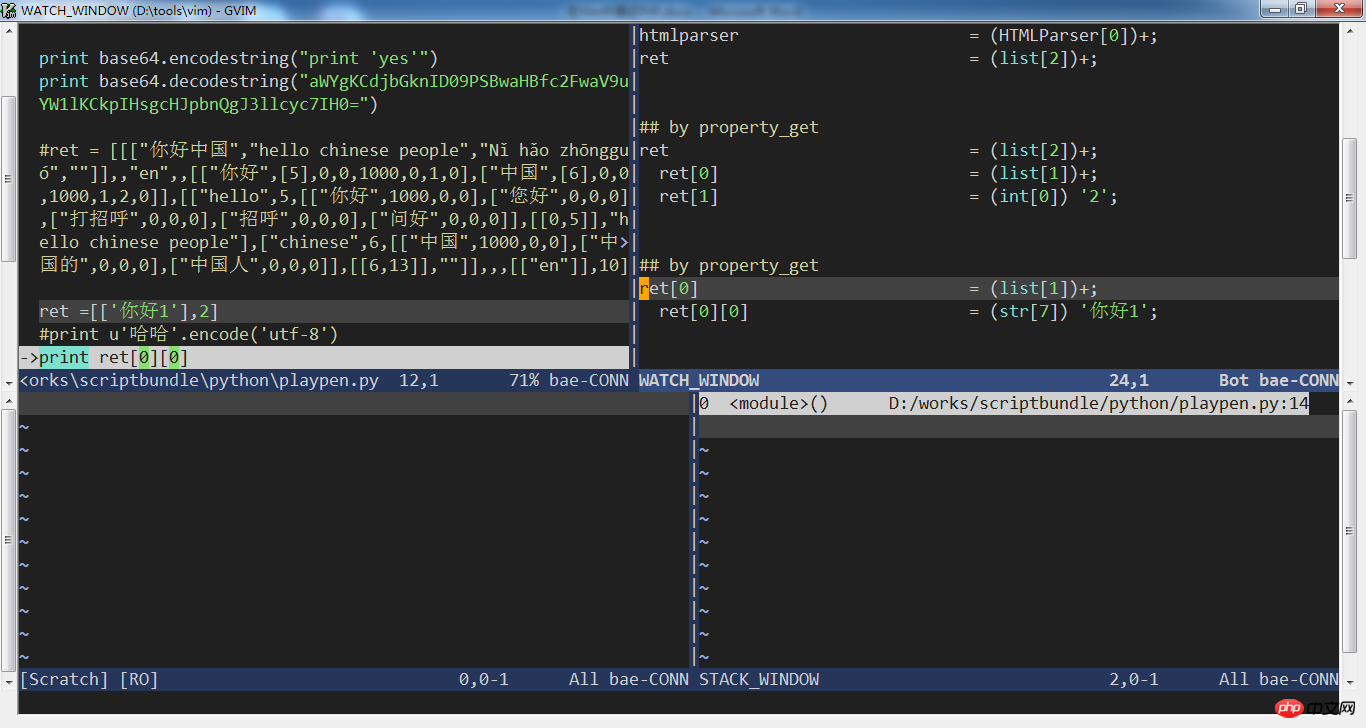
Copy after login上面的:Dp命令同样适用于Python调试,下图为Windows 7下用GVIM + pydbgp调试Python的截图。

VIM + DBGPavim相对于Eclipse + XDebug的优势
大多数服务器不会启动XServer,无法在服务器上启动Eclipse。如果在开发人员工作机上启动Eclipse + XDebug,就相当于把DBGp服务器在工作机上运行,你需要设置路径映射,也就是HTTP Server执行的一份代码在服务器上,Eclipse调试时打开的是一份代码,在工作机上,要保证这两份代码能对应上需要映射路径。当程序规模不大时,问题不大,当程序规模大时,会比较麻烦,而且要保证代码的同步,否则会串行。
同时可以遭遇网络防火墙之类的问题。
VIM + DBGPavim也是支持远程调试的,但同样避免不了路径映射的设置,如下:
let g:dbgPavimPathMap = [['D:/works/php','/var/www'],]
Copy after login注:这里的9009端口就相当于上面为PHP调试时设置的xdebug.remote_port,需要和dbgPavimPort保持一致。
回到你的VIM窗口,将看到提示信息为PEND-1。
按F5进入调试模式。
DBGPavim相对于其他插件的优势
DBGPavim源于VIM早期的一个DBGp插件http://www.vim.org/scripts/script.php?script_id=1152,从这个插件还衍生出其他一些DBGp插件。但DBGPavim重写了作为调试器后台的DBGp服务器,异步监听,使得VIM在监听DBGp的同时不妨碍用户与VIM之间的交互。用户按F5启动调试监听后,可继续使用VIM,随时可按F6停止监听。
DBGPavim会监听所有来自DBGp客户端如XDebug、pydbgp的DBGp连接,不像其它插件只能捕获第一个连接。这对于大规模的WEB程序是必须的,因为现在的一次网页加载通常会触发多个HTTP请求,而我们需要调试的可能来自其中的任何一个。 同时DBGPavim支持只在断点处停下,其它的插件都是在入口处停下,需要程序员一步步跟踪进去。这省了开发人员很大的麻烦,而且避免出错后一次次的重启调试。
相信你也已经发现,DBGPavim可以与Windows下的GVIM一起工作,并且工作的很好。
DBGPavim的详细使用参考
VIM normal模式下
F5	启动调试监听,或者有可调试连接时进入调试模式。
F6	停止调试监听。
F8	切换dbgPavimBreakAtEntry的值,按这个键你可以看到状态栏提示信息在bae和bap之间切换,即是否在PHP程序入口处停下。
F10	在当前行设置或删除断点,在调试模式下同样适用。
调试模式下
F1	打开或关闭帮助窗口
F2	单步进入
F3	单步跳过
F4	单步退出
F5	继续执行直到下一个断点,如果后续没有断点就退出调试模式。
F6	停止调试,这个按键就导致VIM退出调试模式,并且停止调试监听。
F7	调试时执行php语句,按下F7后,用户可在变量查看窗口输入php语句,回车后执行。
F9	最大化某个子窗口,或者重置窗口布局。
F11	查看当前执行环境下的所有变量的值,在不同的堆栈层次,会有不同的结果。
F12	查看光标下的变量的值。
以上功能键为默认配置,你如果习惯多数浏览器的按键设置,可以把下面的代码加入你的.vimrc中:
let g:dbgPavimKeyRun = '<F8>' let g:dbgPavimKeyStepOver = '<F10>' let g:dbgPavimKeyStepInto = '<F11>' let g:dbgPavimKeyStepOut = '<F12>' let g:dbgPavimKeyPropertyGet = '<F3>' let g:dbgPavimKeyContextGet = '<F4>' let g:dbgPavimKeyToggleBp = '<F9>' let g:dbgPavimKeyToggleBae = '<F5>' let g:dbgPavimKeyRelayout = '<F2>'
VIM命令,所有命令只有第一个字母为大写。
:Bl	列出所有断点
:Bp	与F10功能相同  p	这个命令可用于快速调试当前文件,它实现了如下功能:

    1. 检查命令行下XDebug/pydbgp的设置是否正确
    2. 启动调试器监听
    3. 用php/pydbgp执行当前文件  g <longfoo>	查看较长变量的值,比如:Pg $this->savings[3]
:Up	调用堆栈往上一级  n	调用堆栈往下一级
:Wc [$foo]	打开/关闭对变量$foo的监视。如果没有参数,就监视当前执行环境下的所有变量。
:We <foo>	打开/关闭对语句foo的监视,即每一单步后自动执行foo语句。
:Wl	列出所有被监视的变量或语句。
:Children <n>	对于数组默认显示前1024个元素,这个命令可以修改。  epth <n>	对于复杂变量,默认只显示下一层成员,这个命令可以设置限制多层。
:Length <n> 对于字符串变量,默认执行显示前1024个字符,这个命令可以设置显示长度。The above is the detailed content of Detailed explanation of using DBGPavim to debug PHP/Python programs in Vim. For more information, please follow other related articles on the PHP Chinese website!

Hot AI Tools

Undresser.AI Undress
AI-powered app for creating realistic nude photos

AI Clothes Remover
Online AI tool for removing clothes from photos.

Undress AI Tool
Undress images for free

Clothoff.io
AI clothes remover

Video Face Swap
Swap faces in any video effortlessly with our completely free AI face swap tool!

Hot Article

Hot Tools

Notepad++7.3.1
Easy-to-use and free code editor

SublimeText3 Chinese version
Chinese version, very easy to use

Zend Studio 13.0.1
Powerful PHP integrated development environment

Dreamweaver CS6
Visual web development tools

SublimeText3 Mac version
God-level code editing software (SublimeText3)

Hot Topics
 How to solve the permissions problem encountered when viewing Python version in Linux terminal?
Apr 01, 2025 pm 05:09 PM
Solution to permission issues when viewing Python version in Linux terminal When you try to view Python version in Linux terminal, enter python...
 How to teach computer novice programming basics in project and problem-driven methods within 10 hours?
Apr 02, 2025 am 07:18 AM
How to teach computer novice programming basics within 10 hours? If you only have 10 hours to teach computer novice some programming knowledge, what would you choose to teach...
 How to avoid being detected by the browser when using Fiddler Everywhere for man-in-the-middle reading?
Apr 02, 2025 am 07:15 AM
How to avoid being detected when using FiddlerEverywhere for man-in-the-middle readings When you use FiddlerEverywhere...
 How to efficiently copy the entire column of one DataFrame into another DataFrame with different structures in Python?
Apr 01, 2025 pm 11:15 PM
When using Python's pandas library, how to copy whole columns between two DataFrames with different structures is a common problem. Suppose we have two Dats...
 How does Uvicorn continuously listen for HTTP requests without serving_forever()?
Apr 01, 2025 pm 10:51 PM
How does Uvicorn continuously listen for HTTP requests? Uvicorn is a lightweight web server based on ASGI. One of its core functions is to listen for HTTP requests and proceed...
 How to dynamically create an object through a string and call its methods in Python?
Apr 01, 2025 pm 11:18 PM
In Python, how to dynamically create an object through a string and call its methods? This is a common programming requirement, especially if it needs to be configured or run...
 How to solve permission issues when using python --version command in Linux terminal?
Apr 02, 2025 am 06:36 AM
Using python in Linux terminal...
 How to handle comma-separated list query parameters in FastAPI?
Apr 02, 2025 am 06:51 AM
Fastapi ...


 在源码窗口里,把光标定位到某一个变量上面按F12,在变量查看窗口就能看到该变量的值,如果该变量不是简单变量,其成员也会显示出来。如果该变量的某个成员仍不是简单变量,该行后面会出现一个加号,在该行按回车键,该成员的值将被继续展开。如果你想直接查看某个变量的成员变量,可以按v切换到visual模式,选中该成员再按F12,比如$this->login。在堆栈窗口,当你在某一行按回车,将跳到该层。最上面一行是最底层,最下面一行是最顶层。切换调用堆栈的层次,可以帮助你查看各个层次的变量,比如有些全局变量只有在最顶层才能看到。对于源码中没有出现的变量,你可以通过命令:Pg来查看,比如:


