Home > Web Front-end > H5 Tutorial > HTML5 code sharing for circle bubble game

HTML5 code sharing for circle bubble game

黄舟
Release: 2017-03-24 15:29:40
Original
3297 people have browsed it

Function Description:

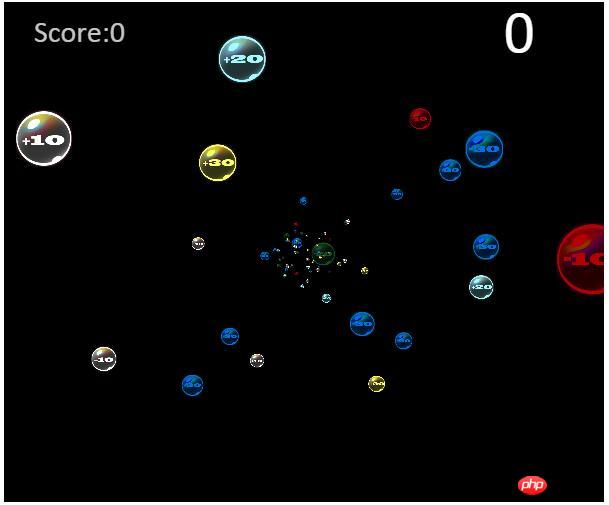
## Within one minute, Use the left mouse button to circle bubbles on the canvas, where the points of bubbles are 10 (white), 20 (light blue), 30 (yellow), -10 (red), -20 (green), -30 (dark blue), which can be used once Circle multiple bubbles and the total score will be calculated when the countdown is over. This game is based on cnGameJS.

Effect preview:
HTML5 code sharing for circle bubble game

Implementation analysis:

First, each ball Define a ball class. Since the ball needs to use pictures and has a certain size and movement, this class

inherits the sprite class of cnGameJS. In addition to having x and y coordinates, the ball class also has a z coordinate , which is used to make the ball have a visual difference in distance from the player.

/*    小球对象    */
var Ball=function(opt){
    this.parent.call(this,opt);
    this.oriPos=[this.x+this.width/2,this.y+this.height/2];
    this.oriSize=opt.size;
    this.z=opt.z||0;
    this.score=opt.score||0;
    this.oriSpeedZ=4+Math.random()*4;
    this.scale=1;
    this.resetXY();
    
}
cg.core.inherit(Ball,Sprite);
Copy after login

After that, we add the resetXY method to the ball. This method changes the position and size of the ball according to the z coordinate of the ball, so that the ball has a visual difference between far and near. First, calculate the scaling ratio scale based on z, and then adjust x, y, width, and height based on scale. In addition, we make the ball disappear when z is greater than 1000, thus preventing the ball from being too large and occupying the entire screen.

cg.core.extendProto(Ball,{
    disappear:function(){//小球被选中消失
        list.remove(this);
    },
    resetXY:function(){//根据Z改变x,y的位置和尺寸
        var oriX=this.oriPos[0];
        var oriY=this.oriPos[1];
        var oriSize=this.oriSize;
        this.scale=((center[0]+this.z)/center[0]);//相对于现时的scale        
        this.x=(oriX-center[0])*this.scale+center[0];
        this.y=(oriY-center[1])*this.scale+center[1];
        this.height=this.width=this.oriSize*this.scale;
        this.speedZ=this.oriSpeedZ*this.scale;
        if(this.z>1000){
            this.disappear();
        }
    },
    update:function(){
        this.parent.prototype.update.call(this);
        this.resetXY();
    }
});
Copy after login

Later, in order to manage multiple balls, you can add a ball manager. The manager is responsible for dynamically changing the distance between the ball and the player and making the ball appear in a random position on the canvas:

/*    小球对象管理器    */
var ballsManager={
    createDuration:200,
    ballSize:30,
    lastCreateTime:Date.now(),
    /*    随机生成小球    */
    createRandomBalls:function(num){
        var now=Date.now();
        if(now-this.lastCreateTime>this.createDuration){
            for(var i=0;i<num;i++){
                var x=Math.random()* cg.width;
                var y=Math.random()* cg.height;
                var randomKind=ballKinds[Math.floor(Math.random()*6)];//随机获得的小球种类和分值    
                var newBall=new Ball({x:x,y:y,size:this.ballSize,z:-280,score:randomKind[1]});
                newBall.setCurrentImage(srcObj[randomKind[0]]);//设置图片
                list.add(newBall);
            }
            this.lastCreateTime=now;
        }
    },
    /*    改变小球位置    */
    changeBallsPos:function(){
        var ballsArr=list.get(function(elem){
            return elem instanceof Ball;                               
        });
        for(var i=0,len=ballsArr.length;i<len;i++){
            var ball=ballsArr[i];
            ball.z+=ball.speedZ;    
        }
    }
}
Copy after login

This is the introduction to ball management, and then we will mainly introduce how to implement mouse circle selection.

If we draw a line segment based on the current position of the mouse and the previous position every time the frame

updates, then the movement trajectory of the mouse can be represented by a curve, which It is composed of line segments drawn each time, so we can also say that the curve is a curve composed of multiple line segments connected end to end. Therefore, we can first implement a line segment class:

/*    直线    */
        var line=function(options){
            if (!(this instanceof arguments.callee)) {
                return new arguments.callee(options);
            }
            this.init(options);
        }
    
        
        line.prototype = {
            /**
            *初始化
            **/
            init: function(options) {    
                this.start=[0,0];
                this.end=[0,0];    
                this.style="red";
                this.lineWidth=1;
                this.context=cg.context;
                options = options || {};
                cg.core.extend(this,options);
            },
Copy after login

This class saves the starting point coordinates and end point coordinates of the line segment, as well as the width, style, etc.

What needs to be considered next is how to implement circle selection. When we draw a circle with the mouse, each small line segment forms a closed polygon. At this time, we can say that the mouse has circled a closed area, and then we can further calculate which small balls are in the area.

But how to determine whether the mouse has circled a closed area? The method used here is:

Traverse each line segment, traverse the remaining line segments starting from the next line segment and the next line segment, and determine whether any of them intersects with the starting line segment. If they intersect, prove the curve closed. Note that traversing from the next line segment to the next line segment here is to skip the situation where the line segments are connected end to end. (For example, the first line segment must intersect with the second line segment, so start judging from the third line segment and skip the intersection of adjacent line segments.) The code is as follows:

/*    返回轨迹是否闭合    */
    var isClose=function(lines){    
        var hasClose=false;
        for(var i=0;i<lines.length;i++){
            var l1=lines[i];
            for(var j=i+2;j<lines.length;j++){
                var l2=lines[j];
                if(l2){
                    var point=l1.isCross(l2);//交点坐标
                    if(point){//非连接的相交
                        resetLineSegs(lines,i,j,point);
                        hasClosed=true;
                        return true;
                    }
                }
            }
        }
        
        return false;
    };
Copy after login

The isCross method returns the intersection point of the line segments After we obtain the coordinates, we need to correct the polygon into a real polygon, because the polygon circled with the mouse is not a real polygon, and its beginning and end parts are likely to be prominent, as shown below:

We assume that the mouse starts a circle from the green part and ends at the blue part.

In this case, the trajectory is not a strict polygon, because it has extra blue and green parts. So we need to perform a correction operation on the circled polygon to turn it into a real closed polygon:

    /*    重置线段    */
    var resetLineSegs=function(lines,i,j,point){
        lines[i].end[0]=point[0];
        lines[i].end[1]=point[1];
        lines[i+1].start[0]=point[0];
        lines[i+1].start[1]=point[1];
        
        lines[j].start[0]=point[0];
        lines[j].start[1]=point[1];
    
        lines[j-1].end[0]=point[0];
        lines[j-1].end[1]=point[1];        for(var m=i+1;m<j;m++){
            closedLineSegsArr.push(lines[m]);
        }    
    }
Copy after login

When we determine that two line segments intersect, we can obtain these two line segments The

index, here are i and j (iarray. We will use these sides later to construct the polygon object.

       for(var i=0,len=closedLineSegsArr.length;i<len;i++){
                            pointsArr.push([closedLineSegsArr[i].start[0],closedLineSegsArr[i].start[1]]);    
                        }
                        polygon=new Polygon({pointsArr:pointsArr,style:"rgba(241,46,8,0.5)"});
Copy after login

Through the array of polygon edge objects, the coordinates of each vertex of the polygon can be obtained, and the polygon object can be constructed based on these coordinates. The next step is to determine whether the ball is inside the polygon.

  判断小球是否在多边形里,可以转化为判断小球的中点是否在多边形里,这里使用的方法叫射线法,意思是从一点向左发射出一条射线,如果射线和多边形有奇数个交点,则证明点在多边形内部。根据该定理实现的isInside方法如下:

/**
            *判断某点是否在多边形内(射线法)
            **/
            isInside:function(point){
                var lines=this.getLineSegs();

                var count=0;//相交的边的数量
                var lLine=new Line({start:[point[0],point[1]],end:[-9999,point[1]]});//左射线
                var crossPointArr=[];//相交的点的数组
                for(var i=0,len=lines.length;i<len;i++){
                    var crossPoint=lLine.isCross(lines[i]);
                    if(crossPoint){
                        for(var j=0,len2=crossPointArr.length;j<len2;j++){
                            //如果交点和之前的交点相同,即表明交点为多边形的顶点
                            if(crossPointArr[j][0]==crossPoint[0]&&crossPointArr[j][1]==crossPoint[1]){
                                break;    
                            }
                            
                        }
                        if(j==len2){
                            crossPointArr.push(crossPoint);    
                            count++;
                        }
                        
                    }
                }
        
                if(count%2==0){//不包含
                    return false;
                }
                return true;//包含
            },
Copy after login

  另外需要注意的是,由于射线与多边形相交交点个数是通过射线和多边形的每条边是否相交来判断,所以如果射线通过多边形的顶点,我们得出的结果就是相交了两次(通过顶点使射线与两条边都有相交)。因此我们需要记录判断过的交点,每次判断时检查该交点是否已经出现过,若出现过则不纳入计数,这样就基本实现了判断小球是否在鼠标圈选的多边形区域内。


The above is the detailed content of HTML5 code sharing for circle bubble game. For more information, please follow other related articles on the PHP Chinese website!

Related labels:
source:php.cn
Statement of this Website
The content of this article is voluntarily contributed by netizens, and the copyright belongs to the original author. This site does not assume corresponding legal responsibility. If you find any content suspected of plagiarism or infringement, please contact admin@php.cn
Popular Tutorials
More>
Latest Downloads
More>
Web Effects
Website Source Code
Website Materials
Front End Template