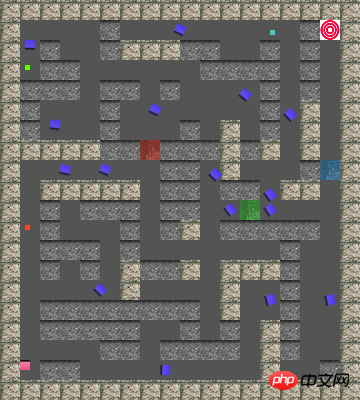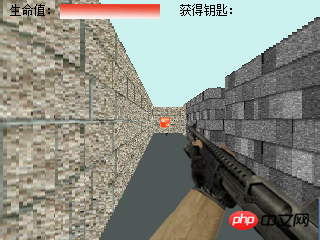
Function description:
In the game, while avoiding enemy attacks, you need to collect three different keys, open the corresponding door, and finally reach the destination.
This game is also based on the self-developed HTML5GameFrameworkcnGameJS.
It is recommended to use Chrome browser to view.
Effect preview:
The arrow keys control movement, the space bar shoots, and the shift key opens the door.


Implementation analysis:
In the previous article In "HTML5 Realizing 3D Maze", the effect of the 3D scene is simulated through the radiation method, and this article adds more game elements based on the 3D effect to build a more complete first-person shooting game.
How to simulate the 3D scene effect has been described in detail above. This article mainly introduces how to realize the interactive part of the game.
1. What is the correspondence between the game elements on the map and the objects on the screen?
First of all, each game element corresponds to two game objects. One game object is the object on the left map, and the other is the object on the right screen. For example, information such as the location of an enemy, whether to shoot, status, etc. are all represented by the map object on the left, and the display of the enemy on the screen is drawn based on the information of the object on the map on the left. In short, the map object on the left is responsible for determining the position and status of game elements. It actually stores game information. The screen object on the right is only responsible for the presentation of game elements. newEnemy.relatedObj= enemy2({src:srcObj.enemy,context:screenContext});
newEnemy.relatedObj.relatedParent=newEnemy;
relationship, so that the screen object can be easily accessed through the map object and vice versa.
2. How to make the enemy shoot after discovering the player?To implement this function, we need to know the angle of the player relative to the enemy. We can find this parameter based on the distance from the enemy to the player and the difference between their x and y. Then we can emit a ray in that direction from the location of the enemy object. If the ray can touch the player without touching the wall, it proves that the enemy can see the player. At this point the enemy can shoot at the player.
nextX = enemyCenter[0];
            nextY = enemyCenter[1];
            while (this.map.getPosValue(nextX, nextY) == 0) {
                distant += 1;
                x = nextX;
                y = nextY;
                if (cnGame.collision.col_Point_Rect(x, y, playerRect)&&!spriteList[i].relatedObj.isCurrentAnimation("enemyDie")) {
                //如果地图上敌人能看到玩家,则向玩家射击
                    spriteList[i].isShooting = true;
                    if (spriteList[i].lastShootTime > spriteList[i].shootDuration) {//检查是否超过射击时间间隔,超过则射击玩家
                        spriteList[i].shoot(player);
                        spriteList[i].relatedObj.setCurrentImage(srcObj.enemy1);
                        spriteList[i].lastShootTime = 0;

                    }
                    else {
                        if (spriteList[i].lastShootTime > 0.1) {
                            spriteList[i].relatedObj.setCurrentImage(srcObj.enemy);
                        }
                        spriteList[i].lastShootTime += duration;
                    }
                    break;
                }
                else {
                    spriteList[i].isShooting = false;
                }
                nextX = distant * Math.cos(angle) + enemyCenter[0];
                nextY = enemyCenter[1] - distant * Math.sin(angle);
            }

}3. How to detect whether the key is obtained?
Detecting key acquisition is actually to simply detect whether the player object and the key object collide. If a collision occurs, the key will be obtained. Collision detection also occurs on the map object on the left.
/*  检测是否获得钥匙    */
var checkGetKeys = function() {
    var list = cnGame.spriteList;
    var playerRect= this.player.getRect();
    for (var i = 0, len = list.length; i < len; i++) {
        if (list[i] instanceof key) {
            if (cnGame.collision.col_Between_Rects(list[i].getRect(),playerRect)) {
                this.keysValue.push(list[i].keyValue);
                list.remove(list[i]);
                i--;
                len--;
            }
        }
    }

}In css, we can use
z-Indexto maintain the correct hierarchical relationship of elements, but now we need to draw graphics on canvas, so Only the z-Index effect can be simulated. As mentioned in the previous article, the 3D scene is drawn by pixel lines of different lengths. Therefore, after adding other game elements, if you want to maintain the correct hierarchical relationship, you need to Customize the zIndex attribute for each element and pixel line and store it in an array.
Every time the array is drawn, the array is sorted according to zIndex, so that there is a sequential order for drawing, thereby ensuring the correct level. The value of zIndex is calculated based on the distance between the player and the element or pixel line: zIndex= Math.floor(1 / distant * 10000)
Sorting:
colImgsArray.sort(function(obj1, obj2) {

            if (obj1.zIndex > obj2.zIndex) {
                return 1;
            }
            else if (obj1.zIndex < obj2.zIndex) {
                return -1;
            }
            else {
                return 0;
            }
});Drawing:
//画出每条像素线和游戏元素
        for (var i = 0, len = colImgsArray.length; i < len; i++) {
            var obj = colImgsArray[i];
            if(obj.draw){
                obj.draw();
            }
            else{
                context.drawImage(obj.img, obj.oriX, obj.oriY, obj.oriWidth, obj.oriHeight, obj.x, obj.y, obj.width, obj.height);
            }
}5. How to determine when the player hits the enemy?
The judgment of the player hitting the enemy actually uses collision detection, but this time the collision detection is performed using the element on the screen.
We only need to detect whether the rectangle formed by the crosshair (middle point of the screen) collides with the enemy object, and then we can detect whether the enemy is hit.The above is the detailed content of Code sharing for HTML5 first-person shooter game implementation. For more information, please follow other related articles on the PHP Chinese website!for (var i = list2.length - 1; i >= 0; i--) {
if (list2[i] instanceof enemy2 && list2[i].relatedParent.isShooting) {
var obj = list2[i];
var enemyRect = obj.getRect();//构造敌人在屏幕上形成的矩形对象
if (cnGame.collision.col_Point_Rect(starPos[0], starPos[1], enemyRect)) {
obj.setCurrentAnimation("enemyDie");
break;
}
}
}
 What are the production methods of html5 animation production?
 The difference between HTML and HTML5
 Why do all the icons in the lower right corner of win10 show up?
 How to solve the problem that the print processor does not exist
 What is nfc access control card
 what is h5
 How to get Bitcoin
 What size is a5 paper
 U coin price today


