With the development of the Internet, the traditional HTTP protocol has been difficult to meet the increasingly complex needs of Web applications. In recent years, with the birth of HTML5, the WebSocket protocol was proposed, which realizes full-duplex communication between the browser and the server, expands the communication functions between the browser and the server, and enables the server to actively send data to the client.
We know that the traditional HTTP protocol is stateless. Each request (request) must be actively initiated by the client (such as a browser). The server returns the response result after processing, and it is difficult for the server to actively request The client sends data; this traditional Web model in which the client is the active party and the server is the passive party causes less trouble for Web applications where information changes infrequently, but it brings problems to Web applications involving real-time information. A big inconvenience, such as applications with instant messaging, real-time data, subscription push and other functions. Before the WebSocket specification was proposed, developers often used compromise solutions to implement these real-time functions: polling and Comet technologies. In fact, the latter is essentially a kind of polling, but it has been improved.
Polling is the original solution for implementing real-time web applications. Polling technology requires the client to periodically send requests to the server at set intervals and frequently query whether there are new data changes. Obviously, this approach will result in too many unnecessary requests, wasting traffic and server resources.
Comet technology can be divided into long polling and streaming technology. Long polling improves the above polling technology and reduces useless requests. It sets an expiration time for certain data, and sends a request to the server only when the data expires; this mechanism is suitable for situations where data changes are not particularly frequent. Streaming technology usually means that the client uses a hidden window to establish a long HTTP connection with the server. The server will continuously update the connection status to keep the HTTP long connection alive; in this case, the server can actively transfer data through this long connection. Sent to the client; streaming technology may test the performance of the server in a large concurrency environment.
These two technologies are based on the request-response model, and they are not real-time technologies in the true sense; each of their requests and responses wastes a certain amount of traffic on the same header information, and the development complexity Also larger.
Along with the launch of HTML5, WebSocket truly realizes real-time communication on the Web, enabling the B/S mode to have the real-time communication capabilities of the C/S mode. The workflow of WebSocket is as follows: the browser sends a request to the server to establish a WebSocket connection through JavaScript. After the WebSocket connection is successfully established, the client and server can transmit data through the TCP connection. Because the WebSocket connection is essentially a TCP connection, it does not need to carry repeated header data with each transmission, so its data transmission volume is much smaller than polling and Comet technologies.
1. Through pip
pip install dwebsocket2
2. By downloading to local
Execute python setup.py install
Attachment: If the installation fails and prompts about the ASCII code, just delete the content in the readme
If If you want to handle a websocket connection for a separate view you can use the accept_websocket decorator, which will route standard HTTP requests to the view. Using the require_websocke decorator only allows WebSocket connections and will reject normal HTTP requests.
Add the setting MIDDLEWARE_CLASSES=dwebsocket.middleware.WebSocketMiddlewareThis will deny the use of separate views websocket, you must add accept_websocket decoration device.
SettingWEBSOCKET_ACCEPT_ALL=TrueAllows each individual view to be usefulwebsockets
1.request.is_websocket()#If it is a websocket request, it returns True, if it is an ordinary http request, it returns False. You can use this method to distinguish them. .
2.request.websocket在一个websocket请求建立之后,这个请求将会有一个websocket属性,用来给客户端提供一个简单的api通讯,如果request.is_websocket()是False,这个属性将是None。
3.WebSocket.wait()返回一个客户端发送的信息,在客户端关闭连接之前他不会返回任何值,这种情况下,方法将返回None
4.WebSocket.read()如果没有从客户端接收到新的消息,read方法会返回一个新的消息,如果没有,就不返回。这是一个替代wait的非阻塞方法
5.WebSocket.count_messages()返回消息队列数量
6.WebSocket.has_messages()如果有新消息返回True,否则返回False
7.WebSocket.send(message)向客户端发送消息
8.WebSocket.__iter__()websocket迭代器
功能:让我们从客户端接收一条消息,将该消息发送回客户端并关闭连接。
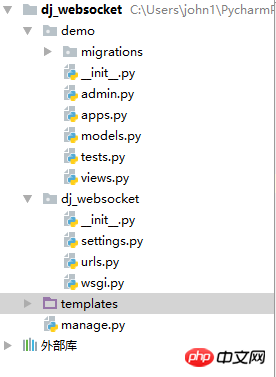
1.新建一个django项目

2.新建index.html在templates文件夹下,编写我们的客户端
<!DOCTYPE html>
<html>
<head>
<title>django-websocket</title>
<script src="http://code.jquery.com/jquery-1.11.1.min.js"></script>
<script type="text/javascript">//<![CDATA[
$(function () {
$('#send_message').click(function () {
var socket = new WebSocket("ws://" + window.location.host + "/echo_once");
socket.onopen = function () {
console.log('WebSocket open');//成功连接上Websocket
socket.send($('#message').val());//发送数据到服务端
};
socket.onmessage = function (e) {
console.log('message: ' + e.data);//打印服务端返回的数据
$('#messagecontainer').prepend('<p>' + e.data + '</p>');
};
});
});
//]]></script>
</head>
<body>
<br>
<input type="text" id="message" value="Hello, World!"/>
<button type="button" id="send_message">发送 message</button>
<h1>Received Messages</h1>
<div id="messagecontainer">
</div>
</body>
</html>3.app的views.py编写我们的服务端
from dwebsocket import require_websocket
@require_websocketdef echo_once(request):
    message = request.websocket.wait()
request.websocket.send(message)4.url路由设置
from demo import views as v
urlpatterns = [
    url(r'^index/', v.index),
    url(r'^echo_once', v.echo_once),
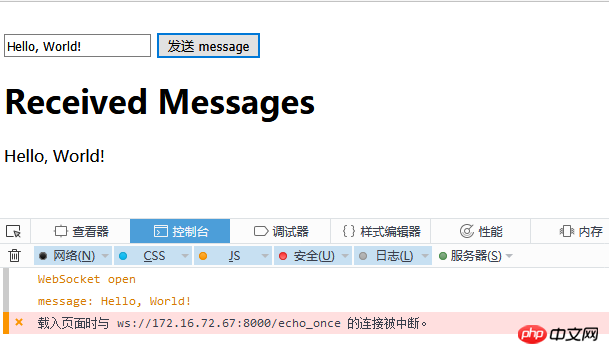
]5.runserver运行,效果展示

可以看到,当我们点击按钮之后,服务端发送消息到客户端之后,就自动关闭了连接。
当然,我们也可以让服务端不自动关闭连接,接下来利用websocket和http Get写一个一样的功能的函数,
6.新建一个html,写一个新的客户端
<!DOCTYPE html>
<html>
<head>
<title>django-websocket</title>
<script src="http://code.jquery.com/jquery-1.11.1.min.js"></script>
<script type="text/javascript">//<![CDATA[
$(function () {
$('#connect_websocket').click(function () {
if (window.s) {
window.s.close()
}
/*创建socket连接*/
var socket = new WebSocket("ws://" + window.location.host + "/echo");
socket.onopen = function () {
console.log('WebSocket open');//成功连接上Websocket
};
socket.onmessage = function (e) {
console.log('message: ' + e.data);//打印出服务端返回过来的数据
$('#messagecontainer').prepend('<p>' + e.data + '</p>');
};
// Call onopen directly if socket is already open
if (socket.readyState == WebSocket.OPEN) socket.onopen();
window.s = socket;
});
$('#send_message').click(function () {
//如果未连接到websocket
if (!window.s) {
alert("websocket未连接.");
} else {
window.s.send($('#message').val());//通过websocket发送数据
}
});
$('#close_websocket').click(function () {
if (window.s) {
window.s.close();//关闭websocket
console.log('websocket已关闭');
}
});
});
//]]></script>
</head>
<body>
<br>
<input type="text" id="message" value="Hello, World!"/>
<button type="button" id="connect_websocket">连接 websocket</button>
<button type="button" id="send_message">发送 message</button>
<button type="button" id="close_websocket">关闭 websocket</button>
<h1>Received Messages</h1>
<div id="messagecontainer">
</div>
</body>
</html>7.在viws.py中加入新的方法
from django.shortcuts import render
from dwebsocket.decorators import accept_websocket,require_websocket
from django.http import HttpResponse


@accept_websocket
def echo(request):
    if not request.is_websocket():#判断是不是websocket连接
        try:#如果是普通的http方法
            message = request.GET['message']
            return HttpResponse(message)
        except:
            return render(request,'index.html')
    else:
        for message in request.websocket:
request.websocket.send(message)#发送消息到客户端8.url.py
from demo import views as v
urlpatterns = [
    url(r'^index2/', v.index2),
    url(r'^echo$', v.echo),
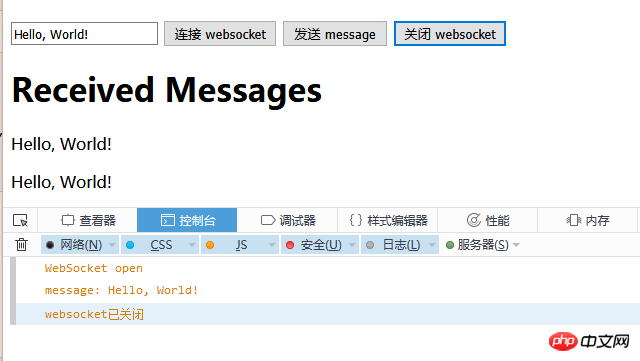
]9.runserver运行,看看效果

可以看到,只有当我们手动关闭连接时候,websocket才会关闭。
The above is the detailed content of Detailed explanation of using Websockets in Django. For more information, please follow other related articles on the PHP Chinese website!
 How to read py files in python
 Why can't I access the Ethereum browser?
 How to use insert statement in mysql
 div scroll bar
 How to export word from powerdesigner
 What is the difference between webstorm and idea?
 How to register on Matcha Exchange
 localstorage usage
 What should I do if my iPad cannot be charged?


