
 Web Front-end
H5 Tutorial
Detailed explanation of HTML5 implementation of partial image magnifying glass (adjustable) (graphics and text)
Web Front-end
H5 Tutorial
Detailed explanation of HTML5 implementation of partial image magnifying glass (adjustable) (graphics and text)
Detailed explanation of HTML5 implementation of partial image magnifying glass (adjustable) (graphics and text)

The following continues to introduce ## based on html5canvascanvas #Magnifying glass effect:
Main steps:1) Loading of images, there is www.php.cn/html5-tutorial-358646.html in the previous blog, you must pay attention to apache configuration, otherwise getImageData() will have security issues and cannot run!##2) Core: Mapping between two image matrices,
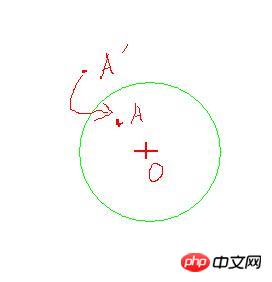 Set o as the center of the circle, then transform The last point A' corresponds to point A of the original image (this is the effect of magnification!!! In this experiment, the magnification factor is 2)
3) For the sake of simplicity, the linear interpolation method is not used, directly Round to get the coordinates of point A.
for (var j=0;j<image.height;j++){
for(var i=0;i<image.width;i++){
var k=4*(image.width*j+i);
var k1=4*(image.width*Math.floor((j+y0)/2)+Math.floor((i+x0)/2));
...
else if(isIn(x0,y0,i,j,r)){//isIn()判定点是否在园内
if(k1>=0&&k1<=4*image.height*image.width){
imagedata2.data[k+0]=imagedata1.data[k1+0];
imagedata2.data[k+1]=imagedata1.data[k1+1];
imagedata2.data[k+2]=imagedata1.data[k1+2];
imagedata2.data[k+3]=255;
// console.log('x:'+x+'y:'+y);
}4) In order to make the mirror stand out, set the point at the edge to a black point (that is, rgb is 0)
	function isOn(x0,y0,x,y,r){//放大镜边缘
	    if((x0-x)*(x0-x)+(y0-y)*(y0-y)==r*r)
		  return true;
		else
		  return false;
} if (isOn(x0,y0,i,j,r)){
imagedata2.data[k+0]=0;
imagedata2.data[k+1]=0;
imagedata2.data[k+2]=0;
imagedata2.data[k+3]=255;
}5) Out of bounds or wrap. point (if it exists), ignore it (just take the original value)
		  else{
		      imagedata2.data[k+0]=imagedata1.data[k+0];
			  imagedata2.data[k+1]=imagedata1.data[k+1];
			  imagedata2.data[k+2]=imagedata1.data[k+2];
			  imagedata2.data[k+3]=255;
}6) External setting of the magnifying glass radius
Also use canvas and onclick functions, as shown below:
<canvas id="bar" height="30" width="305"></canvas>
 放大镜半径为<span id='r'></span>
<script>
var canvas2=document.getElementById('bar');
var context2=canvas2.getContext('2d');
context2.beginPath();
context2.lineWidth = 1;//边框宽度
context2.strokeStyle = "#ff00ff";//边框颜色
context2.strokeRect(10,0,295,28);//边框坐标及大小
context2.closePath();
canvas2.onclick=function(e){
var x1=e.clientX-e.target.offsetLeft;
context2.clearRect(0,0,305,30);//擦除上次的痕迹
context2.beginPath();
context2.lineWidth = 1;//边框宽度
context2.strokeStyle = "#ff00ff";//边框颜色
context2.strokeRect(10,0,295,28);//边框坐标及大小
context2.fillStyle = "#00ff00";//填充canvas的背景颜色
context2.fillRect(0, 0, x1,28);//参数分别表示 x轴,y轴,宽度,高度
document.getElementById('r').innerHTML=Math.floor(x1/6);
r=Math.floor(x1/6);
}
</script>The following is the complete code:
<!DOCTYPE html>
<html>
<head>
<title>canvas图像处理</title>
</head>
<body>
<h1>canvas放大镜</h1>
<canvas id="canvas1" width="600" height="450">是时候更换浏览器了<a href="http://firefox.com.cn/download/">点击下载firefox</a></canvas>
<!--当浏览器不支持html5时,会显示连接提示下载firefox-->
<script>
var canvas1=document.getElementById('canvas1');
var context1=canvas1.getContext('2d');
image=new Image();
image.src="photo.jpg";
context1.drawImage(image,0,0);//绘制原始图像,(0,0)表示图像的左上角位与canvas画布的位置
var imagedata1=context1.getImageData(0,0,image.width,image.height);
var imagedata2=context1.createImageData(image.width,image.height);
r=40;//放大镜半径,原始默认值,可以通过最下面的进度条设置
canvas1.onmousemove=function(e){
var x=e.clientX-e.target.offsetLeft;
var y=e.clientY-e.target.offsetTop;
x0=x;y0=y;
//console.log('x:'+x+'y:'+y);
for (var j=0;j<image.height;j++){
for(var i=0;i<image.width;i++){
var k=4*(image.width*j+i);
var k1=4*(image.width*Math.floor((j+y0)/2)+Math.floor((i+x0)/2));//对应的原始图像上的点
if (isOn(x0,y0,i,j,r)){//放大镜边缘上的点
imagedata2.data[k+0]=0;
imagedata2.data[k+1]=0;
imagedata2.data[k+2]=0;
imagedata2.data[k+3]=255;
}
else if(isIn(x0,y0,i,j,r)){//放大区域的点
if(k1>=0&&k1<=4*image.height*image.width){//放大效果的的时候,这一步其实可以省略
imagedata2.data[k+0]=imagedata1.data[k1+0];
imagedata2.data[k+1]=imagedata1.data[k1+1];
imagedata2.data[k+2]=imagedata1.data[k1+2];
imagedata2.data[k+3]=255;
// console.log('x:'+x+'y:'+y);
}
}
else{//其他剩下不受影响的点
imagedata2.data[k+0]=imagedata1.data[k+0];
imagedata2.data[k+1]=imagedata1.data[k+1];
imagedata2.data[k+2]=imagedata1.data[k+2];
imagedata2.data[k+3]=255;
}
}}
context1.putImageData(imagedata2,0,0);//canvas显示
}
canvas1.onmouseout=function(){context1.drawImage(image,0,0);}//鼠标移出,自动重绘
function isIn(x0,y0,x,y,r){//放大区域
if((x0-x)*(x0-x)+(y0-y)*(y0-y)<r*r)
return true;
else
return false;
}
function isOn(x0,y0,x,y,r){//放大镜边缘
if((x0-x)*(x0-x)+(y0-y)*(y0-y)==r*r)
return true;
else
return false;
}
</script>
<br/>
<canvas id="bar" height="30" width="305"></canvas>
 放大镜半径为<span id='r'></span>
<script>
var canvas2=document.getElementById('bar');
var context2=canvas2.getContext('2d');
context2.beginPath();
context2.lineWidth = 1;//边框宽度
context2.strokeStyle = "#ff00ff";//边框颜色
context2.strokeRect(10,0,295,28);//边框坐标及大小
context2.closePath();
canvas2.onclick=function(e){
var x1=e.clientX-e.target.offsetLeft;
context2.clearRect(0,0,305,30);
context2.beginPath();
context2.lineWidth = 1;//边框宽度
context2.strokeStyle = "#ff00ff";//边框颜色
context2.strokeRect(10,0,295,28);//边框坐标及大小
context2.fillStyle = "#00ff00";//填充canvas的背景颜色
context2.fillRect(0, 0, x1,28);//参数分别表示 x轴,y轴,宽度,高度
document.getElementById('r').innerHTML=Math.floor(x1/6);
r=Math.floor(x1/6);//一个划算,使得最大半径为50px
}
</script>
</body>
</html>Attention:
1) Remember to set the width and height of canvas1 to be the same size as the
picture. If they are different, set the It is troublesome to perform this calculation;The effect is as follows:
The above is the detailed content of Detailed explanation of HTML5 implementation of partial image magnifying glass (adjustable) (graphics and text). For more information, please follow other related articles on the PHP Chinese website!

Hot AI Tools

Undresser.AI Undress
AI-powered app for creating realistic nude photos

AI Clothes Remover
Online AI tool for removing clothes from photos.

Undress AI Tool
Undress images for free

Clothoff.io
AI clothes remover

AI Hentai Generator
Generate AI Hentai for free.

Hot Article
Hot Tools

Notepad++7.3.1
Easy-to-use and free code editor

SublimeText3 Chinese version
Chinese version, very easy to use

Zend Studio 13.0.1
Powerful PHP integrated development environment

Dreamweaver CS6
Visual web development tools

SublimeText3 Mac version
God-level code editing software (SublimeText3)
Hot Topics
 1386
1386
 52
52

 Table Border in HTML
Sep 04, 2024 pm 04:49 PM
Table Border in HTML
Sep 04, 2024 pm 04:49 PM
Guide to Table Border in HTML. Here we discuss multiple ways for defining table-border with examples of the Table Border in HTML.
 HTML margin-left
Sep 04, 2024 pm 04:48 PM
HTML margin-left
Sep 04, 2024 pm 04:48 PM
Guide to HTML margin-left. Here we discuss a brief overview on HTML margin-left and its Examples along with its Code Implementation.
 Nested Table in HTML
Sep 04, 2024 pm 04:49 PM
Nested Table in HTML
Sep 04, 2024 pm 04:49 PM
This is a guide to Nested Table in HTML. Here we discuss how to create a table within the table along with the respective examples.
 HTML Table Layout
Sep 04, 2024 pm 04:54 PM
HTML Table Layout
Sep 04, 2024 pm 04:54 PM
Guide to HTML Table Layout. Here we discuss the Values of HTML Table Layout along with the examples and outputs n detail.
 HTML Input Placeholder
Sep 04, 2024 pm 04:54 PM
HTML Input Placeholder
Sep 04, 2024 pm 04:54 PM
Guide to HTML Input Placeholder. Here we discuss the Examples of HTML Input Placeholder along with the codes and outputs.
 HTML Ordered List
Sep 04, 2024 pm 04:43 PM
HTML Ordered List
Sep 04, 2024 pm 04:43 PM
Guide to the HTML Ordered List. Here we also discuss introduction of HTML Ordered list and types along with their example respectively
 Moving Text in HTML
Sep 04, 2024 pm 04:45 PM
Moving Text in HTML
Sep 04, 2024 pm 04:45 PM
Guide to Moving Text in HTML. Here we discuss an introduction, how marquee tag work with syntax and examples to implement.
 HTML onclick Button
Sep 04, 2024 pm 04:49 PM
HTML onclick Button
Sep 04, 2024 pm 04:49 PM
Guide to HTML onclick Button. Here we discuss their introduction, working, examples and onclick Event in various events respectively.
