This article mainly introduces in detail the implementation of the focus image carousel effect based on JavaScript, which has a certain reference value. Interested friends can refer to it
Whether it is Whether it is a university website or an e-commerce page, the switching and carousel of focus images should be an indispensable application. Today I will take notes on the technical points of focus image carousel production for future review.
1. Structure layer (HTML)
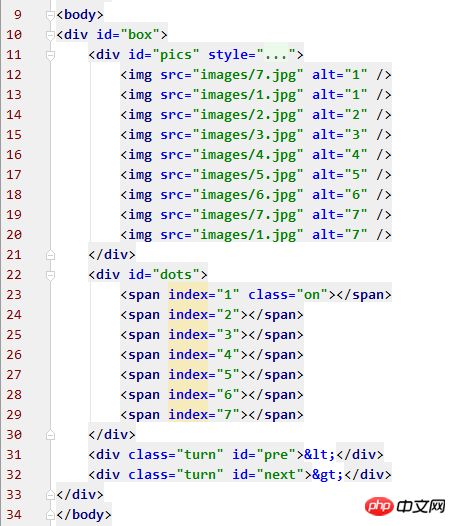
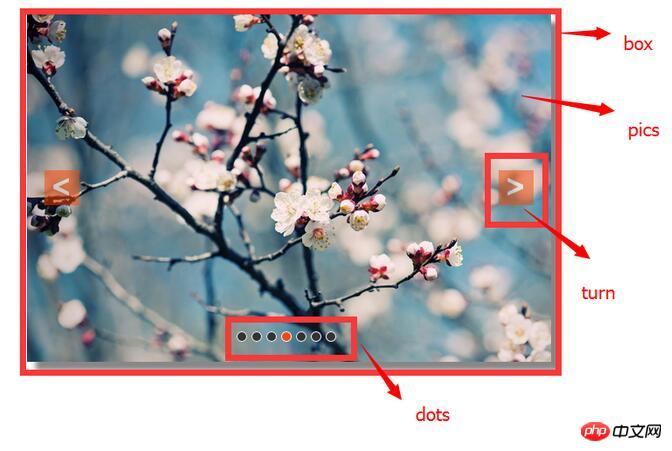
The HTML structure of the focus map is very simple. It is a parent container (id=box), containing three sub-containers, which are stored separately. Pictures (id=pics), bottom buttons (id=dots), function switching arrows (class=turn). After adding the style, the layout is as shown in Figure 2 below.


## 2. Presentation layer (CSS)
The performance and style of the page are always Inseparable from CSS. For the convenience of description, the id selector name or class selector name is used to represent each p module. 1.box As the parent container, box is the intuitive representation of the entire focus image carousel structure on the web page. Its width and height are the width and height of the image to be displayed. I set the image to be 600px wide and 400px high, centered the parent container box, and added a shadow. The style can probably be set as you like, but the overflow must be hidden, and the positioning must be set to relative positioning so that theabsolute positioning of the subcontainer is accurate.
#box{
 width: 600px;
 height: 400px;
 margin-top: 100px;
 margin-left: auto;
 margin-right: auto;
 overflow: hidden;
 position: relative;
 box-shadow: 10px 10px 5px #888;
}z-index should be set to 1.
#pics{
 width: 5400px;
 height: 400px;
 position: absolute;
 z-index: 1;
}#dots{
width: 120px;
height: 10px;
position: absolute;
bottom: 25px;
left: 40%;
z-index: 2;
}
#dots span{
width: 10px;
height: 10px;
float: left;
margin-right: 5px;
background: #333;
border: solid 1px #FFF;
border-radius: 50%;
cursor: pointer;
}
#dots .on{background: orangered;}
#dots span:hover{background: orangered;}.turn{
width: 40px;
height: 40px;
color: #fff;
background: orangered;
line-height: 39px;
text-align: center;
font-size: 36px;
font-weight: bold;
opacity: 0.5;
position: absolute;
top: 180px;
display: none;
z-index: 2;
cursor: pointer;
}
.turn:hover{opacity: 0.8;}
#box:hover .turn{display: block;}3. Behavior layer (Javascript)
Before defining the function, first obtain the node of the page in the global scope.var box = document.getElementById('box'); var pics = document.getElementById('pics'); var dots = document.getElementById('dots').getElementsByTagName('span'); var pre = document.getElementById('pre'); var next = document.getElementById('next');
//图片切换函数
function turn(offset){
turned = true; //切换允许标志,在全局作用域中定义,true表示关闭允许切换
var new_left = parseInt(pics.style.left) + offset; //最后left值
var total_time = 300; //位移总时间
var interval = 10; //每次位移间隔时间
var speed = offset/(total_time/interval); //位移速度——每次位移量
function go(){
if((speed < 0 && parseInt(pics.style.left) > new_left) || (speed > 0 && parseInt(pics.style.left) < new_left)){ //右切||左切
pics.style.left = parseInt(pics.style.left) + speed +'px';
setTimeout(go,interval);
}else{
turned = false; //已切换完毕,开启允许切换
pics.style.left = new_left +'px';
if( new_left < -4200){
pics.style.left = -600 +'px';
}
else if( new_left > -600){
pics.style.left = -4200 +'px';
}
}
}
go();
}//箭头切换实现
next.onclick = function(){
if(index == 7){
index = 1;
}else{
index += 1;
}
show_dots();
if(!turned){
turn(-600);
}
};
pre.onclick = function(){
if(index == 1){
index = 7;
}else{
index -= 1;
}
show_dots();
if(!turned){
turn(600);
}
};//按钮切换样式
function show_dots(){
for(var i = 0; i < dots.length; i++){
if(dots[i].className == 'on'){
dots[i].className = '';
break;
}
}
dots[index - 1].className = 'on';
}
//按钮切换实现
for(var i = 0; i < dots.length; i++){
dots[i].onclick= function(){
if(this.className == 'on'){
return;
}
var my_index = parseInt(this.getAttribute('index')); //注意! index是自定义属性
var offset = -600 * (my_index - index); //计算切换位移量
if(!turned){
turn(offset);
}
index = my_index;
show_dots();
}
}timer and clearing the timer, which I won’t go into details here.
//定时动画
 function play(){
 time = setInterval(function(){
 next.onclick();
 },3000);
 }
 //动画停止
 function stop(){clearInterval(time);}

 play();
 box.onmouseover = stop;
box.onmouseout = play;The above is the detailed content of Introduction to code cases using JavaScript to implement focus chart carousel effect (picture). For more information, please follow other related articles on the PHP Chinese website!


