
 Web Front-end
H5 Tutorial
Code example of application of Zip compression and decompression technology in HTML5 (picture)
Web Front-end
H5 Tutorial
Code example of application of Zip compression and decompression technology in HTML5 (picture)
Code example of application of Zip compression and decompression technology in HTML5 (picture)

JSZip is a javaScript tool that can create, read, and modify .zip files. In web applications, it is inevitable to obtain resources from the web server. If all resources can be merged into a .zip file, then only one request is required, which not only reduces the pressure on the server, but also speeds up the web process. The application's rendering speed.
Today let’s discuss how JSZip is combined with HT applications. Let’s take a look at the renderings of this Demo:

The first step is to package the application and related resources into a .zip file,
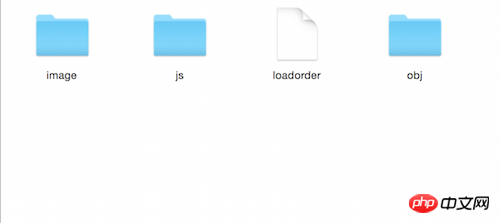
#This is the list of files I want to compress, store the corresponding resource files in the corresponding folder, and then indicate the resource loading in the loadorder file In order, the content of the loadorder file is as follows:
1 2 3 4 5 6 |
|
In the resource loading order, the path of the response resource relative to the .zip file should be indicated, so that it can be quickly found when reading the .zip file. Corresponding resource files.
The second step is to introduce JSZip and the JSZipUtils library into the html file. The next step is to request the .zip file and parse the .zip file.
1 2 3 4 5 6 7 8 9 10 11 12 13 14 15 16 17 18 19 20 21 22 23 24 25 26 27 28 29 30 31 32 33 34 35 36 37 38 39 |
|
First obtain the .zip file through JSZipUtils, and load the obtained file content into the zip through the new JSZip(data) method Variable , read the loadorder file content through zip.file(fileName), use the eval command to dynamically execute the script, convert the text content into the js variable order, and finally, by traversing the order variable, dynamically introduce the js resource into the page.
There are image files in the .zip file. JSZip can only obtain the ArrayBuffer data of the image file. At this time, the ArrayBuffer needs to be converted to Base64 to be recognized by the browser, so A conversion function is defined here: _arrayBufferToBase64
1 2 3 4 5 6 7 8 9 |
|
This case involves 3D model data and HT 3D topology application The obj directory in the .zip file stores 3D model data. During file reading, the 3D model data is read out in the form of text pairs and stored in variables, and then the data is passed to the init function, through ht The .Default.parseObj() method loads 3D model data into HT.
1 2 3 4 5 6 7 8 9 10 11 12 13 14 15 16 17 18 19 20 21 22 23 24 25 26 27 28 29 30 31 32 33 34 35 36 37 38 39 40 41 42 43 44 45 46 47 |
|
The above is the code to generate 3D topology, 3D model introduction and reference 3D model creation topology node. The setImage code needs special attention. Why do I have to go through so much trouble to determine the file name of the image? That’s because there is a attribute for setting the texture in the mtl 3D model description file. This The attribute can specify the absolute path of the file or the relative path of the file. Because JSZip cannot write the file contents in the .zip back to the local directory, the attribute name corresponding to the texture attribute can only be used as HT# The image name in ## is set to HT so that when the HT model is loaded, the image resources required by the model can be obtained. For the application of HT 3D topology, please refer to "3D Topology Automatic Layout Node.jsPart".
JSZip If the speed is slow when compressing or decompressing data, you can consider using Web Worker.
The above is the detailed content of Code example of application of Zip compression and decompression technology in HTML5 (picture). For more information, please follow other related articles on the PHP Chinese website!

Hot AI Tools

Undresser.AI Undress
AI-powered app for creating realistic nude photos

AI Clothes Remover
Online AI tool for removing clothes from photos.

Undress AI Tool
Undress images for free

Clothoff.io
AI clothes remover

Video Face Swap
Swap faces in any video effortlessly with our completely free AI face swap tool!
Hot Article
Hot Tools

Notepad++7.3.1
Easy-to-use and free code editor

SublimeText3 Chinese version
Chinese version, very easy to use

Zend Studio 13.0.1
Powerful PHP integrated development environment

Dreamweaver CS6
Visual web development tools

SublimeText3 Mac version
God-level code editing software (SublimeText3)
Hot Topics


 Table Border in HTML
Sep 04, 2024 pm 04:49 PM
Table Border in HTML
Sep 04, 2024 pm 04:49 PM
Guide to Table Border in HTML. Here we discuss multiple ways for defining table-border with examples of the Table Border in HTML.
 Nested Table in HTML
Sep 04, 2024 pm 04:49 PM
Nested Table in HTML
Sep 04, 2024 pm 04:49 PM
This is a guide to Nested Table in HTML. Here we discuss how to create a table within the table along with the respective examples.
 HTML margin-left
Sep 04, 2024 pm 04:48 PM
HTML margin-left
Sep 04, 2024 pm 04:48 PM
Guide to HTML margin-left. Here we discuss a brief overview on HTML margin-left and its Examples along with its Code Implementation.
 HTML Table Layout
Sep 04, 2024 pm 04:54 PM
HTML Table Layout
Sep 04, 2024 pm 04:54 PM
Guide to HTML Table Layout. Here we discuss the Values of HTML Table Layout along with the examples and outputs n detail.
 HTML Input Placeholder
Sep 04, 2024 pm 04:54 PM
HTML Input Placeholder
Sep 04, 2024 pm 04:54 PM
Guide to HTML Input Placeholder. Here we discuss the Examples of HTML Input Placeholder along with the codes and outputs.
 HTML Ordered List
Sep 04, 2024 pm 04:43 PM
HTML Ordered List
Sep 04, 2024 pm 04:43 PM
Guide to the HTML Ordered List. Here we also discuss introduction of HTML Ordered list and types along with their example respectively
 Moving Text in HTML
Sep 04, 2024 pm 04:45 PM
Moving Text in HTML
Sep 04, 2024 pm 04:45 PM
Guide to Moving Text in HTML. Here we discuss an introduction, how marquee tag work with syntax and examples to implement.
 HTML onclick Button
Sep 04, 2024 pm 04:49 PM
HTML onclick Button
Sep 04, 2024 pm 04:49 PM
Guide to HTML onclick Button. Here we discuss their introduction, working, examples and onclick Event in various events respectively.
