 Database
 Mysql Tutorial
 Graphical tutorial on how to install and configure mysql5.7.17 under Windows 10
Graphical tutorial on how to install and configure mysql5.7.17 under Windows 10
This article mainly introduces the graphic tutorial of mysql5.7.17 installation and configuration method under Windows 10 in detail. It has certain reference value. Interested friends can refer to it
In this article, I will explain in detail how to install the latest version of MySQL database, which is the MySQL5.7.17 compressed version database on the Windows 10 platform.
I won’t say more about the download of the compressed version of the MySQL5.7.17 database here. For those who don’t know how, please do it yourself and have enough food and clothing!
Unzip and install
Since the MySQL5.7.17 database we downloaded is the ZIP Archive version, that is, the compressed version, so just decompress it, and install the version There is no difference, but there is no need to install it. We only need to find the downloaded mysql-5.7.17-winx64.zip file, then right-click and select, unzip it to where you want to install it. If you like the C drive, choose the C drive. If you don't like it, just choose a drive. , here, the author himself chose the D drive. After all, the system C drive stores too many things. Once you unzip it, it’s OK. Isn’t it very simple? Now you know the benefits of ZIP Archive version!
Configuring the default file
In fact, in theory, you can directly install the service now, but because it is the default configuration, there will be many problems when we use it, such as The Chinese characters are all garbled, so it is recommended that you configure the default file first. How to match it? Don't worry, I'll come slowly. Create a new my.ini file in the mysql-5.7.17 (the author's unzipped directory is the mysql-5.7.17 directory under the D drive), copy the following code and save it. :
# CLIENT SECTION
[client]
#default-character-set=utf8

[mysql]
#设置mysql客户端默认字符集
default-character-set=utf8

# SERVER SECTION
[mysqld]
#跳过密码问题,但是这并不能彻底解决,此语句可以忽略登录检查
#skip-grant-tables
#设置3306端口号
port=3306
#设置mysql的安装目录
basedir=D:\mysql-5.7.17
#设置mysql数据库的数据的存放目录
datadir=D:\mysql-5.7.17\data
#允许最大连接数
max_connections=200
#服务端使用的字符集默认为8比特编码的latin1字符集
character-set-server=utf8
#创建新表时将使用的默认存储引擎
default-storage-engine=INNODB
#SQL模式为strict模式
sql_mode='STRICT_TRANS_TABLES,NO_ZERO_IN_DATE,NO_ZERO_DATE,ERROR_FOR_pISION_BY_ZERO,NO_AUTO_CREATE_USER,NO_ENGINE_SUBSTITUTION'
The my.ini file will replace the my-default.ini file under the mysql-5.7.17 directory. The .ini file is the configuration file in Windows. Save various default data inside. The installation version allows you to choose it during installation, and then the system saves it for you. The ZIP Archive is written by yourself, but the effect is the same. What does the code syntax inside mean? Please check the relevant information yourself. After all, I can't explain it in a sentence or two (in fact, the author himself is not very clear). This file is loaded when the software is running.

Install mysql service
win+R key, then type cmd, you can open the cmd window, will Switch the directory to the bin directory where you decompressed the file. My directory is the one in the picture. For you, it should be based on your own directory. Then enter mysqld -install and press Enter to run. Note that it is mysqld, not mysql. At this time, we will encounter the first problem, as follows:

The error message found is: Install/Remove of the Service Denied !. The solution is to choose to open it as an administrator when opening the cmd.exe program.
When we run the cmd.exe program as an administrator and then install the mysql service, everything will be fine.

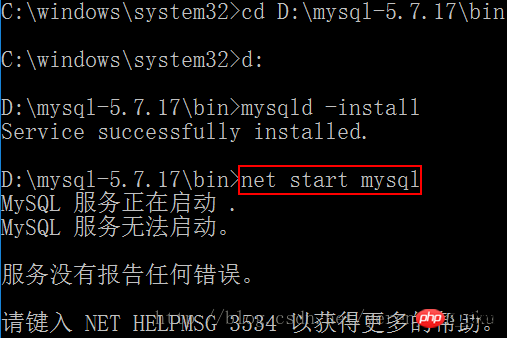
Then enter net start mysql to start the service, so we encounter the second problem, please see the picture below:

When it was started for the first time, it failed to start, and the service did not report any errors. I will then go online to find a solution! I searched and searched, and finally found it. It turned out that the version I installed was too new, and there was no data folder in the decompressed folder. This folder is very important! All important data is stored! And you can’t create it manually (in fact, that’s what I did from the beginning). Then someone said that this folder can only be created through the command mysqld –initialize-insecure –user=root in the mysql document. I tried it and it worked!

Open MySQL
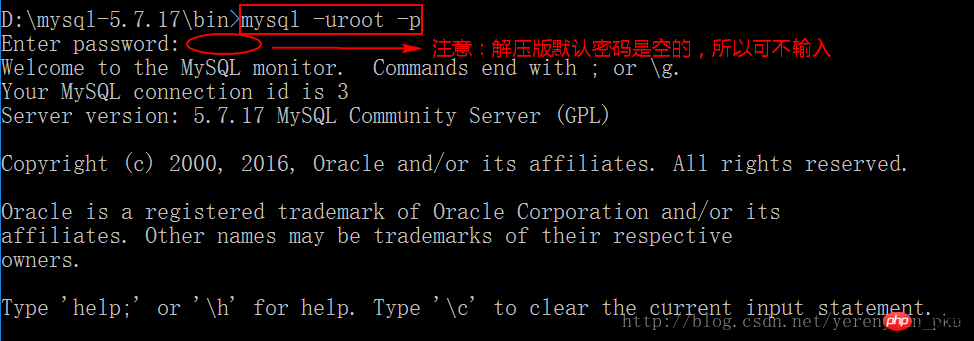
Let’s switch the directory to D:\mysql-5.7.17\bin! Enter the mysql -uroot -p command, and it will prompt you to enter a password (the default password for the decompressed version is empty). Just press Enter and you will successfully log in to mysql as root.

At this time we will change the password, because the default password of the decompressed version is empty, which always feels a bit weird, so I will tell you how to change the password below. Also enter the D:\mysql-5.7.17\bin directory, execute mysqladmin -uroot -p password password, you will be prompted to enter the original password (the original password is empty), just press Enter, such as Picture:

Note:
Execute mysql -uroot -pThe command is when logging in, please ensure that the mysql service is turned on.
When executing the mysqladmin -uroot -p password password command to change the password, please also ensure that the mysql service is turned on.
Configure Path environmentVariables
Although mysql is opened, so many instructions have to be entered every time I open mysql Is it annoying to switch directories? How to do it? Of course, if you know it, there’s no need for me to tell you. If you don’t, don’t worry, I’ll tell you. Right-click this computer→Properties→Advanced System Settings→Environment Variables→Path→Edit, and put the full path to the bin directory under the mysql software you unzipped. I suggest putting the children's shoes at the front, and finally adding an English semicolon (;) after the directory path to save it. Such as D:\mysql-5.7.17\bin;
Why do you do this? What is the principle? Simply put, the Path in the environment variable is the search directory path of the cmd system. When you enter a command, how does the system know whether the command exists? What did the system do? In fact, the system searches all the paths in the current directory and the system environment variable Path. The first one found shall prevail. If it is not found, an error will be reported. So we either need to switch the cmd directory every time, or set it up so that we don’t need to switch the cmd path in the future.
For example: the system is like a bus, it follows a predetermined route. The path in the environment variable is that route or each station. When you reach the station (find the first one), you get off (run) .
Now that the Path environment variable is configured, let’s run it!

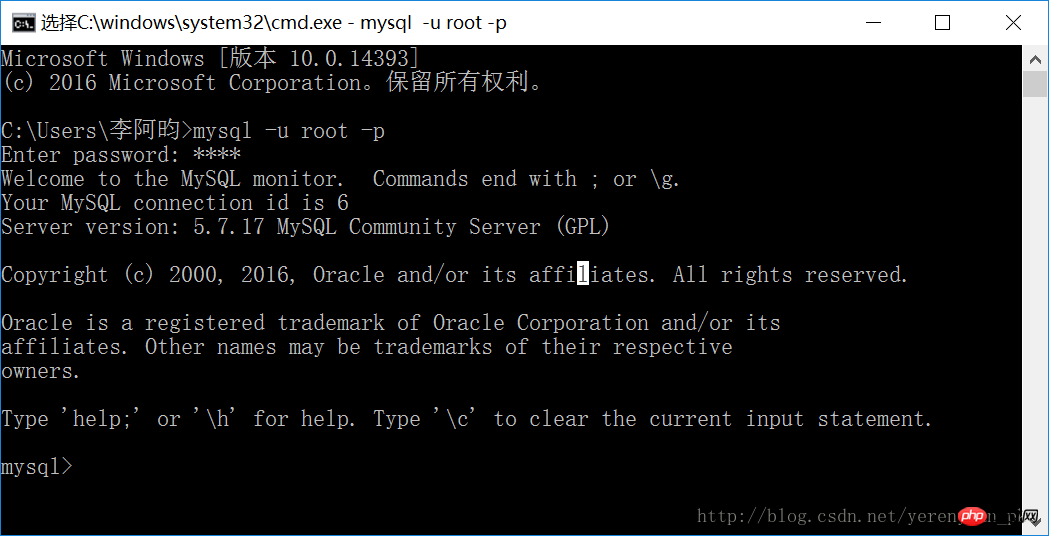
win+R key, then type the mysql -uroot -p command, then enter the previously set password, the login is successful , indicating that the latest version of the MySQL database, that is, the MySQL5.7.17 compressed version database was installed successfully!
The above is the detailed content of Graphical tutorial on how to install and configure mysql5.7.17 under Windows 10. For more information, please follow other related articles on the PHP Chinese website!

Hot AI Tools

Undresser.AI Undress
AI-powered app for creating realistic nude photos

AI Clothes Remover
Online AI tool for removing clothes from photos.

Undress AI Tool
Undress images for free

Clothoff.io
AI clothes remover

AI Hentai Generator
Generate AI Hentai for free.

Hot Article

Hot Tools

Notepad++7.3.1
Easy-to-use and free code editor

SublimeText3 Chinese version
Chinese version, very easy to use

Zend Studio 13.0.1
Powerful PHP integrated development environment

Dreamweaver CS6
Visual web development tools

SublimeText3 Mac version
God-level code editing software (SublimeText3)

Hot Topics
 1377
1377
 52
52
 Where to open windows 10 running
Mar 19, 2024 pm 05:57 PM
Three commonly used methods: 1. The most convenient method is to press the Windows key and R key at the same time; 2. Access "Run" through the shortcut menu or start menu; 3. By entering specific commands, users can quickly start the program, Open files or folders, configure system settings, and more.
 windows10 installation failed
Mar 12, 2024 pm 05:09 PM
Solutions to failed Windows 10 installation: 1. Check the hardware; 2. Update the driver; 3. Use reliable installation media; 4. Clean the existing system; 5. Check the system requirements; 6. Adjust BIOS/UEFI settings; 7. Clear Virus.
 windows10 activation key list latest 2024
Mar 19, 2024 pm 03:45 PM
Obtaining a Windows 10 activation key is key to fully experiencing its capabilities. The legal way is to purchase a genuine key and then activate it through the "Activate" option in the system settings. Using illegal or pirated keys can pose security risks and is a violation of intellectual property rights. This article will guide you through legal means to obtain and activate a Windows 10 activation key, ensuring the security of your computer and supporting the work of software developers.
 Getting Started with Pygame: Comprehensive Installation and Configuration Tutorial
Feb 19, 2024 pm 10:10 PM
Learn Pygame from scratch: complete installation and configuration tutorial, specific code examples required Introduction: Pygame is an open source game development library developed using the Python programming language. It provides a wealth of functions and tools, allowing developers to easily create a variety of type of game. This article will help you learn Pygame from scratch, and provide a complete installation and configuration tutorial, as well as specific code examples to get you started quickly. Part One: Installing Python and Pygame First, make sure you have
 Win10 screenshot shortcut key sharing
Mar 19, 2024 pm 04:05 PM
The most commonly used shortcut keys: 1. Frame selection screenshot: Win Shift S, you can select a rectangle, window or area of any format to take a screenshot, and the screenshot is automatically copied to the clipboard; 2. Full screen screenshot: Win Printscreen, save the entire screenshot to " "This PC - Pictures - Screenshots" folder; 3. Take a full-screen screenshot and edit it: Win W, bring up the screen sketch tool, which can crop, edit and save or copy the screenshot; 4. Take a full-screen screenshot to the clipboard: Print Screen.
 Which one is easier to use, windows10 or windows11?
Mar 19, 2024 pm 04:11 PM
Windows 10 has high stability, traditional interface, smooth performance, and good security. Windows 11 introduces new features, optimizes performance, performs well in games, and enhances security. However, Windows 11, as a new system, may have compatibility issues and needs to be carefully evaluated before upgrading.
 How to manage startup items in Windows 10
Feb 07, 2021 am 11:22 AM
Method: 1. Press "win+R" to open the "Run" window, enter the "msconfig" command, and click "Confirm"; 2. In the msconfig setting interface, click the "Startup" tab and click "Open Task Manager"; 3. In the Task Manager interface, click the "Startup" tab; 4. Find and select the unwanted startup item, right-click the mouse, and select "Disable" in the pop-up menu.
 How to solve the problem that Windows 10 still updates after turning off updates?
Feb 20, 2023 pm 06:25 PM
Cause and solution: The "Windows update" service is still on, just disable the service. Disable method: 1. Press the "win+r" key combination to open the "Run" window, enter "services.msc" and press Enter; 2. In the "Services" interface, double-click the "Windows update" service; 3. In the pop-up window , change the startup type to "Disabled"; 4. Enter the "Recovery" tab and set the "First Failure", "Second Failure", and "Subsequent Failure" options to "No Action".


