 WeChat Applet
 Mini Program Development
 Learn more about the precautions for using Python to develop WeChat payment
Learn more about the precautions for using Python to develop WeChat payment
如今支付的引入是很多互联网产品都需要的。为了让用户用着更方便快捷,集成像支付宝、微信支付这样的第三方支付也就成了常有的事。今天跟着小编就来看看微信支付开发中几个值得注意的地方,涉及代码之处均用 Python 编写。
前言
微信支付是由微信及财付通联合推出的移动支付创新产品。如今,随着微信支付的全面开放,相关需求也越来越多,很多开发人员进行微信支付开发及商家申请微信支付时,面临着诸多疑惑。
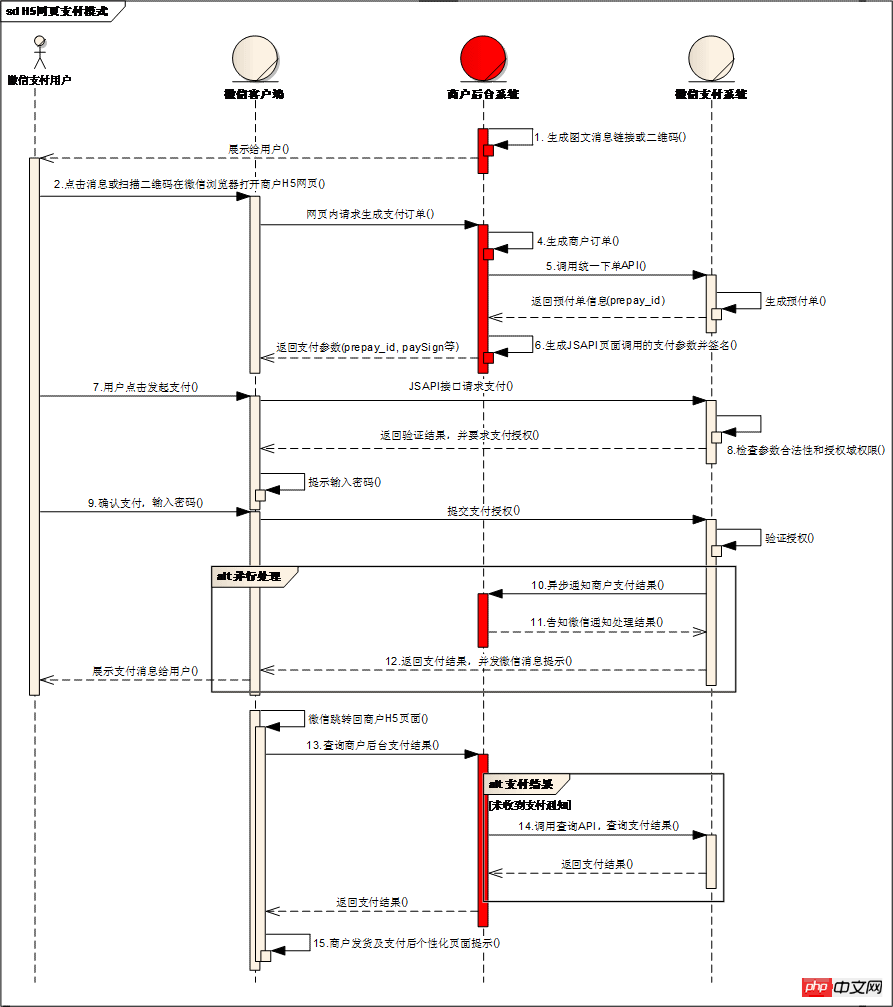
要想开发顺利进行,首先要对业务流程有个清晰的认识。这里以微信公众号支付为例,因此也借用微信支付官方文档中的业务流程图:

接下来来关注几个开发过程中的关键点,包括:
1、生成商户订单与调用统一下单 API
2、微信服务器交互的数据格式
3、公众号支付下网页内通过 JS-API 调起支付
4、异步通知商户支付结果(回调)
一、生成商户订单与调用统一下单 API
这对应业务流程中的第 4 和 第 5 步,商户后台首先为用户生成订单,然后调用微信的【统一下单】接口向微信支付系统提交订单。这里有一个关键点就是签名的生成。
简单来讲分为以下几个步骤:
1、将所有有效参数以“k=v”的形式进行拼接,有效参数是指非空参数,也就是说如果参数为空,则不参与签名;
2、将所有的“k=v”对用“&”连接,得到“k1=v1&k2=v2&k3=v3”这样的字符串;
3、将微信支付 API 密钥 拼接在最后,如“k1=v1&k2=v2&k3=v3&key=secret”;
4、对整体进行 MD5 运算,即得到签名。
这种签名方法有一个高大上的名字叫做 HMAC(Hash-based Message Authentication Code,基于哈希的消息码)。基于此思路,可以实现如下签名方法:
def gen_sign(params, key):
  """
  签名生成函数

  :param params: 参数,dict 对象
  :param key: API 密钥
  :return: sign string
  """

  param_list = []
  for k in sorted(params.keys()):
    v = params.get(k)
    if not v:
      # 参数的值为空不参与签名
      continue
    param_list.append('{0}={1}'.format(k, v))
  # 在最后拼接 key
  param_list.append('key={}'.format(key))
  # 用 & 连接各 k-v 对,然后对字符串进行 MD5 运算
return md5('&'.join(param_list).encode('utf8')).hexdigest()参与签名的参数中有一个随机字符串,在 Python 中有很多方法,当然也可以利用 uuid 库来生成:
def gen_nonce_str():
  """
  生成随机字符串,有效字符a-zA-Z0-9

  :return: 随机字符串
  """

return ''.join(str(uuid.uuid4()).split('-'))二、微信服务器交互的数据格式
微信服务器与商户服务器之间采用 XML 格式进行交互,这就涉及到与语言原生数据类型进行转换以方便处理。交互的数据参数都是 key-value 的形式,因此在 Python 中使用字典会更加方便。而要解析 XML,也有一大把第三方库供使用,比如 BeautifulSoup。
以下是具体实现:
def trans_xml_to_dict(xml):
  """
  将微信支付交互返回的 XML 格式数据转化为 Python Dict 对象

  :param xml: 原始 XML 格式数据
  :return: dict 对象
  """

  soup = BeautifulSoup(xml, features='xml')
  xml = soup.find('xml')
  if not xml:
    return {}

  # 将 XML 数据转化为 Dict
  data = dict([(item.name, item.text) for item in xml.find_all()])
  return data


def trans_dict_to_xml(data):
  """
  将 dict 对象转换成微信支付交互所需的 XML 格式数据

  :param data: dict 对象
  :return: xml 格式数据
  """

  xml = []
  for k in sorted(data.keys()):
    v = data.get(k)
    if k == 'detail' and not v.startswith(''.format(v)
    xml.append('{value}{key}>'.format(key=k, value=v))
return '<xml>{}</xml>'.format(''.join(xml))注意 detail 参数,即商品详情,其值为 JSON 格式,在转换为 XML 数据时应前注意使用 CDATA 标签将其保护起来。
如:
<detail></detail>
三、公众号支付下网页内通过 JS-API 调起支付
这一点对应业务流程中的第 7 步。之所以提及它是因为微信官方文档在此给开发者挖了一个坑(至少截至我在写这篇文章时是的),就是在“网页端调起支付API”中关于 JS 的示例代码是采用的 WeixinJSBridge,这在很早以前就是 Deprecated 的“玩意儿”,如今更是已经不可用了。正确的做法是使用 JS-SDK,可以参考微信公众号的 wiki。
使用 JS-SDK 前需要先调用 config,这里也包含一个签名,但注意这个签名与之前微信支付的签名并不相干。其首先需要用微信公众号的 APPID 和 APPKEY 来换取 access_token,然后用该 access_token 调用 JS-SDK 换取 ticket 的接口得到 ticket,最后再使用该 ticket 和用户当前页面的 URI 通过 sha1 运算生成签名。
在此之后,即可调用 wx.chooseWXPay 来调起支付,这里也有一个坑:timestamp。wx.chooseWXPay 中的参数要求 timestamp 是全小写。而微信支付中签名时要求 timestamp 中的“s”是大写。真的是要傻傻分不清了。
四、异步通知商户支付结果(回调)
最后是关于异步回调,对应业务流程中的第 10 步。在用户支付操作完成后,微信服务器会通过回调的形式告知商户服务器支付结果。回调的地址与【统一下单】中定义的 notify_url 一致。当接收到回调时,首先应验证签名的有效性以保证“来源可靠”,然后可以通过回调中所带的 openid、out_trade_no 等来定位唯一订单。
总结
There are many forms of WeChat payment, and the business processes are also different. But as long as you can play with one of them, the others can basically be realized quickly. In addition, the implementation of the payment function involves security in the business process, so we must pay attention to clarify the business process and check all key nodes. The above is the entire content of this article. I hope it will be helpful to everyone in using Python to develop WeChat payment.
The above is the detailed content of Learn more about the precautions for using Python to develop WeChat payment. For more information, please follow other related articles on the PHP Chinese website!

Hot AI Tools

Undresser.AI Undress
AI-powered app for creating realistic nude photos

AI Clothes Remover
Online AI tool for removing clothes from photos.

Undress AI Tool
Undress images for free

Clothoff.io
AI clothes remover

Video Face Swap
Swap faces in any video effortlessly with our completely free AI face swap tool!

Hot Article

Hot Tools

Notepad++7.3.1
Easy-to-use and free code editor

SublimeText3 Chinese version
Chinese version, very easy to use

Zend Studio 13.0.1
Powerful PHP integrated development environment

Dreamweaver CS6
Visual web development tools

SublimeText3 Mac version
God-level code editing software (SublimeText3)

Hot Topics
 1386
1386
 52
52

