Hands-on creation of HTML5 Tetris (pictures and text)
I’d like to say something before the text begins. The so-called self-sufficiency in the title refers to the development of this game without reference to any design ideas. You may be confused. If you refer to excellent ideas, wouldn’t you get twice the result with half the effort? Of course , there are advantages to both reference and not. I am only talking about the advantages of not referring. When I finally complete a work after painstaking efforts and dozens of bug modifications, I can proudly say to others: "Look, I developed this Game! "Of course, the creativity is not mine, but this does not affect my "vanity". Wouldn't it be interesting to give a classic game my own understanding and integrate it into the game? , when I look back and take a look at other people’s ideas, I sometimes wonder, “Why didn’t I think of this before?”, “So this problem can be solved like this”, “This design idea is much better than mine! ", etc. are much better than just looking at other people's ideas and blocking your own thinking from the beginning, right?
Okay, the text begins~
If you want to see the effect first, jump give it a try!
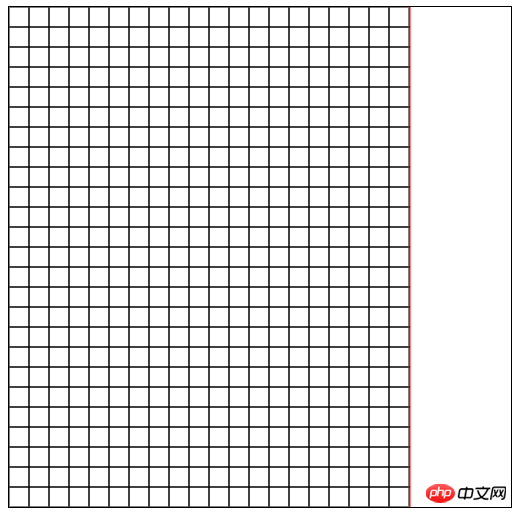
Tetris, the main game interface should be composed of blocks one by one, as shown below. Of course, these grids cannot be seen in the finished product. This is just to help understanding. The main interface size is 400× 500, set the size of each brick (grid) to 20×20, then there are 20 bricks in each row and 25 bricks in each column. Related code:
brickWidth = 20,    //砖块大小
width = 400, height = 500;  //画布宽高,20X25

When it comes to the grid of the main interface, we have to mention a very important variable, It is BOARD, a two-dimensional array. Visually speaking, its size is 20×26, and the stored value is 0 or 1. 0 means there is no brick at this position, and 1 means there is a brick at this position. It plays an important role in the following judgments. Careful gamers may find out why it is 20×26 instead of 20×25 corresponding to the main interface grid. I also set it to 20×25 at the beginning. , and later noticed that if you add a row and the values of this row are all 1, you can easily judge whether the brick has touched the bottom of the main interface. Related codes:
// 初始化BOARD,注意纵向有26个,最后一排用来判断是否触底
for(i=0;i<20;i++){
    BOARD[i] = [];
    for(j=0;j<26;j++) {
        if(j==25) {
            BOARD[i][j] = 1
        } else {
            BOARD[i][j] = 0;
        }
    }
}
Next look at the "shape" composed of 4 bricks, there are five For the sake of description, I named them, Tian (field), Chu (hoe), Tu (bulge), Thunder (lightning), Line (a horizontal line), haha, interesting names, sorry I didn’t find them English name.
First define a brick class Brick:
function Brick() { }There are several prototype variables and methods under it:
Brick.prototype.embattle = null;    //砖块的布局(需重载)
Brick.prototype.isOverturn = 0; //是否翻转
Brick.prototype.originX = 9;    //砖头的绘制起点X
Brick.prototype.originY = -3;    //砖头的绘制起点Y
Brick.prototype.direction = 0;  //砖头朝向
Brick.prototype.autoMoveTimer = null;   //自动移动计时器
Brick.prototype.draw = function() { …… }    //画砖块的方法
Brick.prototype.move = function(moveX, moveY) { …… }    //移动的方法
Brick.prototype.autoMove = function() { …… }    //自动移动的方法
Brick.prototype.change = function() { …… } //变换砖头朝向The subclasses of Brick are: Tian, Chu, Tu, Thunder , Line five, each subclass overloads Brick's embattle variable. What is embattle? In English, it means embattle. What is this array? First of all, students must understand my idea. Let’s use Tu’s embattle as an example. The code is as follows:
this.embattle = [
    [ [0,4,5,8], [1,4,5,6], [1,4,5,9], [0,1,2,5] ],  //布局表为4X4表格,数字为砖头位置
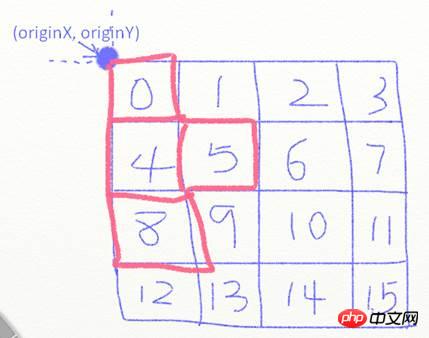
[ [0,4,5,8], [1,4,5,6], [1,4,5,9], [0,1,2,5] ] //次行为翻转的情况];embattle is a three-dimensional array. The first dimension is whether to flip isOverturn (visually speaking, it is like Horizontal flipping of picture ), the second dimension is the direction (up, left, bottom, right), and the third dimension is the distribution of the 4 bricks of the shape. I define each new shape object in a 4 In a ×4 array, for example, Tu's this.embattle[0][0] is [0,4,5,8], and the number is the location of the brick, as shown below:

So to determine the position and appearance of a shape, isOverturn is needed to determine whether it is flipped, direction is required to determine its direction, and originX and originY are required to determine the position of the "array".
Next, explain Brick’s four prototype methods respectively.
Brick.prototype.draw
ctx.fillStyle = 'rgb('+Math.floor(Math.random()*256)+','+Math.floor(Math.random()*256)+',
'+Math.floor(Math.random()*256)+')';
for(i=0;i<4;i++) {
    tmp = this.embattle[this.isOverturn][this.direction][i];
    ctx.fillRect((this.originX+tmp%4)*brickWidth, (this.originY+Math.floor(tmp/4))*brickWidth, brickWidth, brickWidth);
    ctx.strokeRect((this.originX+tmp%4)*brickWidth+1, (this.originY+Math.floor(tmp/4))*brickWidth+1, brickWidth-2, brickWidth-2);   //注意+1和减2
}有上面说的确定形状的位置和样子的方法,之后就是纯粹canvas画图,4个砖块一个一个地画,不要看代码很长其实就是那么一点点,originX、originY和砖块在阵中的位置就可以确定画砖块的起点了。注意到代码的注释了没有,画边框的时候,它是从起点向外面画的,就像我把一个塑料袋套在另一个塑料袋的外面,为了以后的清除的方便且不影响其他的砖块,把边框画进fillRect的领土,就像我现在把这个塑料袋不套在外面而是放进这另一个塑料袋里面一样,就这个意思。
Brick.prototype.move
这是最长的一个了,移动的时候,moveX和moveY表示横纵的增量,没有同时非0的情况(这是人为的设定,要么横向移动要么纵向移动),当然要判断即将移动到的位置是否违规:
横向:
如果阵贴靠主界面左侧则不能向左移即moveX不能为-1
(this.originX==0 && moveX==-1)
判断右边时比较麻烦,因为不能直接用阵来判断是否贴靠右侧(看前面的图就知道阵的右边和下边可能没有砖块的),这时要一个个地判断4个砖块是否有至少有一个在最右,这时不能向右移动
|| (this.originX+tmp[0]%4==19 && moveX==1)
|| (this.originX+tmp[1]%4==19 && moveX==1)
|| (this.originX+tmp[2]%4==19 && moveX==1)
|| (this.originX+tmp[3]%4==19 && moveX==1)
最后还要判断即将到达的位置是否已经有砖块了。
|| (BOARD[this.originX+tmp[0]%4+moveX][this.originY+Math.floor(tmp[0]/4)]==1)
|| (BOARD[this.originX+tmp[1]%4+moveX][this.originY+Math.floor(tmp[1]/4)]==1)
|| (BOARD[this.originX+tmp[2]%4+moveX][this.originY+Math.floor(tmp[2]/4)]==1)
|| (BOARD[this.originX+tmp[3]%4+moveX][this.originY+Math.floor(tmp[3]/4)]==1)
纵向:
即将到达的位置是否已经有砖块了,注意到下面的代码的&& moveX==0,原来是没有的,后来发现每次砖块怎么刚刚靠上下面堆着的砖块就不能再移动了,原来横向移动的时候也进行了这个判断,即刚刚靠上下面的砖块,如果这时想左右移动,但下方有砖块,但是问题来了,下面有没有砖块跟我左右移动有什么关系呢?是吧。
if((as==1 || bs==1 || cs==1 || ds==1) && moveX==0) { …… }纵向终止判断里面主要做了几件事:清除autoMoveTimer,设置BOARD在该形状当前位置的值为1,有可以消除的整行就消除,加分改分,判断胜利/失败,删除当前对象,召唤下一个形状。
横纵都没违规时:
这时,把该形状前一个位置的砖块清除,更新originX和originY,再画出来。
for(i=0;i<4;i++) {
    tmp = this.embattle[this.isOverturn][this.direction][i];
    ctx.clearRect((this.originX+tmp%4)*brickWidth, (this.originY+Math.floor(tmp/4))*brickWidth, brickWidth, brickWidth);
}
this.originX += moveX;
this.originY += moveY;
this.draw();Brick.prototype.autoMove
只做一件事,设置计时器,定时向下移动。
var status, self = this;this.autoMoveTimer = setInterval(function() {
    status = self.move(0,1);
},speed);Brick.prototype.change
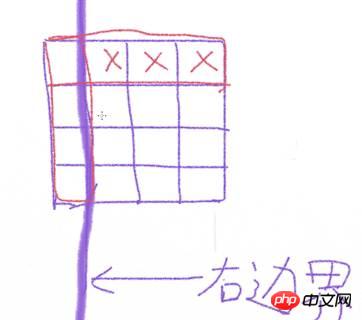
改变形状的朝向,很好办啊,不是有embattle数组了吗?当然没有那么简单,不只是换个数组这么简单。要考虑改变方向之后占用的位置是否已经有砖块了,如果形状是贴着主界面右边界就更糟糕了,比如原来是竖着的Line,改变其方向变为横,占用阵的0、1、2、3,如果Line贴着右边界,originX为19,变为横向,占用阵的0、1、2、3,后面三个砖块已经溢出了主界面。

解决方案是:如果有越界的砖块就把阵往左挪一挪,直到不再越界。
while(ox+tmp[0]%4 > 19 || ox+tmp[1]%4 > 19 || ox+tmp[2]%4 > 19 || ox+tmp[3]%4 > 19) {
    ox -= 1;
}最后,如果都没事,就可以清除原位置,画出改变方向之后的形状了。
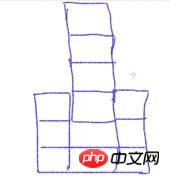
并不是太完美,因为有些卡位的情况没考虑进来,什么是卡位,看下图,你知道Line实例调用change方法的结果是什么了吗?事实上,它不应该成功改变方向的,对吧?还有其他一些卡位的情况。

Brick’s four prototype methods are introduced here. Now if I want to display the next shape in the information interface on the right, the most direct way is to instantiate an object through the shape's constructor . To prevent it from automatically calling autoMove, I added the constructor isModel to determine whether it is used for prompts.
There are also key events monitoring, NextBrick function and deleteObj. Take a look for yourself. It is easy to understand. The entrance to the game is the NextBrick function.
Also, I am not sure whether deleteObj actually successfully allows the GC to recycle the object.
Also, I originally wanted to add a level function, because the speed (speed variable) can be freely set, so I put this function aside.
The above is the detailed content of Hands-on creation of HTML5 Tetris (pictures and text). For more information, please follow other related articles on the PHP Chinese website!

Hot AI Tools

Undresser.AI Undress
AI-powered app for creating realistic nude photos

AI Clothes Remover
Online AI tool for removing clothes from photos.

Undress AI Tool
Undress images for free

Clothoff.io
AI clothes remover

AI Hentai Generator
Generate AI Hentai for free.

Hot Article

Hot Tools

Notepad++7.3.1
Easy-to-use and free code editor

SublimeText3 Chinese version
Chinese version, very easy to use

Zend Studio 13.0.1
Powerful PHP integrated development environment

Dreamweaver CS6
Visual web development tools

SublimeText3 Mac version
God-level code editing software (SublimeText3)

Hot Topics
 Nested Table in HTML
Sep 04, 2024 pm 04:49 PM
This is a guide to Nested Table in HTML. Here we discuss how to create a table within the table along with the respective examples.
 Table Border in HTML
Sep 04, 2024 pm 04:49 PM
Guide to Table Border in HTML. Here we discuss multiple ways for defining table-border with examples of the Table Border in HTML.
 HTML margin-left
Sep 04, 2024 pm 04:48 PM
Guide to HTML margin-left. Here we discuss a brief overview on HTML margin-left and its Examples along with its Code Implementation.
 HTML Table Layout
Sep 04, 2024 pm 04:54 PM
Guide to HTML Table Layout. Here we discuss the Values of HTML Table Layout along with the examples and outputs n detail.
 HTML Ordered List
Sep 04, 2024 pm 04:43 PM
Guide to the HTML Ordered List. Here we also discuss introduction of HTML Ordered list and types along with their example respectively
 Moving Text in HTML
Sep 04, 2024 pm 04:45 PM
Guide to Moving Text in HTML. Here we discuss an introduction, how marquee tag work with syntax and examples to implement.
 HTML Input Placeholder
Sep 04, 2024 pm 04:54 PM
Guide to HTML Input Placeholder. Here we discuss the Examples of HTML Input Placeholder along with the codes and outputs.
 HTML onclick Button
Sep 04, 2024 pm 04:49 PM
Guide to HTML onclick Button. Here we discuss their introduction, working, examples and onclick Event in various events respectively.


