Project introduction for WeChat public account development
Welcome to leave a message, forward,
The project source code reference address click me click me--Welcome Start
This article will learn:
1, Eclipse、Intellij IDEA clone project
2、How to activate Intellij IDEA
3. Maven downloadInstallationConfiguration
4.weixin_guide How to start
How to import the project into Eclipse
The steps are as follows:Navigationbar Select<a href="http://www.php.cn/wiki/1313.html" target="_blank">File</a>>Import...><a href="http://www.php.cn/wiki/1544.html" target="_blank">Git</a>>Projects from Git>Clone URL>URI Enter the address of the project to be cloned and click Next>Select the project branch version Click Next>Wait for the background clone to complete>SelectImport as general project >Finally convert the project into a Maven project (this process requires downloading the jar from the Maven central warehouse. If it fails now, it is recommended to install and configure a maven locally. The installation reference address)
Provide a Everyone who has used the domestic Alibaba warehouse
Configure the sub-nodes of mirrors in the maven
tings.xml file , add the following mirror<mirror>
<id>nexus-aliyun</id>
<mirrorOf>*</mirrorOf>
<name>Nexus aliyun</name>
<url>http://maven.aliyun.com/nexus/content/groups/public</url>
</mirror>
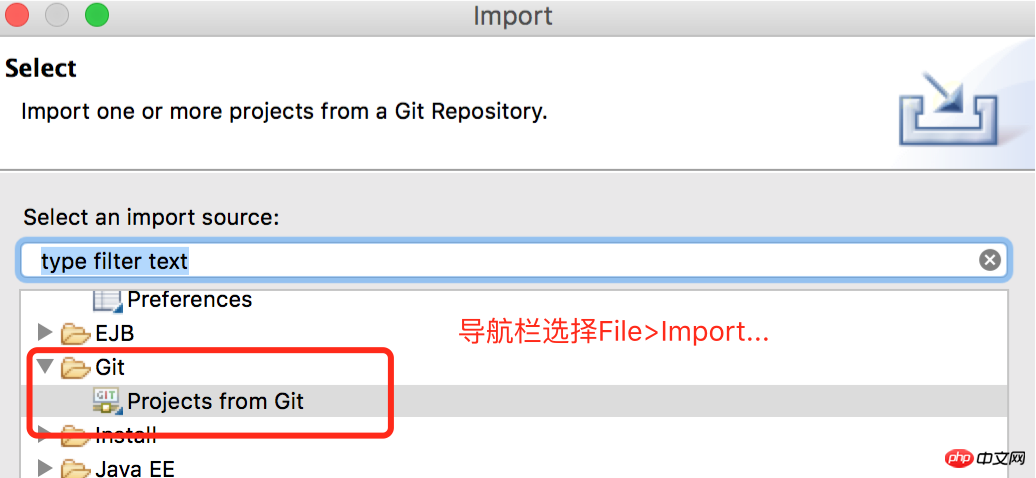
Eclipse import project 01.png
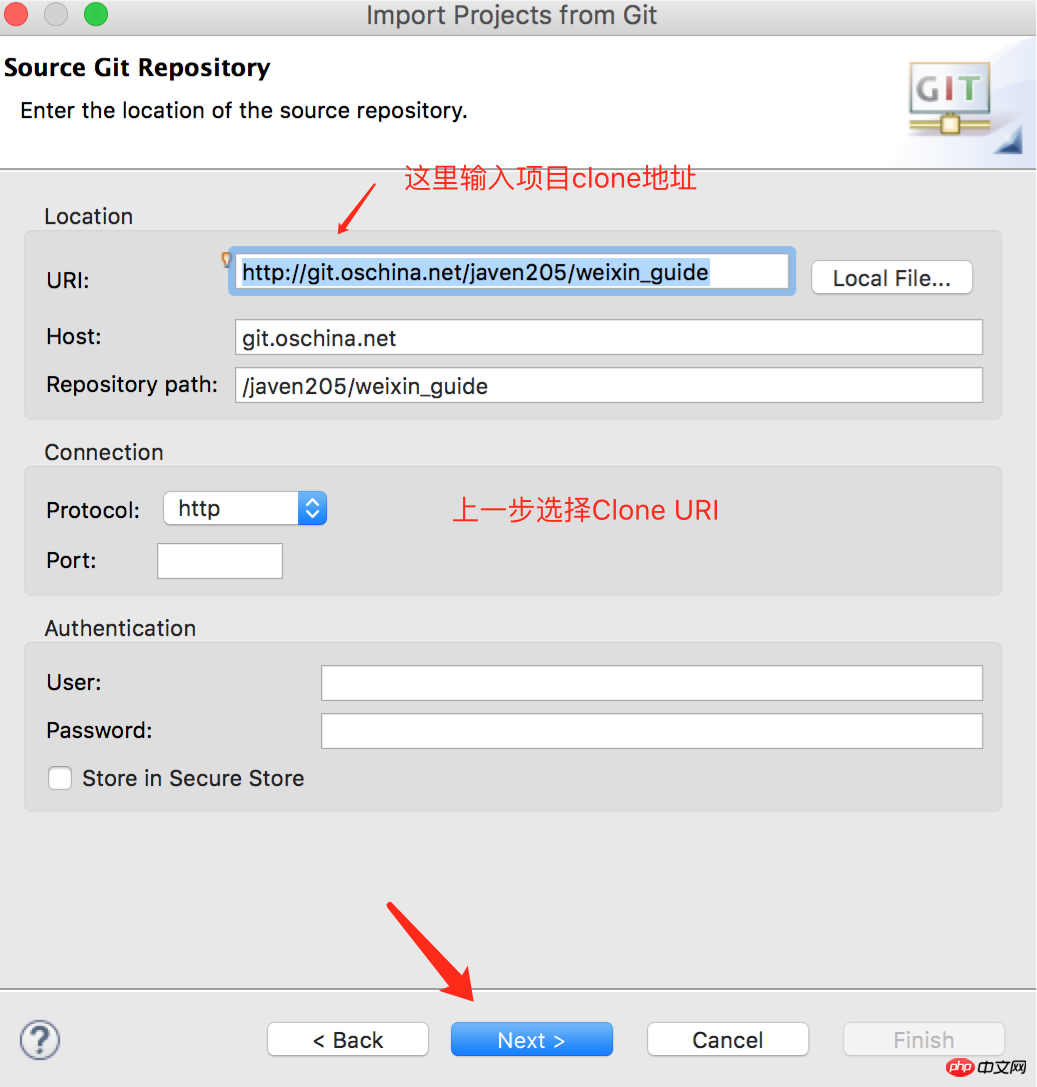
Eclipse import project 02.png
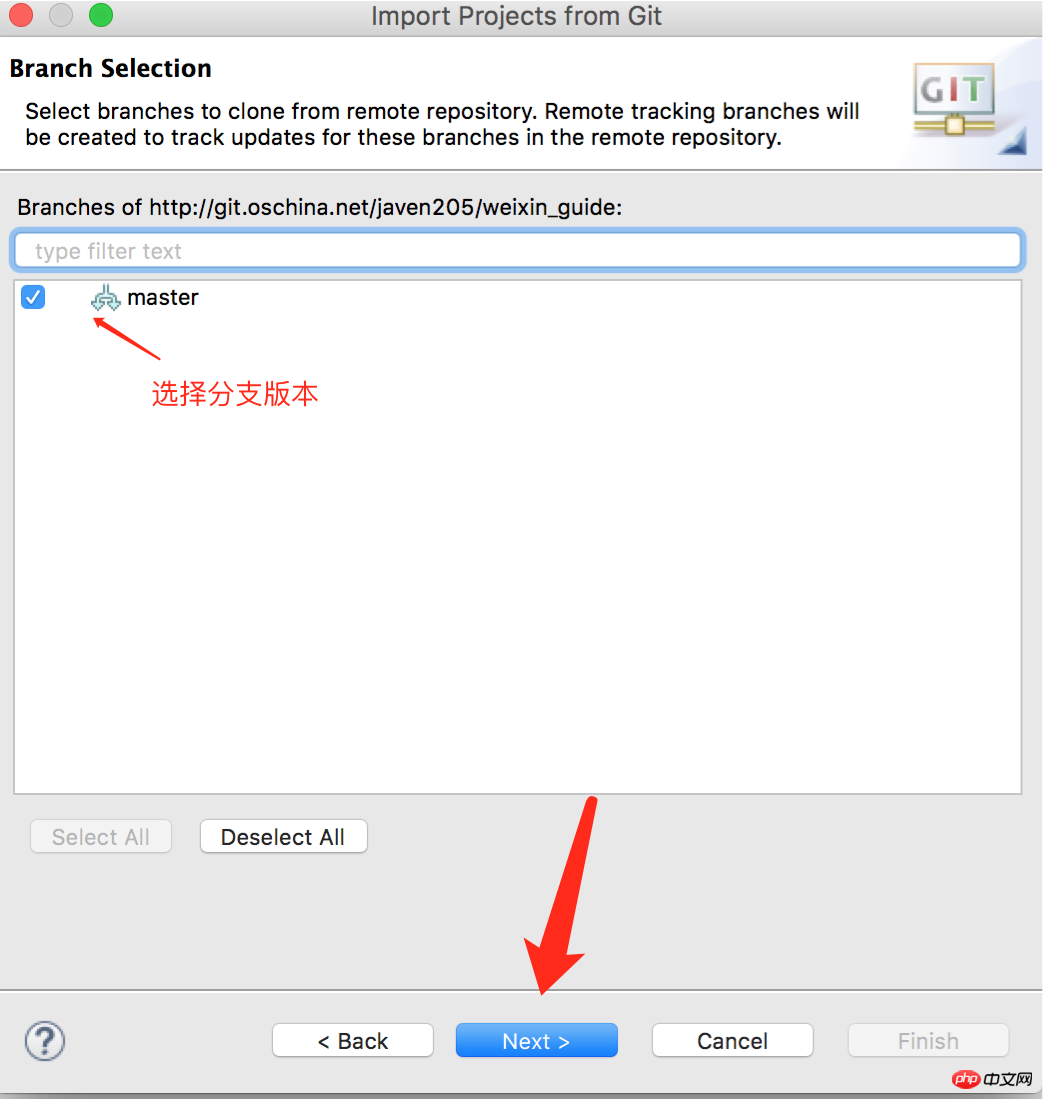
Eclipse import project 03.png
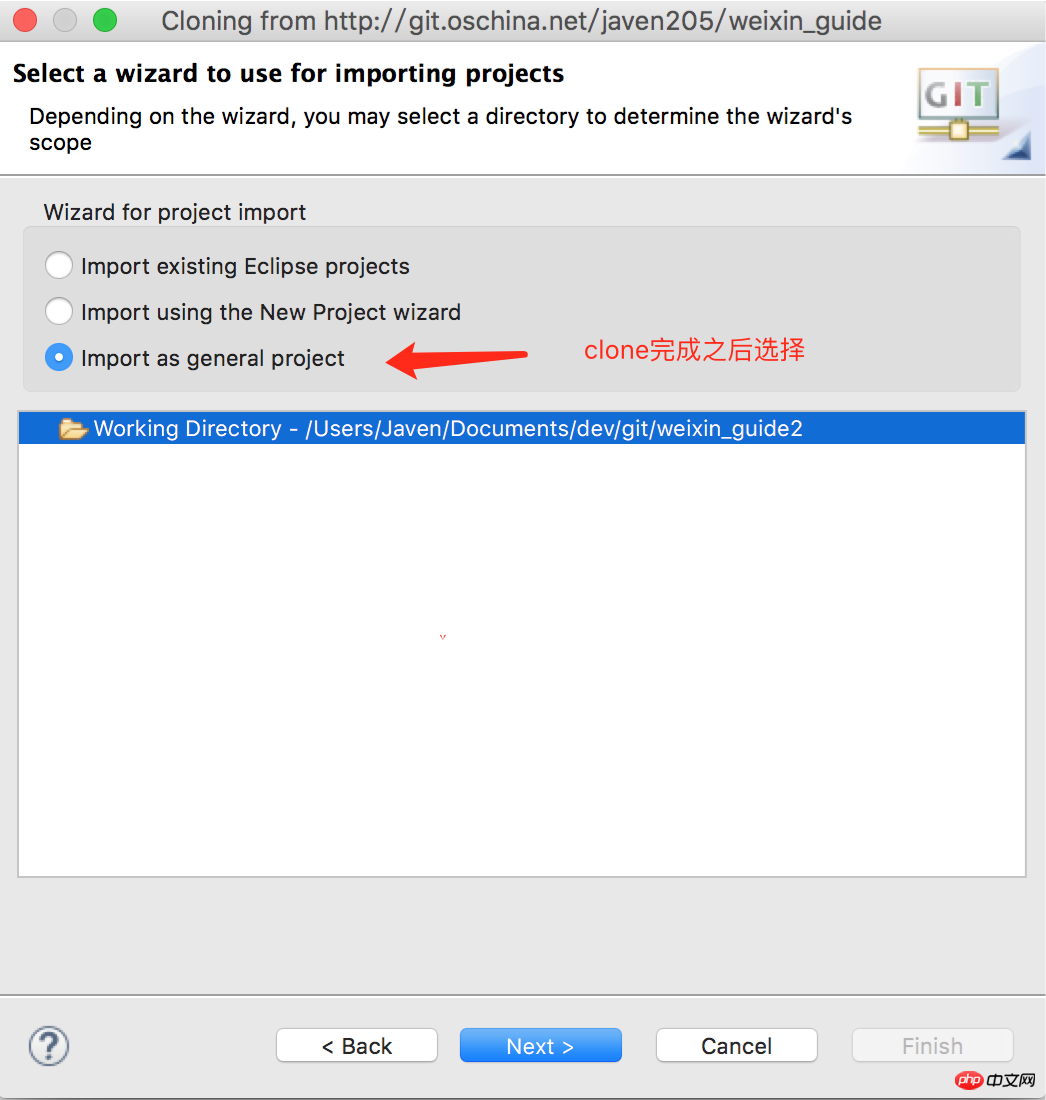
Eclipse import project 04.png
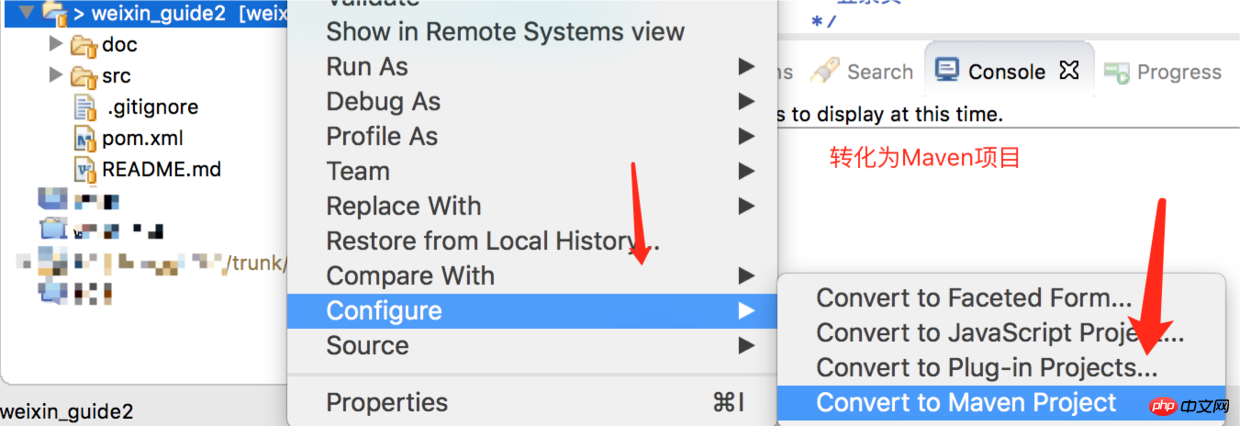 ##Eclipse import project 05.png
Intellij IDEA
Activation method reference addressThe steps are as follows:
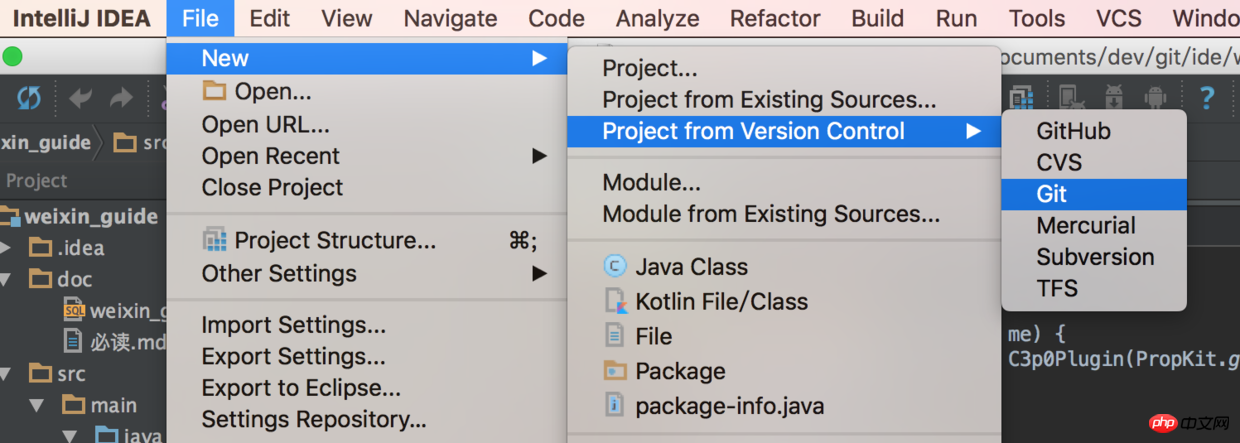 IDEA import Project 01.png
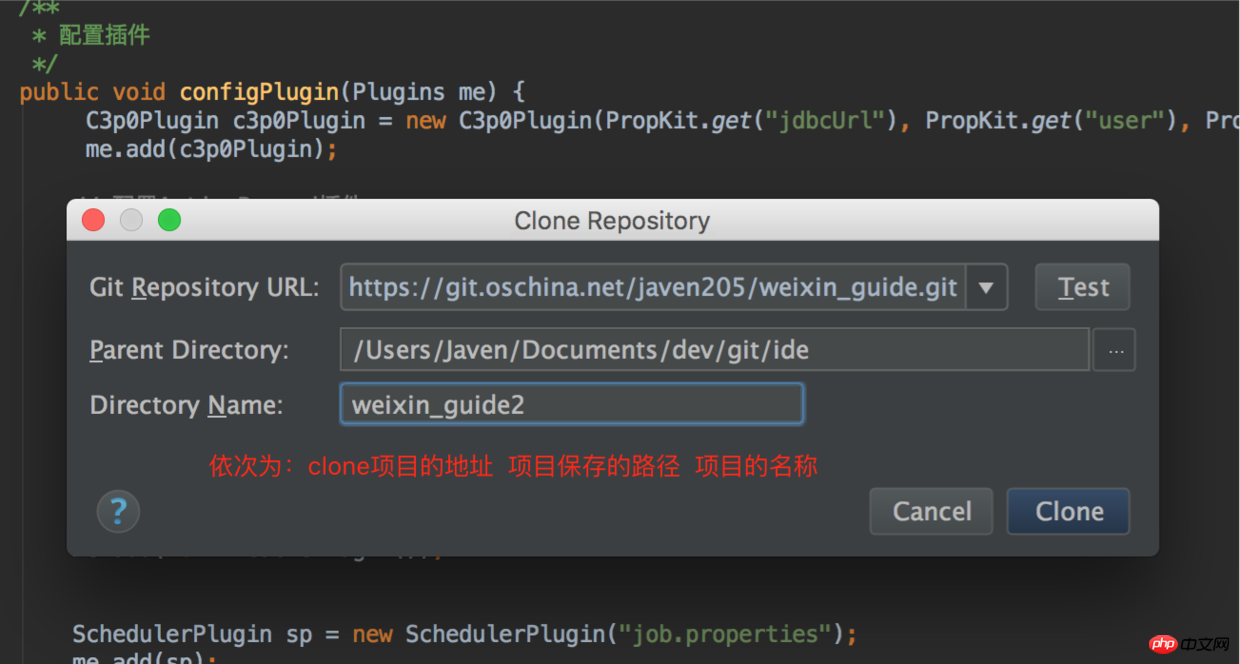 IDEA Import Project 02.png
##IDEA Import Project 03 .png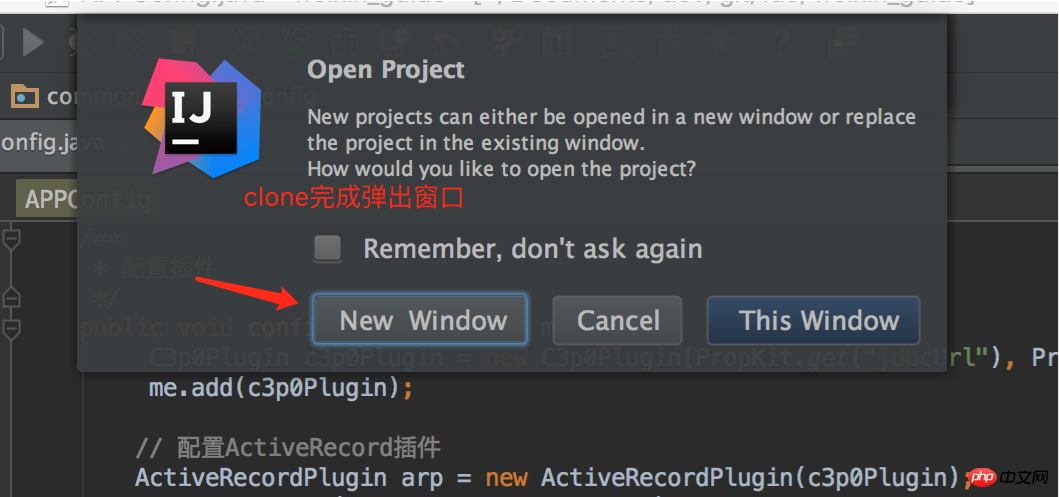
IDEA Import Project 04.png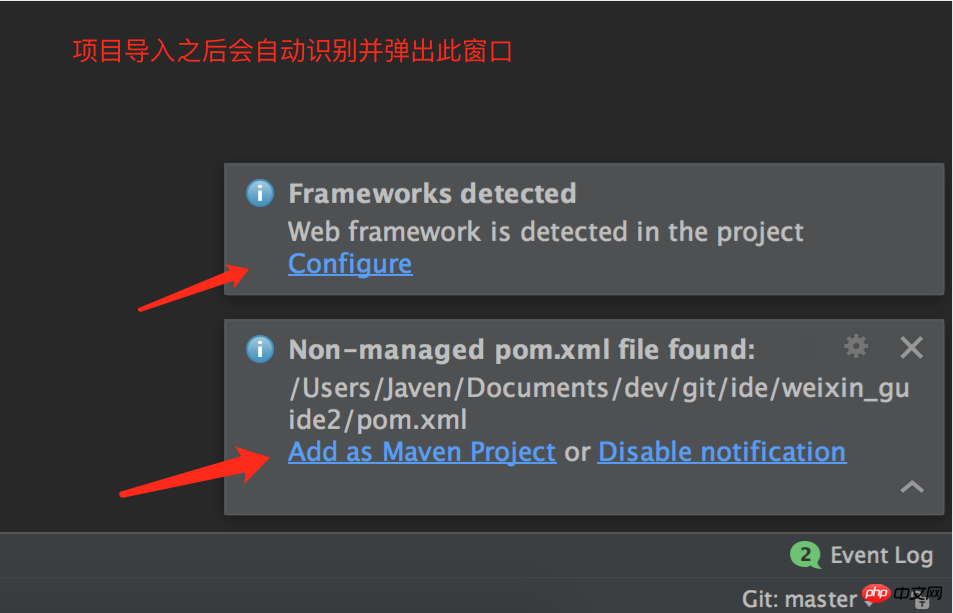
Of course, if you are familiar with Git commands, you can also use the command to import the project
Maven install Install and compile the projectEclipse:
 Project
Configuration file
 Set the startup port and start
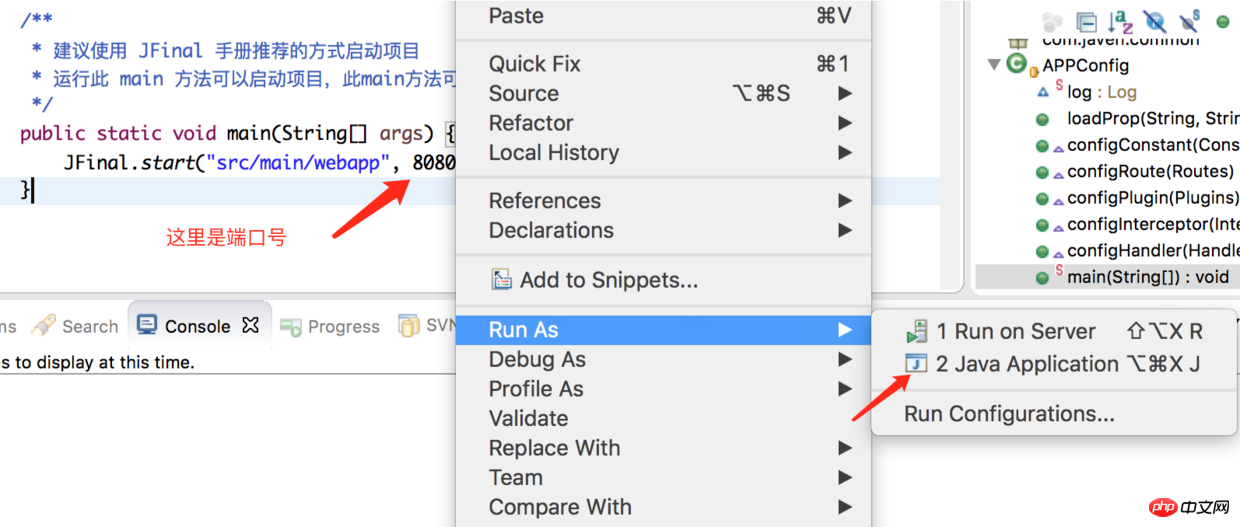 Observe the log
/**
     * 配置插件
     */
    public void configPlugin(Plugins me) {
        /* C3p0Plugin c3p0Plugin = new C3p0Plugin(PropKit.get("jdbcUrl"), PropKit.get("user"), PropKit.get("password").trim());
         me.add(c3p0Plugin);

        // 配置ActiveRecord插件
        ActiveRecordPlugin arp = new ActiveRecordPlugin(c3p0Plugin);
        arp.addMapping("course", Course.class);
        arp.addMapping("orders", Order.class);
        arp.addMapping("users","id", Users.class);
        arp.addMapping("Tuser", TUser.class);
        arp.addMapping("stock", Stock.class);
        arp.addMapping("idea", Idea.class);
        arp.setShowSql(true);
        me.add(arp);

        // ehcahce插件配置
        me.add(new EhCachePlugin());


        SchedulerPlugin sp = new SchedulerPlugin("job.properties");
        me.add(sp);*/
}Intellij IDEA:
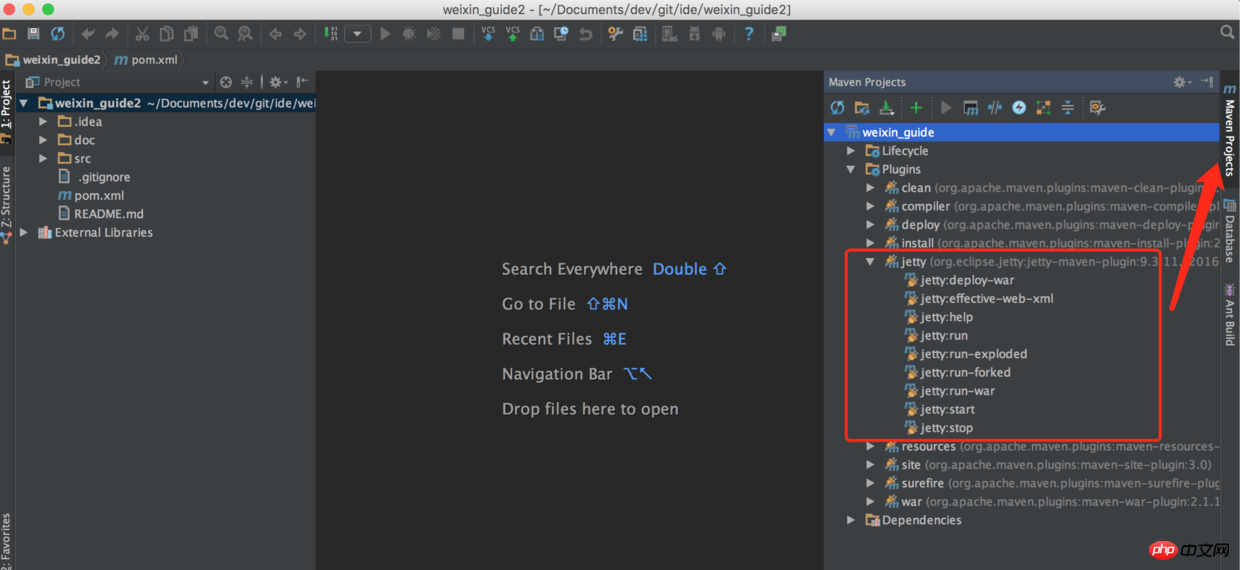
Start the project is to use the Maven plug-in Jetty. The detailed steps are as follows:
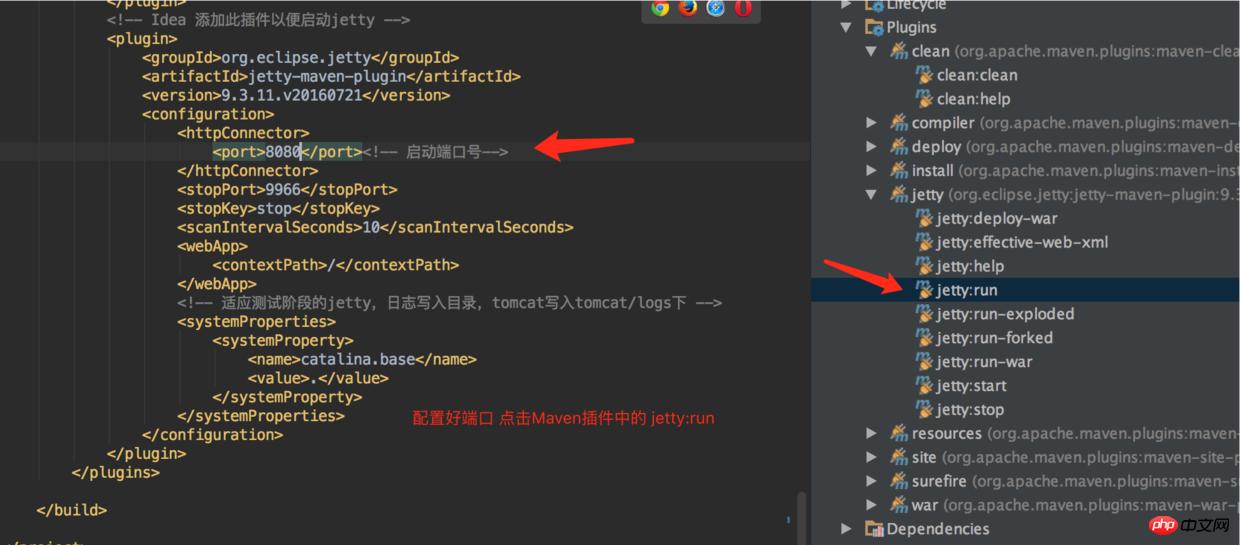
IDEA run Project 01.png
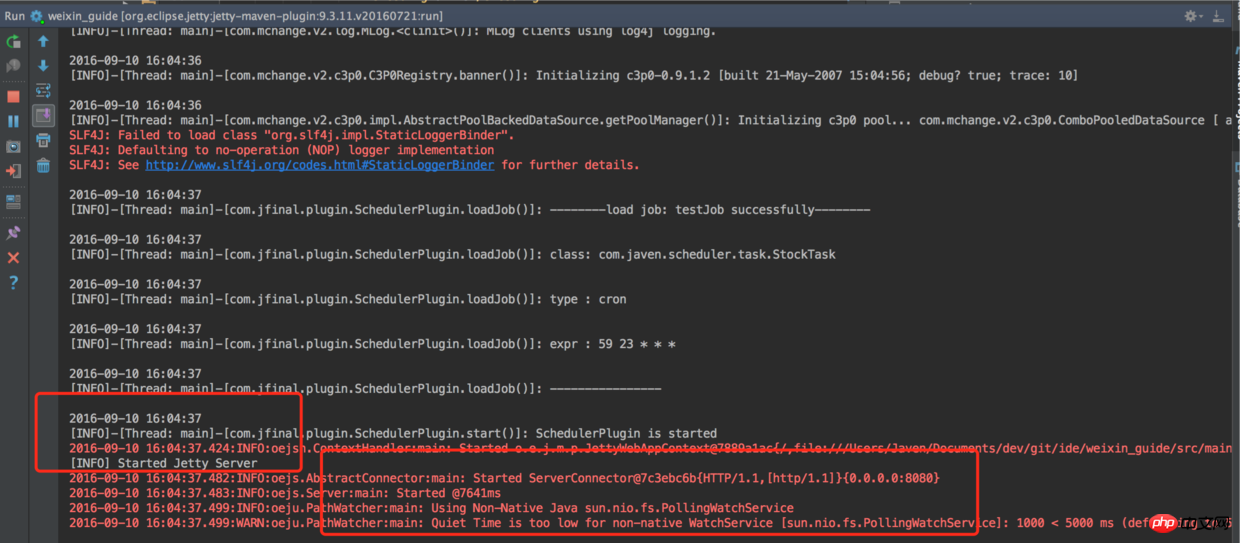
IDEA Run Project 02.png
The above is the detailed content of Project introduction for WeChat public account development. For more information, please follow other related articles on the PHP Chinese website!

Hot AI Tools

Undresser.AI Undress
AI-powered app for creating realistic nude photos

AI Clothes Remover
Online AI tool for removing clothes from photos.

Undress AI Tool
Undress images for free

Clothoff.io
AI clothes remover

AI Hentai Generator
Generate AI Hentai for free.

Hot Article

Hot Tools

Notepad++7.3.1
Easy-to-use and free code editor

SublimeText3 Chinese version
Chinese version, very easy to use

Zend Studio 13.0.1
Powerful PHP integrated development environment

Dreamweaver CS6
Visual web development tools

SublimeText3 Mac version
God-level code editing software (SublimeText3)

Hot Topics
 1359
1359
 52
52
 Scrapy implements crawling and analysis of WeChat public account articles
Jun 22, 2023 am 09:41 AM
Scrapy implements article crawling and analysis of WeChat public accounts. WeChat is a popular social media application in recent years, and the public accounts operated in it also play a very important role. As we all know, WeChat public accounts are an ocean of information and knowledge, because each public account can publish articles, graphic messages and other information. This information can be widely used in many fields, such as media reports, academic research, etc. So, this article will introduce how to use the Scrapy framework to crawl and analyze WeChat public account articles. Scr
 What are the differences between WeChat official account certification and non-certification?
Sep 19, 2023 pm 02:15 PM
The difference between WeChat public account authentication and non-authentication lies in the authentication logo, function permissions, push frequency, interface permissions and user trust. Detailed introduction: 1. Certification logo. Certified public accounts will obtain the official certification logo, which is the blue V logo. This logo can increase the credibility and authority of the public account and make it easier for users to identify the real official public account; 2. Function permissions. Certified public accounts have more functions and permissions than uncertified public accounts. For example, certified public accounts can apply to activate the WeChat payment function to achieve online payment and commercial operations, etc.
 How to use Laravel to develop an online ordering system based on WeChat public account
Nov 02, 2023 am 09:42 AM
How to use Laravel to develop an online ordering system based on WeChat official accounts. With the widespread use of WeChat official accounts, more and more companies are beginning to use them as an important channel for online marketing. In the catering industry, developing an online ordering system based on WeChat public accounts can improve the efficiency and sales of enterprises. This article will introduce how to use the Laravel framework to develop such a system and provide specific code examples. Project preparation First, you need to ensure that the Laravel framework has been installed in the local environment. OK
 Practical crawler combat in Python: WeChat public account crawler
Jun 10, 2023 am 09:01 AM
Python is an elegant programming language with powerful data processing and web crawling capabilities. In this digital era, the Internet is filled with a large amount of data, and crawlers have become an important means of obtaining data. Therefore, Python crawlers are widely used in data analysis and mining. In this article, we will introduce how to use Python crawler to obtain WeChat public account article information. WeChat official account is a popular social media platform for publishing articles online and is an important tool for promotion and marketing of many companies and self-media.
 Can the official account only post one article per day?
Jun 16, 2023 pm 02:04 PM
The public account can not only post one article per day, but can publish up to eight articles at a time. How to publish multiple articles: 1. Click "Material Management" on the left, and then click "New Graphic and Text Material" to start editing. First article; 2. After editing the first article, click the + sign under the first article on the left and click "Graphic Message" to edit the second article; 3. After finishing multiple images and text, click " Save and send in bulk" to complete the publishing of multiple articles.
 Use PHP to build a WeChat public account API interface
May 13, 2023 pm 12:01 PM
In today's Internet era, WeChat official accounts have become an important marketing channel for more and more companies. If you want your WeChat official account to implement more functions, you often need to write corresponding interfaces. This article will use PHP language as an example to introduce how to build a WeChat public account API interface. 1. Preparation Before writing the WeChat public account API interface, the developer needs to have a WeChat public account and apply for developer interface permissions in the WeChat public platform. After the application is successful, you can obtain the relevant developer AppID and AppSe
 PHP and WeChat public account development guide
Jun 11, 2023 pm 03:31 PM
With the gradual popularity of WeChat public accounts in social networks, more and more developers have begun to get involved in the field of WeChat public account development. Among them, PHP, as a common back-end programming language, has also begun to be widely used in the development of WeChat public accounts. This article will introduce the basic knowledge and common techniques of PHP in WeChat public account development. 1. Basics of PHP and WeChat public account development WeChat public account development WeChat public account refers to an Internet application based on the WeChat platform, which can provide users with different types of services and content, such as information push
 Build WeChat public account application using Go language framework
Jun 04, 2023 am 10:40 AM
With the popularity of the Internet and the widespread use of mobile devices, WeChat official accounts have become an indispensable part of corporate marketing. Through WeChat public accounts, companies can easily interact with users, promote products and services, and increase brand awareness. In order to better develop WeChat public account applications, more and more developers and companies choose to use Go language to build WeChat public account applications. Go language is a programming language developed by Google. Its syntax is concise and suitable for building high-performance, high-concurrency real-time applications. In terms of ease of use and


