Python and Django installation steps
Many beginners ask how to install Python and Django. Here we will briefly introduce the installation steps of these two software under Windows 2003.
1. Download and install Python
Python official download address: http://www.python.org/ftp/python/
What we choose here is Python 2.7.2. Although the latest version is Python 3.2.2, Django does not currently support Python 3.2.2.
The installation steps are very simple. Double-click the installation package to start the installation. Here we install to D:\Python, as shown in Figure 1,
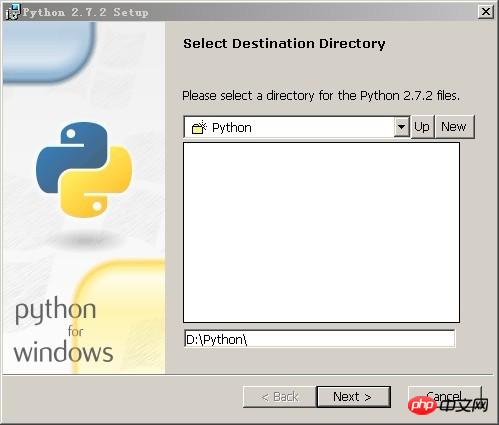
figure 1
Click the "Next" button to enter the Python installation component selection interface. Here we install all components and select the default settings. As shown in Figure 2.
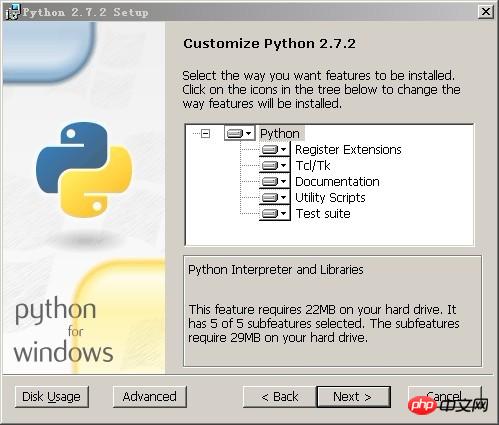
figure 2
After the installation is completed, you need to set the operating system environment variable Path and add the Python installation path ";D:\Python" as shown in Figure 3
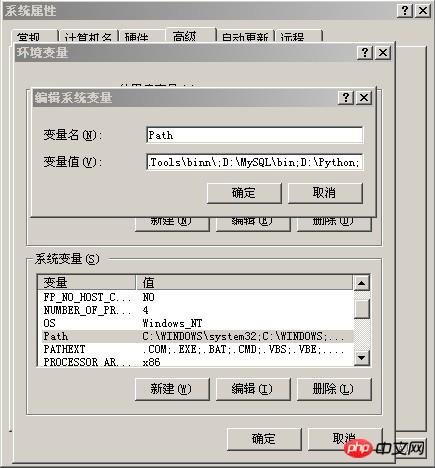
image 3
After the settings are completed, we open the CMD command prompt window, enter "python", and press Enter. You should see a similar screen, as shown in Figure 4.

Figure 4
Ok, at this time, our python installation is complete. You can enter the command print "Hello world" to print the string, and press the Enter key to see if the execution effect of the program is the same.
2. Download and install Django
Download the latest version of Django Django-1.3.1.tar.gz. The Django-1.3.1.tar.gz file we downloaded is a standard Unix compression format file. We can also use software such as WinRAR to decompress it under Windows. After decompression, we get a Django-1.3.1 Directory, assuming we extract it to the D:\Django directory. We open a DOS command prompt window, enter this directory, and then execute the python setup.py install command to start the Django installation. As shown in Figure 5.

Figure 5
After the installation is complete, we found that Django was installed in the directory D:\Python\Lib\site-packages\django. There is a bin subdirectory in this directory, which stores common Django commands. To facilitate future operations, we need to add this bin path to the operating system environment variable Path. Add the Django command path ";D:\Python\Lib\site-packages\django\bin". As shown in Figure 6.
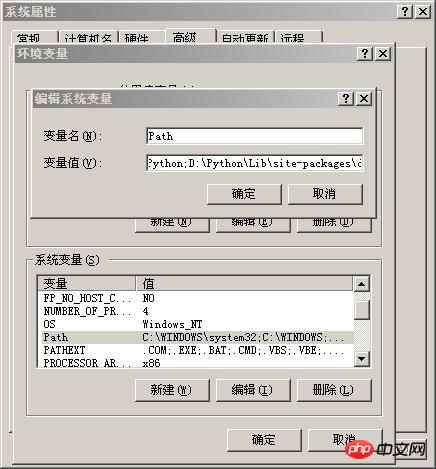
Figure 6
So far we have completed the Django installation, now we need to verify whether we can start working. First, we open a CMD command window to see if Django's regular instructions can be used, and then we see if Django has been integrated with the python language environment. As shown in Figure 7.
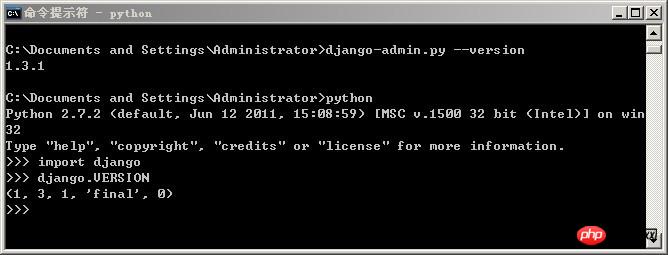
Figure 7
As you can see from the picture, we first execute "django-admin.py --version" at the operating system prompt, and the system prints out the Django version number "1.3.1". Then we enter "Python" to enter the python running environment. At the ">>>" prompt, we enter a python module import statement "import django". This statement means that we are introducing "in the current python running environment" django" function module; then we use the "VERSION" method of this function module to view the version number of this module, and we also see the same version number. If you can see this information completely on your computer, then OK, this proves that your computer can start executing python programs based on the Django system.
3. Create a Django project
Our purpose of learning Django is of course to use it to develop Web-based application systems. Let's take a look at how Django displays a Web page. Open a CMD command window and enter the commands in sequence. As shown in Figure 8
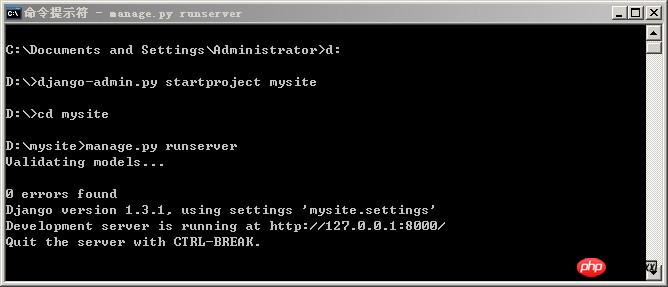
Figure 8
Here is an explanation of the commands in the picture above. First, enter the D drive and enter the command django-admin.py startproject mysite to create a website project. The website directory name is mysite and the path is D:\mysite. Then enter the mysite directory and enter manage.py runserver to open the website. You can specify the port, which defaults to 8000. If you want to use port 90, write manage.py runserver 90.
Finally, we open the browser and enter the address http://localhost:8000 in the address bar. Do you see "It worked"? As shown in Figure 9
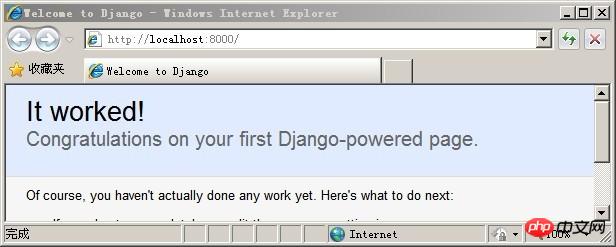
Figure 9
Next we create a Hello world page:
Using Django, the content of the page is generated by view functions. We create a view file views.py in the D:\mysite directory and enter the following content:
from django.http import HttpResponse
import datetime

def hello(request):
    now = datetime.datetime.now()
    html = "<html><body><h3>Hello World!</h3>It is now %s </body></html>" % now
    return HttpResponse(html)
Next, modify the urls.py file in the mysite directory as follows:
from django.conf.urls.defaults import patterns, include, url

urlpatterns = patterns('',

    ('^hello/$','mysite.views.hello'),
)Finally, we open the browser and enter the address http://localhost:8000/hello/ in the address bar. The result is shown in Figure 10
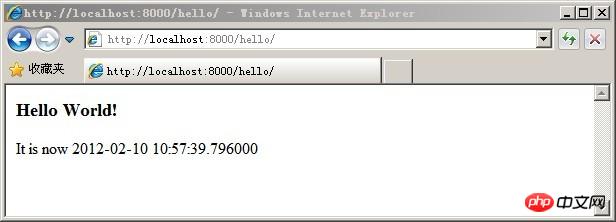
Figure 10
4. Create a Mysql database application
1. First install the MySQL database, here we install it to D:\MySQL. Please refer to the documentation for details: MySQL installation diagram
2. Install the python-mysql driver.
Official download address: http://sourceforge.net/projects/mysql-python/files/
Windows version download address: http://www.codegood.com/downloads
We use the windows version here MySQL-python-1.2.3.win32-py2.7.exe
2. Modify the database items of the settings.py configuration file
There is a settings.py file in the D:\mysite directory. Open it, find the DATABASES item, and change the database connection parameters. The results are as follows:
DATABASES = {
    'default': {
        'ENGINE': 'mysql',
        'NAME': '你的数据库名称',
        'USER': '你的MYSQL账号',
        'PASSWORD': '你的MYSQL密码',
        'HOST': '127.0.0.1',
        'PORT': '3306',
    }
}Open the CMD window and enter the following command in the D:\mysite directory to test whether the data connection is successful. As shown in Figure 11

Figure 11
If there is no prompt message, it means the database connection is successful.
3. Create a new App books
Open the CMD window and enter the command in the D:\mysite directory: Figure 12

Figure 12
4. Custom model file
In the D:\mysite\books directory, modify the contents of the models.py file as follows.
from django.db import models

class Book(models.Model):
    title = models.CharField(max_length=100)
    authors = models.CharField(max_length=100)
    publisher = models.CharField(max_length=100)
    publication_date = models.DateField()

    def __unicode__(self):
        return u'%s %s' % (self.title,self.authors)
Create a model of a book data table
4. Modify the settings.py file and activate the books application
Go to the settings.py file and modify the INSTALLED_APPS item.
INSTALLED_APPS = (
    'mysite.books',
)
5. Create table
Open the CMD window and enter the following command in the d:\mysite directory to synchronize your model to the database. As shown in Figure 13

Figure 13
6. Insert some records into the data table
Open the CMD window and enter some commands in the d:\mysite directory. As shown in Figure 14
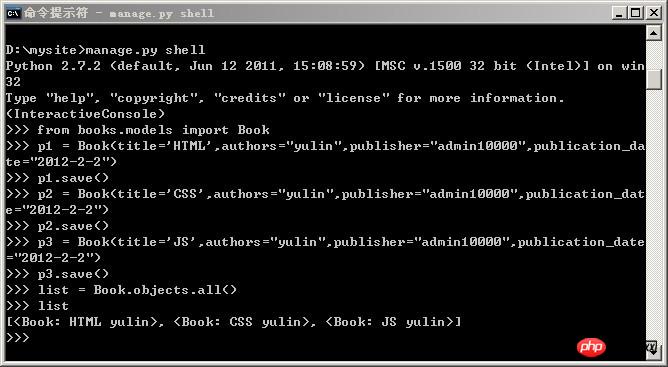
Figure 14
7. Modify the contents of the D:\mysite\books\views.py file
from django.shortcuts import render_to_response
from books.models import Book

def booklist(request):
    list = Book.objects.all()
return render_to_response('booklist.html',{'books':list})8. Modify the content of d:\mysite\url.py, the result is:
urlpatterns = patterns('',
    ('^hello/$','mysite.views.hello'),
    ('^books/$','mysite.books.views.booklist'),
)9. Create a new subdirectory templates in the D:\mysite directory as the directory to store templates
Create a new template file booklist.html with the following content
<ul>
{% for book in books %}

  <li> {{book.title}} </li>

{% endfor %}
</ul>10. Modify the d:\mysite\settings.py file
Find the TEMPLATE_DIRS item and modify it as follows:
TEMPLATE_DIRS = (
      'd:/mysite/templates'
)
Finally, enter the mysite directory and enter manage.py runserver to open the website. Open the browser and access the address http://localhost:8000/books. The result is shown in Figure 15
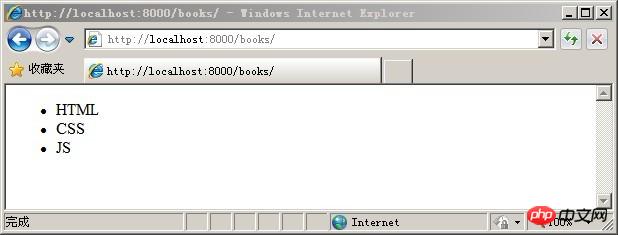
Figure 15
The above is the detailed content of Python and Django installation steps. For more information, please follow other related articles on the PHP Chinese website!

Hot AI Tools

Undresser.AI Undress
AI-powered app for creating realistic nude photos

AI Clothes Remover
Online AI tool for removing clothes from photos.

Undress AI Tool
Undress images for free

Clothoff.io
AI clothes remover

AI Hentai Generator
Generate AI Hentai for free.

Hot Article

Hot Tools

Notepad++7.3.1
Easy-to-use and free code editor

SublimeText3 Chinese version
Chinese version, very easy to use

Zend Studio 13.0.1
Powerful PHP integrated development environment

Dreamweaver CS6
Visual web development tools

SublimeText3 Mac version
God-level code editing software (SublimeText3)

Hot Topics
 1378
1378
 52
52
 How to use Debian Apache logs to improve website performance
Apr 12, 2025 pm 11:36 PM
This article will explain how to improve website performance by analyzing Apache logs under the Debian system. 1. Log Analysis Basics Apache log records the detailed information of all HTTP requests, including IP address, timestamp, request URL, HTTP method and response code. In Debian systems, these logs are usually located in the /var/log/apache2/access.log and /var/log/apache2/error.log directories. Understanding the log structure is the first step in effective analysis. 2. Log analysis tool You can use a variety of tools to analyze Apache logs: Command line tools: grep, awk, sed and other command line tools.
 Python: Games, GUIs, and More
Apr 13, 2025 am 12:14 AM
Python excels in gaming and GUI development. 1) Game development uses Pygame, providing drawing, audio and other functions, which are suitable for creating 2D games. 2) GUI development can choose Tkinter or PyQt. Tkinter is simple and easy to use, PyQt has rich functions and is suitable for professional development.
 PHP and Python: Comparing Two Popular Programming Languages
Apr 14, 2025 am 12:13 AM
PHP and Python each have their own advantages, and choose according to project requirements. 1.PHP is suitable for web development, especially for rapid development and maintenance of websites. 2. Python is suitable for data science, machine learning and artificial intelligence, with concise syntax and suitable for beginners.
 How debian readdir integrates with other tools
Apr 13, 2025 am 09:42 AM
The readdir function in the Debian system is a system call used to read directory contents and is often used in C programming. This article will explain how to integrate readdir with other tools to enhance its functionality. Method 1: Combining C language program and pipeline First, write a C program to call the readdir function and output the result: #include#include#include#includeintmain(intargc,char*argv[]){DIR*dir;structdirent*entry;if(argc!=2){
 The role of Debian Sniffer in DDoS attack detection
Apr 12, 2025 pm 10:42 PM
This article discusses the DDoS attack detection method. Although no direct application case of "DebianSniffer" was found, the following methods can be used for DDoS attack detection: Effective DDoS attack detection technology: Detection based on traffic analysis: identifying DDoS attacks by monitoring abnormal patterns of network traffic, such as sudden traffic growth, surge in connections on specific ports, etc. This can be achieved using a variety of tools, including but not limited to professional network monitoring systems and custom scripts. For example, Python scripts combined with pyshark and colorama libraries can monitor network traffic in real time and issue alerts. Detection based on statistical analysis: By analyzing statistical characteristics of network traffic, such as data
 Python and Time: Making the Most of Your Study Time
Apr 14, 2025 am 12:02 AM
To maximize the efficiency of learning Python in a limited time, you can use Python's datetime, time, and schedule modules. 1. The datetime module is used to record and plan learning time. 2. The time module helps to set study and rest time. 3. The schedule module automatically arranges weekly learning tasks.
 Nginx SSL Certificate Update Debian Tutorial
Apr 13, 2025 am 07:21 AM
This article will guide you on how to update your NginxSSL certificate on your Debian system. Step 1: Install Certbot First, make sure your system has certbot and python3-certbot-nginx packages installed. If not installed, please execute the following command: sudoapt-getupdatesudoapt-getinstallcertbotpython3-certbot-nginx Step 2: Obtain and configure the certificate Use the certbot command to obtain the Let'sEncrypt certificate and configure Nginx: sudocertbot--nginx Follow the prompts to select
 How to configure HTTPS server in Debian OpenSSL
Apr 13, 2025 am 11:03 AM
Configuring an HTTPS server on a Debian system involves several steps, including installing the necessary software, generating an SSL certificate, and configuring a web server (such as Apache or Nginx) to use an SSL certificate. Here is a basic guide, assuming you are using an ApacheWeb server. 1. Install the necessary software First, make sure your system is up to date and install Apache and OpenSSL: sudoaptupdatesudoaptupgradesudoaptinsta


