 Database
 Mysql Tutorial
 Tutorial on adding, deleting, modifying and querying data tables using SQL statements (phpMyAdmin usage tutorial)
Tutorial on adding, deleting, modifying and querying data tables using SQL statements (phpMyAdmin usage tutorial)
In phpMyAdmin, when we click sql, we can write complete sql statements to perform table operations, such as querying, adding, modifying, and deleting data tables, which is what we often call add, delete, modify, and query. .
1. SQL statement to add data table
Use sql statement to insert data, Here we need to use insert into

There is no data in the admin table. Let’s write a sql statement to add a piece of data to the table
INSERT INTO `admin`(`id`, `name`, `pwd`) VALUES (1,'admin','123456')
Then execute, if an error is reported, then we have not added it .

In this way we have completed adding a piece of data. Now let’s go to the table to see if the data we just added exists
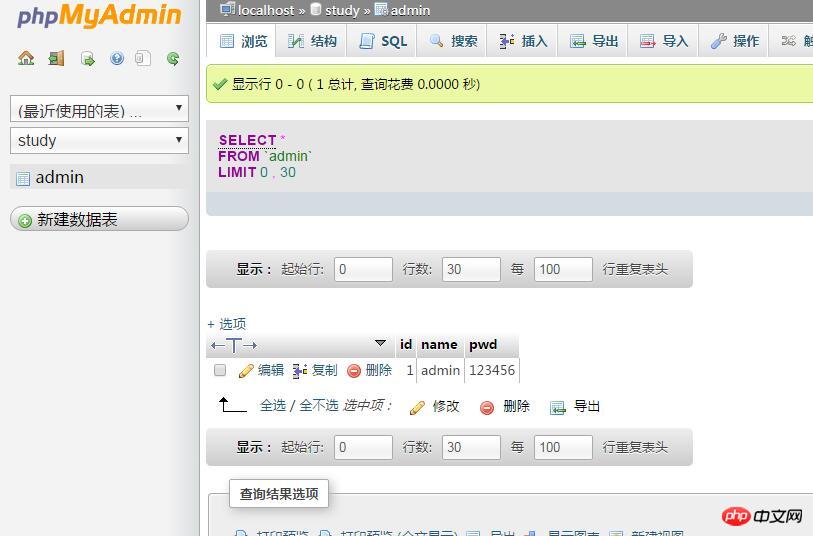
You can see that the data we just added exists in the table
2. SQL statement to modify the data table
Use sql statement to modify the data. We need to use the update statement. It should be noted that we are now using SQL statements to make modifications, so conditional modifications are required. For example, there are 5 pieces of information in my database table. If there are no conditions for modification, which piece should be modified? So we need to take this into consideration.
We just added a piece of information, and then I added several pieces of information to the data table
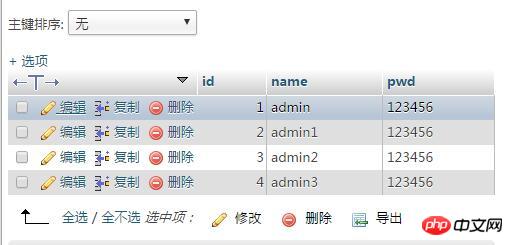
We now need to modify the third piece of information, So how to write sql statement?
UPDATE `admin` SET `name`='admin',`pwd`= '55555' WHERE id=3
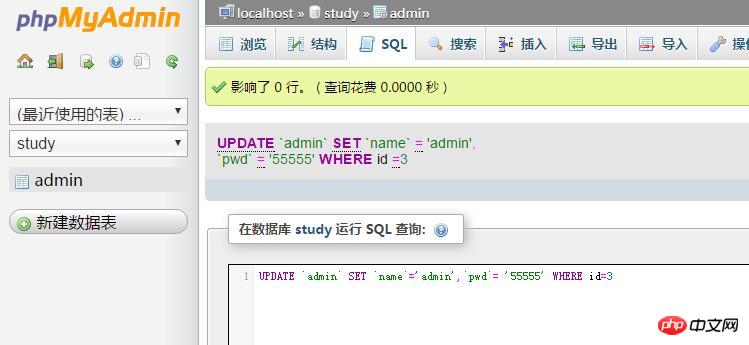
In this way we will change the information of the data with id equal to 3
3. Query the information in the data table
Now we have to query the data table All the information in the table, then when we write the sql statement, we can write
select * from admin
. In this way, we can query the information in the table. Of course We can also query with conditions. There are 4 pieces of data in our admin table. I only want to query the data whose id is 1. At this time we have to write conditions
select * from admin where id =1
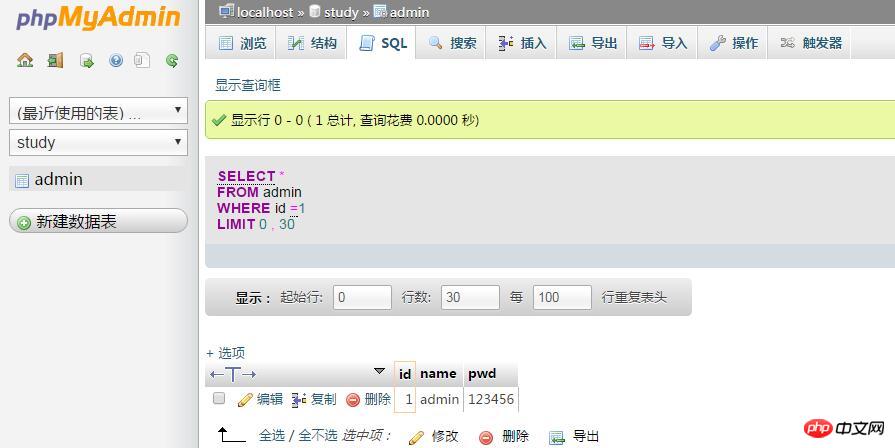
If I want to query the data whose id is less than 3, then we can write like this
select * from admin where id
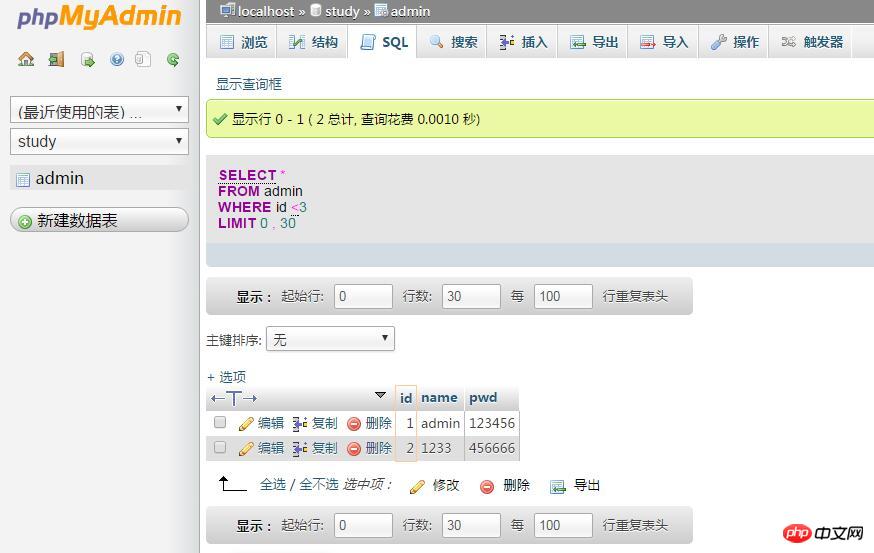
In this way, all ids less than 3 are queried.
4. SQL statement to delete the data table
To delete the information in the data table, we need to use delete. We want to delete the id of 4 in the data table. Data
delete from `admin` where id=4
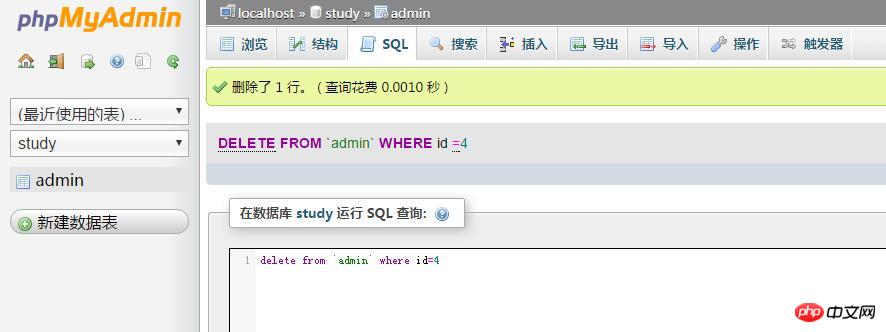
After performing the deletion operation, we You can check the data in the table
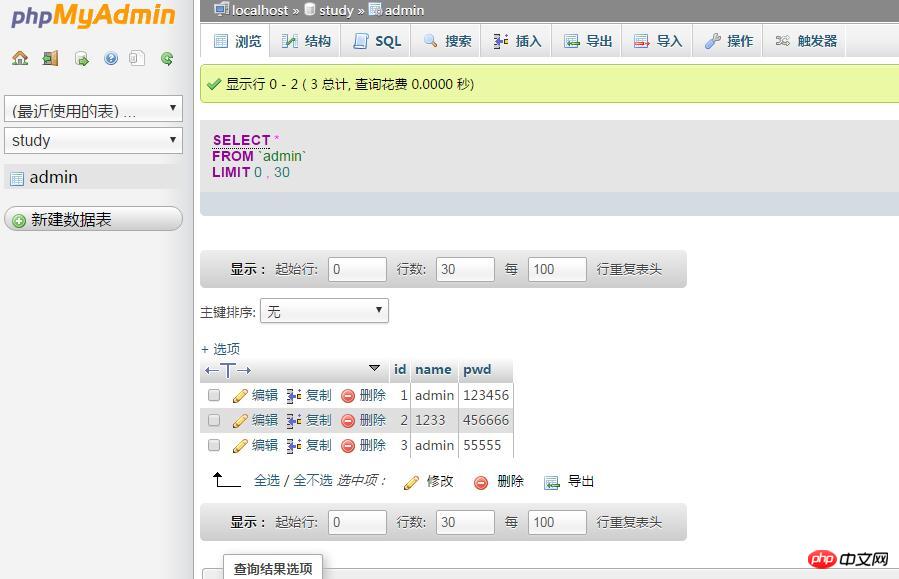
In this way, the data with id 4 in the table has been deleted.
The above is the detailed content of Tutorial on adding, deleting, modifying and querying data tables using SQL statements (phpMyAdmin usage tutorial). For more information, please follow other related articles on the PHP Chinese website!

Hot AI Tools

Undresser.AI Undress
AI-powered app for creating realistic nude photos

AI Clothes Remover
Online AI tool for removing clothes from photos.

Undress AI Tool
Undress images for free

Clothoff.io
AI clothes remover

Video Face Swap
Swap faces in any video effortlessly with our completely free AI face swap tool!

Hot Article

Hot Tools

Notepad++7.3.1
Easy-to-use and free code editor

SublimeText3 Chinese version
Chinese version, very easy to use

Zend Studio 13.0.1
Powerful PHP integrated development environment

Dreamweaver CS6
Visual web development tools

SublimeText3 Mac version
God-level code editing software (SublimeText3)

Hot Topics
 1386
1386
 52
52
 What is the difference between HQL and SQL in Hibernate framework?
Apr 17, 2024 pm 02:57 PM
HQL and SQL are compared in the Hibernate framework: HQL (1. Object-oriented syntax, 2. Database-independent queries, 3. Type safety), while SQL directly operates the database (1. Database-independent standards, 2. Complex executable queries and data manipulation).
 Tutorial on how to use Dewu
Mar 21, 2024 pm 01:40 PM
Dewu APP is currently a very popular brand shopping software, but most users do not know how to use the functions in Dewu APP. The most detailed usage tutorial guide is compiled below. Next is the Dewuduo that the editor brings to users. A summary of function usage tutorials. Interested users can come and take a look! Tutorial on how to use Dewu [2024-03-20] How to use Dewu installment purchase [2024-03-20] How to obtain Dewu coupons [2024-03-20] How to find Dewu manual customer service [2024-03-20] How to check the pickup code of Dewu [2024-03-20] Where to find Dewu purchase [2024-03-20] How to open Dewu VIP [2024-03-20] How to apply for return or exchange of Dewu
 Comparison and differences of SQL syntax between Oracle and DB2
Mar 11, 2024 pm 12:09 PM
Oracle and DB2 are two commonly used relational database management systems, each of which has its own unique SQL syntax and characteristics. This article will compare and differ between the SQL syntax of Oracle and DB2, and provide specific code examples. Database connection In Oracle, use the following statement to connect to the database: CONNECTusername/password@database. In DB2, the statement to connect to the database is as follows: CONNECTTOdataba
 In summer, you must try shooting a rainbow
Jul 21, 2024 pm 05:16 PM
After rain in summer, you can often see a beautiful and magical special weather scene - rainbow. This is also a rare scene that can be encountered in photography, and it is very photogenic. There are several conditions for a rainbow to appear: first, there are enough water droplets in the air, and second, the sun shines at a low angle. Therefore, it is easiest to see a rainbow in the afternoon after the rain has cleared up. However, the formation of a rainbow is greatly affected by weather, light and other conditions, so it generally only lasts for a short period of time, and the best viewing and shooting time is even shorter. So when you encounter a rainbow, how can you properly record it and photograph it with quality? 1. Look for rainbows. In addition to the conditions mentioned above, rainbows usually appear in the direction of sunlight, that is, if the sun shines from west to east, rainbows are more likely to appear in the east.
 Tutorial on how to turn off the payment sound on WeChat
Mar 26, 2024 am 08:30 AM
1. First open WeChat. 2. Click [+] in the upper right corner. 3. Click the QR code to collect payment. 4. Click the three small dots in the upper right corner. 5. Click to close the voice reminder for payment arrival.
 How does Go language implement the addition, deletion, modification and query operations of the database?
Mar 27, 2024 pm 09:39 PM
Go language is an efficient, concise and easy-to-learn programming language. It is favored by developers because of its advantages in concurrent programming and network programming. In actual development, database operations are an indispensable part. This article will introduce how to use Go language to implement database addition, deletion, modification and query operations. In Go language, we usually use third-party libraries to operate databases, such as commonly used sql packages, gorm, etc. Here we take the sql package as an example to introduce how to implement the addition, deletion, modification and query operations of the database. Assume we are using a MySQL database.
 What software is photoshopcs5? -photoshopcs5 usage tutorial
Mar 19, 2024 am 09:04 AM
PhotoshopCS is the abbreviation of Photoshop Creative Suite. It is a software produced by Adobe and is widely used in graphic design and image processing. As a novice learning PS, let me explain to you today what software photoshopcs5 is and how to use photoshopcs5. 1. What software is photoshop cs5? Adobe Photoshop CS5 Extended is ideal for professionals in film, video and multimedia fields, graphic and web designers who use 3D and animation, and professionals in engineering and scientific fields. Render a 3D image and merge it into a 2D composite image. Edit videos easily
 Experts teach you! The Correct Way to Cut Long Pictures on Huawei Mobile Phones
Mar 22, 2024 pm 12:21 PM
With the continuous development of smart phones, the functions of mobile phones have become more and more powerful, among which the function of taking long pictures has become one of the important functions used by many users in daily life. Long screenshots can help users save a long web page, conversation record or picture at one time for easy viewing and sharing. Among many mobile phone brands, Huawei mobile phones are also one of the brands highly respected by users, and their function of cropping long pictures is also highly praised. This article will introduce you to the correct method of taking long pictures on Huawei mobile phones, as well as some expert tips to help you make better use of Huawei mobile phones.


