

Batch add and delete function of react.js

The following editor will bring you an article about the batch addition and deletion functions of react.js. The editor thinks it is quite good, so I will share it with you now and give it as a reference for everyone. Let’s follow the editor and take a look.
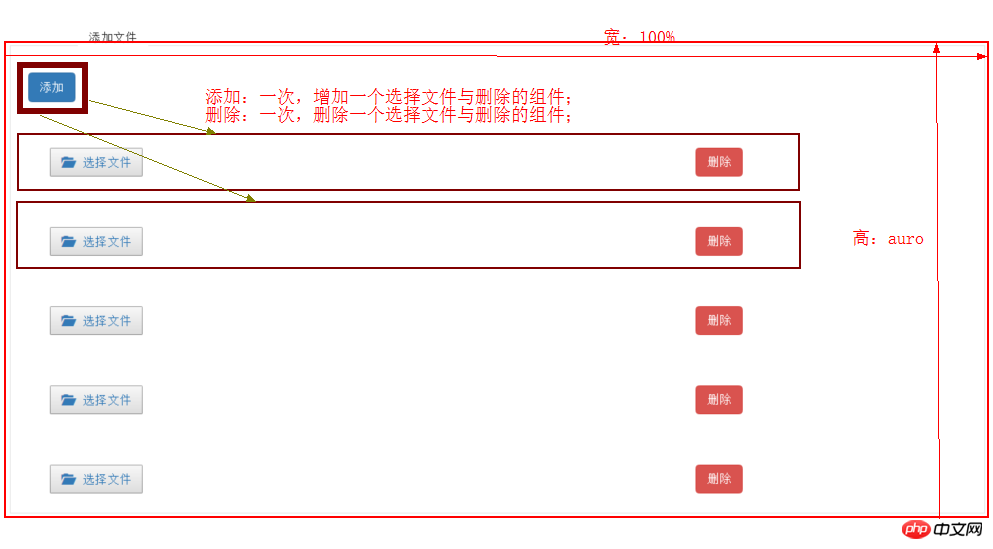
The CMS I recently built requires the function of adding images in batches: In the container box for adding files, there are two contents, namely:Add Button and Select File component added.
Structural analysis:
The added component is called : UploadQiNiuFiles (Qiniu file upload component), contains a delete button to delete the current component
Add button event
The container where the added component is stored
To achieve this effect, you only need to understand the purpose of three methods:
Direct binding requires Delete the component's deleteType(), which is a method that calls removeContent()
//删除{qiniu}与{deleteQiNiu}内容,是把页面上的这两个内容一起删除
  deleteType(){
    let index = this.props.index;
    this.props.callbackParent(index);
}in the container where the component is added
< ;/p>, batch add addContent() and delete removeContent() written for the add button
//批量添加
  addContent(event) {
    if (this.state.number.length >= this.state.maxNum) {
      return;
    }
    console.log("this.state.number:" + this.state.number);
    this.state.number.push(this.state.number[this.state.number.length - 1] + 1);
    let temp = this.state.number;
    this.setState({
      number: temp
    })
  }

  //删除
  removeContent(index) {
    if (this.state.number.length <= 1) {
      return;
    }
    this.state.number.splice(index, 1);
    this.setState({
      number: this.state.number
    })
}Code analysis:
Add a container for component storage
<p className="pBorder">
   {addToBtn} //添加按钮
   {items}   //被添加的组件
</p>.pBorder {
position: relative;
width: 100%;
height: auto;
margin-top: 5%;
border: 1px solid #e3e3e3;
padding: 30px 10px;
margin-bottom: 5%;
-moz-position: relative;
-moz-width: 100%;
-moz-height: auto;
-moz-border: 1px solid #e3e3e3;
-moz-padding: 30px 10px;
-moz-margin-bottom: 5%;
-webkit-position: relative;
-webkit-width: 100%;
-webkit-height: auto;
-webkit-border: 1px solid #e3e3e3;
-webkit-padding: 30px 10px;
-webkit-margin-bottom: 5%;
}Added components: UploadQiNiuFiles and Method of deleting components deleteType()
/**
 * Created by wf on 2016/5/16.
 */
import React,{Component} from 'react';
import {render} from 'react-dom';
import ReactBootstrap , {Input,Button,ButtonToolbar} from 'react-bootstrap';
import style from '../../../../css/meeting_data.css';

//七牛上传公共组件
import QiniuUpload from 'qiniu_uploader';

export default class UploadQiNiuFiles extends Component {
  constructor(props){
    super(props);
  }

  //获取qiniukey
  getQiniuKey(qiniuKey){
    this.props.setQiniuKey(qiniuKey);
  }

  //获取qiniutoken
  getQiniuUptoken() {
    this.props.acquireToken();
  };

  //删除{qiniu}与{deleteQiNiu}内容,是把页面上的这两个内容一起删除,直接绑定要删除的组件
  //这个方法调用的是removeContent(),在下面有介绍
  deleteType(){
    let index = this.props.index;
    this.props.callbackParent(index);
  }

  render(){

    const qiniu = (
      <p className="col-md-8 qiNiuBtn">
        <QiniuUpload containerId="containerId" pickfilesId="pickfilesId" qiniuToken={this.props.meetingState.token} callback={this.getQiniuKey.bind(this)} getQiniuUptoken={this.getQiniuUptoken.bind(this)} />
      </p>
    );

    const deleteQiNiu = (
      <p className="col-md-4">
        <Button bsStyle="danger" className="deleteQiniu" onClick={this.deleteType.bind(this)}>删除</Button>
      </p>

    );

    return(
      <p>
        <p className="uploadBox">
          {qiniu}
          {deleteQiNiu}
        </p>
      </p>
    );
  }
}Qiniu upload component has been introduced. When making this component, you need to use the action method With state in reducers, please refer to this link. Because obtaining the parameters in orange font requires the use of methods in action
Add events in the container where p is pBorder
First load, Qiniu Upload component: UploadQiNiuFiles, its loading path is the method in webpack:
/**常用组件路径简写为:
  *
  * 例:config: path.join(__dirname,"./build/config.js")
  * config 变量名
  * path.join(__dirname,"./build/config.js") config的路径
  *
  * 使用方法: import {变量} from 'config'
  * //七牛上传公共组件
   import QiniuUpload from 'qiniu_uploader';
  * **/
 resolve: {
  alias: {
   qiniu_uploader: path.join(__dirname,"./public_component/qiniu_upload/QiniuUpload.js"),
   storage: path.join(__dirname,"./utils/Storage.js"),
   config: path.join(__dirname,"./build/config.js")
  }
}import React,{Component} from 'react';
import {render} from 'react-dom';
import ReactBootstrap , {Input,Button,ButtonToolbar} from 'react-bootstrap';
import { Link } from 'react-router';
//
import UploadQiNiuFiles from './UploadQiNiuFiles.js';The component name of batch upload files, I define For: UploadFileToFolde
The default parameters are:
constructor(props){
    super(props);
    this.state = {number: [1], maxNum: 10} //最大数据为10条,默认显示1条
}/*获取上个页面传过来的值 let local = this.props.location;
如果从(row,query)中跳转过来的页面,从query中传值过来要这么写:let query = local.query;
如果这个页面是包含在某个大的页面下的,要把query与对应的ID传过去
*/
componentDidMount(){
let local = this.props.location;
let query = local.query;
this.props.setActivityId(query.activityId);
}After the data rendering is completed, componentDidUpdate() needs to be executed. This is all the data in the state:
this.props.meetingState.addUploadFolderToFileList; Determine whether the data in it is empty or undefined. If this state has a value and is added successfully, all data will be cleared the next time you go to this page and you will be returned to the original page when you click the save button. The clearInvitation() method is to clear all business data. Its method is written in the action. Data is the business data. Write it according to the actual situation:
/* 清空*/

export const CLEAR_INVITATION = 'CLEAR_INVITATION';
 export function clearInvitation(){
  return {
    type: CLEAR_INVITATION,
    data:{
      addInvitationResponse:{},
      Invitations:[],
      deleteInvitationsResponse:{},
      invitationName:'',
      folderName: ''
    }
  }
}componentDidUpdate(){
let addFileToFolderList = this.props.meetingState.addUploadFolderToFileList;
if (typeof(addFileToFolderList) != 'undefined') {
let status = addFileToFolderList.status;
if (200 == status) {
//如果新增成功,则下次添加前清空所有
this.props.clearInvitation();
//点击保存按钮,返回原来的页面
this.props.history.goBack();
}
}
}//批量添加,直接拿来使用
addContent(event) {
if (this.state.number.length >= this.state.maxNum) {
return;
}
console.log("this.state.number:" + this.state.number);
this.state.number.push(this.state.number[this.state.number.length - 1] + 1);
let temp = this.state.number;
this.setState({
number: temp
})
}//删除,直接拿来使用
removeContent(index) {
if (this.state.number.length <= 1) {
return;
}
this.state.number.splice(index, 1);
this.setState({
number: this.state.number
})
}There is a deleteType() deletion method in the Qiniu upload component, which calls the removeContent() method. It is missing It’s important to note that I also put the deleteType() method code here:
//绑定被删除的组件,直接拿来使用
  deleteType(){
    let index = this.props.index;
    this.props.callbackParent(index); //调用removeContent()方法
}render(){
//将要添加的组件定义为变量为一个数组 items
let items = [];
//从添加的组件数量中遍历,
for(let i = 0; i < this.state.number.length; i++){
//给这个items推送组件
items.push(<UploadQiNiuFiles index={i}
callbackParent={this.removeContent.bind(this)}
key={this.state.number[i]} {...this.props} />)
}
const addToBtn = (
<Button bsStyle="primary" onClick={this.addContent.bind(this)}>添加</Button>
);return (
<p>
<p>
<p className="pTitle">添加文件</p>
<p className="pBorder">
{addToBtn}
{items}
</p>
</p></p>
);
}The above is the detailed content of Batch add and delete function of react.js. For more information, please follow other related articles on the PHP Chinese website!

Hot AI Tools

Undresser.AI Undress
AI-powered app for creating realistic nude photos

AI Clothes Remover
Online AI tool for removing clothes from photos.

Undress AI Tool
Undress images for free

Clothoff.io
AI clothes remover

Video Face Swap
Swap faces in any video effortlessly with our completely free AI face swap tool!

Hot Article
Hot Tools

Notepad++7.3.1
Easy-to-use and free code editor

SublimeText3 Chinese version
Chinese version, very easy to use

Zend Studio 13.0.1
Powerful PHP integrated development environment

Dreamweaver CS6
Visual web development tools

SublimeText3 Mac version
God-level code editing software (SublimeText3)
Hot Topics
 1386
1386
 52
52

 How to call the method of child component in React parent component
Dec 27, 2022 pm 07:01 PM
How to call the method of child component in React parent component
Dec 27, 2022 pm 07:01 PM
Calling method: 1. Calls in class components can be implemented by using React.createRef(), functional declaration of ref or props custom onRef attribute; 2. Calls in function components and Hook components can be implemented by using useImperativeHandle or forwardRef to throw a child Component ref is implemented.
 How to debug React source code? Introduction to debugging methods using multiple tools
Mar 31, 2023 pm 06:54 PM
How to debug React source code? Introduction to debugging methods using multiple tools
Mar 31, 2023 pm 06:54 PM
How to debug React source code? The following article will talk about how to debug React source code under various tools, and introduce how to debug the real source code of React in contributors, create-react-app, and vite projects. I hope it will be helpful to everyone!
 In-depth understanding of React's custom Hooks
Apr 20, 2023 pm 06:22 PM
In-depth understanding of React's custom Hooks
Apr 20, 2023 pm 06:22 PM
React custom Hooks are a way to encapsulate component logic in reusable functions. They provide a way to reuse state logic without writing classes. This article will introduce in detail how to customize encapsulation hooks.
 Why React doesn't use Vite as the first choice for building apps
Feb 03, 2023 pm 06:41 PM
Why React doesn't use Vite as the first choice for building apps
Feb 03, 2023 pm 06:41 PM
Why doesn’t React use Vite as the first choice for building applications? The following article will talk to you about the reasons why React does not recommend Vite as the default recommendation. I hope it will be helpful to everyone!
 How to set div height in react
Jan 06, 2023 am 10:19 AM
How to set div height in react
Jan 06, 2023 am 10:19 AM
How to set the div height in react: 1. Implement the div height through CSS; 2. Declare an object C in the state and store the style of the change button in the object, then get A and reset the "marginTop" in C. That is Can.
 7 great and practical React component libraries (shared under pressure)
Nov 04, 2022 pm 08:00 PM
7 great and practical React component libraries (shared under pressure)
Nov 04, 2022 pm 08:00 PM
This article will share with you 7 great and practical React component libraries that are often used in daily development. Come and collect them and try them out!
 10 practical tips for writing cleaner React code
Jan 03, 2023 pm 08:18 PM
10 practical tips for writing cleaner React code
Jan 03, 2023 pm 08:18 PM
This article will share with you 10 practical tips for writing simpler React code. I hope it will be helpful to you!
![[Translation] Refactoring React components using custom hooks](https://img.php.cn/upload/article/000/000/024/63c690a1b11d0794.jpg?x-oss-process=image/resize,m_fill,h_207,w_330) [Translation] Refactoring React components using custom hooks
Jan 17, 2023 pm 08:13 PM
[Translation] Refactoring React components using custom hooks
Jan 17, 2023 pm 08:13 PM
I often hear people talk about React function components, mentioning that function components will inevitably become larger and more logically complex. After all, we wrote the component in "a function", so you have to accept that the component will expand and the function will continue to expand.
