
 Backend Development
Python Tutorial
Detailed explanation of graphic code for making TCP port scanner using Python3
Backend Development
Python Tutorial
Detailed explanation of graphic code for making TCP port scanner using Python3
Detailed explanation of graphic code for making TCP port scanner using Python3

This article shares with you the production process of using Python3 to implement a TCP full-connection port scanner, including ideas and code. It is very simple and easy to understand. I recommend it to everyone
In penetration In the preliminary stage of testing, we usually need to collect information about the attack target, and port scanning is a crucial step in information collection. Through port scanning, we can learn what services are open on the target host, and we can even guess that there may be certain vulnerabilities based on the services. TCP port scans are generally divided into the following types:
TCP connect scan: also called full connection scan, this method directly connects to the target port and completes the TCP three-way handshake process. This method scan results More accurate, but slower and easily detected by the target system.
TCP SYN scan: Also known as semi-open scan, this method will send a SYN packet, start a TCP session, and wait for the target response packet. If a RST packet is received, it indicates that the port is closed, and if a SYN/ACK packet is received, it indicates that the corresponding port is open.
Tcp FIN scan: This method sends a FIN packet indicating the teardown of an active TCP connection, allowing the other party to close the connection. If a RST packet is received, it indicates that the corresponding port is closed.
TCP XMAS scanning: This method sends packets with PSH, FIN, URG, and TCP flag bits set to 1. If a RST packet is received, it indicates that the corresponding port is closed.
Next we will use Python3 to implement the TCP full connection port scanner, and then enter the programming link.
Coding practice
Full connection scanThe core of the method is to conduct TCP connections for different ports, and determine whether the port is open based on whether the connection is successful. Now let's implement the simplest port scanner:
#!/usr/bin/python3
# -*- coding: utf-8 -*-
from socket import *

def portScanner(host,port):
  try:
    s = socket(AF_INET,SOCK_STREAM)
    s.connect((host,port))
    print('[+] %d open' % port)
    s.close()
  except:
    print('[-] %d close' % port)

def main():
  setdefaulttimeout(1)
  for p in range(1,1024):
    portScanner('192.168.0.100',p)

if name == 'main':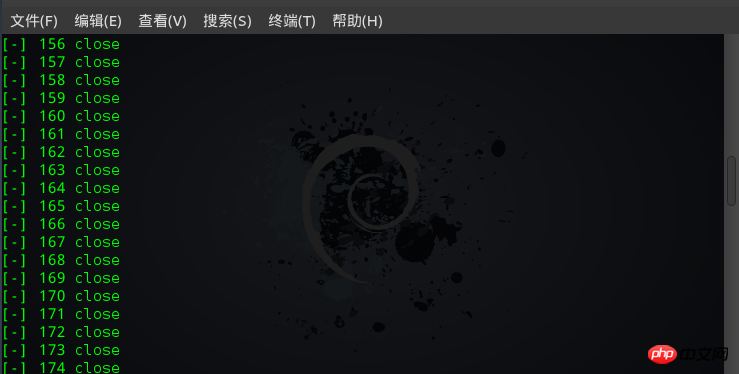
main()The core of this code is the portScannerfunction. It can be seen from the content that it only performs A simple TCP connection is made. If the connection is successful, it is judged that the port is open, otherwise it is considered closed. Let’s take a look at the running results:
Such a scan seems too inefficient, and it is actually very slow because we set the default timeout to 1 second. If we scan 10,000 ports, wouldn't we have to wait until the flowers have withered? The simplest way is to use multithreading to improve efficiency. Although python's multithreading is a bit too weak, we can at least use the time we wait to do something else. In addition, there were many ports scanned before, and the displayed information seemed inconvenient for us. This time we only display the open ports we care about, and display the number of open ports at the end of the scan.
#!/usr/bin/python3
# -*- coding: utf-8 -*-
from socket import *
import threading

lock = threading.Lock()
openNum = 0
threads = []

def portScanner(host,port):
  global openNum
  try:
    s = socket(AF_INET,SOCK_STREAM)
    s.connect((host,port))
    lock.acquire()
    openNum+=1
    print('[+] %d open' % port)
    lock.release()
    s.close()
  except:
    pass

def main():
  setdefaulttimeout(1)
  for p in range(1,1024):
    t = threading.Thread(target=portScanner,args=('192.168.0.100',p))
    threads.append(t)
    t.start()

  for t in threads:
    t.join()

  print('[*] The scan is complete!')
  print('[*] A total of %d open port ' % (openNum))

if name == 'main':
main()Run it and see the effect, as shown below:
Does it look more convenient now? At this point, the efficiency problem has been solved. Now we still need to add a parameter parsing function to the scanner so that it can look decent. We can't change the code every time to modify the scanning target and port!
Parameter analysis We will use the standard module argparse that comes with python3, so that we save the trouble of parsing the string ourselves! Let’s look at the code:
#!/usr/bin/python3
# -*- coding: utf-8 -*-
from socket import *
import threading
import argparse
lock = threading.Lock()
openNum = 0
threads = []
def portScanner(host,port):
global openNum
try:
s = socket(AF_INET,SOCK_STREAM)
s.connect((host,port))
lock.acquire()
openNum+=1
print('[+] %d open' % port)
lock.release()
s.close()
except:
pass
def main():
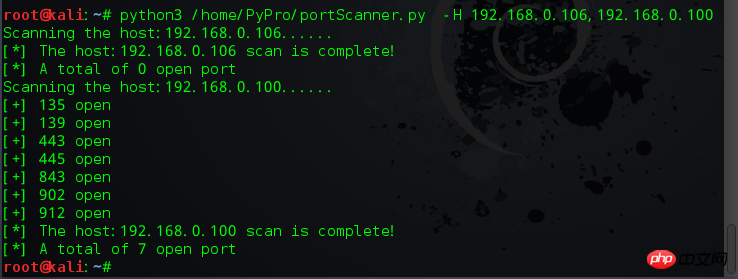
p = argparse.ArgumentParser(description='Port scanner!.')
p.add_argument('-H', dest='hosts', type=str)
args = p.parse_args()
hostList = args.hosts.split(',')
setdefaulttimeout(1)
for host in hostList:
print('Scanning the host:%s......' % (host))
for p in range(1,1024):
t = threading.Thread(target=portScanner,args=(host,p))
threads.append(t)
t.start()
for t in threads:
t.join()
print('[*] The host:%s scan is complete!' % (host))
print('[*] A total of %d open port ' % (openNum))
if name == 'main':
main()Take a look at the running effect, as shown below:

At this point, our port scanner is basically completed, although the function is relatively simple. , aiming to express the basic implementation ideas of the port scanner! As for more detailed functions, they can be gradually improved based on this basic structure!
Summary
This section mainly explains the process of implementing a simple port scanner in Python3. This experiment uses Tcp full connection and continuously tries to connect to the host. Although there are some shortcomings, this method is most suitable for beginners to learn. As for more complex methods, it will not be difficult to learn in the future. Friends who want to draw inferences from one example can complete the scan and output the protocol at the same time based on the comparison relationship between the protocol and the port. This will look better. As for the more detailed functions, I will leave it to you to do Exercise!
The above is the detailed content of Detailed explanation of graphic code for making TCP port scanner using Python3. For more information, please follow other related articles on the PHP Chinese website!

Hot AI Tools

Undresser.AI Undress
AI-powered app for creating realistic nude photos

AI Clothes Remover
Online AI tool for removing clothes from photos.

Undress AI Tool
Undress images for free

Clothoff.io
AI clothes remover

Video Face Swap
Swap faces in any video effortlessly with our completely free AI face swap tool!

Hot Article
Hot Tools

Notepad++7.3.1
Easy-to-use and free code editor

SublimeText3 Chinese version
Chinese version, very easy to use

Zend Studio 13.0.1
Powerful PHP integrated development environment

Dreamweaver CS6
Visual web development tools

SublimeText3 Mac version
God-level code editing software (SublimeText3)
Hot Topics
 1387
1387
 52
52

 How to solve the permissions problem encountered when viewing Python version in Linux terminal?
Apr 01, 2025 pm 05:09 PM
How to solve the permissions problem encountered when viewing Python version in Linux terminal?
Apr 01, 2025 pm 05:09 PM
Solution to permission issues when viewing Python version in Linux terminal When you try to view Python version in Linux terminal, enter python...
 How to efficiently copy the entire column of one DataFrame into another DataFrame with different structures in Python?
Apr 01, 2025 pm 11:15 PM
How to efficiently copy the entire column of one DataFrame into another DataFrame with different structures in Python?
Apr 01, 2025 pm 11:15 PM
When using Python's pandas library, how to copy whole columns between two DataFrames with different structures is a common problem. Suppose we have two Dats...
 How to teach computer novice programming basics in project and problem-driven methods within 10 hours?
Apr 02, 2025 am 07:18 AM
How to teach computer novice programming basics in project and problem-driven methods within 10 hours?
Apr 02, 2025 am 07:18 AM
How to teach computer novice programming basics within 10 hours? If you only have 10 hours to teach computer novice some programming knowledge, what would you choose to teach...
 How to avoid being detected by the browser when using Fiddler Everywhere for man-in-the-middle reading?
Apr 02, 2025 am 07:15 AM
How to avoid being detected by the browser when using Fiddler Everywhere for man-in-the-middle reading?
Apr 02, 2025 am 07:15 AM
How to avoid being detected when using FiddlerEverywhere for man-in-the-middle readings When you use FiddlerEverywhere...
 How does Uvicorn continuously listen for HTTP requests without serving_forever()?
Apr 01, 2025 pm 10:51 PM
How does Uvicorn continuously listen for HTTP requests without serving_forever()?
Apr 01, 2025 pm 10:51 PM
How does Uvicorn continuously listen for HTTP requests? Uvicorn is a lightweight web server based on ASGI. One of its core functions is to listen for HTTP requests and proceed...
 What are some popular Python libraries and their uses?
Mar 21, 2025 pm 06:46 PM
What are some popular Python libraries and their uses?
Mar 21, 2025 pm 06:46 PM
The article discusses popular Python libraries like NumPy, Pandas, Matplotlib, Scikit-learn, TensorFlow, Django, Flask, and Requests, detailing their uses in scientific computing, data analysis, visualization, machine learning, web development, and H
 How to dynamically create an object through a string and call its methods in Python?
Apr 01, 2025 pm 11:18 PM
How to dynamically create an object through a string and call its methods in Python?
Apr 01, 2025 pm 11:18 PM
In Python, how to dynamically create an object through a string and call its methods? This is a common programming requirement, especially if it needs to be configured or run...
 How to solve permission issues when using python --version command in Linux terminal?
Apr 02, 2025 am 06:36 AM
How to solve permission issues when using python --version command in Linux terminal?
Apr 02, 2025 am 06:36 AM
Using python in Linux terminal...
