
 WeChat Applet
Mini Program Development
Take you to experience the complete development process of WeChat mini program
WeChat Applet
Mini Program Development
Take you to experience the complete development process of WeChat mini program
Take you to experience the complete development process of WeChat mini program

The WeChat mini program has quickly become the focus of discussion before it is officially released. So you may think that you can only experience the development process of the mini program if you receive an invitation for internal testing. In fact, everyone can experience it. Here is Let everyone know together.
Download WeChat Web Developer Tools
First of all, WeChat provides us with its own small program integrated development tools. You only need to go to this Just download the page:
After the download is completed, open the developer tools, and there will be a scan code login interface. Use your WeChat code to log in, and then the developer tools will help us create a default project. The file structure of the project is as follows:
All code editing and Run preview can be performed in this developer tool. Next, let’s take a look at the project structure of the WeChat applet.
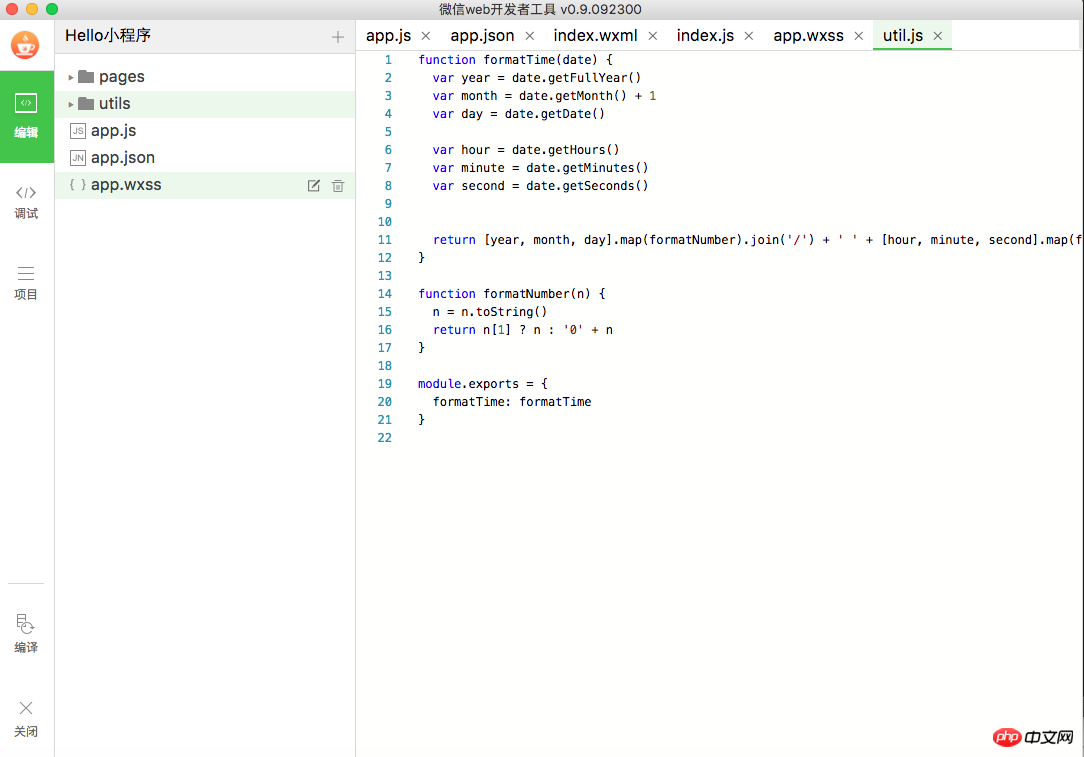
Project structure
As shown above, there are three files app.js, app.json, app.wxss in the root directory. Among them, app.js is the script file for the main entrance of the program, app.json is the global configuration file, and app.wxss is the style sheet file of the mini program.
Let’s take a look at app.json first:
{ "pages":[ "pages/index/index", "pages/logs/logs" ], "window":{ "backgroundTextStyle":"light", "navigationBarBackgroundColor": "#fff", "navigationBarTitleText": "WeChat", "navigationBarTextStyle":"black" }
}This configuration file defines two nodes. pages is the path corresponding to all pages of the mini program, and window is the configuration information of the mini program window. .
Let’s take a look at the style file app.wxss:
.container {
  height: 100%;
  display: flex;
  flex-direction: column;
  align-items: center;
  justify-content: space-between;
  padding: 200rpx 0;
  box-sizing: border-box;
}We don’t need to delve into the specific styles it defines first, we just need to understand the project structure first. Next, let’s take a look at app.js, the main entrance of the program:
//app.js App({
  onLaunch: function () { //调用API从本地缓存中获取数据 var logs = wx.getStorageSync('logs') || []
    logs.unshift(Date.now())
    wx.setStorageSync('logs', logs)
  },
  getUserInfo:function(cb){ var that = this if(this.globalData.userInfo){ typeof cb == "function" && cb(this.globalData.userInfo)
    }else{ //调用登录接口 wx.login({
        success: function () {
          wx.getUserInfo({
            success: function (res) {
              that.globalData.userInfo = res.userInfo typeof cb == "function" && cb(that.globalData.userInfo)
            }
          })
        }
      })
    }
  },
  globalData:{
    userInfo:null }
})An App object is initialized here, and three methods onLaunch, getUserInfo and globalData are defined. Let’s take a look at onLaunch first:
onLaunch: function () { //调用API从本地缓存中获取数据 var logs = wx.getStorageSync('logs') || []
    logs.unshift(Date.now())
    wx.setStorageSync('logs', logs)

}First, the wx.getStorageSync method will obtain a local cache data with logs as key. The logs passed into this method do not have any special meaning, they are just used to represent the cache data we use. This mechanism can be understood as similar to iOS's NSUserDefaults.
Then, we want to insert the current date into this cache array logs.unshift(Date.now()) . Finally, call the setStorageSync method to write our new cache content into the local cache.
Because the onLaunch method is the life cycle method of the applet, it will be called when the applet is started, and the current startup date will be recorded and written to the local cache. That's right, the entire onLaunch method does just that.
Let's take a look at the getUserInfo method. It obtains the current user login information by calling wx.login and wx.getUserInfo functions of the two WeChat platforms, and passes it to the callback function cb:
getUserInfo:function(cb){ var that = this if(this.globalData.userInfo){ typeof cb == "function" && cb(this.globalData.userInfo)
    }else{ //调用登录接口 wx.login({
        success: function () {
          wx.getUserInfo({
            success: function (res) {
              that.globalData.userInfo = res.userInfo typeof cb == "function" && cb(that.globalData.userInfo)
            }
          })
        }
      })
    }

}As for the initial if judgment if(this.globalData.userInfo), we don’t need to delve into it for the time being, just look at the else part.
页面结构
了解完根目录的几个文件, 咱们再来看看页面文件, 正如咱们刚开始截图中看到的项目结构:
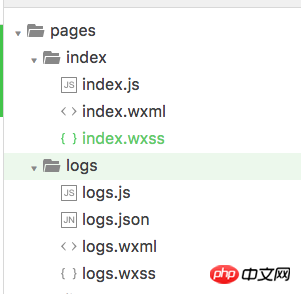
所有的页面都在 pages 文件夹中。 我们这个示例工程中有两个页面 index 和 logs。 还记得我们前面在 app.json 看到的页面配置吗:
"pages":[ "pages/index/index", "pages/logs/logs" ]
正好对应上咱们现在看到的两个目录, 还要记得一点, pages 数组中的第一个元素会作为我们小程序的主页。 切记,index 页面之所以是首页,是因为它是 pages 里面的第一个元素, 而不是因为它的名称是 index。
我们来看看 index 页面的构成, index.js, index.wxml, index.wxss。 index.js 是页面的脚本文件, index.wxml 是页面的 UI 文件, index.wxss 是页面的样式文件。
先看一下 index.js:
//index.js //获取应用实例 var app = getApp()
Page({
  data: {
    motto: 'Hello World',
    userInfo: {}
  }, //事件处理函数 bindViewTap: function() {
    wx.navigateTo({
      url: '../logs/logs' })
  },
  onLoad: function () { console.log('onLoad') var that = this //调用应用实例的方法获取全局数据 app.getUserInfo(function(userInfo){ //更新数据 that.setData({
        userInfo:userInfo
      })
    })
  }
})getApp() 方法获取我们的 app 实例。 然后在看 onLoad 方法, 使用我们刚才提到的 getUserInfo 方法获取用户信息,并设置到 data 属性中。
bindViewTap 方法会绑定一个事件,这个事件调用 wx.navigateTo 方法。 这个方法其实就是页面跳转,从代码中也不难看出,跳转到了 logs 页面。
脚本文件就这些内容了,咱们继续再来看看 UI 文件, index.wxml:
<!-- <view class="container"> <view bindtap="bindViewTap" class="userinfo"> <image class="userinfo-avatar" src="{{userInfo.avatarUrl}}" background-size="cover"></image> <text class="userinfo-nickname">{{userInfo.nickName}}</text> </view> <view class="usermotto"> <text class="user-motto">{{motto}}</text> </view> </view> -->这个就是小程序 index 页面的 UI 文件了,其实就是微信平台定义了一系列组件,最外层是
<!-- <view bindtap="bindViewTap" class="userinfo"> <image class="userinfo-avatar" src="{{userInfo.avatarUrl}}" background-size="cover"></image> <text class="userinfo-nickname">{{userInfo.nickName}}</text> </view> -->首先 bindtap="bindViewTap" 给这个 View 绑定了一个点击事件,也就是我们前面 index.js 对应的这个方法,用户点击这个 View 就会跳转到 logs 页面上。 然后这个 View 里面包含了一个 Image 和 Text, Image 的 src 属性设置为 userInfo.avatarUrl, 代表当前用户的头像, Text 中使用 userInfo.nickName, 代表当前用户的昵称。
这样, index 页面的整体逻辑就都完成了, 还有一个 index.wxss 样式文件,这个咱们就先略过。
再来看看第二个视图:
<!-- <view class="usermotto"> <text class="user-motto">{{motto}}</text> </view> -->motto 其实就是我们在 index.js 中定义的一个属性:
data: {
    motto: 'Hello World',
    userInfo: {}
}它会在页面上显示一个 Hello World。
现在,我们切换到调试界面, 就可以看到小程序的主页了, 和我们刚刚描述的 UI 完全一样吧:
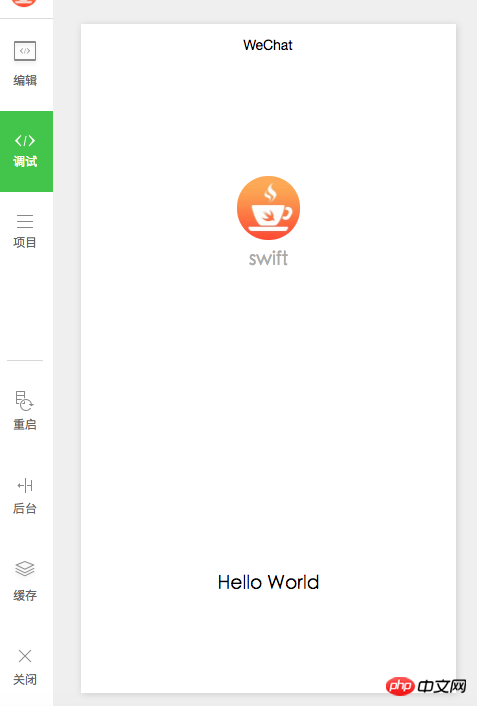
这里的用户头像和昵称是动态从你的登录状态中取到的。
然后我们在这里点击用户的头像,就会跳转到 logs 页面, 列出你每次登录小程序的时间点。
Upload Mini Program
Now I have introduced the basic development process of WeChat Mini Program to you. There is also a logs page that has not been introduced, but it has the same basic ideas as the index page. It’s the same, so we won’t go into details. After developing the small program, where do we need to deploy it? I believe everyone has the same problem. The answer is also very simple, switch to the Project tab, and then click the upload button:
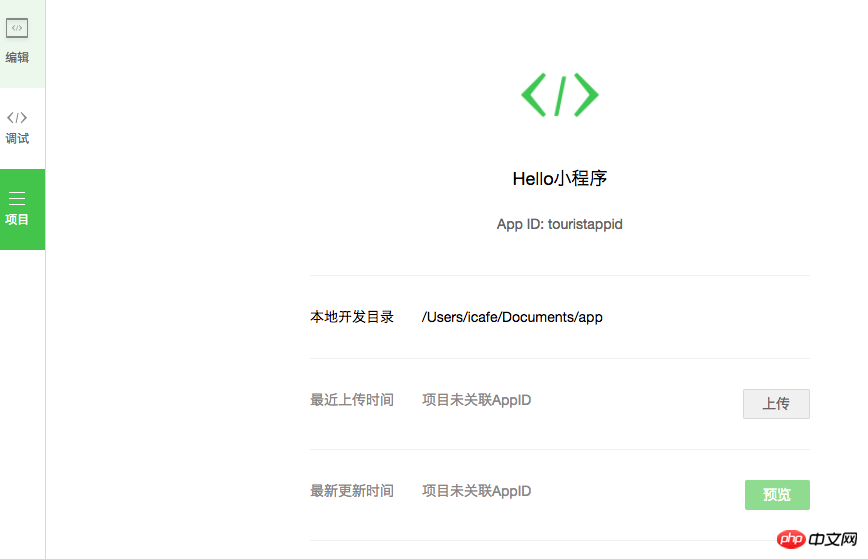
Since my environment does not have a beta account, so in The upload area shows that the project is not associated with the AppID. If you have a test account, your AppID will be displayed. Currently, only internal beta accounts can upload mini programs. That's the only difference. If you don't have a beta account, you just can't upload it, but you can develop and test it locally.
This uploading method of the mini program may make you feel a little different. As everyone usually understands, Web apps generally require you to build and maintain your own server. The hosting method of mini programs is actually almost the same as how we develop a native app. Although the front-end uses js, which looks like web technologies, its core ideas are different from traditional web apps. More like an implementation similar to React Native.
End
This time, together with everyone, I have completely experienced the overall structure and development ideas of the simplest small program from beginning to end. Personally, I feel that if we can find a suitable entry point, we can still find some good opportunities on the mini program platform. But my point is, don’t think that the emergence of mini programs will subvert anyone immediately, and you don’t need to hear people on the Internet saying that it is difficult for mini programs to become something big to think that they have no chance. Find what you are good at and what users need, and you may be able to create some good products. This time I will also help you with a basic technical review, I hope it will be helpful to you.
The above is the detailed content of Take you to experience the complete development process of WeChat mini program. For more information, please follow other related articles on the PHP Chinese website!

Hot AI Tools

Undresser.AI Undress
AI-powered app for creating realistic nude photos

AI Clothes Remover
Online AI tool for removing clothes from photos.

Undress AI Tool
Undress images for free

Clothoff.io
AI clothes remover

Video Face Swap
Swap faces in any video effortlessly with our completely free AI face swap tool!

Hot Article
Hot Tools

Notepad++7.3.1
Easy-to-use and free code editor

SublimeText3 Chinese version
Chinese version, very easy to use

Zend Studio 13.0.1
Powerful PHP integrated development environment

Dreamweaver CS6
Visual web development tools

SublimeText3 Mac version
God-level code editing software (SublimeText3)
Hot Topics
 1387
1387
 52
52

 deepseek image generation tutorial
Feb 19, 2025 pm 04:15 PM
deepseek image generation tutorial
Feb 19, 2025 pm 04:15 PM
DeepSeek: A powerful AI image generation tool! DeepSeek itself is not an image generation tool, but its powerful core technology provides underlying support for many AI painting tools. Want to know how to use DeepSeek to generate images indirectly? Please continue reading! Generate images with DeepSeek-based AI tools: The following steps will guide you to use these tools: Launch the AI Painting Tool: Search and open a DeepSeek-based AI Painting Tool (for example, search "Simple AI"). Select the drawing mode: select "AI Drawing" or similar function, and select the image type according to your needs, such as "Anime Avatar", "Landscape"
 gateio Chinese official website gate.io trading platform website
Feb 21, 2025 pm 03:06 PM
gateio Chinese official website gate.io trading platform website
Feb 21, 2025 pm 03:06 PM
Gate.io, a leading cryptocurrency trading platform founded in 2013, provides Chinese users with a complete official Chinese website. The website provides a wide range of services, including spot trading, futures trading and lending, and provides special features such as Chinese interface, rich resources and community support.
 List of handling fees for okx trading platform
Feb 15, 2025 pm 03:09 PM
List of handling fees for okx trading platform
Feb 15, 2025 pm 03:09 PM
The OKX trading platform offers a variety of rates, including transaction fees, withdrawal fees and financing fees. For spot transactions, transaction fees vary according to transaction volume and VIP level, and adopt the "market maker model", that is, the market charges a lower handling fee for each transaction. In addition, OKX also offers a variety of futures contracts, including currency standard contracts, USDT contracts and delivery contracts, and the fee structure of each contract is also different.
 Ouyi Exchange app domestic download tutorial
Mar 21, 2025 pm 05:42 PM
Ouyi Exchange app domestic download tutorial
Mar 21, 2025 pm 05:42 PM
This article provides a detailed guide to safe download of Ouyi OKX App in China. Due to restrictions on domestic app stores, users are advised to download the App through the official website of Ouyi OKX, or use the QR code provided by the official website to scan and download. During the download process, be sure to verify the official website address, check the application permissions, perform a security scan after installation, and enable two-factor verification. During use, please abide by local laws and regulations, use a safe network environment, protect account security, be vigilant against fraud, and invest rationally. This article is for reference only and does not constitute investment advice. Digital asset transactions are at your own risk.
 gateio exchange app old version gateio exchange app old version download channel
Mar 04, 2025 pm 11:36 PM
gateio exchange app old version gateio exchange app old version download channel
Mar 04, 2025 pm 11:36 PM
Gateio Exchange app download channels for old versions, covering official, third-party application markets, forum communities and other channels. It also provides download precautions to help you easily obtain old versions and solve the problems of discomfort in using new versions or device compatibility.
 How to copy Xiaohongshu copywriting. Graphical tutorial on how to copy Xiaohongshu copywriting.
Jan 16, 2025 pm 04:03 PM
How to copy Xiaohongshu copywriting. Graphical tutorial on how to copy Xiaohongshu copywriting.
Jan 16, 2025 pm 04:03 PM
Learn to easily copy Xiaohongshu copywriting! This tutorial teaches you step by step how to quickly copy Xiaohongshu video copy, saying goodbye to tedious steps. Open the Xiaohongshu APP, find the video you like, and click on the [Copywriting] area below the video. Long press the copy text and select the [Extract Text] function from the pop-up options. The system will automatically extract the text, click the [Copy] button in the lower left corner. Open WeChat or other applications, such as Moments, long press the input box, and select [Paste]. Click Send to complete the copy. It's that simple!
 The difference between H5 and mini-programs and APPs
Apr 06, 2025 am 10:42 AM
The difference between H5 and mini-programs and APPs
Apr 06, 2025 am 10:42 AM
H5. The main difference between mini programs and APP is: technical architecture: H5 is based on web technology, and mini programs and APP are independent applications. Experience and functions: H5 is light and easy to use, with limited functions; mini programs are lightweight and have good interactiveness; APPs are powerful and have smooth experience. Compatibility: H5 is cross-platform compatible, applets and APPs are restricted by the platform. Development cost: H5 has low development cost, medium mini programs, and highest APP. Applicable scenarios: H5 is suitable for information display, applets are suitable for lightweight applications, and APPs are suitable for complex functions.
 Sesame Open Door Login Registration Entrance gate.io Exchange Registration Official Website Entrance
Mar 04, 2025 pm 04:51 PM
Sesame Open Door Login Registration Entrance gate.io Exchange Registration Official Website Entrance
Mar 04, 2025 pm 04:51 PM
Gate.io (Sesame Open Door) is the world's leading cryptocurrency trading platform. This article provides a complete tutorial on spot trading of Gate.io. The tutorial covers steps such as account registration and login, KYC certification, fiat currency and digital currency recharge, trading pair selection, limit/market transaction orders, and orders and transaction records viewing, helping you quickly get started on the Gate.io platform for cryptocurrency trading. Whether a beginner or a veteran, you can benefit from this tutorial and easily master the Gate.io trading skills.
