 Database
 Mysql Tutorial
 Detailed graphic explanation of data table addition, deletion and modification operations (phpMyAdmin usage tutorial 2)
Detailed graphic explanation of data table addition, deletion and modification operations (phpMyAdmin usage tutorial 2)
Detailed graphic and text explanation of data table addition, deletion and modification operations (phpMyAdmin usage tutorial 2)
The operation of data table is based on selecting the specified database, and then Create and manage data tables in this database. Below we will introduce in detail how to create, modify and delete data tables!
In the previous article " Detailed graphic explanation of database addition, deletion and modification operations (phpMyAdmin usage tutorial 1)", the creation of data tables was also briefly mentioned, but it was just briefly mentioned, There is no in-depth introduction, so in this article we will introduce the operation data table in detail.
1. Create a data table
Let’s use the user’s account as an example to introduce the creation method of the data table in detail.
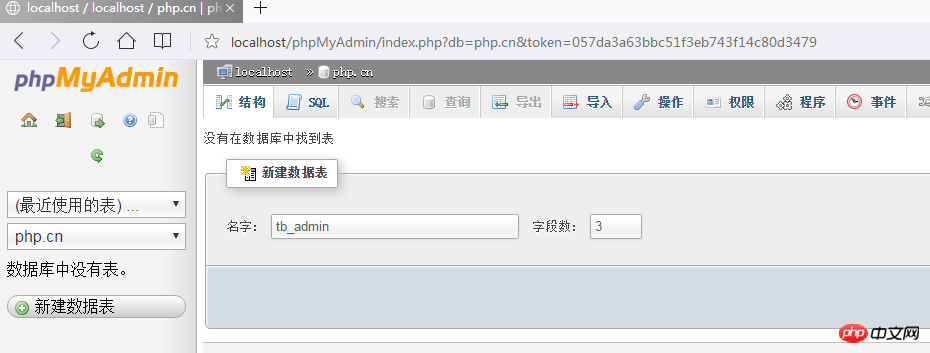
After creating the php.cn database, click on the php.cn database, enter the name of the data table and the number of fields in the text box under "New Data Table", and then click the "Execute" button to create Data table, as shown below:

After the data table is successfully created, the interface of the data table structure will be displayed. Enter the detailed information of each field in the form of this interface, including Field name, data type, length/value, encoding format, whether it is empty and primary key, etc., to complete the detailed settings of the table structure. After all the information is filled in, click "Save" to create the data table structure. , as shown in the picture below,

Tips:
After clicking the "Save" button , click "Data Table Name" to display the data table structure in horizontal format, making it easy to edit the structure!
2. Modify the data table
After creating a new data table, enter the data table structure page, here Tables can be modified by changing the structure of the data table. You can perform operations such as adding columns, deleting columns, indexing columns, modifying the data type of columns or the length/value of fields, as shown below:

##3 .Delete a data table
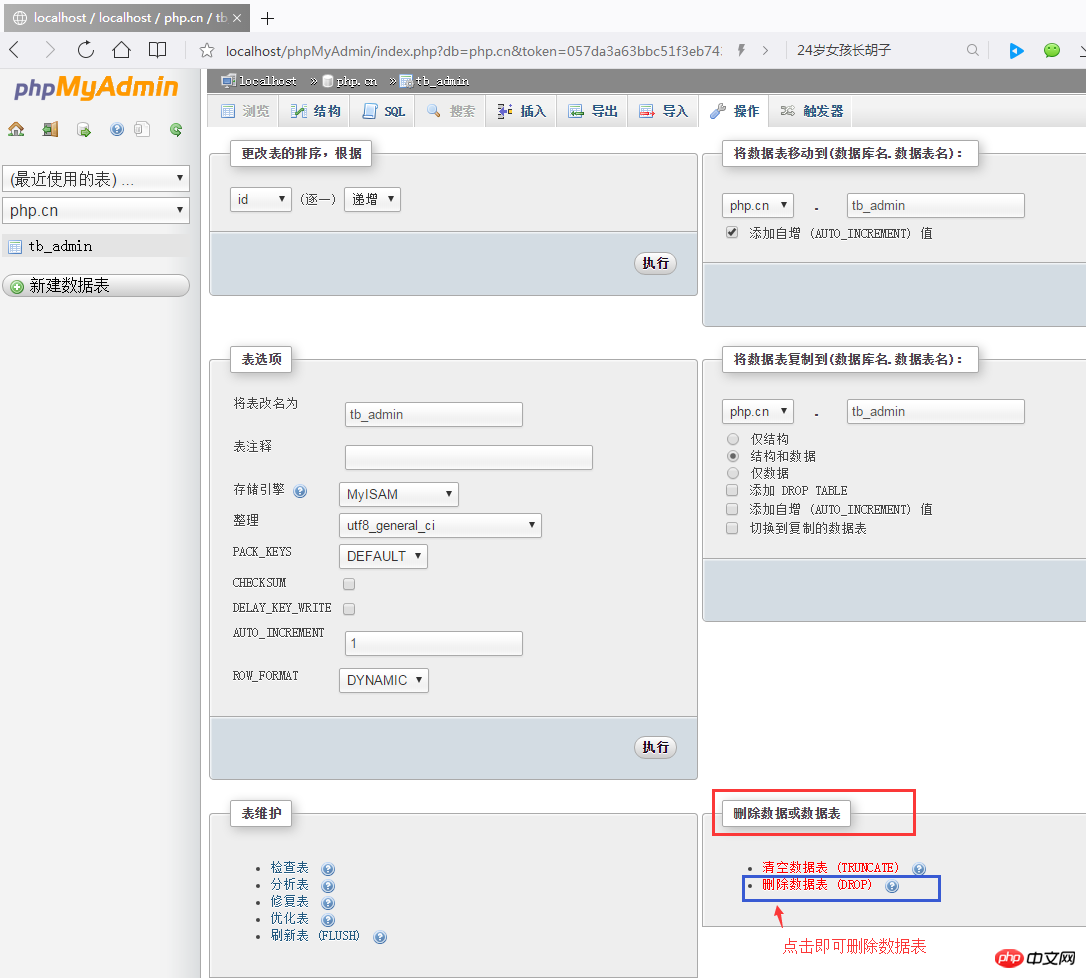
Deleting a data table is similar to that of a database. Click the data table to enter the data table structure page. There is an "operation button" in the upper right corner. Click to enter the operation page. In this The page can sort and modify the table, move the table to other databases, modify table options, and maintain the table. There is a "Delete data or data table" in the lower right corner. Click "Delete data table" to delete the data. Showed! As shown below:
Detailed graphic and text explanation of using SQL statements to operate data tables (phpMyAdmin usage tutorial 3)"!
【Related recommendations】1. Relevant topic recommendations: "2. Related video courses Recommended: "3. Online download of related tools: "The above is the detailed content of Detailed graphic explanation of data table addition, deletion and modification operations (phpMyAdmin usage tutorial 2). For more information, please follow other related articles on the PHP Chinese website!

Hot AI Tools

Undresser.AI Undress
AI-powered app for creating realistic nude photos

AI Clothes Remover
Online AI tool for removing clothes from photos.

Undress AI Tool
Undress images for free

Clothoff.io
AI clothes remover

AI Hentai Generator
Generate AI Hentai for free.

Hot Article

Hot Tools

Notepad++7.3.1
Easy-to-use and free code editor

SublimeText3 Chinese version
Chinese version, very easy to use

Zend Studio 13.0.1
Powerful PHP integrated development environment

Dreamweaver CS6
Visual web development tools

SublimeText3 Mac version
God-level code editing software (SublimeText3)

Hot Topics
 How to set primary key in phpmyadmin
Apr 07, 2024 pm 02:54 PM
The primary key of a table is one or more columns that uniquely identify each record in the table. Here are the steps to set a primary key: Log in to phpMyAdmin. Select database and table. Check the column you want to use as the primary key. Click "Save Changes". Primary keys provide data integrity, lookup speed, and relationship modeling benefits.
 How to add foreign keys in phpmyadmin
Apr 07, 2024 pm 02:36 PM
Adding a foreign key in phpMyAdmin can be achieved by following these steps: Select the parent table that contains the foreign key. Edit the parent table structure and add new columns in "Columns". Enable foreign key constraints and select the referencing table and key. Set update/delete operations. save Changes.
 Where does the wordpress database exist?
Apr 15, 2024 pm 10:39 PM
The WordPress database is housed in a MySQL database that stores all website data and can be accessed through your hosting provider’s dashboard, FTP, or phpMyAdmin. The database name is related to the website URL or username, and access requires the use of database credentials, including name, username, password, and hostname, which are typically stored in the "wp-config.php" file.
 What is the password for the phpmyadmin account?
Apr 07, 2024 pm 01:09 PM
The default username and password for PHPMyAdmin are root and empty. For security reasons, it is recommended to change the default password. Method to change password: 1. Log in to PHPMyAdmin; 2. Select "privileges"; 3. Enter the new password and save it. When you forget your password, you can reset it by stopping the MySQL service and editing the configuration file: 1. Add the skip-grant-tables line; 2. Log in to the MySQL command line and reset the root password; 3. Refresh the permission table; 4. Delete skip-grant-tables line, restart the MySQL service.
 Where is the phpmyadmin log?
Apr 07, 2024 pm 12:57 PM
Default location for PHPMyAdmin log files: Linux/Unix/macOS:/var/log/phpmyadminWindows: C:\xampp\phpMyAdmin\logs\ Log file purpose: Troubleshooting Audit Security
 How to delete data table in phpmyadmin
Apr 07, 2024 pm 03:00 PM
Steps to delete a data table in phpMyAdmin: Select the database and data table; click the "Action" tab; select the "Delete" option; confirm and perform the deletion operation.
 why phpmyadmin access denied
Apr 07, 2024 pm 01:03 PM
Reasons and solutions for access denied by phpMyAdmin: Authentication failed: Check whether the username and password are correct. Server configuration error: adjust firewall settings and check whether the database port is correct. Permissions issue: Granting users access to the database. Session timeout: Refresh the browser page and reconnect. phpMyAdmin configuration error: Check the configuration file and file permissions to make sure the required Apache modules are enabled. Server issue: Wait for a while and try again or contact your hosting provider.
 What kind of vulnerability does the phpmyadmin vulnerability belong to?
Apr 07, 2024 pm 01:36 PM
phpMyAdmin is susceptible to multiple vulnerabilities, including: 1. SQL injection vulnerability; 2. Cross-site scripting (XSS) vulnerability; 3. Remote code execution (RCE) vulnerability; 4. Local file inclusion (LFI) vulnerability; 5. Information disclosure Vulnerability; 6. Privilege escalation vulnerability.


