Abstract: Among the installed base of smartphone software, weather forecast apps rank relatively high. It shows that users are very concerned about the weather. Because people need to arrange various activities according to the natural weather, whether they are working or traveling on vacation. Follow this article to develop a "micro-weather" applet to facilitate WeChat users to check the weather at any time.
Introduction: Among the installed base of smartphone software, weather forecast apps rank relatively high. It shows that users are very concerned about the weather. Because people need to arrange various activities according to the natural weather, whether they are working or traveling on vacation. Follow this article to develop a "micro-weather" applet to facilitate WeChat users to check the weather at any time.
In the next two days, the editor will work with you to develop a "Micro Weather" applet. This article first introduces you to the API and interface code writing of "Micro Weather". This article is selected from "Learning WeChat Mini Program Development from Scratch".
In a software system, WeChat applet is usually used as a front-end, and generally requires a back-end system to provide support, which requires developers (or operators) to purchase cloud servers (or have own independent host) and deploy the back-end system on it. For many beginners, these conditions are not easy to achieve. But we can choose to use online free API interfaces. Developers only need to write the front-end system (WeChat applet) and directly call these free APIs in the front-end system to obtain the corresponding data.
1 Weather Forecast API
To develop a weather forecast APP, the first thing to consider is the source of weather forecast data. Only with the data source of the weather forecast can it be displayed in the WeChat applet as needed. In fact, the WeChat applet is a front-end system that displays weather information, and the weather forecast API is the back-end system. Since the weather forecast API can be obtained for free online, the developer in this case does not need to develop a back-end system and only needs to access it according to the API requirements.
Chinese Perpetual Calendar Weather Forecast Interface
The Chinese Perpetual Calendar weather forecast interface address is as follows:
wthrcdn.etouch.cn/weather_mini?city=Beijing
The interface is very simple and only You only need to give the name of the city. The data returned by the interface is also in JSON format. The specific form is as follows:
{    "desc": "OK",    "status": 1000,    "data": {        "wendu": "15",    "ganmao": "昼夜温差较大,较易发生感冒,请适当增减衣服。体质较弱的朋友请注意防护。",        "forecast": [{            "fengxiang": "北风",            "fengli": "3-4级",            "high": "高温 14℃",            "type": "晴",            "low": "低温 3℃",            "date": "19日星期六"
        },
        {            "fengxiang": "无持续风向",            "fengli": "微风级",            "high": "高温 4℃",            "type": "雨夹雪",            "low": "低温 -1℃",            "date": "20日星期天"
        },
        {            "fengxiang": "北风",            "fengli": "3-4级",            "high": "高温 0℃",            "type": "小雪",            "low": "低温 -7℃",            "date": "21日星期一"
        },
        {            "fengxiang": "北风",            "fengli": "3-4级",            "high": "高温 -3℃",            "type": "晴",            "low": "低温 -9℃",            "date": "22日星期二"
        },
        {            "fengxiang": "无持续风向",            "fengli": "微风级",            "high": "高温 -3℃",            "type": "多云",            "low": "低温 -10℃",            "date": "23日星期三"
        }],        "yesterday": {            "fl": "微风",            "fx": "无持续风向",            "high": "高温 10℃",            "type": "霾",            "low": "低温 6℃",            "date": "18日星期五"
        },        "aqi": "40",        "city": "北京"
    }
}It can be seen that there is a lot of JSON data returned above, including the day's temperature wendu and cold description ganmao , as well as the weather data of the last 5 days saved in the forecast array, and yesterday's weather data saved in yesterday.
2 Interface design
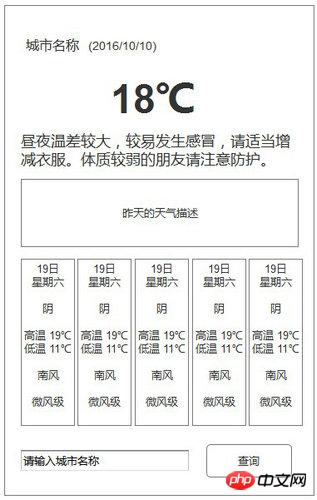
This case requires a simple interface. Try to display the current weather and the weather of the last five days on one page. At the same time, It also provides the function of querying by city name, which can display the weather forecast information of the queried city. The UI design is as follows.

In the figure, the name of the queried city is displayed on the top and the current date is displayed on the right. Then display the temperature and cold description of the query city in a larger font size. There are 5 small cards arranged below to display the weather information of the last 5 days. The bottom accepts the user to input the name of the city to be queried. Click the "Query" button to query the weather forecast information of the specified city.
When the applet is first opened, since the user has not yet entered the query city name, a default city name needs to be set to facilitate the display of the initial weather forecast information.
3 Write the interface code
After selecting the API to be used and designing the layout of the UI interface, you can create a WeChat applet project. And write the interface code and logic layer JavaScript code.
1 Create a project
Based on the cases in the previous chapters of this book, first create a project according to the following steps.
(1) Create a project directory named ch11.
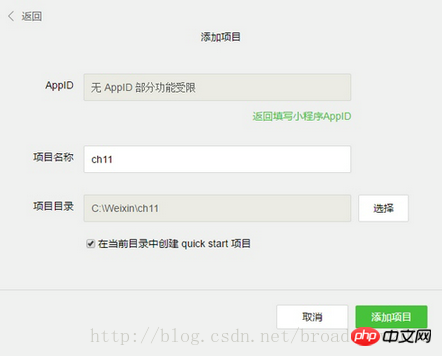
(2) Start the WeChat applet development tool, click the "Add Project" button in the startup interface, and open the following dialog box.

(3) Fill in the corresponding project name in the above dialog box, select the directory to save the project, and click the "Add Project" button to create the framework of a project.
This project only has one page, so there is no need to add other pages, delete the existing content in the index page, and then write wxml and js code in the index page.
(4) Modify the display title, open the app.json file, and modify it to the following content:
{  "pages":[    "pages/index/index",    "pages/logs/logs"
  ],  "window":{    "backgroundTextStyle":"light",    "navigationBarBackgroundColor": "#fff",    "navigationBarTitleText": "微天气",    "navigationBarTextStyle":"black"
  }
}2 Write the interface code
Based on the UI design, open the index .wxml file, delete the original content of the file and enter the following wxml code.
<view class="content">
  <!--显示当天的天气信息-->
  <view class="info">
    <!--城市名称 当前日期-->
    <view class="city">{{city}} ({{today}})</view>
    <!--当天温度-->
    <view class="temp">{{weather.wendu}}℃</view>
    <!--感冒描述-->
    <view class="weather">{{weather.ganmao}}</view>
  </view>
  <!--昨天的天气信息-->
  <view class="yesterday">
    <view class="detail"><text class="yesterday-title">昨天</text>
        {{weather.yesterday.date}}</view>
    <view class="detail">  {{weather.yesterday.type}}  <!--天气类型,如阴、晴-->
        {{weather.yesterday.fx}}  <!--风向-->
        {{weather.yesterday.fl}}  <!--风力-->
        {{weather.yesterday.low}}  <!--最低温度-->
        {{weather.yesterday.high}}  <!--最高温度-->
    </view>
  </view>
<view class="forecast" >
    <view class="next-day"  wx:key="{{index}}" wx:for="{{weather.forecast}}" >
      <!--日期-->
      <view class="detail date">{{item.date}}</view>
      <!--天气类型-->
      <view class="detail">{{item.type}}</view>
      <!--最高温度-->
      <view class="detail">{{item.high}}</view>
      <!--最低温度-->
      <view class="detail">{{item.low}}</view>
      <!--风向-->
      <view class="detail">{{item.fengxiang}}</view>
      <!--风力-->
      <view class="detail">{{item.fengli}}</view>
    </view>
  </view>
 <view class="search-area">
    <input bindinput="inputing" placeholder="请输入城市名称"
        value="{{inputCity}}"  />
    <button type="primary" size="mini" bindtap="bindSearch">查询</button>
</view></view>以上wxml代码添加了注释,每一部分的作用都在注释中进行了描述。
3 编写界面样式代码
保存以上wxml代码之后,在开发工具左侧的预览区中并没有看到UI设计图中的UI效果。为了达到设计的布局效果,需要编写样式代码对wxml组件进行控制。其实,在上面的wxml代码中,已经为各组件设置了class属性,接下来只需要在index.wxss中针对每一个class编写相应的样式代码即可,具体代码如下:
.content{  height: 100%;  width:100%;  display:flex;  flex-direction:column;  font-family: 微软雅黑, 宋体;  box-sizing:border-box;  padding:20rpx 10rpx;  color: #252525;  font-size:16px;  background-color:#F2F2F8;
}/*当天天气信息*/.info{  margin-top:50rpx;  width:100%;  height:160px;
}/*城市名称*/.city{  margin: 20rpx;  border-bottom:1px solid #043567;
}/*当天温度*/.temp{  font-size: 120rpx;  line-height: 130rpx;  text-align: center;  padding-top:20rpx;  color:#043567;
}/*感冒描述*/.weather{  line-height: 22px;  margin: 10px 0;  padding: 0 10px;
}/*昨天天气信息*/.yesterday{  width:93%;  padding:20rpx;  margin-top:50rpx;  border-radius:10rpx;  border:1px solid #043567;
}/*昨天的*/.yesterday-title{  color:red;
}/*最近五天天气信息*/.forecast{  width: 100%;  display:flex;  margin-top:50rpx;  align-self:flex-end;
}/*每一天的天气信息*/.next-day{  width:20%;  height:450rpx;  text-align:center;  line-height:30px;  font-size:14px;  margin: 0 3rpx;  border:1px solid #043567;  border-radius:10rpx;
}/*日期*/.date{  margin-bottom:20rpx;  border-bottom:1px solid #043567;  color:#F29F39;
}/*搜索区域*/.search-area{    display:flex;    background: #f4f4f4;    padding: 1rem 0.5rem;
}/*搜索区域的输入框*/.search-area input{    width:70%;    height: 38px;    line-height: 38px;    border: 1px solid #ccc;    box-shadow: inset 0 0 10px #ccc;    color: #000;    background-color:#fff;    border-radius: 5px;
}/*搜索区的按钮*/.search-area button{   width: 30%;    height: 40px;    line-height: 40px;    margin-left: 5px;
} 在上面的wxss代码中,每一个class设置前都有相应的注释,可与wxml代码对应起来。
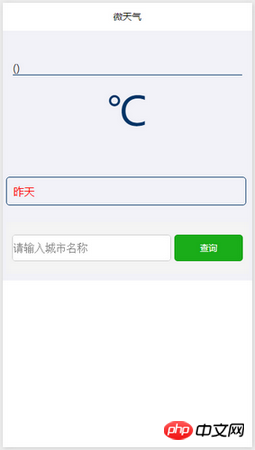
保存好index.wxss文件之后,开发工具左侧预览区可看到下面的界面效果。

The above is the detailed content of 'Micro Weather' Tutorial on WeChat Mini Program Development (1). For more information, please follow other related articles on the PHP Chinese website!
 ie shortcut cannot be deleted
 Mac shortcut key list
 How to modify folder 777 permissions
 How to connect asp to access database
 How to read macro control data in javascript
 The difference between console cable and network cable
 How to represent negative numbers in binary
 What does wifi deactivated mean?


