Flask is a very excellent web framework. Its biggest feature is that it maintains a small core that is simple and easy to expand. Others are mastered by users and can be easily replaced. You can even see many open source ones in the community. , can be directly used for expansion in production environments. So far, I believe that there are a lot of introductions about him. Even in cnblog, a casual search will find a lot of content, but I still want to give you some ideas, just treat it as a self-summary
Deployment environment
Install python
First of all, of course, install the python environment, go to the official website to download the latest environment (I choose The latest version 3.6)
Then just go to the next step, pay attention to record or select the installation path.
Environment variables
The next configuration of environment variables is almost the same as java, after path;.; enter the installation path of python, and then again; ,;Enter the Scripts folder in the python directory, and have used some of the tools that come with py (such as pip)
Install flask
Configuration After completing pip, installing flask is very simple. Enter cmd to enter the console, and then enter the following command:
pip3.6 install flask
Development tools
If you want to do your job well, you must first sharpen your tools. The choice of development tools is very important. I chose pycharm, which can also be downloaded from the official website. Please use it correctly. Version shi
Start development
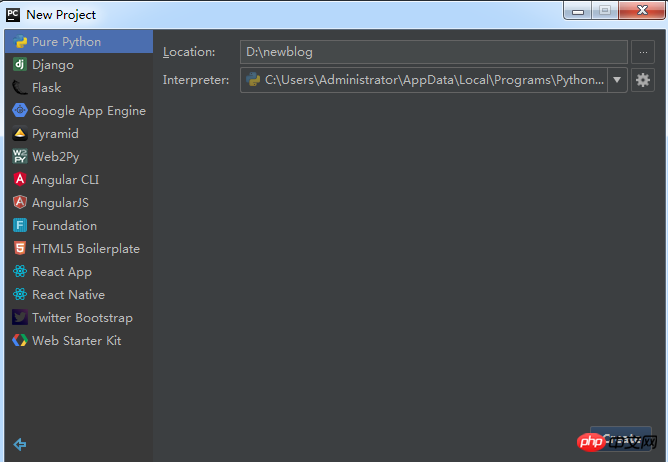
First, open pycharm and create a Pure Python project:

Project creation After that, it is just an empty project, and a py file has been created for development. Right-click new-->python file in the project folder and then pick a name. I got the name default, which will be in the directory file. Create a default.py file in the folder.
Initial exploration of flask
Enter the code on this file (assuming that the installation of flask has been successful):
from flask import Flask #导入Flask类
app=Flask(__name__) #创建Flask类的一个实例

if __name__=='__main__': #Python入口程序
 app.run(debug=True) #使其运行于本地服务器上
This is to switch the directory of the cmd console to the project directory, enter the command:
python default.py
After importing the Flask class, When running the script, the WSGI program will be automatically created
The picture shown is correct:

According to the prompts, enter the default address of flask in the browser at this time , the display is as follows:

Because there is no page yet, all access to any address will be 404
Explanation
debug =true means running in debug mode. Debug mode must not be used in production environment! ! !
Routing
The following creates a default route for this application. Flask uses a decorator to configure the route:
@app.route("/")
def index():
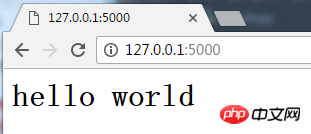
return "<h1>hello world</h1>"When accessed at this time, the page is as follows:

The return content is output, and the console at this time displays:

The status code is 200, no longer 404
The decorator here can be understood as annotations in java for the time being, and will be discussed in detail later. At the same time, this The usage of routing can also be temporarily understood as the annotation routing method of servlet in j2ee.
Routing with parameters
At the same time, flask also supports routing with parameters:
@app.route("/user/<name>")
def user(name):
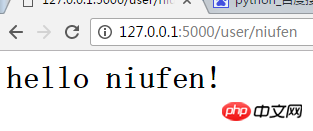
return "<h1>hell %s</h1>"%nameInput in the browser:
127.0.0.1:5000/user/niufen
The input at this time is:

Let’s talk about routing for now, then enter the cmd console, ctrl+c to exit the server, enter python, enter the python command line interface, at this time you can execute various py statements
Then import the app object under the default.py object in this interface:
from default import app
and then press Enter. At this time, you can use the command line Using the app object, enter:
app.url_map
My display is as follows:

可以看到,使用一个map存储了此对象下的所有路由,并从内容可以看到 全是get方式,注意其中的static,是存放的静态文件,如图片,顺便提一下,这也体现了flask的一个特点,即它有众多的配置选项,但基本上都在初始状态下有个明确的默认值,比如模板在templates中,图片在static中,虽然这个配置可以修改,但不建议这么做,尤其是刚开始的时候。
from default import app这行代码代表了从default对象中导入app,并在之下可以直接使用app,同样的还有之前的代码 from flask import Flask
python中有两种导入方式,import直接导入和from ... import导入,具体区别可查看py基本语法
如果想让路由为post方式,也很简单:
@app.route("/user",methods=["POST"])
def user():
 name=request.args.get("name")
return "<h1>hell %s</h1>"%name即可
请求上下文
flask还有请求上下文对象,即request,如:
from flask import request #页头 导入request对象

@app.route(/req_test)
def req_test():
 val=""
 for key,value in request.args.items():
 val+=" %s = %s <br>"%(key,value)
 return val;
在控制台输入exit()后,继续输入python default.py进入服务器
此时在浏览器中输入url:
127.0.0.1:5000/req_test?age=5&name=abc
此时浏览器中显示为:

测试代码2(假设已导入request对象):
@app.route(/req_test)
def req_test():
 val=""
 for key,value in request.headers.items():
 val+=" %s = %s <br>"%(key,value)
 return val;
浏览器显示为:

flask自带系统上下文共计四个:
current_app 约等于application
g 一个用于临时存储的对象 约等于viewbag
request 与servlet或asp.net中含义大体相同
session 与servlet或asp.net中含义大体相同
响应
flask响应可以使用make_response对象,用法与java servlet中的用法类似:
from flask import make_response #页头,导入make_response对象

@app.route("/res_test")
def res_test():
 response=make_response("<h1>hello world</h1")
 response.set_cookie("name","niufennan")
return response;此代码的内容为在响应的时候设置cookie
在浏览器中输入地址:
127.0.0.1:5000/res_test
在页面中显示为黑体hello world,但是可以查看浏览器,发现响应内容已经存入浏览器的cookie中 如图:

其他常用功能:跳转
在web开发中,经常会遇到直接跳转的情况,flask中也提供了redirect方法来实现:
from flask import redirect # 页头,导入redirect对象
@app.route("/")
def index():
return redirect("www.baidu.com/")此时访问将直接跳转至百度
其他常用功能:响应码
普通响应码可直接在return的返回字符串后使用,如:
@app.route("/")
def index():
return "<h1>hello world</h1>",400访问结果如下:

可以看到,虽然此时页面显示内容不变,但是响应码为400
错误码flask也提供了一个专有的函数:
from flask import abort #导入abort对象 @app.route('/user/<name>') def user(name): if name =='test': abort(500) return "<h1>hello %s!</h1>"%name
此代码的功能是当name的值为test是,返回错误码为500,注意此时页面不会显示内容,因为此时程序不由代码控制,而将控制权交给了系统。
至此,flask基础知识已经讲完,现在已经可以做一些简单的程序,但是肯定不会如此的做,就像只用servlet,不用jsp页面或其他模板也可以做出很绚丽的系统,但大部分还是需要jsp页面或其他模板页作为支撑,下一章将说明在系统中如何使用jinja2模板引擎和wtf表单插件。
The above is the detailed content of Get you started with learning Python (flask-based web application). For more information, please follow other related articles on the PHP Chinese website!


