
 Backend Development
Python Tutorial
Detailed tutorial on installing and building django1.10.3 and Apache2.4 under windows10
Backend Development
Python Tutorial
Detailed tutorial on installing and building django1.10.3 and Apache2.4 under windows10
Detailed tutorial on installing and building django1.10.3 and Apache2.4 under windows10

Recently, I have discovered that many tutorials are built on Linux. Windows seems not to be naturally suitable, but I am still willing to try this pit. The following article mainly introduces you to the method of installing and building django1.10.3 and Apache2.4 under Windows 10 system. Friends in need can refer to it. Let’s take a look together.
Environment introduction
python3.5.2 64-bit
django 1.10.3
apache 2.4 64-bit
windows 10
The focus is on apache.
I believe that everyone who is interested in reading this article already knows about python and django.
Install Apache2.4
Address: www.apachelounge.com/download/
Download: vc_redist.x64. exe direct installation vc_redist_x64/86.exe.
Download: httpd-2.4.17-win64-VC14.zip
Configure environment variables: add path to D:\Apache24\bin;
Extract to the specified directory and modify the configuration file: http.conf (Change the ServerRoot in the following content to your own actual Apche decompression path)
 ServerRoot "D:/Apache24"
 ……
 Listen 127.0.0.1:8081 #修改端口号
 ……
 ServerName www.example.com:8081
 ……
 DocumentRoot "D:/Apache24/htdocs"
 <Directory "D:/Apache24/htdocs">
 ……
 ScriptAlias /cgi-bin/ "D:/Apache24/cgi-bin/"
 ……
 <Directory "D:/Apache24/cgi-bin">
  AllowOverride None
  Options None
  Require all granted
 </Directory>
Start the apache service:
cmd>httpd
127.0.0.1:8081/index.html
It works! apache configuration successful
install mod_wsgi
Install first: pip install wheel
Installmod_wsgi-4.4.23+ap24vc14-cp35-cp35m-win_amd64.whl
Download: mod_wsgi-4.4.23+ap24vc14-cp35-cp35m-win_amd64.whl
Address: www.lfd.uci.edu/~gohlke/pythonlibs/#mod_wsgi
pip installation: pip install mod_wsgi-4.4.23+ap24vc14-cp35-cp35m-win_amd64.whl
Configure Apache2.4, mod_wsgi, Django project engineering
1. Copy C:\Python35\mod_wsgi.so to D:\Apache24\modules
(mod_wsgi. so can only be found after mod_wsgi-4.4.23+ap24vc14-cp35-cp35m-win_amd64.whl is installed successfully)
2. Modify the http.conf file of apache2.4:
 #添加mod_wsgi.so 模块
 LoadModule wsgi_module modules/mod_wsgi.so
3. Configure the django project and modify http.conf
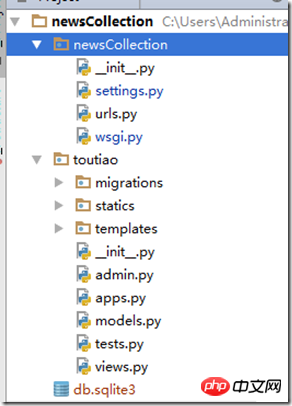
#添加mod_wsgi.so 模块
LoadModule wsgi_module modules/mod_wsgi.so
#指定静态资源路径
Alias /statics/ F:/pydj/newsCollection/toutiao/statics/
<Directory F:/pydj/newsCollection/toutiao/statics>
 Require all granted
</Directory>
#指定newsCollection项目的wsgi.py配置文件路径
WSGIScriptAlias / F:/pydj/newsCollection/newsCollection/wsgi.py
#指定项目路径
WSGIPythonPath F:/pydj/newsCollection
<Directory F:/pydj/newsCollection/newsCollection>
 <Files wsgi.py>
  Require all granted
 </Files>
</Directory>
wsgi.py content:
import os
os.environ.setdefault("DJANGO_SETTINGS_MODULE", "myweb.settings")
from django.core.wsgi import get_wsgi_application
application = get_wsgi_application()
#Note that myweb above is changed to your own project name, such as newsCollection in the picture above. Refer to the directory structure in the picture above.
Configuring the django project setting.py
ALLOWED_HOSTS = ['127.0.0.1', 'localhost']
Finally, let me tell you that there will be a log when Apche starts an error, httpd-2.4. 23-x64-vc14-r3\Apache24\logs directory error information, troubleshoot slowly
Summary
The above is the detailed content of Detailed tutorial on installing and building django1.10.3 and Apache2.4 under windows10. For more information, please follow other related articles on the PHP Chinese website!

Hot AI Tools

Undresser.AI Undress
AI-powered app for creating realistic nude photos

AI Clothes Remover
Online AI tool for removing clothes from photos.

Undress AI Tool
Undress images for free

Clothoff.io
AI clothes remover

AI Hentai Generator
Generate AI Hentai for free.

Hot Article
Hot Tools

Notepad++7.3.1
Easy-to-use and free code editor

SublimeText3 Chinese version
Chinese version, very easy to use

Zend Studio 13.0.1
Powerful PHP integrated development environment

Dreamweaver CS6
Visual web development tools

SublimeText3 Mac version
God-level code editing software (SublimeText3)
Hot Topics
 1381
1381
 52
52

 How to start apache
Apr 13, 2025 pm 01:06 PM
How to start apache
Apr 13, 2025 pm 01:06 PM
The steps to start Apache are as follows: Install Apache (command: sudo apt-get install apache2 or download it from the official website) Start Apache (Linux: sudo systemctl start apache2; Windows: Right-click the "Apache2.4" service and select "Start") Check whether it has been started (Linux: sudo systemctl status apache2; Windows: Check the status of the "Apache2.4" service in the service manager) Enable boot automatically (optional, Linux: sudo systemctl
 How to set the cgi directory in apache
Apr 13, 2025 pm 01:18 PM
How to set the cgi directory in apache
Apr 13, 2025 pm 01:18 PM
To set up a CGI directory in Apache, you need to perform the following steps: Create a CGI directory such as "cgi-bin", and grant Apache write permissions. Add the "ScriptAlias" directive block in the Apache configuration file to map the CGI directory to the "/cgi-bin" URL. Restart Apache.
 What to do if the apache80 port is occupied
Apr 13, 2025 pm 01:24 PM
What to do if the apache80 port is occupied
Apr 13, 2025 pm 01:24 PM
When the Apache 80 port is occupied, the solution is as follows: find out the process that occupies the port and close it. Check the firewall settings to make sure Apache is not blocked. If the above method does not work, please reconfigure Apache to use a different port. Restart the Apache service.
 How to connect to the database of apache
Apr 13, 2025 pm 01:03 PM
How to connect to the database of apache
Apr 13, 2025 pm 01:03 PM
Apache connects to a database requires the following steps: Install the database driver. Configure the web.xml file to create a connection pool. Create a JDBC data source and specify the connection settings. Use the JDBC API to access the database from Java code, including getting connections, creating statements, binding parameters, executing queries or updates, and processing results.
 How to delete more than server names of apache
Apr 13, 2025 pm 01:09 PM
How to delete more than server names of apache
Apr 13, 2025 pm 01:09 PM
To delete an extra ServerName directive from Apache, you can take the following steps: Identify and delete the extra ServerName directive. Restart Apache to make the changes take effect. Check the configuration file to verify changes. Test the server to make sure the problem is resolved.
 How to view your apache version
Apr 13, 2025 pm 01:15 PM
How to view your apache version
Apr 13, 2025 pm 01:15 PM
There are 3 ways to view the version on the Apache server: via the command line (apachectl -v or apache2ctl -v), check the server status page (http://<server IP or domain name>/server-status), or view the Apache configuration file (ServerVersion: Apache/<version number>).
 How to view the apache version
Apr 13, 2025 pm 01:00 PM
How to view the apache version
Apr 13, 2025 pm 01:00 PM
How to view the Apache version? Start the Apache server: Use sudo service apache2 start to start the server. View version number: Use one of the following methods to view version: Command line: Run the apache2 -v command. Server Status Page: Access the default port of the Apache server (usually 80) in a web browser, and the version information is displayed at the bottom of the page.
 What is apache server software
Apr 13, 2025 pm 12:45 PM
What is apache server software
Apr 13, 2025 pm 12:45 PM
Apache HTTP Server is an open source, free web server software maintained by the Apache Software Foundation. It has functions such as handling HTTP requests, managing virtual hosts, supporting modules, efficient and scalable, and high security.
