 WeChat Applet
 WeChat Development
 Detailed explanation of the process of implementing WeChat sharing function using Asp.net MVC
Detailed explanation of the process of implementing WeChat sharing function using Asp.net MVC
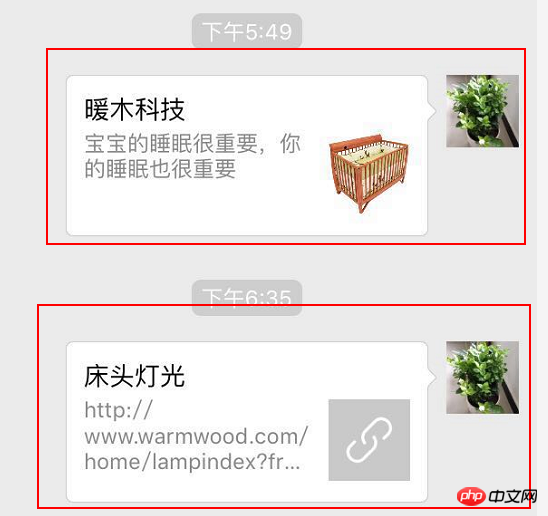
Web pages embedded in WeChat will have a default sharing function in the upper right corner. As shown in the figure below, the first one is the customized effect, and the second one is the default effect. Will implementing customized sharing links make people more eager to click? The development process is explained below.

1. Preparation, set the js interface security domain name
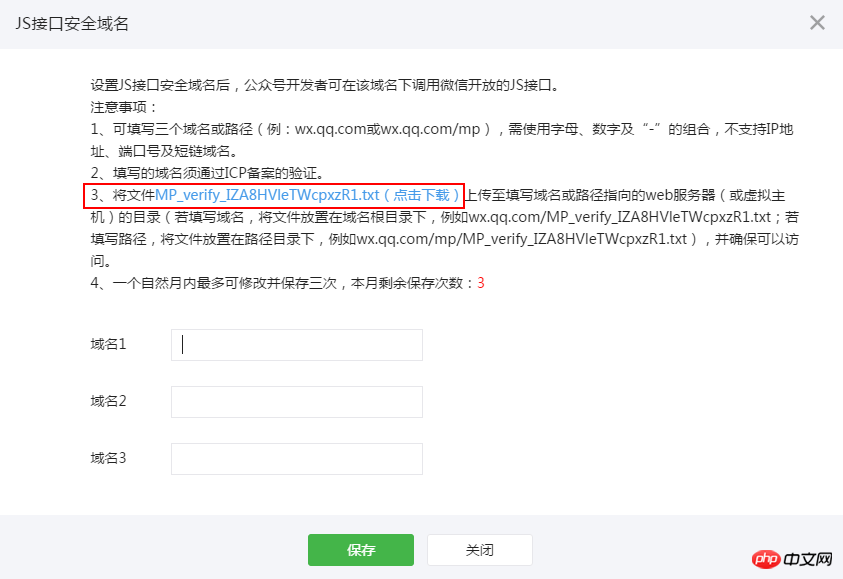
This requires using WeChat’s jssdk, and first needs to be set in the WeChat official account background: Official account settings -->Function Settings-->JS interface security domain name. After opening this page you will see the following prompt. You need to download this file first and upload it to the root directory of the specified domain name.

#This file contains a string, which from the name is used for verification. You must upload this file first before you can save it successfully. This way you can use jssdk.
2. Front-end configuration
The first thing to note is that the sharing function is a configuration function, and it has no effect if it is bound to the click event of a button. In other words, only clicking Share in the upper right corner will have an effect (I don’t know how to share some text content). The official js has four steps. The first is to introduce jssdk:
<script src="http://res.wx.qq.com/open/js/jweixin-1.1.0.js"></script>
According to the official configuration parameters, we can define a WXShareModel object:
   public class WXShareModel
    {        public string appId { get; set; }        public string nonceStr { get; set; }        public long timestamp { get; set; }        public string signature { get; set; }        public string ticket { get; set; }        public string url { get; set; }        public void MakeSign()
        {             var string1Builder = new StringBuilder();
             string1Builder.Append("jsapi_ticket=").Append(ticket).Append("&")
                          .Append("noncestr=").Append(nonceStr).Append("&")
                          .Append("timestamp=").Append(timestamp).Append("&")
                          .Append("url=").Append(url.IndexOf("#") >= 0 ? url.Substring(0, url.IndexOf("#")) : url);            var string1 = string1Builder.ToString();
            signature = Util.Sha1(string1, Encoding.Default);
        }
}and then configure it:
wx.config({
        debug: true, // 开启调试模式,调用的所有api的返回值会在客户端alert出来,若要查看传入的参数,可以在pc端打开,参数信息会通过log打出,仅在pc端时才会打印。
        appId: '@Model.appId', // 必填,公众号的唯一标识
        timestamp: '@Model.timestamp', // 必填,生成签名的时间戳
        nonceStr: '@Model.nonceStr', // 必填,生成签名的随机串
        signature: '@Model.signature',// 必填,签名,见附录1
        jsApiList: ["checkJsApi", "onMenuShareTimeline", "onMenuShareAppMessage", "onMenuShareQQ", "onMenuShareQZone"] // 必填,需要使用的JS接口列表,所有JS接口列表见附录2    });

    wx.ready(function () {
        document.querySelector('#checkJsApi').onclick = function () {
            wx.checkJsApi({
                jsApiList: [            'getNetworkType',            'previewImage'
                ],
                success: function (res) {
                    alert(JSON.stringify(res));
                }
            });
        };
    //朋友圈        wx.onMenuShareTimeline({
            title: '暖木科技', // 分享标题
            link: 'http://www.warmwood.com/home/lampindex', // 分享链接
            imgUrl: 'http://www.warmwood.com/images/s1.jpg',
            success: function (res) {
                alert('已分享');
            },
            cancel: function (res) {
                alert('已取消');
            },
            fail: function (res) {
                alert(JSON.stringify(res));
            }
        });        //朋友        wx.onMenuShareAppMessage({
            title: '暖木科技', // 分享标题
            desc: '宝宝的睡眠很重要,你的睡眠也很重要', // 分享描述
            link: 'http://www.warmwood.com/home/lampindex', // 分享链接
            imgUrl: 'http://www.warmwood.com/images/s1.jpg', // 分享图标
            type: '', // 分享类型,music、video或link,不填默认为link
            dataUrl: '', // 如果type是music或video,则要提供数据链接,默认为空
            success: function () {                // 用户确认分享后执行的回调函数
                alert("分享");
            },
            cancel: function () {                // 用户取消分享后执行的回调函数
                alert("取消分享");
            }
        });
});Then the rest is the backend. The key to the backend is getting the access_token and jsapi_ticket and generating the correct signature. In addition, if you want to count the number of shares, it is best to count them in the success method.
3. Generate signature
1.access_token
The method of obtaining access_token is the same across all platforms.
public const string AccessTokenUrl = "https://api.weixin.qq.com/cgi-bin/token?grant_type=client_credential&appid={0}&secret={1}"; public TokenResult GetAccessToken()
{ var url = string.Format(WxDeviceConfig.AccessTokenUrl, WxDeviceConfig.AppId, WxDeviceConfig.APPSECRET); var res = SendHelp.Send<TokenResult>(null, url, null, CommonJsonSendType.GET); return res;
}The timeout of access_token is 7200 seconds, so it can be cached first. You can download it at the end of the SendHelp article
2. Get jsapi_ticket
The purpose of access_token is to get jsapi_ticket. Use get method to obtain, url: https://api.weixin.qq.com/cgi-bin/ticket/getticket?access_token=ACCESS_TOKEN&type=jsapi, the returned JSON object is as follows.
{"errcode":0,"errmsg":"ok","ticket":"bxLdikRXVbTPdHSM05e5u5sUoXNKd8-41ZO3MhKoyN5OfkWITDGgnr2fwJ0m9E8NYzWKVZvdVtaUgWvsdshFKA","expires_in":7200}So you can define a model:
public class jsapiTicketModel
    {        public string errcode { get; set; }        public string errmsg { get; set; }        public string ticket { get; set; }        public string expires_in { get; set; }
}Then complete the method of obtaining the ticket:
 public jsapiTicketModel GetJsApiTicket(string accessToken)
        {            var url = string.Format(WxPayConfig.Jsapi_ticketUrl, accessToken);            return SendHelp.Send<jsapiTicketModel>(accessToken, url, "", CommonJsonSendType.GET);
}The ticket expiration time is also 7200 seconds, and frequent requests cannot be made, so it is also needed Then cache it on the server side.
 private void setCacheTicket(string cache)
        {
            _cacheManager.Set(tokenKey, cache, 7200);
}MemoryCacheManager:
 View Code
3. Signature
Finally this step is reached, and then you I saw a scene in the document that will disappoint you:

Is there a C# demo? The payment side provides it. Why is jssdk not provided? Well, let’s not complain now. . The official also explained the rules for signing. At the beginning, I used the signature in github.com/night-king/weixinSDK:
 public static string Sha1(string orgStr, string encode = "UTF-8")
        {            var sha1 = new SHA1Managed();            var sha1bytes = System.Text.Encoding.GetEncoding(encode).GetBytes(orgStr);            byte[] resultHash = sha1.ComputeHash(sha1bytes);            string sha1String = BitConverter.ToString(resultHash).ToLower();
            sha1String = sha1String.Replace("-", "");            return sha1String;
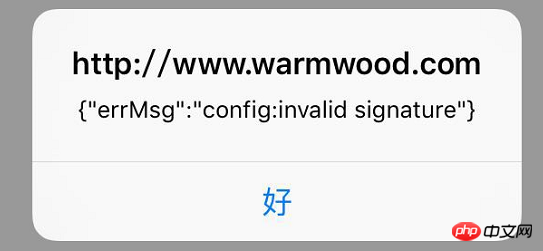
}//错误示例The result obtained was inconsistent with the official verification, and it kept prompting a signature error.

The correct way to write it is:
public static string Sha1(string orgStr, Encoding encode)
        {
            SHA1 sha1 = new SHA1CryptoServiceProvider();            byte[] bytes_in = encode.GetBytes(orgStr);            byte[] bytes_out = sha1.ComputeHash(bytes_in);
            sha1.Dispose();            string result = BitConverter.ToString(bytes_out);
            result = result.Replace("-", "");            return result;
}Once it matches the official verification result, it will be ok (ignoring the case). Another thing to pay attention to is the url in the signature. If the page has parameters, the url in the model also needs to have parameters, and the ones after the # sign are not required. Otherwise, a signature error will be reported.
 public ActionResult H5Share()
        {            var model = new WXShareModel();
            model.appId = WxPayConfig.APPID;
            model.nonceStr = WxPayApi.GenerateNonceStr();
            model.timestamp = Util.CreateTimestamp();
            model.ticket = GetTicket();
            model.url = "http://www.warmwood.com/AuthWeiXin/share";// domain + Request.Url.PathAndQuery;            model.MakeSign();
            Logger.Debug("获取到ticket:" + model.ticket);
            Logger.Debug("获取到签名:" + model.signature);            return View(model);
}4. Summary
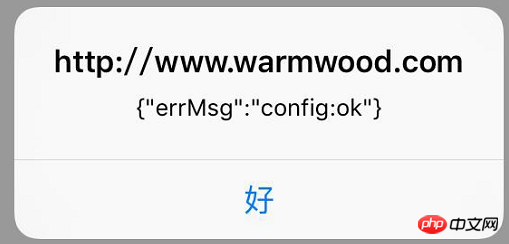
If debug in wx.config is true, various operation results will be alerted. After the parameters are correct, the interface will prompt:

At this point, the sharing function is ok. This also opens the door to calling other jssdk. In addition, the SendHelp object in this article uses the dll of Senparc (based on .net4.5).
The above is the detailed content of Detailed explanation of the process of implementing WeChat sharing function using Asp.net MVC. For more information, please follow other related articles on the PHP Chinese website!

Hot AI Tools

Undresser.AI Undress
AI-powered app for creating realistic nude photos

AI Clothes Remover
Online AI tool for removing clothes from photos.

Undress AI Tool
Undress images for free

Clothoff.io
AI clothes remover

AI Hentai Generator
Generate AI Hentai for free.

Hot Article

Hot Tools

Notepad++7.3.1
Easy-to-use and free code editor

SublimeText3 Chinese version
Chinese version, very easy to use

Zend Studio 13.0.1
Powerful PHP integrated development environment

Dreamweaver CS6
Visual web development tools

SublimeText3 Mac version
God-level code editing software (SublimeText3)

Hot Topics
 1378
1378
 52
52
 PHP WeChat development: How to implement message encryption and decryption
May 13, 2023 am 11:40 AM
PHP is an open source scripting language that is widely used in web development and server-side programming, especially in WeChat development. Today, more and more companies and developers are starting to use PHP for WeChat development because it has become a truly easy-to-learn and easy-to-use development language. In WeChat development, message encryption and decryption are a very important issue because they involve data security. For messages without encryption and decryption methods, hackers can easily obtain the data, posing a threat to users.
 Using PHP to develop WeChat mass messaging tools
May 13, 2023 pm 05:00 PM
With the popularity of WeChat, more and more companies are beginning to use it as a marketing tool. The WeChat group messaging function is one of the important means for enterprises to conduct WeChat marketing. However, if you only rely on manual sending, it is an extremely time-consuming and laborious task for marketers. Therefore, it is particularly important to develop a WeChat mass messaging tool. This article will introduce how to use PHP to develop WeChat mass messaging tools. 1. Preparation work To develop WeChat mass messaging tools, we need to master the following technical points: Basic knowledge of PHP WeChat public platform development Development tools: Sub
 PHP WeChat development: How to implement user tag management
May 13, 2023 pm 04:31 PM
In the development of WeChat public accounts, user tag management is a very important function, which allows developers to better understand and manage their users. This article will introduce how to use PHP to implement the WeChat user tag management function. 1. Obtain the openid of the WeChat user. Before using the WeChat user tag management function, we first need to obtain the user's openid. In the development of WeChat public accounts, it is a common practice to obtain openid through user authorization. After the user authorization is completed, we can obtain the user through the following code
 PHP WeChat development: How to implement group message sending records
May 13, 2023 pm 04:31 PM
As WeChat becomes an increasingly important communication tool in people's lives, its agile messaging function is quickly favored by a large number of enterprises and individuals. For enterprises, developing WeChat into a marketing platform has become a trend, and the importance of WeChat development has gradually become more prominent. Among them, the group sending function is even more widely used. So, as a PHP programmer, how to implement group message sending records? The following will give you a brief introduction. 1. Understand the development knowledge related to WeChat public accounts. Before understanding how to implement group message sending records, I
 PHP WeChat development: How to implement customer service chat window management
May 13, 2023 pm 05:51 PM
WeChat is currently one of the social platforms with the largest user base in the world. With the popularity of mobile Internet, more and more companies are beginning to realize the importance of WeChat marketing. When conducting WeChat marketing, customer service is a crucial part. In order to better manage the customer service chat window, we can use PHP language for WeChat development. 1. Introduction to PHP WeChat development PHP is an open source server-side scripting language that is widely used in the field of Web development. Combined with the development interface provided by WeChat public platform, we can use PHP language to conduct WeChat
 PHP WeChat development: How to implement voting function
May 14, 2023 am 11:21 AM
In the development of WeChat public accounts, the voting function is often used. The voting function is a great way for users to quickly participate in interactions, and it is also an important tool for holding events and surveying opinions. This article will introduce you how to use PHP to implement WeChat voting function. Obtain the authorization of the WeChat official account. First, you need to obtain the authorization of the WeChat official account. On the WeChat public platform, you need to configure the API address of the WeChat public account, the official account, and the token corresponding to the public account. In the process of our development using PHP language, we need to use the PH officially provided by WeChat
 PHP WeChat development: How to implement speech recognition
May 13, 2023 pm 09:31 PM
With the popularity of mobile Internet, more and more people are using WeChat as a social software, and the WeChat open platform has also brought many opportunities to developers. In recent years, with the development of artificial intelligence technology, speech recognition technology has gradually become one of the popular technologies in mobile terminal development. In WeChat development, how to implement speech recognition has become a concern for many developers. This article will introduce how to use PHP to develop WeChat applications to implement speech recognition functions. 1. Principles of Speech Recognition Before introducing how to implement speech recognition, let us first understand the language
 How to use PHP for WeChat development?
May 21, 2023 am 08:37 AM
With the development of the Internet and mobile smart devices, WeChat has become an indispensable part of the social and marketing fields. In this increasingly digital era, how to use PHP for WeChat development has become the focus of many developers. This article mainly introduces the relevant knowledge points on how to use PHP for WeChat development, as well as some of the tips and precautions. 1. Development environment preparation Before developing WeChat, you first need to prepare the corresponding development environment. Specifically, you need to install the PHP operating environment and the WeChat public platform


