
Many websites today use the WeChat open platform's code scanning login authentication process. This is equivalent to handing over identity authentication to a more authoritative third party for authentication. There is no need to store the user's password in the application website. . This article introduces how to log in to the website based on QR code scanning on the WeChat open platform.
To use the website's QR code login process, you need to first conduct the developer qualification certification of the WeChat open platform account, submit relevant information, and deliver 300 per year Yuan certification fee.

After authentication and establishing relevant website applications, there will be relevant APPID and APPSecret. These key parameters can be used to obtain relevant user information.
The application details interface of the website application is as follows.
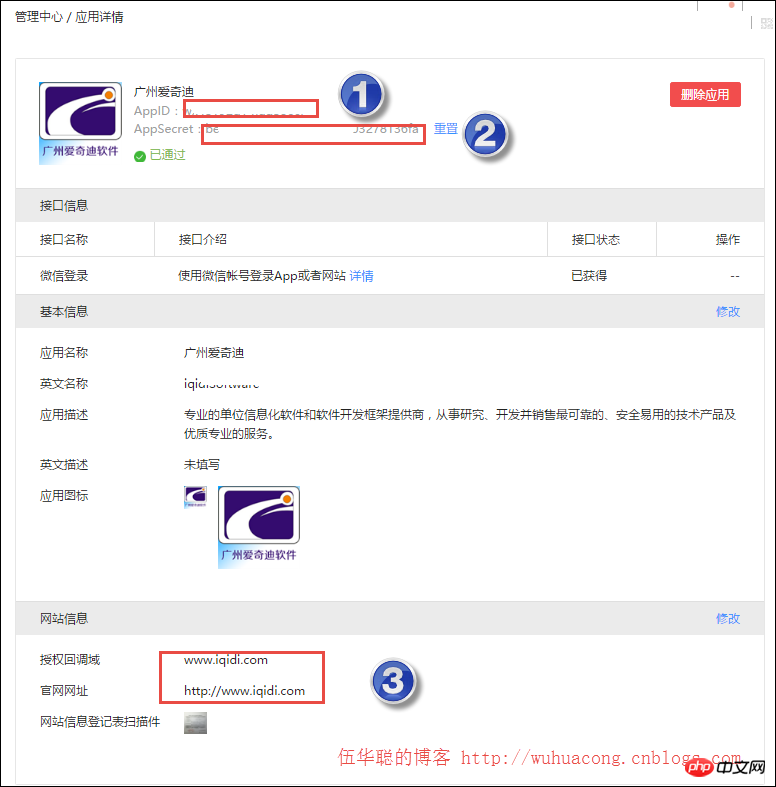
The entire open platform feels like there isn’t much, but it requires paid authentication to use these functions, which doesn’t feel very good.
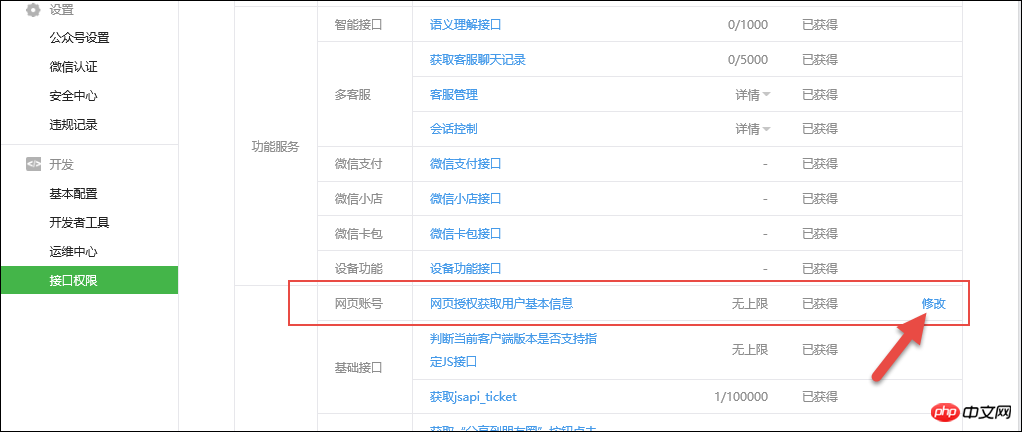
The scan code login we use needs to obtain user information through an open platform, so it is also necessary to set the domain name of the interface for obtaining basic user information, otherwise the information cannot be obtained, which will cause redirection errors.
Set the domain name in the modification entry of [Interface Permissions] [Web Page Account] [Web Page Authorization to Obtain User Basic Information], as shown in the figure below.
#Then enter the domain name of the authorization callback in the pop-up dialog box.
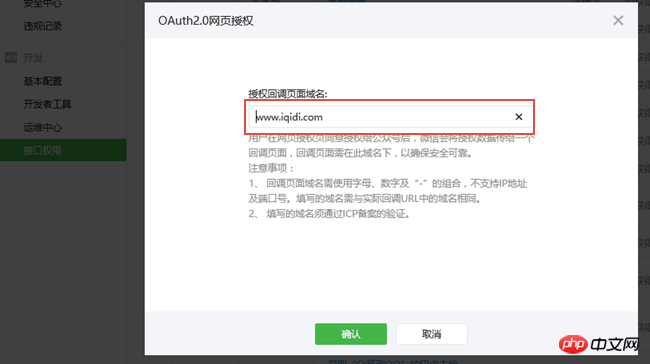
# This setting ensures that user information is obtained.
Website application WeChat login is a WeChat OAuth2.0 authorized login system built based on the OAuth2.0 protocol standard.
Before performing WeChat OAuth2. Before performing WeChat OAuth2.0 authorized login and access, register a developer account on the WeChat open platform, have an approved website application, and obtain the corresponding AppID and AppSecret. After applying for WeChat login and passing the review, you can start the access process.
WeChat OAuth2.0 authorized login allows WeChat users to use WeChat identities to securely log in to third-party applications or websites. After WeChat users authorize login to third-party applications that have accessed WeChat OAuth2.0, the third party can obtain the user The interface call certificate (access_token) can be used to call the WeChat open platform authorization relationship interface through access_token, so as to obtain the basic open information of WeChat users and help users realize basic open functions.
WeChat OAuth2.0 authorized login currently supports authorization_code mode, which is suitable for application authorization with server side. The overall process of this model is:
1. A third party initiates a WeChat authorization login request. After the WeChat user allows authorization of the third-party application, WeChat will launch the application or redirect to the third-party website, and bring the authorization temporary ticket. code parameter; 2. Use the code parameter plus AppID and AppSecret, etc., to exchange for access_token through the API; 3. Make an interface call through access_token to obtain the user's basic data resources or help the user implement basic operations.
Get the access_token sequence diagram:
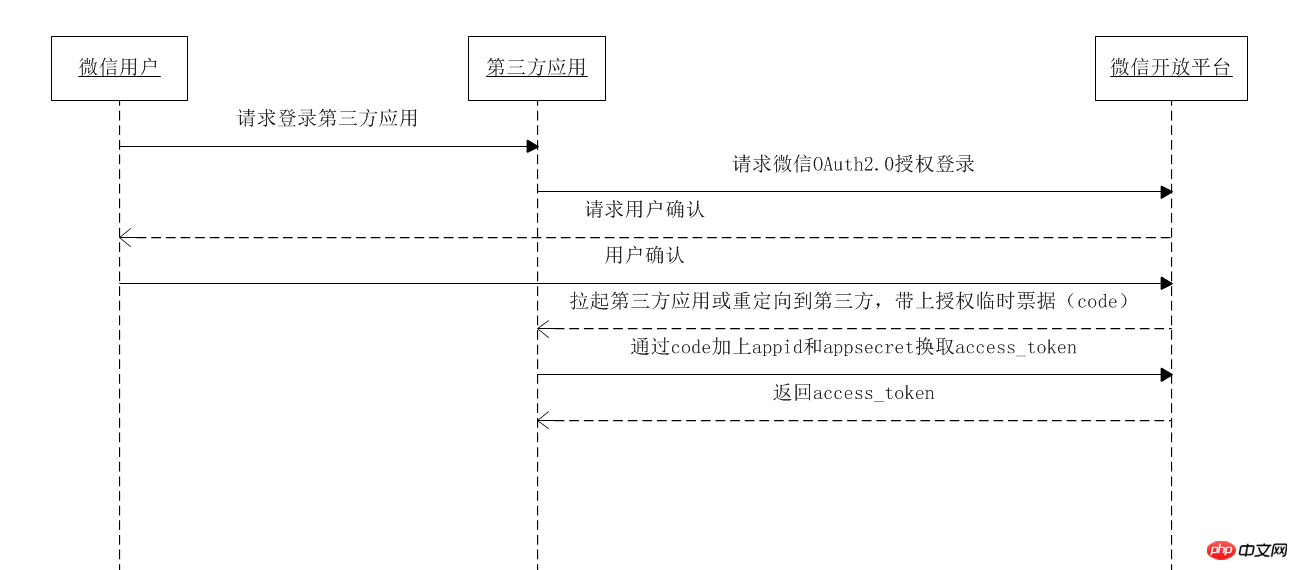
From the above figure we can have a general understanding of the entire scan code login process.
1) Binding of user identity
In order to realize QR code scanning login, we The user's WeChat needs to be bound to the existing system so that when the user scans the QR code, the user's identity can be determined and the automatic login process can be realized.
We can make unified settings in user management, or we can set them after regular user login (username + password). This mainly depends on whether we need to retain the username and password to log in.
For example, you can bind them uniformly in user management, that is, when creating a user, let the user bind to WeChat and obtain the unique identifier of WeChat.
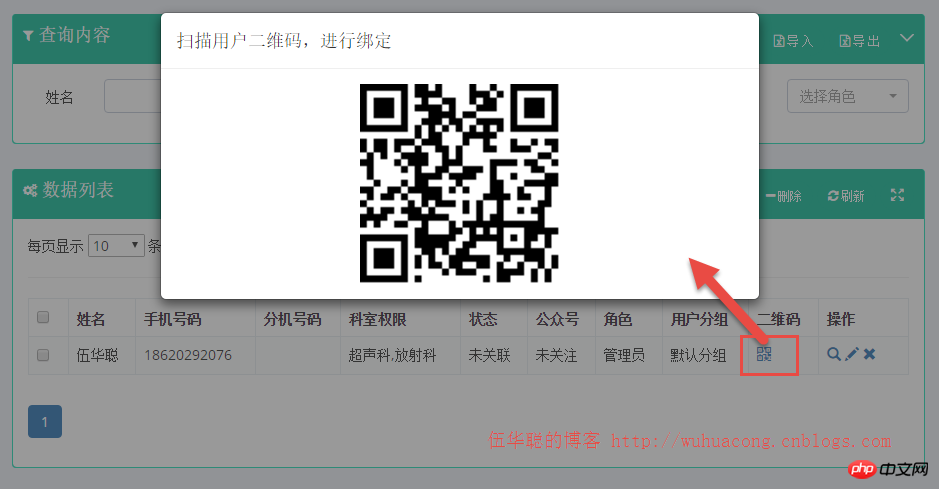
In addition to the login method of retaining the username and password, users can also bind WeChat by themselves after logging in to the system.
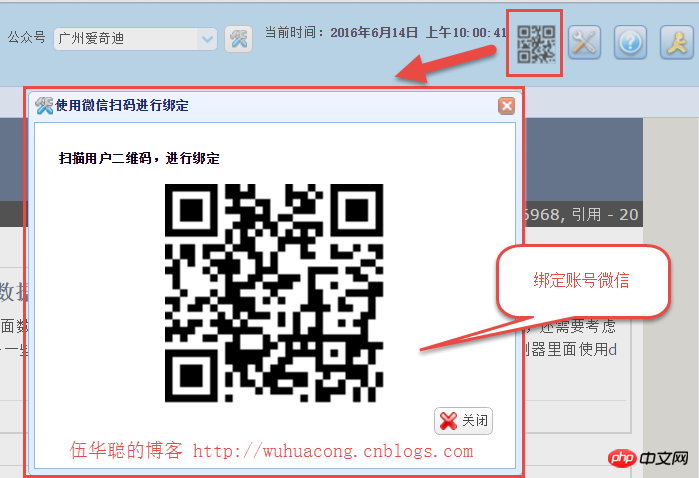
#The above interface is to pop up a layer in a page and then request the QR code to be displayed, as shown in the following interface code.
<p id="pWechat" class="easyui-dialog" style="width:450px;height:350px;padding:10px 20px"
closed="true" resizable="true" modal="true" iconcls="icon-setting">
<p>
<h4>扫描用户二维码,进行绑定</h4>
</p>
<p align="center">
<img id="imgQRcode" alt="使用微信扫码进行绑定" style="height:200px;width:auto" />
</p>
<p align="right">
<a href="javascript:void(0)" class="easyui-linkbutton" iconcls="icon-cancel" onclick="javascript: $('#pWechat').dialog('close')">关闭</a>
</p>
</p>When the above layer is opened, we use JS to dynamically obtain the QR code for display. The specific JS code is as follows.
    //绑定微信登陆
    function BindWechat() {        var url = "http://www.iqidi.com/H5/BindWechat?id=@Session["UserID"]";
        url = encodeURIComponent(url);        $("#imgQRcode").attr("src", "/H5/QR?url=" + url);        //打开绑定窗口
        $("#pWechat").dialog('open').dialog('setTitle', '使用微信扫码进行绑定');
}上面的JS只是做前端的数据请求和显示,具体的QR动作Action其实就是生成扫描二维码的过程,这个二维码其实就是采用通用的方式,来构建一个指向我们绑定账号的地址,从而实现我们绑定账号的判断,二维码的生成过程如下所示。
        /// <summary>
        /// 转换二维码连接为图片格式        /// </summary>
        /// <param name="url">二维码连接</param>
        /// <returns></returns>        [HttpGet]        public ActionResult QR(string url)
        {            //初始化二维码生成工具
            QRCodeEncoder qrCodeEncoder = new QRCodeEncoder();
            qrCodeEncoder.QRCodeEncodeMode = QRCodeEncoder.ENCODE_MODE.BYTE;
            qrCodeEncoder.QRCodeErrorCorrect = QRCodeEncoder.ERROR_CORRECTION.M;
            qrCodeEncoder.QRCodeVersion = 0;
            qrCodeEncoder.QRCodeScale = 4;            //将字符串生成二维码图片
            var image = qrCodeEncoder.Encode(url, Encoding.Default);            //保存为PNG到内存流
            MemoryStream ms = new MemoryStream();
            image.Save(ms, ImageFormat.Png);
            image.Dispose();            return File(ms.ToArray(), "image/Png");
}为了实现用户的绑定,我们需要获取当前用户的身份信息,因此需要在BindWeChat的操作里面做一个转向处理,如下接口所示。
        /// <summary>
        /// 生成绑定微信的地址        /// </summary>
        /// <returns></returns>
public ActionResult BindWechat()这个函数处理里面,我们需要重新定向处理,我们把它定向到BindAccount函数里面,方便获取用户的openid和其他必要的信息。
另外我们基于微信开放平台的应用,建立了一个和微信账号信息的联系,因此创建数据库信息如下所示。
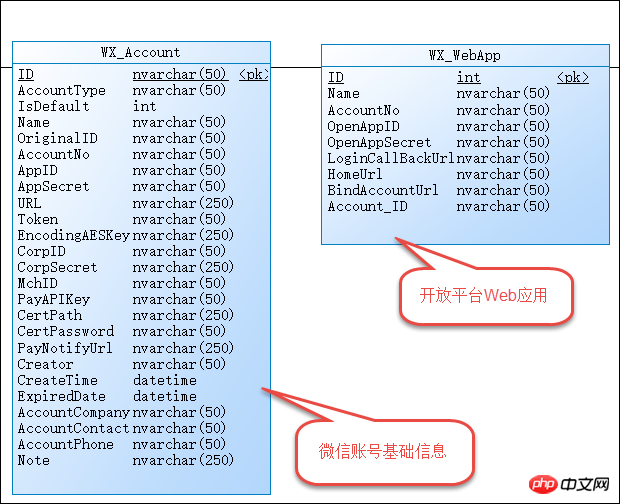
也就是一个具体的开放平台应用对应着一个具体的微信账号,这样我们就可以充分利用配置进行处理了。
上面提到的BindAccount的处理的逻辑就是获取必要的信息,然后在数据库层面对身份信息进行验证,具体代码如下所示。
        /// <summary>
        /// 绑定用户微信号        /// </summary>
        /// <param name="id">账号ID</param>
        /// <returns></returns>
        public ActionResult BindAccount()
        {
            WebAppInfo appInfo = GetWebApp(ConfigData.WebAppId);
            AccountInfo accountInfo = GetAccount(appInfo.AccountNo);            var htResult = GetOpenIdAndUnionId(accountInfo.UniteAppId, accountInfo.UniteAppSecret);//存储openid方便使用
            string openid = htResult["openid"].ToString();            var unionid = htResult["unionid"].ToString();            var userid = Request.QueryString["id"];            var state = Request.QueryString["state"];

            if (!string.IsNullOrEmpty(openid) && !string.IsNullOrEmpty(userid))
            {
                CommonResult result = BLLFactory<User>.Instance.BindUser(openid, unionid, userid.ToInt32());                if (result.Success)
                {                    return BindSuccess();
                }                else
                {                    return BindFail();
                }
            }            else
            {                throw new WeixinException("无法获取openid" + string.Format(", openid:{0}, userid:{1}", openid, userid));
            }
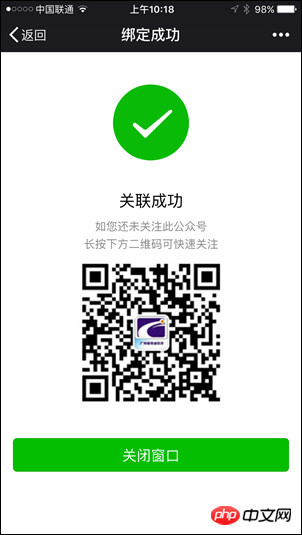
}在绑定的过程,我们需要考虑绑定正确账号,重复绑定其他账号,无效绑定几种情况,如果成功绑定正确账号(可多次处理结果一样),那么得到界面如下所示(这个界面的样式采用了weui的样式)。

上面绑定了账号后,就可以通过扫码进行登录了,扫码回调的时候我们有自己的判断处理,扫码界面如下所示(我们在保留用户名密码登陆的方式外,增加了一个扫码登录的处理)。
如果是Bootstrap的界面效果
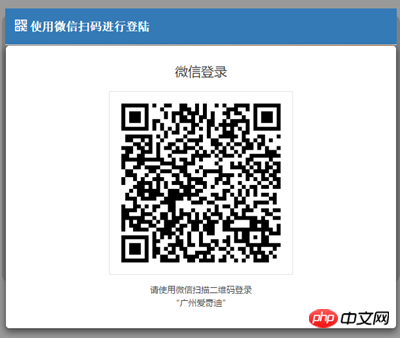
如果是EasyUI的界面效果
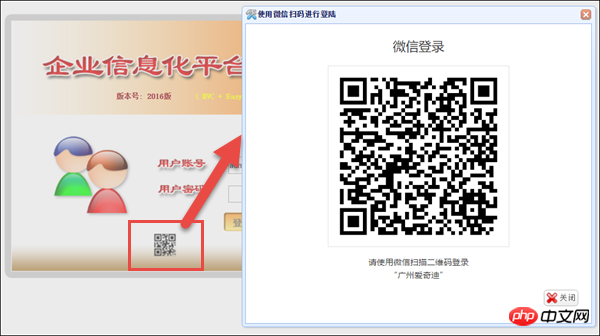
这个和前面的二维码显示规则差不多,不过他们的连接地址是不同的,这个地方用到了开放平台的接口,也就是我们前面提到开放平台认证的接口了。
上面的扫码登录的界面代码如下所示。
<!--二维码扫描登陆的界面层-->
<p id="pWechat" class="easyui-dialog" style="width:550px;height:500px;padding:10px 20px"
closed="true" resizable="true" modal="true" iconcls="icon-setting">
<p id="login_container" align="center">
</p>
<p align="right">
<a href="javascript:void(0)" class="easyui-linkbutton" iconcls="icon-cancel" onclick="javascript: $('#pWechat').dialog('close')">关闭</a>
</p>
</p>上面代码需要引入JS文件,并使用微信JSSDK的API进行显示的。
<!--使用微信扫码进行登陆-->
<script src="http://res.wx.qq.com/connect/zh_CN/htmledition/js/wxLogin.js"></script>
<script language="javascript">
function OpenJSLogin() { var obj = new WxLogin({
id: "login_container",
appid: "@ViewBag.appid",
scope: "snsapi_login",
redirect_uri: "@ViewBag.redirect_uri",
state: "@ViewBag.state",
style: "black",
href: ".impowerBox .qrcode {width: 200px;}"
}); //打开绑定窗口 $("#pWechat").dialog('open').dialog('setTitle', '使用微信扫码进行登陆');
} </script>这个里面的参数,如APPID就是来源我们认证后的开放平台参数。
这些信息我们在MVC控制器后面获取后绑定在ViewBag,方便界面前端的使用。
            //使用JSLogin登陆
            WebAppInfo appInfo = BLLFactory<WebApp>.Instance.FindByID(ConfigData.WebAppId);
            ArgumentValidation.CheckForNullReference(appInfo, "Web应用程序appInfo");            if (appInfo != null)
            {
                ViewBag.appid = appInfo.OpenAppID;
                ViewBag.redirect_uri = appInfo.LoginCallBackUrl;
                ViewBag.state = ConfigData.AuthState;
}其中的redirect_uri是通过数据库获取的LoginCallBackUrl地址,这个地址类似如下格式:www.iqidi.com/H5/callback?uid=iqidiSoftware
也就是我们在开放平台处理返回后进行的回调处理。
通过开放平台的APPID和APPSecret,我们可以获取到对应的接口调用凭证,然后根据接口凭证,以及openid,获得用户的公众平台统一的UnionID,这个标识是我们用户的唯一标识,代码如下所示。
                var result = baseApi.GetAuthToken(appid, appsecret, code);                if (result != null && !string.IsNullOrEmpty(result.openid))
                {
                    openid = result.openid;                    var unionResult = baseApi.GetSnsapiUserInfo(result.access_token, result.openid);

                    ht.Add("openid", openid);
                    ht.Add("unionid", unionResult != null ? unionResult.unionid : "");
}有了unionid我们就可以根据这个标识在我们的用户数据库里面查找对应的用户,如下代码所示。
            //开放平台的OpenID,不是公众号的OpenID,需要转换为unionid
            if (!string.IsNullOrEmpty(openid) && !string.IsNullOrEmpty(unionid))
            {
UserInfo userInfo = BLLFactory<User>.Instance.FindByUnionId(unionid);然后判断我们去到的用户信息是否正确,如下代码所示
                if (userInfo != null)
                {
                    CommonResult loginResult = CheckLogin(userInfo.Name);                    if (!loginResult.Success)
                    {
                        LogHelper.Info(string.Format("用户登陆不成功,{0}", loginResult.ErrorMessage));
                    }                    //登陆成功后的重定向地址
                    var url = appInfo.HomeUrl;  //例如:http://www.iqidi.com/Home
                    return Redirect(url);
}如果不成功,那么我们定向到指定的界面即可。
            //如不成功,最后都统一提示信息
ViewBag.Error = "获取信息失败,登陆错误"; return View("LoginError");如果我们登陆成功后,需要设置一些Session信息或者Cookie信息,那么就可以通过CheckLogin函数进行处理即可。
以上就是我们结合微信开放平台实现微信扫码登录的过程,其中整个过程就是用到了下面几个过程。
JS微信登录主要用途:网站希望用户在网站内就能完成登录,无需跳转到微信域下登录后再返回,提升微信登录的流畅性与成功率。 网站内嵌二维码微信登录JS实现办法:
步骤1:在页面中先引入如下JS文件(支持https):
<script src="http://res.wx.qq.com/connect/zh_CN/htmledition/js/wxLogin.js"></script>
步骤2:在需要使用微信登录的地方实例以下JS对象:
                          var obj = new WxLogin({
                              id:"login_container",
                              appid: "",
                              scope: "",
                              redirect_uri: "",
                              state: "",
                              style: "",
                              href: ""
});通过code获取access_token
api.weixin.qq.com/sns/oauth2/access_token?appid=APPID&secret=SECRET&code=CODE&grant_type=authorization_code
获取access_token后,进行接口调用,
对于接口作用域(scope),能调用的接口有以下:
| Authorization scope (scope) | Interface | Interface description |
|---|---|---|
| snsapi_base | /sns/oauth2/access_token | Exchange code for access_token, refresh_token and authorized scope |
| Refresh or renew access_token using | ||
| Check access_token validity | ||
| /sns/userinfo | Get user personal information |
The above is the detailed content of Detailed explanation of the steps for scanning code login processing developed by WeChat. For more information, please follow other related articles on the PHP Chinese website!
 Kaspersky Firewall
 How to shut down your computer quickly
 Introduction to the use of vscode
 HP notebook sound card driver
 Usage of accept function
 ntuser.dat deleted recovery method
 Free website domain name
 What is the difference between eclipse and idea?
 How to solve the problem that the folder does not have security options


