
CSS Grid layout (also known as "grid") is a system based on two-dimensional grid layout. Its main purpose is to change the way we design user interfaces based on grids. As we know, CSS is always used for styling web pages, but it does not work very well. At the beginning we used tables, then floats, positioning and inline-blocks, but all these methods are essentially hacks and leave a lot of important things to implement. Functional issues (e.g. vertical centering). Although Flexbox can play a certain remedial role, it can only implement simple one-dimensional layout and is not suitable for complex two-dimensional layout (in fact, Flexbox and Grid can be used together to achieve the best results). Grid is the first specially created module of CSS to solve the layout problems we used to use hacks when making websites.

Here are two things that inspired me to create this guide. The first is Rachel Andrew's awesome book - Getting Ready for CSS Grid Layout. This book introduces Grid in detail and clearly. If you want to master the basic knowledge of Grid, I strongly recommend you to buy it. Another big inspiration comes from Chris Coyier's - The Complete Guide to Flexbox. This book is an excellent resource for me to learn about Flebox. I'd also like to add here that when you google "flexbox" a lot of similar resources will come up, but why not just tap into the best ones?
My goal in writing this guide is to standardize the grid concepts based on the latest version. So I won't mention outdated IE syntax again, and I'll try to update this guide regularly as the specification matures.
Getting started with Grid is easy. You just need to define a container element and set display: grid, use the grid-template-columns and grid-template-rows properties to set the size of the grid's columns and rows, and then use the grid-column and grid-row properties to set the size of its child elements. into the grid. Similar to flexbox, the source order of grid items does not matter. To better integrate your grid with media queries, you can place them anywhere in your CSS. Imagine you define an entire page layout and then want to completely rearrange it to fit a different screen width. This can be done with just a few lines of CSS code. Grid is one of the most powerful CSS modules ever introduced.
One important thing to note about Grid is that it is not yet suitable for project use. It is currently a working draft at the W3C and is not supported by default in all browsers. Internet Explorer 10 and 11 already have support, but it does so using an outdated syntax. Now for the sake of demonstration, I recommend you to use Chrome, Opera or Firefox with special flags enabled. In Chrome, navigate to chrome://flags and enable "web experimentation platform features". This method also works with Opera (opera://flags). In Firefox, enable the layout.css.grid.enabled flag.
Here is a table of browser support (I will continue to update it later):
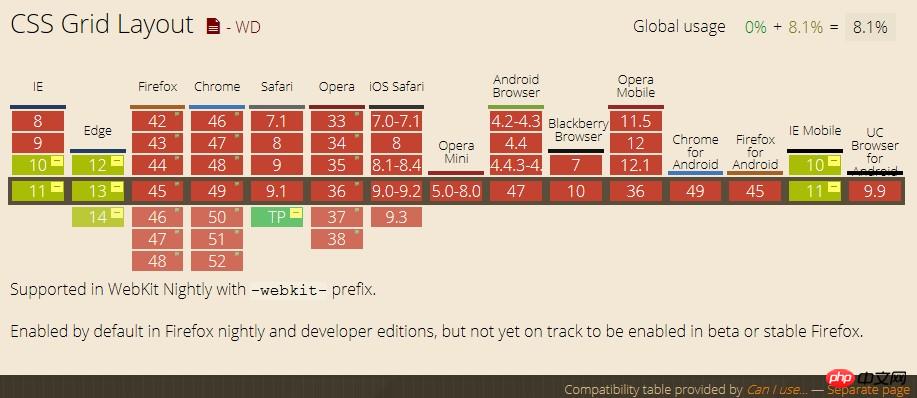
In addition to Microsoft, browser manufacturers seem to want to wait until the Grid specification matures before promoting it. This is a good thing because it means we don't need to worry about learning multiple syntaxes.
Waiting for the use of Grid is only a matter of time. But now you need to start learning it.
Before delving into Grid, we need to understand its related terminology. Because the terms involved here are conceptually similar, you can easily confuse it with another concept if you don't first remember the relevant definitions in the Grid specification. But don't worry, there aren't many properties here.
When an element sets the display: grid attribute, it becomes the parent element of all grid items (Grid Items). In the following example, container is the grid container.
<p class="container">
    <p class="item item-1"></p>
    <p class="item item-2"></p>
    <p class="item item-3"></p>
</p>
The children (e.g. child elements) of the grid container. The item elements here are all grid items, but the sub-item is not included.
<p class="container">
    <p class="item"></p>
    <p class="item">
        <p class="sub-item"></p>
    </p>
    <p class="item"></p>
</p>
The dividing lines form the structure of the grid. They can be vertical ("column gridlines") or horizontal ("row gridlines"), and exist on either side of a row or column. The yellow line in the image below is an example of column grid lines.

The space between two adjacent grid lines. You can think of them as rows or columns of a grid. Shown below is the grid track between the second and third rows of grid lines.
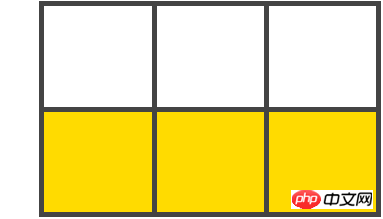
两个相邻的行和两个相邻的列之间的网格线空间。它是网格的一个"单位"。下面图片所示的是行网格线 1 和 2 与列网格线 2 和 3 之间的网格单元格。

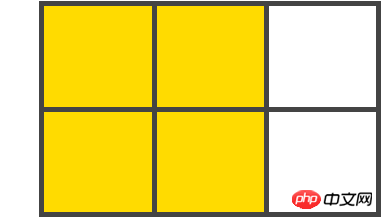
四条网格线所包围的所有空间。网格区域可由任意数量的网格单元格组成。下面图片所示的是行网格线 1 和 3 和列网格线 1 和 3 之间的网格区域。
定义一个元素成为网格容器,并对其内容建立一个网格格式的上下文。
grid: 产生一个块级的网格
inline-grid: 产生内联级网格
.container{
    display: grid | inline-grid
}注: column, float, clear, 和 vertical-align 元素对网格容器不起作用。
利用以空格分隔的值定义网格的列和行。值的大小代表轨道的大小,并且它们之间的空格表示网格线。
subgrid - 如果你的网格容器本身就是一个网格项(即嵌套网格),你可以使用此属性指定行和列的大小继承于父元素而不是自身指定。
.container{
    grid-template-columns: <track-size> ... | <line-name> <track-size> ... | subgrid;
    grid-template-rows: <track-size> ... | <line-name> <track-size> ... | subgrid;
}当你在值之间留有空格时,网络线就会自动分配数值名称:
.container{
    grid-template-columns: 40px 50px auto 50px 40px;
    grid-template-rows: 25% 100px auto;
}
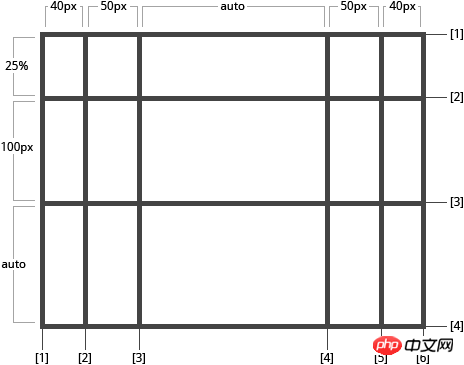
但是你也可以显示命名,请参考下面括号语法中的名称命名方式:
.container{
    grid-template-columns: [first] 40px [line2] 50px [line3] auto [col4-start] 50px [five] 40px [end];
    grid-template-rows: [row1-start] 25% [row1-end] 100% [third-line] auto [last-line];
}
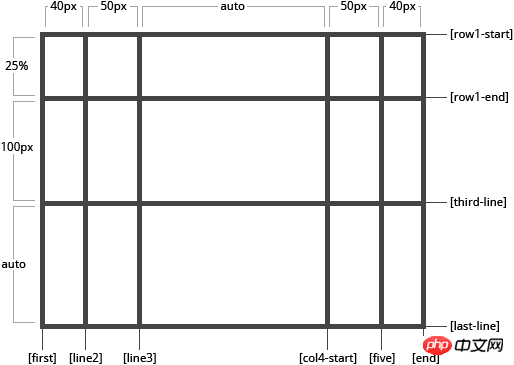
请注意,一条网格线可以具有有多个名称。例如,这里的第二行将有两个名字: row1-end 和 row2-start:
.container{
    grid-template-rows: [row1-start] 25% [row1-end row2-start] 25% [row2-end];
}如果你的定义中包含重复的部分,你可以使用 repeat() 表示法进行精简:
.container{
    grid-template-columns: repeat(3, 20px [col-start]) 5%;
}等效于:
.container{
    grid-template-columns: 20px [col-start] 20px [col-start] 20px [col-start] 5%;
}fr 单位允许你将一个轨道大小设置为网格容器内自由空间的一小部分。如下所示,每个网格项就会占据网格容器宽度的三分之一:
.container{
    grid-template-columns: 1fr 1fr 1fr;
}这里自由空间表示除去非弹性项以后剩余的空间。在此示例中的 fr 单位的可用空间表示减去50px以后的空间大小:
.container{
    grid-template-columns: 1fr 50px 1fr 1fr;
}使用grid-area属性定义网格区域名称,从而定义网格模板。网格区域重复的名称就会导致内容跨越这些单元格。句点表示一个空单元格。语法本身提供了一种可视化的网格结构。
.: 句点表示一个空单元格
none: 无网格区域被定义
.container{
    grid-template-areas: "<grid-area-name> | . | none | ..."
                      "..."
}.item-a{
grid-area: header;
}
.item-b{
grid-area: main;
}
.item-c{
grid-area: sidebar;
}
.item-d{
grid-area: footer;
}
.container{
grid-template-columns: 50px 50px 50px 50px;
grid-template-rows: auto;
grid-template-areas: "header header header header"
"main main . sidebar"
"footer footer footer footer"
}这将创建一个四列三行的网格。最上面的一行为header区域。中间一行由两个main区域,一个空单元格和一个sidebar区域。最后一行是footer区域。
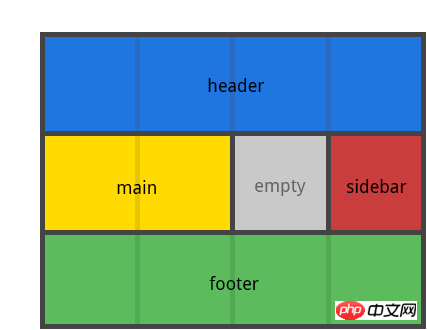
你所声明的每一行都需要具有相同数目的单元格。
你可以使用任意数量的句点(.)声明单个空单元格。只要句点之间没有空格就表示一个空单元格。
注意,你只是使用此语法进行网格区域命名,而不是网格线命名。当你使用此语法时,区域两边的线就会得到自动命名。如果网格区域名称为foo,则其行线和列线的名称就将为foo-start,最后一行线及其最后一列线的名字就会为foo-end。这意味着一些线就可能具有多个名称,如上面示例中所示,拥有三个名称: header-start, main-start, 以及footer-start。
指定网格线的大小。你可以把它想像成在行/列之间设置间距宽度。
.container{
    grid-column-gap: <line-size>;
    grid-row-gap: <line-size>;
}.container{
grid-template-columns: 100px 50px 100px;
grid-template-rows: 80px auto 80px;
grid-column-gap: 10px;
grid-row-gap: 15px;
}
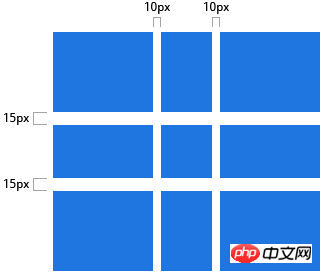
间距仅仅在列/行之间产生,而不会在边缘区。
grid-column-gap 和 grid-row-gap的简写值。
.container{
    grid-gap: <grid-column-gap> <grid-row-gap>;
}.container{
grid-template-columns: 100px 50px 100px;
grid-template-rows: 80px auto 80px;
grid-gap: 10px 15px;
}如果没有指定grid-row-gap属性的值,默认与grid-column-gap属性值相同
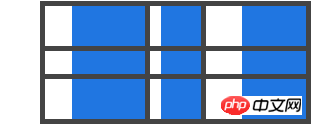
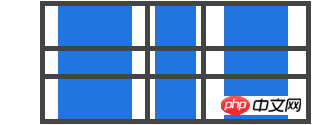
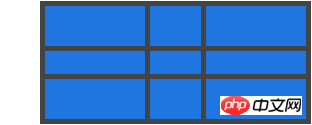
沿列轴对齐网格项中的内容(相反于align-item属性定义的沿行轴对齐)。此值适用于容器内所有的网格项。
start: 内容与网格区域的左端对齐
end: 内容与网格区域的右端对齐
center: 内容处于网格区域的中间位置
stretch: 内容宽度占据整个网格区域空间(默认值)
.container{
    justify-items: start | end | center | stretch;
}.container{
justify-items: start;
}
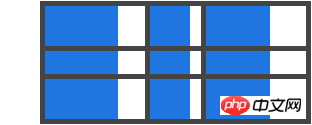
.container{
    justify-items: end;
}
.container{
    justify-items: center;
}
.container{
    justify-items: stretch;
}
这也可以使用justify-self属性对各个网格项进行设置。
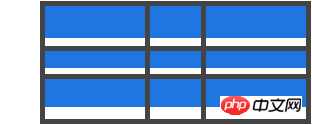
沿行轴对齐网格项中的内容(相反于justify-item属性定义的沿列轴对齐)。此值适用于容器内所有的网格项。
start: 内容与网格区域的顶端对齐
end: 内容与网格区域的底部对齐
center: 内容处于网格区域的中间位置
stretch: 内容高度占据整个网格区域空间(默认值)
.container{
    align-items: start | end | center | stretch;
}.container{
align-items: start;
}
.container{
    align-items: end;
}
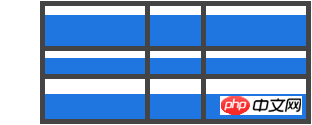
.container{
    align-items: center;
}
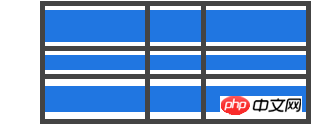
.container{
    align-items: stretch;
}
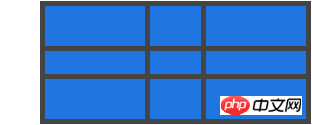
这也可以使用align-self属性对各个网格项进行设置。
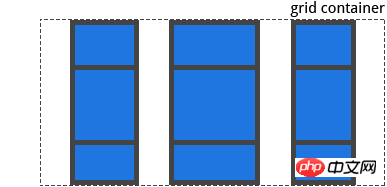
当你使用px这种非响应式的单位对你的网格项进行大小设置时,就有可能出现一种情况--你的网格大小可能小于其网格容器的大小。在这种情况下,你就可以设置网格容器内网格的对齐方式。此属性会将网格沿列轴进行对齐(相反于align-content属性定义的沿行轴对齐)。
start: 网格与网格容器的左端对齐
end: 网格与网格容器的右端对齐
center: 网格处于网格容器的中间
stretch: 调整网格项的大小,使其宽度填充整个网格容器
space-around: 在网格项之间设置偶数个空格间隙,其最边缘间隙大小为中间空格间隙大小的一半
space-between: 在网格项之间设置偶数个空格间隙,其最边缘不存在空格间隙
space-evenly: 在网格项之间设置偶数个空格间隙,同样适用于最边缘区域
.container{
    justify-content: start | end | center | stretch | space-around | space-between | space-evenly;
}.container{
justify-content: start;
}
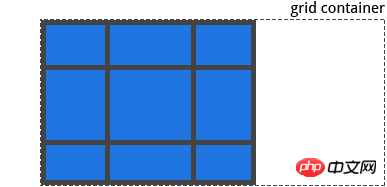
.container{
    justify-content: end;
}
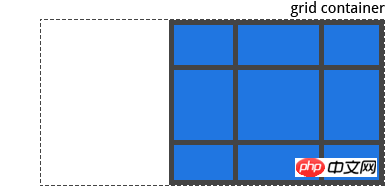
.container{
    justify-content: center;
}
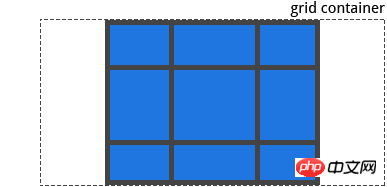
.container{
    justify-content: stretch;
}
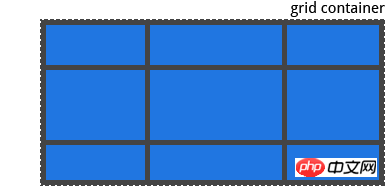
.container{
    justify-content: space-around;
}
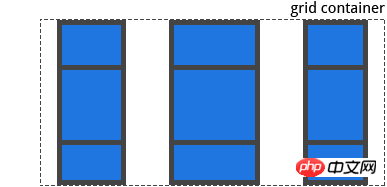
.container{
    justify-content: space-between;
}
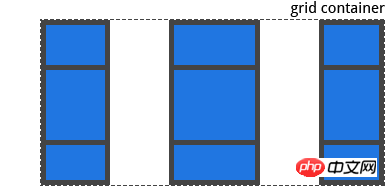
.container{
  justify-content: space-evenly;
}
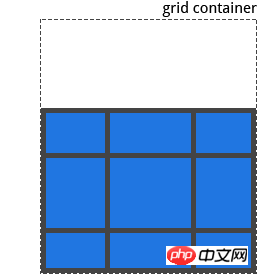
当你使用px这种非响应式的单位对你的网格项进行大小设置时,就有可能出现一种情况--你的网格大小可能小于其网格容器的大小。在这种情况下,你就可以设置网格容器内网格的对齐方式。此属性会将网格沿行轴进行对齐(相反于justify-content属性定义的沿列轴对齐)。
start: 网格与网格容器的顶端对齐
end: 网格与网格容器的底部对齐
center: 网格处于网格容器的中间
stretch: 调整网格项的大小,使其高度填充整个网格容器
space-around: 在网格项之间设置偶数个空格间隙,其最边缘间隙大小为中间空格空隙大小的一半
space-between: 在网格项之间设置偶数个空格间隙,其最边缘不存在空格间隙
space-evenly: 在网格项之间设置偶数个空格间隙,同样适用于最边缘区域
.container{
    align-content: start | end | center | stretch | space-around | space-between | space-evenly;
}.container{
align-content: start;
}
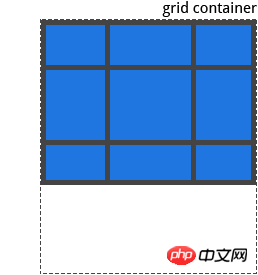
.container{
    align-content: end;
}
.container{
    align-content: center;
}
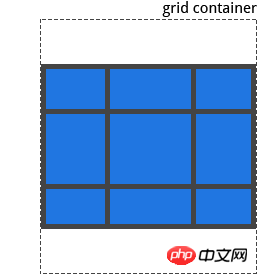
.container{
    align-content: stretch;
}
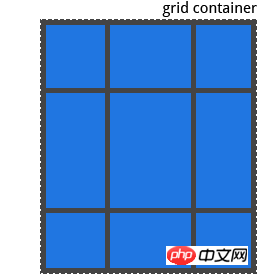
.container{
    align-content: space-around;
}
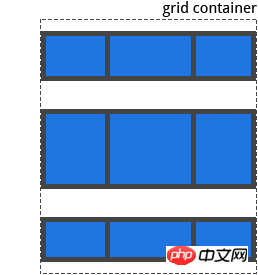
.container{
    align-content: space-between;
}
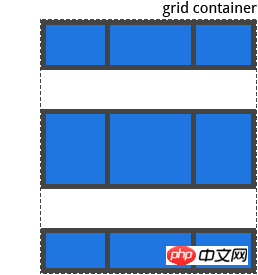
.container{
    align-content: space-evenly;
}

指定任何自动生成的网格轨道(隐式网格跟踪)的大小。当你显式定位行或列(使用 grid-template-rows/grid-template-columns属性)时,就会产生超出定义范围内的隐式网格轨道。
.container{
    grid-auto-columns: <track-size> ...;
    grid-auto-rows: <track-size> ...;
}为了说明隐式网格轨道是如何被创造出来的,请思考如下代码:
.container{
    grid-template-columns: 60px 60px;
    grid-template-rows: 90px 90px
}
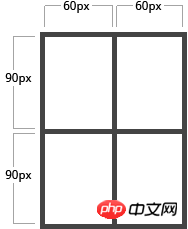
这里创建了一个2 x 2 的网格。
但是现在你想象你使用grid-column 和 grid-row 来定位网格项,如下所示:
.item-a{
    grid-column: 1 / 2;
    grid-row: 2 / 3;
}
.item-b{
    grid-column: 5 / 6;
    grid-row: 2 / 3;
}
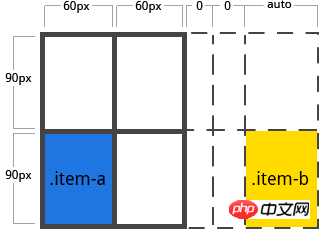
这里我们定义.item b开始于列线 5 并结束于在列线 6,但是我们从来没有定义列线 5 或 6。因为我们引用不存在的线,宽度为0的隐式轨道的就会被创建用来填补空白。我们可以使用grid-auto-columns 和 grid-auto-rows属性来设置这些隐式轨道的宽度:
.container{
    grid-auto-columns: 60px;
}
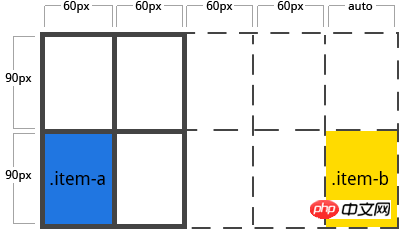
如果你不显式的在网格中放置网格项,自动布局算法就会自动踢出此网格项。此属性用来控制自动布局算法的工作原理。
row: 告诉自动布局算法填充每一行,必要时添加新行
column: 告诉自动布局算法填充每一列,必要时添加新列
dense: 告诉自动布局算法试图填补网格中之前较小的网格项留有的空白
.container{
    grid-auto-flow: row | column | row dense | column dense
}注意:dense值可能会导致更改网格项的顺序。
考虑如下HTMl代码:
<section class="container">
    <p class="item-a">item-a</p>
    <p class="item-b">item-b</p>
    <p class="item-c">item-c</p>
    <p class="item-d">item-d</p>
    <p class="item-e">item-e</p>
</section>
这里定义了一个两列五行的网格,并将 grid-auto-flow属性设置为row(即默认值):
.container{
    display: grid;
    grid-template-columns: 60px 60px 60px 60px 60px;
    grid-template-rows: 30px 30px;
    grid-auto-flow: row;
}将网格项放置在网格中时只需要其中的两个网格项:
.item-a{
    grid-column: 1;
    grid-row: 1 / 3;
}
.item-e{
    grid-column: 5;
    grid-row: 1 / 3;
}因为我们将grid-auto-flow属性设置为了row,所以我们的网格看起来会像这个样子。注意我们我们没有对其进行设置的三个网格项(item-b, item-c and item-d),会沿行轴进行布局。

如果我们将grid-auto-flow属性设置为 column,item-b, item-c 和 item-d 就会沿列轴进行布局。
.container{
    display: grid;
    grid-template-columns: 60px 60px 60px 60px 60px;
    grid-template-rows: 30px 30px;
    grid-auto-flow: column;
}

在一行声明中设置一下所有属性的简写形式:grid-template-rows, grid-template-columns, grid-template-areas, grid-auto-rows, grid-auto-columns, 以及 grid-auto-flow。它将 grid-column-gap 和 grid-row-gap属性设置为初始值,即使它们不能显示的设置此属性。
none: 将所有的子属性设置为初始值
subgrid: 将grid-template-rows 和 grid-template-columns属性值设置为subgrid,其余子属性设置为初始值
.container{
    grid: none | subgrid | <grid-template-rows> / <grid-template-columns> | <grid-auto-flow> [<grid-auto-rows> [/ <grid-auto-columns>]];
}下面两个代码块是等效的:
.container{
    grid: 200px auto / 1fr auto 1fr;
}

.container{
    grid-template-rows: 200px auto;
    grid-template-columns: 1fr auto 1fr;
    grid-template-areas: none;
}同样,下面的两个代码块也是等效的:
.container{
    grid: column 1fr / auto;
}

.container{
    grid-auto-flow: column;
    grid-auto-rows: 1fr;
    grid-auto-columns: auto;
}它还接受一次性设置所有属性,更复杂但非常方便的语法。指定grid-template-areas, grid-auto-rows 和 grid-auto-columns属性,其他所有子属性都将设置为其初始值。你现在所做的是在其网格区域内,指定网格线名称和内联轨道大小。下面是最简单的描述:
.container{
    grid: [row1-start] "header header header" 1fr [row1-end]
          [row2-start] "footer footer footer" 25px [row2-end]
          / auto 50px auto;
}等效于:
.container{
    grid-template-areas: "header header header"
                         "footer footer footer";
    grid-template-rows: [row1-start] 1fr [row1-end row2-start] 25px [row2-end];
    grid-template-columns: auto 50px auto;
}使用特定的网格线确定网格项在网格内的位置。grid-column-start/grid-row-start 属性表示网格项的网格线的起始位置,grid-column-end/grid-row-end属性表示网格项的网格线的终止位置。
span
span
auto: 表明自动定位,自动跨度或者默认跨度之一
.item{
    grid-column-start: <number> | <name> | span <number> | span <name> | auto
    grid-column-end: <number> | <name> | span <number> | span <name> | auto
    grid-row-start: <number> | <name> | span <number> | span <name> | auto
    grid-row-end: <number> | <name> | span <number> | span <name> | auto
}.item-a{
grid-column-start: 2;
grid-column-end: five;
grid-row-start: row1-start
grid-row-end: 3
}
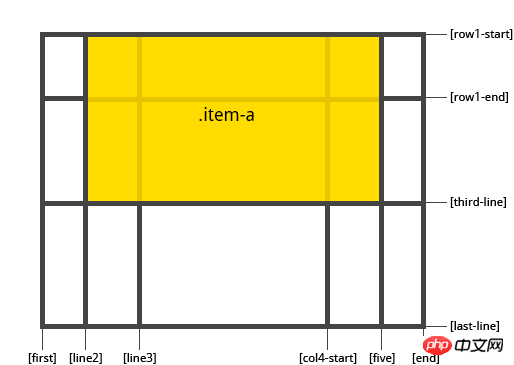
.item-b{
    grid-column-start: 1;
    grid-column-end: span col4-start;
    grid-row-start: 2
    grid-row-end: span 2
}
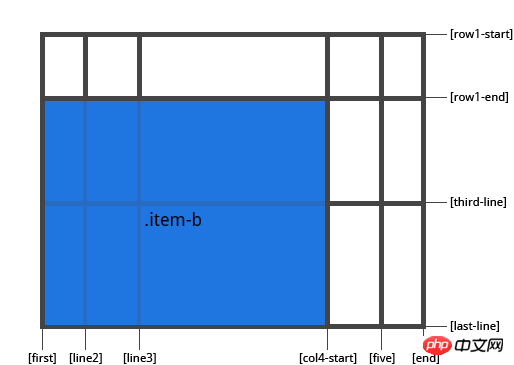
如果没有声明grid-column-end/grid-row-end属性,默认情况下网格项的跨度为1。
网格项可以互相重叠。可以使用z-index属性控制堆叠顺序。
grid-column-start + grid-column-end, 和 grid-row-start + grid-row-end属性分别的简写形式。
.item{
    grid-column: <start-line> / <end-line> | <start-line> / span <value>;
    grid-row: <start-line> / <end-line> | <start-line> / span <value>;
}.item-c{
grid-column: 3 / span 2;
grid-row: third-line / 4;
}

如果没有声明结束网格线值,默认网格轨道跨度为1.
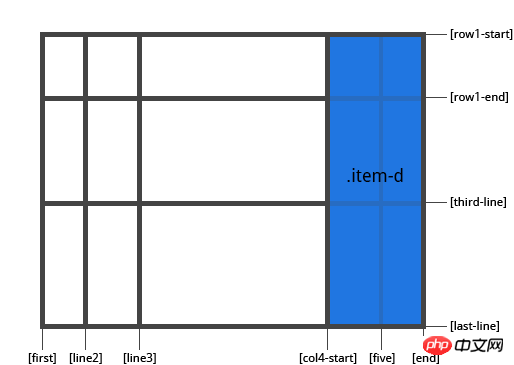
给网格项进行命名以便于模板使用grid-template-areas属性创建时可以加以引用。另外也可以被grid-row-start + grid-column-start + grid-row-end + grid-column-end属性更为简洁的加以引用。
.item{
    grid-area: <name> | <row-start> / <column-start> / <row-end> / <column-end>;
}对网格项进行命名的一种方式:
.item-d{
    grid-area: header
}grid-row-start + grid-column-start + grid-row-end + grid-column-end属性的一种简写方式:
.item-d{
    grid-area: 1 / col4-start / last-line / 6
}
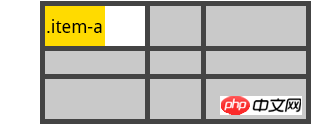
沿列轴对齐网格项中的内容(相反于align-item属性定义的沿行轴对齐)。此值适用于单一网格项中的内容。
start: 内容与网格区域的左端对齐
end: 内容与网格区域的右端对齐
center: 内容处于网格区域的中间位置
stretch: 内容宽度占据整个网格区域空间(默认值)
.item{
    justify-self: start | end | center | stretch;
}.item-a{
justify-self: start;
}
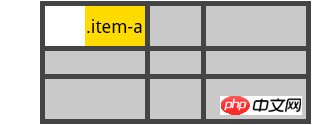
.item-a{
    justify-self: end;
}
.item-a{
    justify-self: center;
}
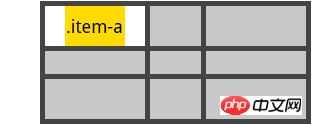
.item-a{
    justify-self: stretch;
}
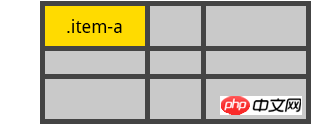
设置网格中所有网格项的对齐方式,可以使用网格容器上的justify-items属性。
沿行轴对齐网格项中的内容(相反于justify-item属性定义的沿列轴对齐)。此值适用于单一网格项中的内容。
start: 内容与网格区域的顶端对齐
end: 内容与网格区域的底部对齐
center: 内容处于网格区域的中间位置
stretch: 内容高度占据整个网格区域空间(默认值)
.item{
    align-self: start | end | center | stretch;
}.item-a{
align-self: start;
}
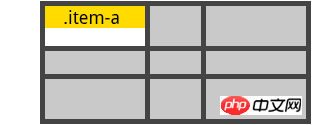
.item-a{
    align-self: end;
}
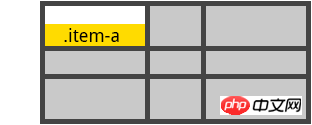
.item-a{
    align-self: center;
}
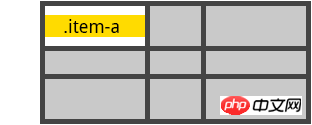
.item-a{
    align-self: stretch;
}
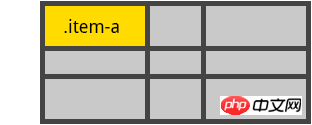
使网格中所有的网格项对齐,可以使用网格容器上的align-items属性。
The above is the detailed content of CSS Grid Layout Guide. For more information, please follow other related articles on the PHP Chinese website!


