
 WeChat Applet
WeChat Development
Detailed explanation of java code for springmvc mybatis project structure developed by WeChat
WeChat Applet
WeChat Development
Detailed explanation of java code for springmvc mybatis project structure developed by WeChat
Detailed explanation of java code for springmvc mybatis project structure developed by WeChat

This article mainly introduces in detail the second step of WeChat development preparation, the construction of springmvc and mybatis project structure, which has certain reference value. Interested friends can refer to the previous one.
The article talks about how to build a maven project in MyEclipse. Here we will continue to introduce how to introduce our commonly used javaweb framework-SpringMVC into the built basic maven project!
①Introduce dependencies into the pom.xml file in the established maven project. The code is as follows:
<project xmlns="http://maven.apache.org/POM/4.0.0" xmlns:xsi="http://www.w3.org/2001/XMLSchema-instance"
 xsi:schemaLocation="http://maven.apache.org/POM/4.0.0 http://maven.apache.org/maven-v4_0_0.xsd">
 <modelVersion>4.0.0</modelVersion>
 <groupId>wechat.cuiyongzhi.com</groupId>
 <artifactId>wechat</artifactId>
 <packaging>war</packaging>
 <version>0.0.1-SNAPSHOT</version>
 <name>wechat</name>
 <url>http://maven.apache.org</url>
 <dependencies>
  <!-- spring -->
  <dependency>
   <groupId>org.springframework</groupId>
   <artifactId>spring-test</artifactId>
   <version>3.2.0.RELEASE</version>
  </dependency>
  <dependency>
   <groupId>org.springframework</groupId>
   <artifactId>spring-webmvc</artifactId>
   <version>3.2.0.RELEASE</version>
  </dependency>
  <dependency>
   <groupId>org.springframework</groupId>
   <artifactId>spring-core</artifactId>
   <version>3.2.0.RELEASE</version>
  </dependency>

  <!-- mybatis -->
  <dependency>
   <groupId>org.mybatis</groupId>
   <artifactId>mybatis</artifactId>
   <version>3.1.1</version>
  </dependency>
  <dependency>
   <groupId>org.mybatis</groupId>
   <artifactId>mybatis-spring</artifactId>
   <version>1.1.1</version>
  </dependency>

  <!-- mysql -->
  <dependency>
   <groupId>mysql</groupId>
   <artifactId>mysql-connector-java</artifactId>
   <version>5.1.21</version>
  </dependency>

  <!-- junit测试 -->
  <dependency>
   <groupId>junit</groupId>
   <artifactId>junit</artifactId>
   <version>4.11</version>
   <scope>test</scope>
  </dependency>

  <!-- mysql阿里连接池druid -->
  <dependency>
   <groupId>com.alibaba</groupId>
   <artifactId>druid</artifactId>
   <version>0.2.9</version>
  </dependency>

  <!-- spring aop包 -->
  <dependency>
   <groupId>org.aspectj</groupId>
   <artifactId>aspectjweaver</artifactId>
   <version>1.7.1</version>
  </dependency>

  <!-- json包 -->
  <dependency>
   <groupId>com.alibaba</groupId>
   <artifactId>fastjson</artifactId>
   <version>1.2.7</version>
  </dependency>

  <!-- 文件上传包 -->
  <dependency>
   <groupId>commons-fileupload</groupId>
   <artifactId>commons-fileupload</artifactId>
   <version>1.2.2</version>
  </dependency>

  <!--servlet包 -->
  <dependency>
   <groupId>javax.servlet</groupId>
   <artifactId>servlet-api</artifactId>
   <version>3.0-alpha-1</version>
  </dependency>

  <dependency>
   <groupId>javax.servlet.jsp</groupId>
   <artifactId>jsp-api</artifactId>
   <version>2.1</version>
   <scope>provided</scope>
  </dependency>

  <dependency>
   <groupId>javax.servlet</groupId>
   <artifactId>jstl</artifactId>
   <version>1.2</version>
  </dependency>

  <!-- 日志包 -->
  <dependency>
   <groupId>log4j</groupId>
   <artifactId>log4j</artifactId>
   <version>1.2.17</version>
  </dependency>
 </dependencies>
 <build>
  <finalName>wechat</finalName>
 </build>
</project>
②Modify the web.xml file under the project path as follows:
<?xml version="1.0" encoding="UTF-8"?>
<web-app xmlns:xsi="http://www.w3.org/2001/XMLSchema-instance"
 xmlns:web="http://java.sun.com/xml/ns/javaee" xmlns="http://java.sun.com/xml/ns/javaee"
 xsi:schemaLocation="http://java.sun.com/xml/ns/javaee http://java.sun.com/xml/ns/javaee/web-app_3_0.xsd
 http://www.springframework.org/schema/websocket http://www.springframework.org/schema/websocket/spring-websocket.xsd"
 id="WebApp_ID" version="3.0">
 <display-name>com.cuiyongzhi.wechat</display-name>
 <context-param>
  <param-name>contextConfigLocation</param-name>
  <param-value>classpath:spring.xml,classpath:spring-mybatis.xml</param-value>
  <!-- ,classpath:spring-quartz.xml 用于做任务调度 任务定时都可以 -->
 </context-param>
 <context-param>
  <param-name>log4jConfigLocation</param-name>
  <param-value>classpath:log4j.properties</param-value>
 </context-param>
 <listener>
  <listener-class>org.springframework.web.util.Log4jConfigListener</listener-class>
 </listener>
 <context-param>
  <param-name>spring.profiles.active</param-name>
  <param-value>dev</param-value>
 </context-param>
 <context-param>
  <param-name>spring.profiles.default</param-name>
  <param-value>dev</param-value>
 </context-param>
 <context-param>
  <param-name>spring.liveBeansView.mbeanDomain</param-name>
  <param-value>dev</param-value>
 </context-param>
 <filter>
  <filter-name>encodingFilter</filter-name>
  <filter-class>org.springframework.web.filter.CharacterEncodingFilter</filter-class>
  <init-param>
   <param-name>encoding</param-name>
   <param-value>UTF-8</param-value>
  </init-param>
  <init-param>
   <param-name>forceEncoding</param-name>
   <param-value>true</param-value>
  </init-param>
 </filter>
 <listener>
  <description>spring监听器</description>
  <listener-class>org.springframework.web.context.ContextLoaderListener</listener-class>
 </listener>
 <!-- 防止内存溢出 -->
 <listener>
  <listener-class>org.springframework.web.util.IntrospectorCleanupListener</listener-class>
 </listener>
 <servlet>
  <description>spring mvc servlet</description>
  <servlet-name>springMvc</servlet-name>
  <servlet-class>org.springframework.web.servlet.DispatcherServlet</servlet-class>
  <init-param>
   <description>spring mvc 配置文件</description>
   <param-name>contextConfigLocation</param-name>
   <param-value>classpath:spring-mvc.xml</param-value>
  </init-param>
  <load-on-startup>1</load-on-startup>
 </servlet>
 <servlet>
  <servlet-name>interface_url-init_servlet</servlet-name>
  <servlet-class>com.cuiyongzhi.web.start.InterfaceUrlIntiServlet</servlet-class>
  <load-on-startup>1</load-on-startup>
 </servlet>
 <servlet-mapping>
  <servlet-name>springMvc</servlet-name>
  <url-pattern>/</url-pattern>
 </servlet-mapping>

 <welcome-file-list>
  <welcome-file>/index.jsp</welcome-file>
 </welcome-file-list>
 <session-config>
  <session-timeout>300</session-timeout>
 </session-config>

 <error-page>
  <error-code>404</error-code>
  <location>/WEB-INF/error/error.jsp</location>
 </error-page>

 <error-page>
  <error-code>500</error-code>
  <location>/WEB-INF/error/error.jsp</location>
 </error-page>

 <servlet-mapping>
  <servlet-name>default</servlet-name>
  <url-pattern>*.css</url-pattern>
 </servlet-mapping>

 <servlet-mapping>
  <servlet-name>default</servlet-name>
  <url-pattern>*.gif</url-pattern>
 </servlet-mapping>

 <servlet-mapping>
  <servlet-name>default</servlet-name>
  <url-pattern>*.jpg</url-pattern>
 </servlet-mapping>

 <servlet-mapping>
  <servlet-name>default</servlet-name>
  <url-pattern>*.js</url-pattern>
 </servlet-mapping>

 <servlet-mapping>
  <servlet-name>default</servlet-name>
  <url-pattern>*.xhtml</url-pattern>
 </servlet-mapping>

 <servlet-mapping>
  <servlet-name>default</servlet-name>
  <url-pattern>*.html</url-pattern>
 </servlet-mapping>

 <filter>
  <filter-name>DruidWebStatFilter</filter-name>
  <filter-class>com.alibaba.druid.support.http.WebStatFilter</filter-class>
  <init-param>
   <param-name>exclusions</param-name>
   <param-value>*.js,*.gif,*.jpg,*.png,*.css,*.ico,/druid/*</param-value>
  </init-param>
 </filter>
 <filter-mapping>
  <filter-name>DruidWebStatFilter</filter-name>
  <url-pattern>/*</url-pattern>
 </filter-mapping>
 <servlet>
  <servlet-name>DruidStatView</servlet-name>
  <servlet-class>com.alibaba.druid.support.http.StatViewServlet</servlet-class>
  <init-param>
   <!-- 允许清空统计数据 -->
   <param-name>resetEnable</param-name>
   <param-value>true</param-value>
  </init-param>
  <init-param>
   <!-- 用户名 -->
   <param-name>loginUsername</param-name>
   <param-value>cuiyongzhi</param-value>
  </init-param>
  <init-param>
   <!-- 密码 -->
   <param-name>loginPassword</param-name>
   <param-value>123456</param-value>
  </init-param>
 </servlet>
 <servlet-mapping>
  <servlet-name>DruidStatView</servlet-name>
  <url-pattern>/druid/*</url-pattern>
 </servlet-mapping>
 <!-- 访问监控页面:http://ip:port/projectName/druid/index.html -->

 <jsp-config>
  <jsp-property-group>
   <display-name>jspConfiguration</display-name>
   <url-pattern>*.jsp</url-pattern>
   <el-ignored>false</el-ignored>
   <scripting-invalid>false</scripting-invalid>
   <include-prelude>/WEB-INF/common/head.jsp</include-prelude>
  </jsp-property-group>
 </jsp-config>

</web-app>
③Add database configuration information. The database configured in the project here is MySQL. Create a new config.properties configuration file under resources and set it as follows:
validationQuery=SELECT 1
jdbc_url=jdbc:mysql://127.0.0.1:3306/wechat?useUnicode=true&characterEncoding=UTF-8&zeroDateTimeBehavior=convertToNull
jdbc_username=root
jdbc_password=123456789
④Create a new spring.xml configuration file under resources and set it. As follows:
<?xml version="1.0" encoding="UTF-8"?>
<beans xmlns="http://www.springframework.org/schema/beans" xmlns:xsi="http://www.w3.org/2001/XMLSchema-instance" xmlns:context="http://www.springframework.org/schema/context" xsi:schemaLocation="
http://www.springframework.org/schema/beans
http://www.springframework.org/schema/beans/spring-beans-3.0.xsd
http://www.springframework.org/schema/context
http://www.springframework.org/schema/context/spring-context-3.0.xsd">
 <!-- 引入属性文件 -->
 <context:property-placeholder location="classpath:config.properties" />
 <!-- 自动扫描(自动注入) -->
 <context:component-scan base-package="com.cuiyongzhi.web.service" />
 <context:component-scan base-package="com.cuiyongzhi.wechat.*" />

</beans>
⑤ Create a new spring-mvc.xml configuration file under resources, and set it as follows:
<?xml version="1.0" encoding="UTF-8"?>
<beans xmlns="http://www.springframework.org/schema/beans" xmlns:mvc="http://www.springframework.org/schema/mvc" xmlns:xsi="http://www.w3.org/2001/XMLSchema-instance" xmlns:p="http://www.springframework.org/schema/p" xmlns:context="http://www.springframework.org/schema/context" xsi:schemaLocation="http://www.springframework.org/schema/beans
http://www.springframework.org/schema/beans/spring-beans-4.0.xsd
http://www.springframework.org/schema/context
http://www.springframework.org/schema/context/spring-context-4.0.xsd
http://www.springframework.org/schema/mvc
http://www.springframework.org/schema/mvc/spring-mvc-4.0.xsd">

 <!-- 自动扫描controller包下的所有类,使其认为spring mvc的控制器 -->
 <context:component-scan base-package="com.cuiyongzhi.web.controller" />

 <!-- 避免IE执行AJAX时,返回JSON出现下载文件 -->
 <bean id="mappingJacksonHttpMessageConverter" class="org.springframework.http.converter.json.MappingJacksonHttpMessageConverter">
  <property name="supportedMediaTypes">
   <list>
    <value>text/html;charset=UTF-8</value>
   </list>
  </property>
 </bean>

 <!-- 启动Spring MVC的注解功能,完成请求和注解POJO的映射 -->
 <bean class="org.springframework.web.servlet.mvc.annotation.AnnotationMethodHandlerAdapter">
  <property name="messageConverters">
   <list>
    <ref bean="mappingJacksonHttpMessageConverter" /><!-- json转换器 -->
   </list>
  </property>
 </bean>

 <!-- 对模型视图名称的解析,即在模型视图名称添加前后缀 -->
 <bean class="org.springframework.web.servlet.view.InternalResourceViewResolver" p:prefix="/WEB-INF/views/" p:suffix=".jsp" />

 <bean id="multipartResolver" class="org.springframework.web.multipart.commons.CommonsMultipartResolver">
  <property name="defaultEncoding">
   <value>UTF-8</value>
  </property>
  <property name="maxUploadSize">
   <value>32505856</value><!-- 上传文件大小限制为31M,31*1024*1024 -->
  </property>
  <property name="maxInMemorySize">
   <value>4096</value>
  </property>
 </bean>

</beans>⑥ Create a new spring-mybatis.xml configuration file under resources, and set it as follows:
<?xml version="1.0" encoding="UTF-8"?>
<beans xmlns="http://www.springframework.org/schema/beans" xmlns:xsi="http://www.w3.org/2001/XMLSchema-instance" xmlns:tx="http://www.springframework.org/schema/tx" xmlns:aop="http://www.springframework.org/schema/aop" xsi:schemaLocation="
http://www.springframework.org/schema/beans
http://www.springframework.org/schema/beans/spring-beans-3.0.xsd
http://www.springframework.org/schema/tx
http://www.springframework.org/schema/tx/spring-tx-3.0.xsd
http://www.springframework.org/schema/aop
http://www.springframework.org/schema/aop/spring-aop-3.0.xsd
">

 <!-- 配置数据源 -->
 <bean name="dataSource" class="com.alibaba.druid.pool.DruidDataSource" init-method="init" destroy-method="close">
  <property name="url" value="${jdbc_url}" />
  <property name="username" value="${jdbc_username}" />
  <property name="password" value="${jdbc_password}" />

  <!-- 初始化连接大小 -->
  <property name="initialSize" value="5" />
  <!-- 连接池最大使用连接数量 -->
  <property name="maxActive" value="100" />
  <!-- 连接池最大空闲 -->
  <property name="maxIdle" value="10" />
  <!-- 连接池最小空闲 -->
  <property name="minIdle" value="0" />
  <!-- 获取连接最大等待时间 -->
  <property name="maxWait" value="60000" />

  <property name="poolPreparedStatements" value="true" />
  <property name="maxPoolPreparedStatementPerConnectionSize" value="33" />

  <property name="validationQuery" value="${validationQuery}" />
  <property name="testOnBorrow" value="false" />
  <property name="testOnReturn" value="false" />
  <property name="testWhileIdle" value="true" />

  <!-- 配置间隔多久才进行一次检测,检测需要关闭的空闲连接,单位是毫秒 -->
  <property name="timeBetweenEvictionRunsMillis" value="60000" />
  <!-- 配置一个连接在池中最小生存的时间,单位是毫秒 -->
  <property name="minEvictableIdleTimeMillis" value="25200000" />

  <!-- 打开removeAbandoned功能 -->
  <property name="removeAbandoned" value="true" />
  <!-- 1800秒,也就是30分钟 -->
  <property name="removeAbandonedTimeout" value="1800" />
  <!-- 关闭abanded连接时输出错误日志 -->
  <property name="logAbandoned" value="true" />

  <!-- 监控数据库 -->
  <!-- <property name="filters" value="stat" /> -->
  <property name="filters" value="mergeStat" />
 </bean>

 <!-- myBatis文件 -->
 <bean id="sqlSessionFactory" class="org.mybatis.spring.SqlSessionFactoryBean">
  <property name="dataSource" ref="dataSource" />
  <!-- 自动扫描entity目录, 省掉Configuration.xml里的手工配置 -->
  <property name="mapperLocations" value="classpath:com/cuiyongzhi/web/mapping/*.xml" />
 </bean>

 <bean class="org.mybatis.spring.mapper.MapperScannerConfigurer">
  <property name="basePackage" value="com.cuiyongzhi.web.dao" />
  <property name="sqlSessionFactoryBeanName" value="sqlSessionFactory" />
 </bean>

 <!-- 配置事务管理器 -->
 <bean id="transactionManager" class="org.springframework.jdbc.datasource.DataSourceTransactionManager">
  <property name="dataSource" ref="dataSource" />
 </bean>

 <!-- 注解方式配置事物 -->
 <!-- <tx:annotation-driven transaction-manager="transactionManager" /> -->

 <!-- 拦截器方式配置事物 -->
 <tx:advice id="transactionAdvice" transaction-manager="transactionManager">
  <tx:attributes>
   <tx:method name="add*" propagation="REQUIRED" />
   <tx:method name="append*" propagation="REQUIRED" />
   <tx:method name="insert*" propagation="REQUIRED" />
   <tx:method name="save*" propagation="REQUIRED" />
   <tx:method name="update*" propagation="REQUIRED" />
   <tx:method name="modify*" propagation="REQUIRED" />
   <tx:method name="edit*" propagation="REQUIRED" />
   <tx:method name="delete*" propagation="REQUIRED" />
   <tx:method name="remove*" propagation="REQUIRED" />
   <tx:method name="repair" propagation="REQUIRED" />
   <tx:method name="delAndRepair" propagation="REQUIRED" />
   <tx:method name="get*" propagation="SUPPORTS" />
   <tx:method name="find*" propagation="SUPPORTS" />
   <tx:method name="load*" propagation="SUPPORTS" />
   <tx:method name="search*" propagation="SUPPORTS" />
   <tx:method name="datagrid*" propagation="SUPPORTS" />
   <tx:method name="*" propagation="SUPPORTS" />
  </tx:attributes>
 </tx:advice>
 <aop:config>
  <aop:pointcut id="transactionPointcut" expression="execution(* com.cuiyongzhi.web.service..*Impl.*(..))" />
  <aop:advisor pointcut-ref="transactionPointcut" advice-ref="transactionAdvice" />
 </aop:config>


 <!-- 配置druid监控spring jdbc -->
 <bean id="druid-stat-interceptor" class="com.alibaba.druid.support.spring.stat.DruidStatInterceptor">
 </bean>
 <bean id="druid-stat-pointcut" class="org.springframework.aop.support.JdkRegexpMethodPointcut" scope="prototype">
  <property name="patterns">
   <list>
    <value>com.cuiyongzhi.web.service.*</value>
   </list>
  </property>
 </bean>
 <aop:config>
  <aop:advisor advice-ref="druid-stat-interceptor" pointcut-ref="druid-stat-pointcut" />
 </aop:config>
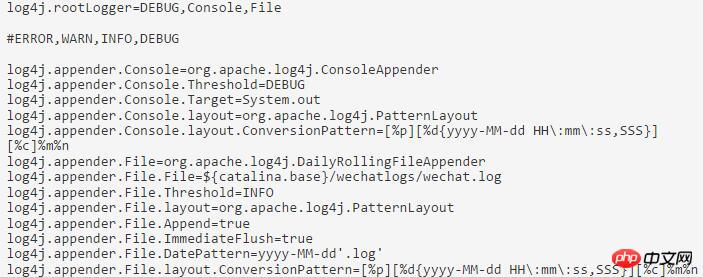
</beans>⑦Create a new log4j.properties configuration file under resources, which is used to set the output level and output location of the log. The settings are as follows:
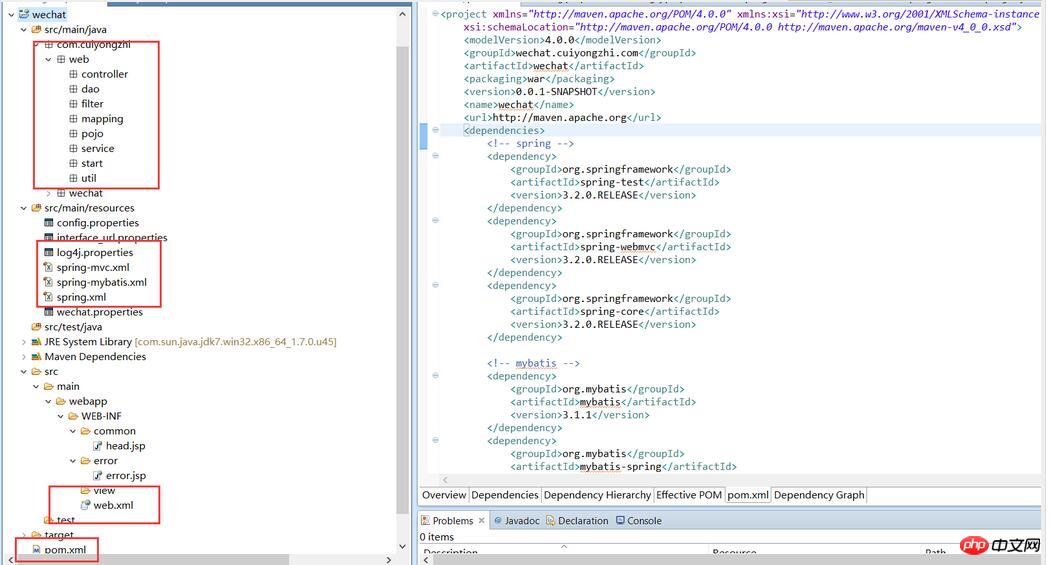
Go here springmvc+mybatis The basic configuration file is basically completed. The general project structure is as follows:
This article mainly focuses on code examples. The basic project construction is recorded here. Next In this article, I will briefly describe some simple applications under this framework. Thank you for reading. If you have any questions, you can discuss it!
The above is the detailed content of Detailed explanation of java code for springmvc mybatis project structure developed by WeChat. For more information, please follow other related articles on the PHP Chinese website!

Hot AI Tools

Undresser.AI Undress
AI-powered app for creating realistic nude photos

AI Clothes Remover
Online AI tool for removing clothes from photos.

Undress AI Tool
Undress images for free

Clothoff.io
AI clothes remover

Video Face Swap
Swap faces in any video effortlessly with our completely free AI face swap tool!

Hot Article
Hot Tools

Notepad++7.3.1
Easy-to-use and free code editor

SublimeText3 Chinese version
Chinese version, very easy to use

Zend Studio 13.0.1
Powerful PHP integrated development environment

Dreamweaver CS6
Visual web development tools

SublimeText3 Mac version
God-level code editing software (SublimeText3)
Hot Topics


 The difference between H5 and mini-programs and APPs
Apr 06, 2025 am 10:42 AM
The difference between H5 and mini-programs and APPs
Apr 06, 2025 am 10:42 AM
H5. The main difference between mini programs and APP is: technical architecture: H5 is based on web technology, and mini programs and APP are independent applications. Experience and functions: H5 is light and easy to use, with limited functions; mini programs are lightweight and have good interactiveness; APPs are powerful and have smooth experience. Compatibility: H5 is cross-platform compatible, applets and APPs are restricted by the platform. Development cost: H5 has low development cost, medium mini programs, and highest APP. Applicable scenarios: H5 is suitable for information display, applets are suitable for lightweight applications, and APPs are suitable for complex functions.
 Ouyi Exchange app domestic download tutorial
Mar 21, 2025 pm 05:42 PM
Ouyi Exchange app domestic download tutorial
Mar 21, 2025 pm 05:42 PM
This article provides a detailed guide to safe download of Ouyi OKX App in China. Due to restrictions on domestic app stores, users are advised to download the App through the official website of Ouyi OKX, or use the QR code provided by the official website to scan and download. During the download process, be sure to verify the official website address, check the application permissions, perform a security scan after installation, and enable two-factor verification. During use, please abide by local laws and regulations, use a safe network environment, protect account security, be vigilant against fraud, and invest rationally. This article is for reference only and does not constitute investment advice. Digital asset transactions are at your own risk.
 What should I do if the company's security software conflicts with applications? How to troubleshoot HUES security software causes common software to fail to open?
Apr 01, 2025 pm 10:48 PM
What should I do if the company's security software conflicts with applications? How to troubleshoot HUES security software causes common software to fail to open?
Apr 01, 2025 pm 10:48 PM
Compatibility issues and troubleshooting methods for company security software and application. Many companies will install security software in order to ensure intranet security. However, security software sometimes...
 What is the difference between H5 page production and WeChat applets
Apr 05, 2025 pm 11:51 PM
What is the difference between H5 page production and WeChat applets
Apr 05, 2025 pm 11:51 PM
H5 is more flexible and customizable, but requires skilled technology; mini programs are quick to get started and easy to maintain, but are limited by the WeChat framework.
 How to choose H5 and applets
Apr 06, 2025 am 10:51 AM
How to choose H5 and applets
Apr 06, 2025 am 10:51 AM
The choice of H5 and applet depends on the requirements. For applications with cross-platform, rapid development and high scalability, choose H5; for applications with native experience, rich functions and platform dependencies, choose applets.
 How to solve the problem of JS resource caching in enterprise WeChat?
Apr 04, 2025 pm 05:06 PM
How to solve the problem of JS resource caching in enterprise WeChat?
Apr 04, 2025 pm 05:06 PM
Discussion on the JS resource caching issue of Enterprise WeChat. When upgrading project functions, some users often encounter situations where they fail to successfully upgrade, especially in the enterprise...
 Detailed tutorial on how to buy and sell Binance virtual currency
Mar 18, 2025 pm 01:36 PM
Detailed tutorial on how to buy and sell Binance virtual currency
Mar 18, 2025 pm 01:36 PM
This article provides a brief guide to buying and selling of Binance virtual currency updated in 2025, and explains in detail the operation steps of virtual currency transactions on the Binance platform. The guide covers fiat currency purchase USDT, currency transaction purchase of other currencies (such as BTC), and selling operations, including market trading and limit trading. In addition, the guide also specifically reminds key risks such as payment security and network selection for fiat currency transactions, helping users to conduct Binance transactions safely and efficiently. Through this article, you can quickly master the skills of buying and selling virtual currencies on the Binance platform and reduce transaction risks.
 The first dual-core cultural and tourism digital hominid in the country! Tencent Cloud helps Huaguoshan Scenic Area connect to DeepSeek, making the 'Sage Monkey King' smarter and warmer
Mar 12, 2025 pm 12:57 PM
The first dual-core cultural and tourism digital hominid in the country! Tencent Cloud helps Huaguoshan Scenic Area connect to DeepSeek, making the 'Sage Monkey King' smarter and warmer
Mar 12, 2025 pm 12:57 PM
Lianyungang Huaguoshan Scenic Area joins hands with Tencent Cloud to launch the first "dual-core brain" Digital Homo sapiens in the cultural and tourism industry - Monkey King! On March 1, the scenic spot officially connected the Monkey King to the DeepSeek platform, so that it has the two AI model capabilities of Tencent Hunyuan and DeepSeek, bringing tourists a smarter and more considerate service experience. Huaguoshan Scenic Area has previously launched the Monkey King of the Digital Homo sapiens based on Tencent Hunyuan model. This time, Tencent Cloud further utilizes technologies such as the big model knowledge engine to connect it to DeepSeek to achieve a "dual-core" upgrade. This makes the Monkey King's interactive ability to a higher level, faster response speed, stronger understanding ability, and more warmth. Monkey King has strong natural language processing capabilities and can understand various ways of asking questions from tourists.
