Detailed example of Core MVC compression style (ASP)
This article mainly introduces the relevant information of ASP.NET Core MVC compression style and script details. Friends in need can refer to the following
Preface
. NET Core, we may need to use third-party tools to compress style files and scripts, but in ASP.NET MVC Core, there is no need to use third-party tools to complete the compression. In this section, we will take a look at what ASP.NET Core MVC does for us. What conveniences are provided.
Automatic compression of styles and scripts
When we do not need to compress scripts in the test environment, if once the script is compressed, it will not be helpful if an error occurs in the console We debug, but in the production environment we can reduce the transmission traffic by compressing scripts or styles, and secondly speed up the page loading time. In other words, at this time we need the corresponding test environment and production environment. Native version and compressed version, so how to do it in ASP.NET Core MVC? Please read below.
We place some static files such as scripts, styles, pictures etc. in the wwwroot website directory. At this time we first need to add bower.jsonFile to download the scripts and versions we need, as follows:
{
  "name": "asp.net",
  "private": true,
  "dependencies": {
  "jquery": "2.2.3",
  "bootstrap": "3.3.6"
 }
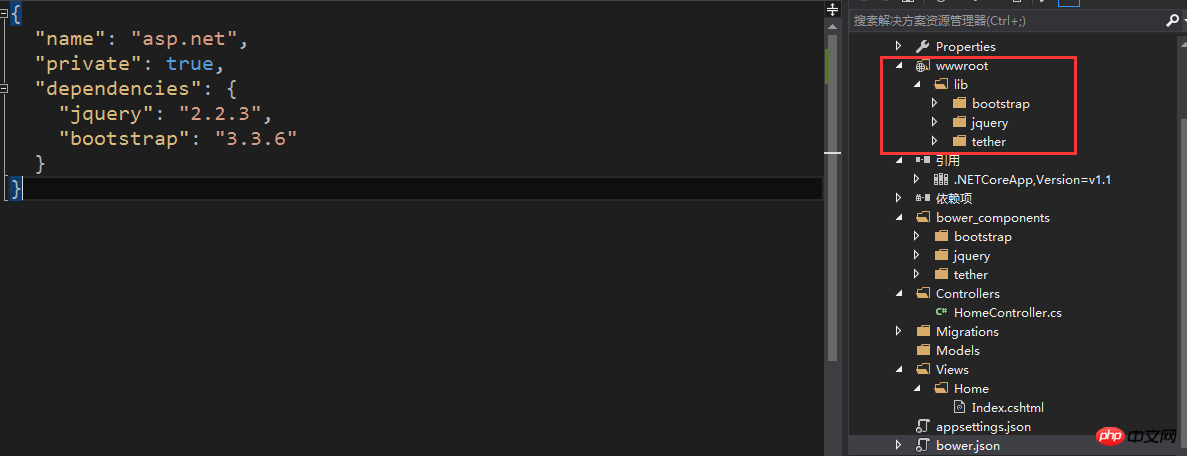
}When adding the scripts and styles we need to a node in this json file, the downloaded scripts and styles will be It is automatically added to the website directory folder as follows

Of course we can also download it by right-clicking ->Manage Bower package and it will also be automatically restored to the website directory folder. At this point we have all the scripts and styles we want. Next, we need to introduce scripts and styles into View. ASP.NET Core MVC provides us with three environments for loading styles and scripts: Development, Staging, and Production. Development is the development environment, Staging is the test version before release, and Production is the release version. So how do we use it in the view? We specify the above three environments through the names on the environment node, as follows:
<environment names="Development">
 ..开发环境-加载脚本和样式
</environment>

<environment names="Staging,Production">
 ..准备和发布环境-加载脚本和样式
</environment>
Let’s see how it works in practice. Load the JQuery script and Bootstrap style as follows:
<html>
<head>
  <title>学习加载脚本和样式</title>
</head>
<body>
</body>
</html>
<environment names="Development">
  <script src="~/lib/jquery/dist/jquery.js"></script>
  <script src="~/lib/tether/dist/js/tether.js"></script>
  <script src="~/lib/bootstrap/dist/js/bootstrap.js"></script>
  <link href="~/lib/bootstrap/dist/css/bootstrap.css" rel="stylesheet" />
</environment>
<environment names="Staging,Production">
  <script src="~/lib/jquery/dist/jquery.min.js"></script>
  <script src="~/lib/tether/dist/js/tether.min.js"></script>
  <script src="~/lib/bootstrap/dist/js/bootstrap.min.js"></script>
  <link href="~/lib/bootstrap/dist/css/bootstrap.min.css" rel="stylesheet" />
</environment>
Let’s see if the page loading result is as we expected.

It’s a little embarrassing, it’s all loaded in, what’s the situation, it turns out that you need to add TagHelper at the top of the page, as follows:
@addTagHelper *, Microsoft.AspNetCore.Mvc.TagHelpers

There's nothing wrong with this. We haven't explained one point before. How does ASP.NET MVC Core detect the value we set for names on the environment node? We need to specify the environment in the Profiles node under launchSettings.json, as follows:
"profiles": {
  "IIS Express": {
   "commandName": "IISExpress",
   "launchBrowser": true,
   "launchUrl": "Home/Index",
   "environmentVariables": {
    "ASPNETCORE_ENVIRONMENT": "Development"
   }
  },
  "IIS Express (Production)": {
   "commandName": "IISExpress",
   "launchUrl": "Home/Index",
   "launchBrowser": true,
   "environmentVariables": {
    "ASPNETCORE_ENVIRONMENT": "Production"
   }
  }
}At this time we see the following when running the application The operating environment we set up.

At this time, another classmate asked, we can manually write code before .NET Core to implement the version of loading scripts and styles. In ASP.NET Core MVC, we can Can it be implemented? Now that we have mentioned it, of course it is possible, as follows.
<environment names="Staging,Production">
  <script src="~/lib/jquery/dist/jquery.min.js" asp-append-version="true"></script>
  <script src="~/lib/tether/dist/js/tether.min.js" asp-append-version="true"></script>
  <script src="~/lib/bootstrap/dist/js/bootstrap.min.js" asp-append-version="true"></script>
  <link href="~/lib/bootstrap/dist/css/bootstrap.min.css" asp-append-version="true" rel="stylesheet" />
</environment>

Isn’t it wonderful? Since we have .NET Core, we only need to add asp-append-version="true"attribute,. NET Core automatically added version control for us, and I felt refreshed. At this point, we have finished talking about more than half of the automatic compression scripts and styles. However, I don’t know if you have noticed after reading this. The packages we added automatically come with compressed versions. So if When we write our own scripts and styles, how do we compress the scripts and styles? Please continue to read below.
Before manually writing our own scripts and styles, we need to search Web Essentials package and install in the package. I have already installed it. The Web Essentials package can be seen in extensions and Updates, as follows:

We create a js folder under the website directory folder and add JeffckyWang .js script, in which we give the following script:
(function ($) {
  "use strict";
   alert("学习自动压缩脚本和样式");
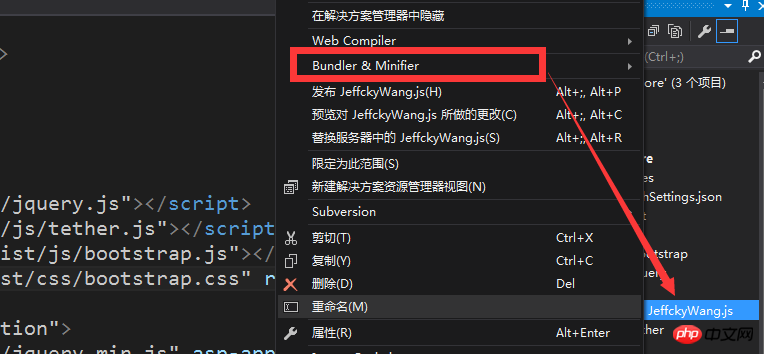
})(jQuery);由于上述我们已经添加了Web Essentials程序包此时我们右键JeffckyWang.js脚本,你会发现有了自动压缩的菜单,如下:

当进行压缩后,我们展开JeffckyWang.js脚本会有我们压缩的JeffckyWang.min.js脚本,如下:

复制文件到输出目录
在.NET Core之前我们创建一个文件可以通过设置该文件的属性来复制到bin目录下的debug或者release目录。例如我们创建一个install.bat文件,在.NET Core之前版本,我们可以手动通过如下设置,如下:

此时我们设置为始终复制则将其复制到debug或者release目录下。但是在.NET Core中其属性却是如下这样的

在项目中遇到这个问题瞬间懵逼了,想了想,既然在.NET Core一切基于配置,那么是否在project.json是否可以进行一下配置即可呢,功夫不负有心人,进行如下设置即可。
 "buildOptions": {
  "emitEntryPoint": true,
  "preserveCompilationContext": true,
  "copyToOutput": [ "install.bat" ]
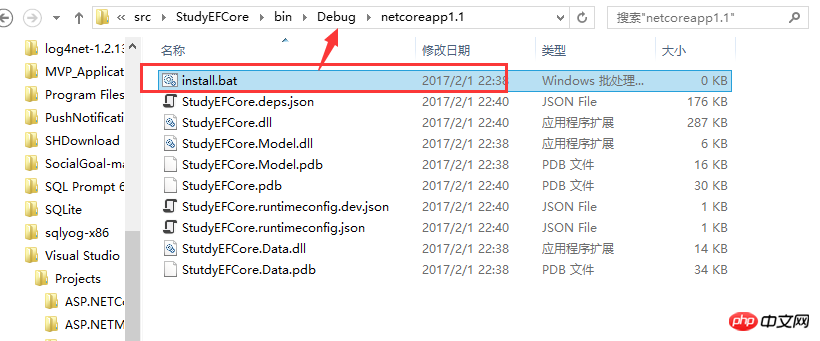
},我们只需要在buildOptions节点下添加一个copyToOutput节点,该节点为一个数组,添加我们对应的文件路径即可。此时重新生成一下则在debug或者release目录下看到我们的文件,如下:

【相关推荐】
1. ASP免费视频教程
2. ASP教程
3. 李炎恢ASP基础视频教程
The above is the detailed content of Detailed example of Core MVC compression style (ASP). For more information, please follow other related articles on the PHP Chinese website!

Hot AI Tools

Undresser.AI Undress
AI-powered app for creating realistic nude photos

AI Clothes Remover
Online AI tool for removing clothes from photos.

Undress AI Tool
Undress images for free

Clothoff.io
AI clothes remover

Video Face Swap
Swap faces in any video effortlessly with our completely free AI face swap tool!

Hot Article

Hot Tools

Notepad++7.3.1
Easy-to-use and free code editor

SublimeText3 Chinese version
Chinese version, very easy to use

Zend Studio 13.0.1
Powerful PHP integrated development environment

Dreamweaver CS6
Visual web development tools

SublimeText3 Mac version
God-level code editing software (SublimeText3)

Hot Topics
 1386
1386
 52
52
 How to enable Core Isolation's memory integrity feature in Windows 11
May 10, 2023 pm 11:49 PM
Microsoft's Windows 11 2022 Update (22H2) enables CoreIsolation's memory integrity protection by default. However, if you are running an older version of the operating system, such as Windows 11 2022 Update (22H1), you will need to turn this feature on manually. Turn on CoreIsolation's Memory Integrity feature in Windows 11 For users who don't know about Core Isolation, it's a security process designed to protect basic core activities on Windows from malicious programs by isolating them in memory. This process, combined with the memory integrity feature, ensures
 What does computer core mean?
Sep 05, 2022 am 11:24 AM
Core has two meanings in computers: 1. The core, also known as the core, is the most important component of the CPU. All calculations, accepting storage commands, and processing data of the CPU are performed by the core; 2. Core, core is Intel's processor Name, Core is the processor brand launched by Intel after the Pentium processor. It has currently released twelfth generation Core processors.
 PHP MVC Architecture: Building Web Applications for the Future
Mar 03, 2024 am 09:01 AM
Introduction In today's rapidly evolving digital world, it is crucial to build robust, flexible and maintainable WEB applications. The PHPmvc architecture provides an ideal solution to achieve this goal. MVC (Model-View-Controller) is a widely used design pattern that separates various aspects of an application into independent components. The foundation of MVC architecture The core principle of MVC architecture is separation of concerns: Model: encapsulates the data and business logic of the application. View: Responsible for presenting data and handling user interaction. Controller: Coordinates the interaction between models and views, manages user requests and business logic. PHPMVC Architecture The phpMVC architecture follows the traditional MVC pattern, but also introduces language-specific features. The following is PHPMVC
![How to Fix Processor Thermal Trip Error in Windows 11/10 [Fix]](https://img.php.cn/upload/article/000/000/164/168169038621890.png?x-oss-process=image/resize,m_fill,h_207,w_330) How to Fix Processor Thermal Trip Error in Windows 11/10 [Fix]
Apr 17, 2023 am 08:13 AM
How to Fix Processor Thermal Trip Error in Windows 11/10 [Fix]
Apr 17, 2023 am 08:13 AM
Most of the devices, such as laptops and desktops, have been heavily used by young gamers and coders for a long time. The system sometimes hangs due to application overload. This forces users to shut down their systems. This mainly happens to players who install and play heavy games. When the system tries to boot after force shutdown, it throws an error on a black screen as shown below: Below are the warnings detected during this boot. These can be viewed in the settings on the event log page. Warning: Processor thermal trip. Press any key to continue. ..These types of warning messages are always thrown when the processor temperature of a desktop or laptop exceeds its threshold temperature. Listed below are the reasons why this happens on Windows systems. Many heavy applications are in
 An advanced guide to PHP MVC architecture: unlocking advanced features
Mar 03, 2024 am 09:23 AM
The MVC architecture (Model-View-Controller) is one of the most popular patterns in PHP development because it provides a clear structure for organizing code and simplifying the development of WEB applications. While basic MVC principles are sufficient for most web applications, it has some limitations for applications that need to handle complex data or implement advanced functionality. Separating the model layer Separating the model layer is a common technique in advanced MVC architecture. It involves breaking down a model class into smaller subclasses, each focusing on a specific functionality. For example, for an e-commerce application, you might break down the main model class into an order model, a product model, and a customer model. This separation helps improve code maintainability and reusability. Use dependency injection
 .NET Core cross-platform application development practice: a seamless journey from Windows to Linux and macOS
Feb 26, 2024 pm 12:55 PM
With the launch of .NETCore, .NET developers have a new opportunity to easily write and run .NET applications on multiple operating systems. This article will delve into how to use .NETCore to achieve cross-platform application development, and share best practice experience on operating systems such as Windows, Linux, and macOS. 1. Prepare the development environment. To start cross-platform application development, you first need to prepare the development environment for each target platform. Windows On Windows, you can install .NETCoreSDK through Visual Studio. After installation is complete, you can create and run .NETCore projects through Visual Studio. Li
 Uncovering the success of the SpringMVC framework: why it is so popular
Jan 24, 2024 am 08:39 AM
SpringMVC framework decrypted: Why is it so popular, specific code examples are needed Introduction: In today's software development field, the SpringMVC framework has become a very popular choice among developers. It is a Web framework based on the MVC architecture pattern, providing a flexible, lightweight, and efficient development method. This article will delve into the charm of the SpringMVC framework and demonstrate its power through specific code examples. 1. Advantages of SpringMVC framework Flexible configuration method Spr
 How to implement the MVC pattern using PHP
Jun 07, 2023 pm 03:40 PM
The MVC (Model-View-Controller) pattern is a commonly used software design pattern that can help developers better organize and manage code. The MVC pattern divides the application into three parts: Model, View and Controller, each part has its own role and responsibilities. In this article, we will discuss how to implement the MVC pattern using PHP. Model A model represents an application's data and data processing. usually,


