
 Backend Development
Python Tutorial
Detailed explanation of memcached operation in Python (picture and text)
Backend Development
Python Tutorial
Detailed explanation of memcached operation in Python (picture and text)
Detailed explanation of memcached operation in Python (picture and text)

Preface
Many Web applications save data to Relational database management systems such as MySQL, application The server reads the data from it and displays it in the browser. However, as the amount of data increases and access becomes concentrated, there will be adverse effects such as increased burden on the database, deterioration of database response, and delayed website display. Distributed caching is an important means to optimize website performance. A large number of sites provide large-scale hot data caching services through scalable server clusters. By caching data library query results and reducing the number of database accesses, the speed and scalability of dynamic web applications can be significantly improved. Commonly used in the industry are redis, memcached, etc. Today I want to talk about how to use the memcached cache service in the python project.
memcachedIntroduction
memcached is an open source, high-performance, distributed memory objectcaching system that can be applied Various scenarios require caching, the main purpose of which is to speed up web applications by reducing access to the Database.
Memcached itself does not actually provide a distributed solution. On the server side, the memcached cluster environment is actually the accumulation of memcached servers, and the environment construction is relatively simple; the distribution of the cache is mainly implemented on the client, and is processed through the client's routing Achieve the purpose of distributed solutions. The principle of client routing is very simple. Every time the application server accesses the value of a certain key, it maps the key to a certain memcached server nodeA through the routing algorithm. Therefore, all operations on this key are performed on nodeA. Carried on. As long as the server still caches the data, a cache hit is guaranteed. 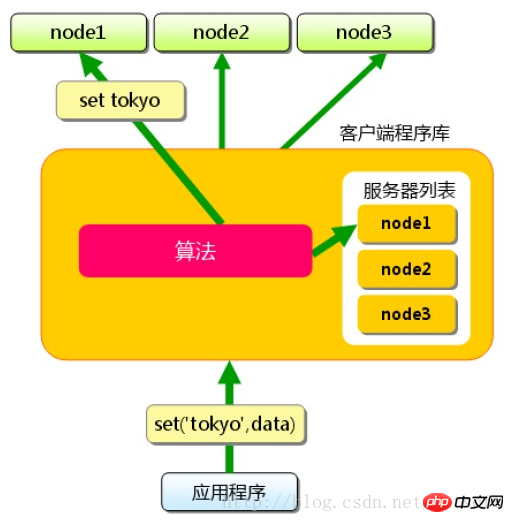
Hash: Use the hash value of the cached data key , divided by the number of servers, the remainder is the number in the table below of the server list. This algorithm can evenly distribute cache data throughout the memcached cluster, and can also meet most cache routing requirements.
However, when the memcached cluster needs to be expanded, problems will occur. For example: the website needs to expand the capacity of 3 cache servers to 4 cache servers. After changing the server list, if you still use the remainder hash, it is easy to calculate that 75% of the requests will not hit the cache. As the size of the server cluster increases, the miss rate becomes higher.
1%3 = 1
1%4 = 1
2%3 = 2
2%4 = 2
3%3 = 0
3%4 = 3
4%4 = 1
4%4 = 0
#以此类推
deleting a single node will not have a big impact on the entire cluster. 
内存管理
存储方式
为了提高性能,memcached中保存的数据都存储在memcached内置的内存存储空间中。由于数据仅存在于内存中,因此重启memcached、重启操作系统会导致全部数据消失。另外,缓存的内容容量达到指定值之后,就基于LRU(Least Recently Used)算法自动删除不使用的缓存。memcached本身是为缓存而设计的服务,因此并没有过多考虑数据的永久性问题。
内存结构
memcached仅支持基础的key-value键值对类型数据存储。在memcached内存结构中有两个非常重要的概念:slab和chunk。
slab是一个内存块,它是memcached一次申请内存的最小单位。在启动memcached的时候一般会使用参数-m指定其可用内存,但是并不是在启动的那一刻所有的内存就全部分配出去了,只有在需要的时候才会去申请,而且每次申请一定是一个slab。Slab的大小固定为1M(1048576 Byte),一个slab由若干个大小相等的chunk组成。每个chunk中都保存了一个item结构体、一对key和value。
虽然在同一个slab中chunk的大小相等的,但是在不同的slab中chunk的大小并不一定相等,在memcached中按照chunk的大小不同,可以把slab分为很多种类(class),默认情况下memcached把slab分为40类(class1~class40),在class 1中,chunk的大小为80字节,由于一个slab的大小是固定的1048576字节(1M),因此在class1中最多可以有13107个chunk(也就是这个slab能存最多13107个小于80字节的key-value数据)。 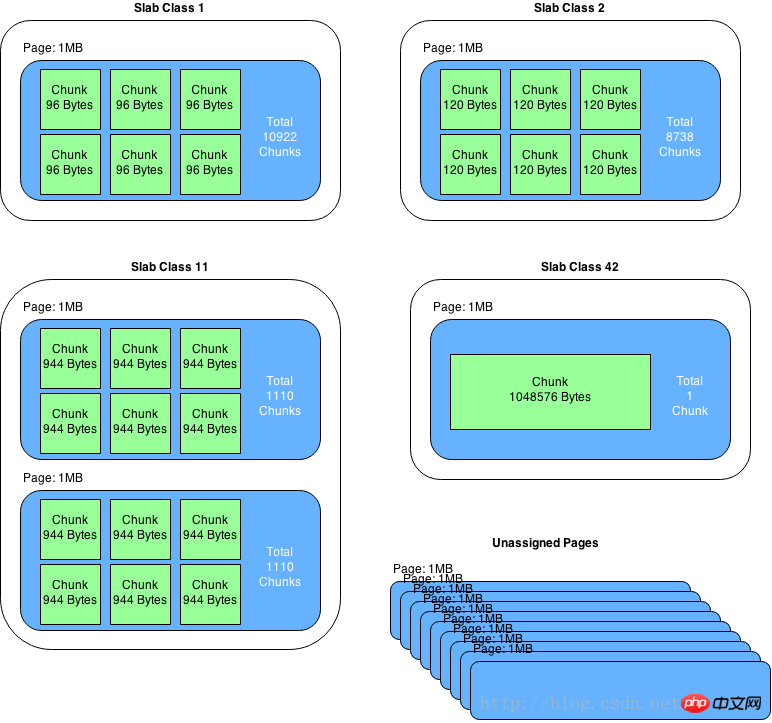
memcached内存管理采取预分配、分组管理的方式,分组管理就是我们上面提到的slab class,按照chunk的大小slab被分为很多种类。内存预分配过程是怎样的呢?向memcached添加一个item时候,memcached首先会根据item的大小,来选择最合适的slab class:例如item的大小为190字节,默认情况下class 4的chunk大小为160字节显然不合适,class 5的chunk大小为200字节,大于190字节,因此该item将放在class 5中(显然这里会有10字节的浪费是不可避免的),计算好所要放入的chunk之后,memcached会去检查该类大小的chunk还有没有空闲的,如果没有,将会申请1M(1个slab)的空间并划分为该种类chunk。例如我们第一次向memcached中放入一个190字节的item时,memcached会产生一个slab class 2(也叫一个page),并会用去一个chunk,剩余5241个chunk供下次有适合大小item时使用,当我们用完这所有的5242个chunk之后,下次再有一个在160~200字节之间的item添加进来时,memcached会再次产生一个class 5的slab(这样就存在了2个pages)。
注意事项
chunk是在page里面划分的,而page固定为1m,所以chunk最大不能超过1m。
chunk实际占用内存要加48B,因为chunk数据结构本身需要占用48B。
如果用户数据大于1m,则memcached会将其切割,放到多个chunk内。
已分配出去的page不能回收。
-对于key-value信息,最好不要超过1m的大小;同时信息长度最好相对是比较均衡稳定的,这样能够保障最大限度的使用内存;同时,memcached采用的LRU清理策略,合理甚至过期时间,提高命中率。
使用场景
key-value能满足需求的前提下,使用memcached分布式集群是较好的选择,搭建与操作使用都比较简单;分布式集群在单点故障时,只影响小部分数据异常,目前还可以通过Magent缓存代理模式,做单点备份,提升高可用;整个缓存都是基于内存的,因此响应时间是很快,不需要额外的序列化、反序列化的程序,但同时由于基于内存,数据没有持久化,集群故障重启数据无法恢复。高版本的memcached已经支持CAS模式的原子操作,可以低成本的解决并发控制问题。
安装启动
$ sudo apt-get install memcached
$ memcached -m 32 -p 11211 -d
# memcached将会以守护程序的形式启动 memcached(-d),为其分配32M内存(-m 32),并指定监听 localhost的11211端口。
python操作memcached
在python中可通过memcache库来操作memcached,这个库使用很简单,声明一个client就可以读写memcached缓存了。
python访问memcached
#!/usr/bin/env pythonimport memcache

mc = memcache.Client(['127.0.0.1:12000'],debug=0)

mc.set("some_key", "Some value")
value = mc.get("some_key")

mc.set("another_key", 3)
mc.delete("another_key")

mc.set("key", "1")   # note that the key used for incr/decr must be a string.
mc.incr("key")
mc.decr("key")然而,python-memcached默认的路由策略没有使用一致性哈希。
    def _get_server(self, key):
        if isinstance(key, tuple):
            serverhash, key = key
            else:
            serverhash = serverHashFunction(key)
            if not self.buckets:
            return None, None

        for i in range(Client._SERVER_RETRIES):
            server = self.buckets[serverhash % len(self.buckets)]
            if server.connect():
            # print("(using server %s)" % server,)
                return server, key
            serverhash = serverHashFunction(str(serverhash) + str(i))
return None, None从源码中可以看到:server = self.buckets[serverhash % len(self.buckets)],只是根据key进行了简单的取模。我们可以通过重写_get_server方法,让python-memcached支持一致性哈希。
import memcacheimport typesfrom hash_ring import HashRingclass MemcacheRing(memcache.Client):
    """Extends python-memcache so it uses consistent hashing to
    distribute the keys.
    """
    def init(self, servers, *k, **kw):
        self.hash_ring = HashRing(servers)
        memcache.Client.init(self, servers, *k, **kw)
        self.server_mapping = {}
        for server_uri, server_obj in zip(servers, self.servers):
            self.server_mapping[server_uri] = server_obj
            def _get_server(self, key):
        if type(key) == types.TupleType:
        return memcache.Client._get_server(key)
        for i in range(self._SERVER_RETRIES):
            iterator = self.hash_ring.iterate_nodes(key)
            for server_uri in iterator:
                server_obj = self.server_mapping[server_uri]
                if server_obj.connect():
                return server_obj, key
return None, Nonetorando项目中使用memcached
这里采用的策略是:1. 应用程序先从cache取数据,没有得到,则从数据库中取数据,成功后,放到缓存中。2. 应用程序从cache中取数据,取到后返回。缓存更新是一个很复杂的问题,一般是先把数据存到数据库中,成功后,再让缓存失效。后面会再写文单独讨论memcached缓存更新的问题。
代码
# coding: utf-8import sysimport tornado.ioloopimport tornado.webimport loggingimport memcacheimport jsonimport urllib# 初始化memcache clientmc = memcache.Client(['127.0.0.1:11211'], debug=0)
mc_prefix = 'demo'class BaseHandler(tornado.web.RequestHandler):
    """ 把缓存处理抽象到BaseHandler基类 """
    USE_CACHE = False  # 控制是否使用缓存

    def format_args(self):
        arg_list = []
        for a in self.request.arguments:
        for value in self.request.arguments[a]:
                arg_list.append('%s=%s' % (a, urllib.quote(value.replace(' ', ''))))
                # 根据请求的URL产生key
        arg_list.sort()
        key = '%s?%s' % (self.request.path, '&'.join(arg_list)) if arg_list else self.request.path
        key = '%s_%s' % (mc_prefix, key)
        # key太长,不进行缓存处理
        if len(key) > 250:
            logging.error('key out of length: %s', key)
            return None

        return key    def get(self, *args, **kwargs):
        if self.USE_CACHE:
        try:
        # 根据请求获取key
                self.key = self.format_args()
                if self.key:
                    data = mc.get(self.key)
                    # 若缓存命中,则直接返回数据
                    if data:
                        logging.info('get data from memecahce')
                        self.finish(data)
                        return
            except Exception, e:
                logging.exception(e)
                # 若未命中缓存,调用do_get处理请求,获取数据
        data = self.do_get()
        data_str = json.dumps(data)
        # 把成功获取到的数据,放入memcache缓存
        if self.USE_CACHE and data and data.get('result', -1) == 0 and self.key:
        try:
                mc.set(self.key, data_str, 60)
                except Exception, e:
                logging.exception(e)

        self.finish(data_str)    def do_get(self):
        return Noneclass DemoHandler(BaseHandler):
    USE_CACHE = True

    def do_get(self):
        a = self.get_argument('a', 'test')
        b = self.get_argument('b', 'test')
        # 访问数据库获取数据,此处略去
        data = {'result': 0, 'a': a, 'b': b}        return datadef make_app():
    return tornado.web.Application([
        (r"/", DemoHandler),
    ])if name == "main":
    logging.basicConfig(stream=sys.stdout, level=logging.INFO,
                    format='%(asctime)s %(levelno)s %(message)s',
                    )

    app = make_app()
    app.listen(8888)
tornado.ioloop.IOLoop.current().start()测试结果
在浏览器访问http://127.0.0.1:8888/?a=1&b=3,终端打印的log如下:
2017-02-21 22:45:05,987 20 304 GET /?a=1&b=2 (127.0.0.1) 3.11ms
2017-02-21 22:45:07,427 20 get data from memecahce
2017-02-21 22:45:07,427 20 304 GET /?a=1&b=2 (127.0.0.1) 0.71ms
2017-02-21 22:45:10,350 20 200 GET /?a=1&b=3 (127.0.0.1) 0.82ms
2017-02-21 22:45:13,586 20 get data from memecahce
从日志可以看到,缓存命中的情况。
小结
本文介绍了memcached的路由算法、内存管理、使用场景等基本概念,然后举例说明了在python项目中如何使用memcached缓存。缓存更新的问题还需要进一步分析讨论。
The above is the detailed content of Detailed explanation of memcached operation in Python (picture and text). For more information, please follow other related articles on the PHP Chinese website!

Hot AI Tools

Undresser.AI Undress
AI-powered app for creating realistic nude photos

AI Clothes Remover
Online AI tool for removing clothes from photos.

Undress AI Tool
Undress images for free

Clothoff.io
AI clothes remover

Video Face Swap
Swap faces in any video effortlessly with our completely free AI face swap tool!

Hot Article
Hot Tools

Notepad++7.3.1
Easy-to-use and free code editor

SublimeText3 Chinese version
Chinese version, very easy to use

Zend Studio 13.0.1
Powerful PHP integrated development environment

Dreamweaver CS6
Visual web development tools

SublimeText3 Mac version
God-level code editing software (SublimeText3)
Hot Topics
 1387
1387
 52
52

 Is the vscode extension malicious?
Apr 15, 2025 pm 07:57 PM
Is the vscode extension malicious?
Apr 15, 2025 pm 07:57 PM
VS Code extensions pose malicious risks, such as hiding malicious code, exploiting vulnerabilities, and masturbating as legitimate extensions. Methods to identify malicious extensions include: checking publishers, reading comments, checking code, and installing with caution. Security measures also include: security awareness, good habits, regular updates and antivirus software.
 How to run programs in terminal vscode
Apr 15, 2025 pm 06:42 PM
How to run programs in terminal vscode
Apr 15, 2025 pm 06:42 PM
In VS Code, you can run the program in the terminal through the following steps: Prepare the code and open the integrated terminal to ensure that the code directory is consistent with the terminal working directory. Select the run command according to the programming language (such as Python's python your_file_name.py) to check whether it runs successfully and resolve errors. Use the debugger to improve debugging efficiency.
 Can vs code run in Windows 8
Apr 15, 2025 pm 07:24 PM
Can vs code run in Windows 8
Apr 15, 2025 pm 07:24 PM
VS Code can run on Windows 8, but the experience may not be great. First make sure the system has been updated to the latest patch, then download the VS Code installation package that matches the system architecture and install it as prompted. After installation, be aware that some extensions may be incompatible with Windows 8 and need to look for alternative extensions or use newer Windows systems in a virtual machine. Install the necessary extensions to check whether they work properly. Although VS Code is feasible on Windows 8, it is recommended to upgrade to a newer Windows system for a better development experience and security.
 Can visual studio code be used in python
Apr 15, 2025 pm 08:18 PM
Can visual studio code be used in python
Apr 15, 2025 pm 08:18 PM
VS Code can be used to write Python and provides many features that make it an ideal tool for developing Python applications. It allows users to: install Python extensions to get functions such as code completion, syntax highlighting, and debugging. Use the debugger to track code step by step, find and fix errors. Integrate Git for version control. Use code formatting tools to maintain code consistency. Use the Linting tool to spot potential problems ahead of time.
 Choosing Between PHP and Python: A Guide
Apr 18, 2025 am 12:24 AM
Choosing Between PHP and Python: A Guide
Apr 18, 2025 am 12:24 AM
PHP is suitable for web development and rapid prototyping, and Python is suitable for data science and machine learning. 1.PHP is used for dynamic web development, with simple syntax and suitable for rapid development. 2. Python has concise syntax, is suitable for multiple fields, and has a strong library ecosystem.
 Can vscode be used for mac
Apr 15, 2025 pm 07:36 PM
Can vscode be used for mac
Apr 15, 2025 pm 07:36 PM
VS Code is available on Mac. It has powerful extensions, Git integration, terminal and debugger, and also offers a wealth of setup options. However, for particularly large projects or highly professional development, VS Code may have performance or functional limitations.
 Can vscode run ipynb
Apr 15, 2025 pm 07:30 PM
Can vscode run ipynb
Apr 15, 2025 pm 07:30 PM
The key to running Jupyter Notebook in VS Code is to ensure that the Python environment is properly configured, understand that the code execution order is consistent with the cell order, and be aware of large files or external libraries that may affect performance. The code completion and debugging functions provided by VS Code can greatly improve coding efficiency and reduce errors.
 Golang vs. Python: Concurrency and Multithreading
Apr 17, 2025 am 12:20 AM
Golang vs. Python: Concurrency and Multithreading
Apr 17, 2025 am 12:20 AM
Golang is more suitable for high concurrency tasks, while Python has more advantages in flexibility. 1.Golang efficiently handles concurrency through goroutine and channel. 2. Python relies on threading and asyncio, which is affected by GIL, but provides multiple concurrency methods. The choice should be based on specific needs.
