
 Backend Development
Python Tutorial
Detailed explanation of the python code of asynchronous proxy and proxy pool
Backend Development
Python Tutorial
Detailed explanation of the python code of asynchronous proxy and proxy pool
Detailed explanation of the python code of asynchronous proxy and proxy pool

This article mainly introduces the relevant knowledge of Python to implement asynchronous proxy crawlers and proxy pools. It has a very good reference value. Let’s take a look at it with the editor.
Using python asyncio to implement an asynchronous proxy pool , crawl the free proxies on the proxy website according to the rules, store them in redis after verifying their validity, regularly expand the number of proxies and check the validity of the proxies in the pool, and remove invalid proxies. At the same time, a server is implemented using aiohttp, and other programs can obtain the proxy from the proxy pool by accessing the corresponding URL.
Source code
Github
Environment
Python 3.5+
Redis
PhantomJS(optional)
Supervisord(optional )
Because the code uses asyncio's async and await syntax extensively, they are only provided in Python3.5, so it is best to use Python3.5 and above. I Python3.6 is used.
Dependencies
redis
aiohttp
bs4
- ##lxml ##requests
- selenium
- The selenium package is mainly used to operate PhantomJS.
The code is explained below.
1. Crawler part
Core codeasync def start(self):
for rule in self._rules:
parser = asyncio.ensure_future(self._parse_page(rule)) # 根据规则解析页面来获取代理
logger.debug('{0} crawler started'.format(rule.rule_name))
if not rule.use_phantomjs:
await page_download(ProxyCrawler._url_generator(rule), self._pages, self._stop_flag) # 爬取代理网站的页面
else:
await page_download_phantomjs(ProxyCrawler._url_generator(rule), self._pages,
rule.phantomjs_load_flag, self._stop_flag) # 使用PhantomJS爬取
await self._pages.join()
parser.cancel()
logger.debug('{0} crawler finished'.format(rule.rule_name))
implemented using asyncio.Queue. The following is a simple implementation of this model: import asyncio
from random import random
async def produce(queue, n):
for x in range(1, n + 1):
print('produce ', x)
await asyncio.sleep(random())
await queue.put(x) # 向queue中放入item
async def consume(queue):
while 1:
item = await queue.get() # 等待从queue中获取item
print('consume ', item)
await asyncio.sleep(random())
queue.task_done() # 通知queue当前item处理完毕
async def run(n):
queue = asyncio.Queue()
consumer = asyncio.ensure_future(consume(queue))
await produce(queue, n) # 等待生产者结束
await queue.join() # 阻塞直到queue不为空
consumer.cancel() # 取消消费者任务,否则它会一直阻塞在get方法处
def aio_queue_run(n):
loop = asyncio.get_event_loop()
try:
loop.run_until_complete(run(n)) # 持续运行event loop直到任务run(n)结束
finally:
loop.close()
if name == 'main':
aio_queue_run(5)
produce 1
produce 2
consume 1
produce 3
produce 4
consume 2
produce 5
consume 3
consume 4
consume 5
Crawling pagesasync def page_download(urls, pages, flag):
url_generator = urls
async with aiohttp.ClientSession() as session:
for url in url_generator:
if flag.is_set():
break
await asyncio.sleep(uniform(delay - 0.5, delay + 1))
logger.debug('crawling proxy web page {0}'.format(url))
try:
async with session.get(url, headers=headers, timeout=10) as response:
page = await response.text()
parsed = html.fromstring(decode_html(page)) # 使用bs4来辅助lxml解码网页:http://lxml.de/elementsoup.html#Using only the encoding detection
await pages.put(parsed)
url_generator.send(parsed) # 根据当前页面来获取下一页的地址
except StopIteration:
break
except asyncio.TimeoutError:
logger.error('crawling {0} timeout'.format(url))
continue # TODO: use a proxy
except Exception as e:
logger.error(e)
, most proxy websites can use the above method to crawl, for websites that use js to dynamically generate pages, you can use selenium to control PhantomJS to crawl - this project does not have high requirements for the efficiency of the crawler, and the update frequency of the proxy website is limited, so it is not required For frequent crawling, PhantomJS can be used.
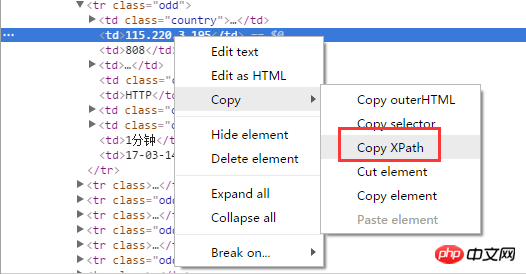
Parse proxyThe easiest way is to use xpath to parse the proxy. If you use the Chrome browser, you can get it directly by right-clicking xpath of the selected page element:
Chrome's extension "XPath Helper" to run and debug## directly on the page #xpath, very convenient:
BeautifulSoup does not support xpath and uses lxml to parse the page. The code is as follows: 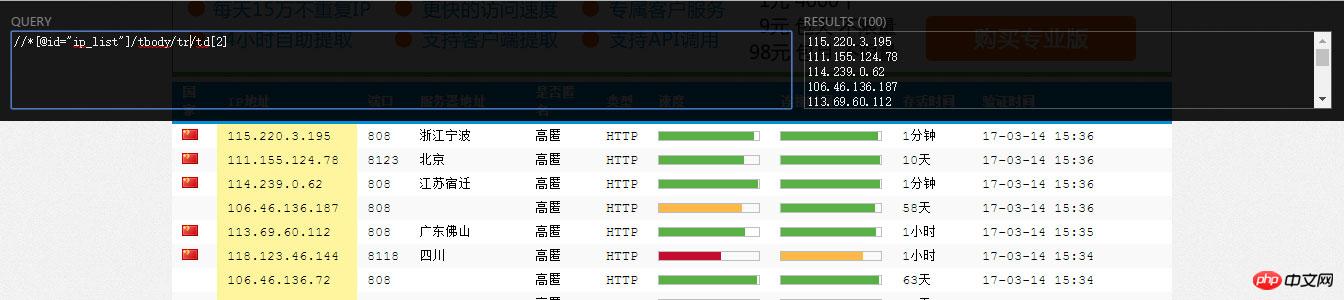
async def _parse_proxy(self, rule, page):
 ips = page.xpath(rule.ip_xpath) # 根据xpath解析得到list类型的ip地址集合
 ports = page.xpath(rule.port_xpath) # 根据xpath解析得到list类型的ip地址集合
 if not ips or not ports:
 logger.warning('{2} crawler could not get ip(len={0}) or port(len={1}), please check the xpaths or network'.
  format(len(ips), len(ports), rule.rule_name))
 return
 proxies = map(lambda x, y: '{0}:{1}'.format(x.text.strip(), y.text.strip()), ips, ports)
 if rule.filters: # 根据过滤字段来过滤代理,如“高匿”、“透明”等
 filters = []
 for i, ft in enumerate(rule.filters_xpath):
  field = page.xpath(ft)
  if not field:
  logger.warning('{1} crawler could not get {0} field, please check the filter xpath'.
   format(rule.filters[i], rule.rule_name))
  continue
  filters.append(map(lambda x: x.text.strip(), field))
 filters = zip(*filters)
 selector = map(lambda x: x == rule.filters, filters)
 proxies = compress(proxies, selector)
for proxy in proxies:
await self._proxies.put(proxy) # 解析后的代理放入asyncio.Queue中The rules for website crawling, proxy parsing, filtering, and other operations are defined by the rule classes of each proxy website. Metaclasses and base classes are used to manage rule classes. The base class is defined as follows:
class CrawlerRuleBase(object, metaclass=CrawlerRuleMeta):
 start_url = None
 page_count = 0
 urls_format = None
 next_page_xpath = None
 next_page_host = ''
 use_phantomjs = False
 phantomjs_load_flag = None
 filters = ()
 ip_xpath = None
 port_xpath = None
 filters_xpath = ()
start_url
(required)The starting page of the crawler.
ip_xpath
(required)XPath rules for crawling IP.
port_xpath
(required)XPath rules for crawling port numbers.
page_count
The number of crawled pages.
urls_format
Format of page address String
next_page_host Use xpath rules to obtain the url of the next page (commonly the relative path), and combine it with the host to get the next page Page address: next_page_host + url.
use_phantomjs
, phantomjs_load_flaguse_phantomjs is used to identify whether to use PhantomJS to crawl the website. If used, you need to define phantomjs_load_flag (on the web page A certain element, str type) as a sign that the PhantomJS page has been loaded.
filters
Filter field collection, iterable type. Used to filter proxies.
will be thrown, which will not be described here.
目前已经实现的规则有西刺代理、快代理、360代理、66代理和 秘密代理。新增规则类也很简单,通过继承CrawlerRuleBase来定义新的规则类YourRuleClass,放在proxypool/rules目录下,并在该目录下的init.py中添加from . import YourRuleClass(这样通过CrawlerRuleBase.subclasses()就可以获取全部的规则类了),重启正在运行的proxy pool即可应用新的规则。
2. 检验部分
免费的代理虽然多,但是可用的却不多,所以爬取到代理后需要对其进行检验,有效的代理才能放入代理池中,而代理也是有时效性的,还要定期对池中的代理进行检验,及时移除失效的代理。
这部分就很简单了,使用aiohttp通过代理来访问某个网站,若超时,则说明代理无效。
async def validate(self, proxies):
 logger.debug('validator started')
 while 1:
 proxy = await proxies.get()
 async with aiohttp.ClientSession() as session:
  try:
  real_proxy = 'http://' + proxy
  async with session.get(self.validate_url, proxy=real_proxy, timeout=validate_timeout) as resp:
   self._conn.put(proxy)
  except Exception as e:
  logger.error(e)
 proxies.task_done()
3. server部分
使用aiohttp实现了一个web server,启动后,访问http://host:port即可显示主页:
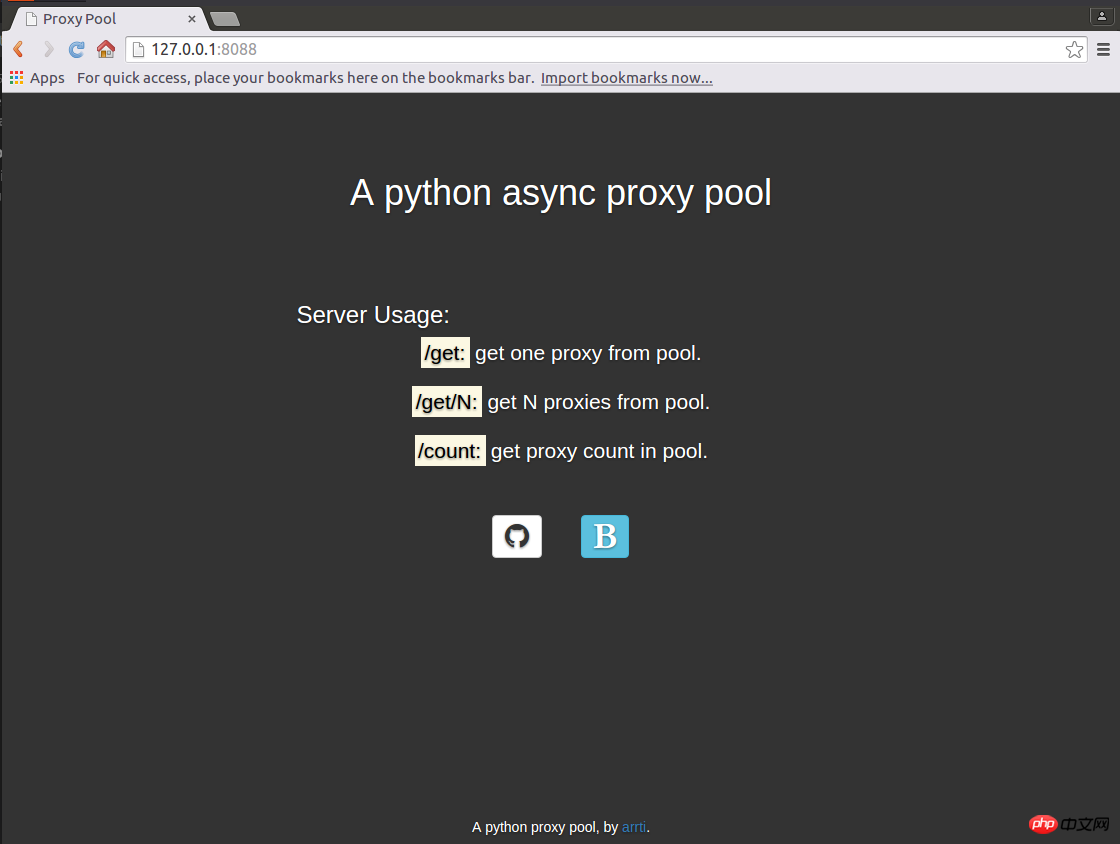
访问host:port/get来从代理池获取1个代理,如:'127.0.0.1:1080';
访问host:port/get/n来从代理池获取n个代理,如:"['127.0.0.1:1080', '127.0.0.1:443', '127.0.0.1:80']";
访问host:port/count来获取代理池的容量,如:'42'。
因为主页是一个静态的html页面,为避免每来一个访问主页的请求都要打开、读取以及关闭该html文件的开销,将其缓存到了redis中,通过html文件的修改时间来判断其是否被修改过,如果修改时间与redis缓存的修改时间不同,则认为html文件被修改了,则重新读取文件,并更新缓存,否则从redis中获取主页的内容。
返回代理是通过aiohttp.web.Response(text=ip.decode('utf-8'))实现的,text要求str类型,而从redis中获取到的是bytes类型,需要进行转换。返回的多个代理,使用eval即可转换为list类型。
返回主页则不同,是通过aiohttp.web.Response(body=main_page_cache, content_type='text/html') ,这里body要求的是bytes类型,直接将从redis获取的缓存返回即可,conten_type='text/html'必不可少,否则无法通过浏览器加载主页,而是会将主页下载下来——在运行官方文档中的示例代码的时候也要注意这点,那些示例代码基本上都没有设置content_type。
这部分不复杂,注意上面提到的几点,而关于主页使用的静态资源文件的路径,可以参考之前的博客《aiohttp之添加静态资源路径》。
4. 运行
将整个代理池的功能分成了3个独立的部分:
proxypool
定期检查代理池容量,若低于下限则启动代理爬虫并对代理检验,通过检验的爬虫放入代理池,达到规定的数量则停止爬虫。
proxyvalidator
用于定期检验代理池中的代理,移除失效代理。
proxyserver
启动server。
这3个独立的任务通过3个进程来运行,在Linux下可以使用supervisod来=管理这些进程,下面是supervisord的配置文件示例:
; supervisord.conf
[unix_http_server]
file=/tmp/supervisor.sock

[inet_http_server]
port=127.0.0.1:9001

[supervisord]
logfile=/tmp/supervisord.log
logfile_maxbytes=5MB
logfile_backups=10
loglevel=debug
pidfile=/tmp/supervisord.pid
nodaemon=false
minfds=1024
minprocs=200

[rpcinterface:supervisor]
supervisor.rpcinterface_factory = supervisor.rpcinterface:make_main_rpcinterface

[supervisorctl]
serverurl=unix:///tmp/supervisor.sock

[program:proxyPool]
command=python /path/to/ProxyPool/run_proxypool.py
redirect_stderr=true
stdout_logfile=NONE

[program:proxyValidator]
command=python /path/to/ProxyPool/run_proxyvalidator.py
redirect_stderr=true
stdout_logfile=NONE

[program:proxyServer]
command=python /path/to/ProxyPool/run_proxyserver.py
autostart=false
redirect_stderr=true
stdout_logfile=NONE
因为项目自身已经配置了日志,所以这里就不需要再用supervisord捕获stdout和stderr了。通过supervisord -c supervisord.conf启动supervisord,proxyPool和proxyServer则会随之自动启动,proxyServer需要手动启动,访问http://127.0.0.1:9001即可通过网页来管理这3个进程了:

supervisod的官方文档说目前(版本3.3.1)不支持python3,但是我在使用过程中没有发现什么问题,可能也是由于我并没有使用supervisord的复杂功能,只是把它当作了一个简单的进程状态监控和启停工具了。
【相关推荐】
1. Python免费视频教程
2. Python Meets Data Collection Video Tutorial
The above is the detailed content of Detailed explanation of the python code of asynchronous proxy and proxy pool. For more information, please follow other related articles on the PHP Chinese website!

Hot AI Tools

Undresser.AI Undress
AI-powered app for creating realistic nude photos

AI Clothes Remover
Online AI tool for removing clothes from photos.

Undress AI Tool
Undress images for free

Clothoff.io
AI clothes remover

AI Hentai Generator
Generate AI Hentai for free.

Hot Article
Hot Tools

Notepad++7.3.1
Easy-to-use and free code editor

SublimeText3 Chinese version
Chinese version, very easy to use

Zend Studio 13.0.1
Powerful PHP integrated development environment

Dreamweaver CS6
Visual web development tools

SublimeText3 Mac version
God-level code editing software (SublimeText3)
Hot Topics
 1378
1378
 52
52

 The 2-Hour Python Plan: A Realistic Approach
Apr 11, 2025 am 12:04 AM
The 2-Hour Python Plan: A Realistic Approach
Apr 11, 2025 am 12:04 AM
You can learn basic programming concepts and skills of Python within 2 hours. 1. Learn variables and data types, 2. Master control flow (conditional statements and loops), 3. Understand the definition and use of functions, 4. Quickly get started with Python programming through simple examples and code snippets.
 Python: Exploring Its Primary Applications
Apr 10, 2025 am 09:41 AM
Python: Exploring Its Primary Applications
Apr 10, 2025 am 09:41 AM
Python is widely used in the fields of web development, data science, machine learning, automation and scripting. 1) In web development, Django and Flask frameworks simplify the development process. 2) In the fields of data science and machine learning, NumPy, Pandas, Scikit-learn and TensorFlow libraries provide strong support. 3) In terms of automation and scripting, Python is suitable for tasks such as automated testing and system management.
 Navicat's method to view MongoDB database password
Apr 08, 2025 pm 09:39 PM
Navicat's method to view MongoDB database password
Apr 08, 2025 pm 09:39 PM
It is impossible to view MongoDB password directly through Navicat because it is stored as hash values. How to retrieve lost passwords: 1. Reset passwords; 2. Check configuration files (may contain hash values); 3. Check codes (may hardcode passwords).
 How to use AWS Glue crawler with Amazon Athena
Apr 09, 2025 pm 03:09 PM
How to use AWS Glue crawler with Amazon Athena
Apr 09, 2025 pm 03:09 PM
As a data professional, you need to process large amounts of data from various sources. This can pose challenges to data management and analysis. Fortunately, two AWS services can help: AWS Glue and Amazon Athena.
 How to start the server with redis
Apr 10, 2025 pm 08:12 PM
How to start the server with redis
Apr 10, 2025 pm 08:12 PM
The steps to start a Redis server include: Install Redis according to the operating system. Start the Redis service via redis-server (Linux/macOS) or redis-server.exe (Windows). Use the redis-cli ping (Linux/macOS) or redis-cli.exe ping (Windows) command to check the service status. Use a Redis client, such as redis-cli, Python, or Node.js, to access the server.
 How to read redis queue
Apr 10, 2025 pm 10:12 PM
How to read redis queue
Apr 10, 2025 pm 10:12 PM
To read a queue from Redis, you need to get the queue name, read the elements using the LPOP command, and process the empty queue. The specific steps are as follows: Get the queue name: name it with the prefix of "queue:" such as "queue:my-queue". Use the LPOP command: Eject the element from the head of the queue and return its value, such as LPOP queue:my-queue. Processing empty queues: If the queue is empty, LPOP returns nil, and you can check whether the queue exists before reading the element.
 How to view server version of Redis
Apr 10, 2025 pm 01:27 PM
How to view server version of Redis
Apr 10, 2025 pm 01:27 PM
Question: How to view the Redis server version? Use the command line tool redis-cli --version to view the version of the connected server. Use the INFO server command to view the server's internal version and need to parse and return information. In a cluster environment, check the version consistency of each node and can be automatically checked using scripts. Use scripts to automate viewing versions, such as connecting with Python scripts and printing version information.
 How secure is Navicat's password?
Apr 08, 2025 pm 09:24 PM
How secure is Navicat's password?
Apr 08, 2025 pm 09:24 PM
Navicat's password security relies on the combination of symmetric encryption, password strength and security measures. Specific measures include: using SSL connections (provided that the database server supports and correctly configures the certificate), regularly updating Navicat, using more secure methods (such as SSH tunnels), restricting access rights, and most importantly, never record passwords.
