

h5canvas implements special effects code for falling snowflakes

This article mainly introduces in detail HTML5 canvas to achieve the special effect of falling snowflakes, and the effect is fascinating and very realistic animation effect. Interested friends can refer to it
I have seen many displays on the Internet showing the effect of html5 snowflakes flying, which is indeed very fascinating. I believe that everyone is as excited as me and is also very curious and wants to study how to implement the code; although many places also I can download these source codes, but I don’t know other people’s ideas and analysis of difficulties when making such animations.
I just happened to study a little these days, and I took advantage of the time to dissect it step by step from demand analysis, knowledge points, and programming. If I try to make a fool of myself in front of you, please don’t laugh. .
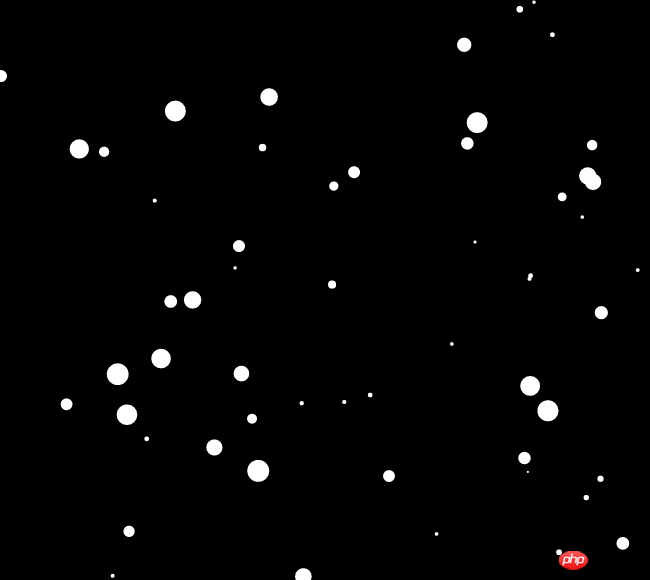
The final rendering is as follows:
Figure 1
1. Requirements analysis
1. Circular snowflakes
In this example, the shape of the snowflakes is circular
2. The number of snowflakes is fixed
Carefully observe the number of white snowflakes according to Figure 1. During the falling process, The number of snowflakes in the picture should be fixed. This requirement needs to be obtained through our observation and analysis. This is consistent with the scene we see in real life where snowflakes are flying all over the sky.
3. The size of snowflakes is inconsistent
Each snowflake has a different size, which means that the radius of the snowflake is random. This is also consistent with the scene where we see snowflakes flying all over the sky in real life.
4. The position of the snowflakes is moving
Snowflakes fall, and naturally their positions are also moving.
2. Knowledge points
1. Use Html5 Canvas+JavaScript to draw a circle - forming a circular snowflake
In Html5 , you need to use Canvas and draw a circle with JavaScript to form a circular snowflake—arc(x,y,r,start,stop);
2. Random numbers—generate circles with different radii and coordinates Snowflake
In this example, when the web page is loaded for the first time, a certain number of snowflakes with different radii and positions need to be generated, so the radius and coordinates are random numbers; while the snowflakes are falling, their radius remains unchanged and their coordinates remain unchanged. Changes within a certain range, so the coordinates are also random numbers at this time - Math.random()
3. Programming
1. Preparation
Put a canvas and set the background color of the entire body to black
HTML code:
XML/HTML CodeCopy content to clipboard
<canvas id="mycanvas">
    您的浏览器不支持canvas画布
</canvas>CSS Code:
CSS CodeCopy content to clipboard
* {
    margin: 0;
    padding: 0;
}
#mycanvas {
    background: black;
}The effect at this time is as follows:

Note: canvas has an initialized height and width by default, so there is no need to worry about it
2. The canvas fills the screen
The JavaScript code is as follows:
JavaScript CodeCopy the content to the clipboard
//获取mycanvas画布
    var can = document.getElementById("mycanvas");
    var ctx = can.getContext("2d");
    //画布宽度
    var wid = window.innerWidth;
    //画布高度
    var hei = window.innerHeight;
    can.width=wid;
can.height=hei;The effect at this time is as follows:

3. Initialization generates a fixed number of snowflakes
According to our above demand analysis And interpretation of knowledge points, first of all, the number of snowflakes is fixed, so we need to define a variable var snow = 100; here it is assumed that the number of snowflakes is 100,;
When generating snowflakes, each Each snowflake has a different radius and position. We regard each snowflake as an object. Then the attributes of this object include: radius and coordinates (X, Y). Then a snowflake object can be written as var snowOject={x:1,y: 10,r:5}, here represents a circular snowflake with coordinates (1,10) and radius 5; in this example, since the radius and coordinates are random numbers, Math.random() is used to generate 100 snowflakes respectively. Generate radius and coordinates (X, Y);
We have 100 snowflakes here, so in order to facilitate subsequent operations, we use an array to save these 100 snowflake objects.
The JavaScript code is as follows:
JavaScript CodeCopy the content to the clipboard
//雪花数目
var snow = 100;
//雪花坐标、半径
var arr = []; //保存各圆坐标及半径
for (var i = 0; i < snow; i++) {
arr.push({
x: Math.random() * wid,
y: Math.random() * hei,
r: Math.random() * 10 + 1
})
}4. Draw snowflakes
上面我们已经将100个雪花半径、坐标(X、Y)生成,下面就是循环使用canvas画出雪花了(这里就是画圆),这里定义一个函数
JavaScript代码如下:
JavaScript Code复制内容到剪贴板
//画雪花
function DrawSnow() {
    ctx.fillStyle="white";
    ctx.beginPath();
    for (var i = 0; i < snow; i++) {
        var p = arr[i];
        ctx.moveTo(p.x,p.y);
        ctx.arc(p.x,p.y,p.r,0,2*Math.PI,false);
    }
    ctx.fill();

ctx.closePath();然后调用 DrawSnow()函数,效果如下:
可以尝试多次刷新网页看是否会生成不同大小、位置的雪花(正常情况下是可以的),做到这里就已经接近最终效果了
注意:由于这里需要绘制100个圆,所以每当画一个圆时重新定义绘制开始坐标即:ctx.moveTo(p.x,p.y);否则会出现异样效果,不信可以试试呀
5、雪花飘动
上面我们已经画出100个雪花,可惜只能依靠刷新网页才能看到变化效果,但是我们需要实现的是雪花不停的移动位置。
首先我们需要借助setInterval函数不停的重画雪花,这里间隔时间为50毫秒:setInterval(DrawSnow,50);
同时每一朵雪花的坐标(X、Y)需要不停的改变(在一定幅度内),我们这里的雪花是从左上方飘落到右下方,所以每朵X、Y坐标值都在不停的增大,那我们用一个函数SnowFall()定义雪花飘过规则
该函数代码如下:
JavaScript Code复制内容到剪贴板
//雪花飘落
function SnowFall() {
    for (var i = 0; i < snow; i++) {
        var p = arr[i];
        p.y += Math.random() * 2 + 1;
        if (p.y > hei) {
            p.y = 0;
        }
        p.x += Math.random() * 2 + 1;
        if (p.x > wid) {
            p.x = 0;
    <span style="white-space:pre">    </span>}
    }
}然后将该函数放入DrawSnow()执行,注意:我们每隔50毫毛重画雪花,必须擦除画布,所以DrawSnow()函数体内必须在前面执行clearRect()函数,即:ctx.clearRect(0, 0, wid, hei);
此时DrawSnow函数定义如下:
JavaScript Code复制内容到剪贴板
//画雪花
function DrawSnow() {
    ctx.clearRect(0, 0, wid, hei);
    ctx.fillStyle = "white";
    ctx.beginPath();
    for (var i = 0; i < snow; i++) {
        var p = arr[i];
        ctx.moveTo(p.x, p.y);
        ctx.arc(p.x, p.y, p.r, 0, 2 * Math.PI, false);
    }
    ctx.fill();
    SnowFall();
    ctx.closePath();
}最后执行setInterval(DrawSnow, 50);
OK,经过我们上述步骤,小伙伴们是否已经对整个过程及技术实现很清晰了。
完整代码如下(大家可以直接复制到自己项目中执行,测试下效果):
XML/HTML Code复制内容到剪贴板
<!DOCTYPE html>
<html>
    <head>
        <meta charset="utf-8" />
        <title></title>
        <script src="js/jquery-1.8.3.min.js"></script>
        <style type="text/css">
            * {
                margin: 0;
                padding: 0;
            }

            #mycanvas {
                background: black;
            }
        </style>
    </head>

    <body>
        <canvas id="mycanvas">
            您的浏览器不支持canvas画布
        </canvas>
        <script>
            //获取mycanvas画布
            var can = document.getElementById("mycanvas");
            var ctx = can.getContext("2d");
            //画布宽度
            var wid = window.innerWidth;
            //画布高度
            var hei = window.innerHeight;
            can.width = wid;
            can.height = hei;
            //雪花数目
            var snow = 100;
            //雪花坐标、半径
            var arr = []; //保存各圆坐标及半径
            for (var i = 0; i < snow; i++) {
                arr.push({
                    x: Math.random() * wid,
                    y: Math.random() * hei,
                    r: Math.random() * 10 + 1
                })
            }
            //画雪花
            function DrawSnow() {
                ctx.clearRect(0, 0, wid, hei);
                ctx.fillStyle = "white";
                ctx.beginPath();
                for (var i = 0; i < snow; i++) {
                    var p = arr[i];
                    ctx.moveTo(p.x, p.y);
                    ctx.arc(p.x, p.y, p.r, 0, 2 * Math.PI, false);
                }
                ctx.fill();
                SnowFall();
                ctx.closePath();
            }
            //雪花飘落
            function SnowFall() {
                for (var i = 0; i < snow; i++) {
                    var p = arr[i];
                    p.y += Math.random() * 2 + 1;
                    if (p.y > hei) {
                        p.y = 0;
                    }
                    p.x += Math.random() * 2 + 1;
                    if (p.x > wid) {
                        p.x = 0;
                    }
                }
            }
            setInterval(DrawSnow, 50);
        </script>
    </body>

</html>【相关推荐】
1. 特别推荐:“php程序员工具箱”V0.1版本下载
2. h5 Canvas中Fill 与Stroke文字效果实现实例
The above is the detailed content of h5canvas implements special effects code for falling snowflakes. For more information, please follow other related articles on the PHP Chinese website!

Hot AI Tools

Undresser.AI Undress
AI-powered app for creating realistic nude photos

AI Clothes Remover
Online AI tool for removing clothes from photos.

Undress AI Tool
Undress images for free

Clothoff.io
AI clothes remover

Video Face Swap
Swap faces in any video effortlessly with our completely free AI face swap tool!

Hot Article
Hot Tools

Notepad++7.3.1
Easy-to-use and free code editor

SublimeText3 Chinese version
Chinese version, very easy to use

Zend Studio 13.0.1
Powerful PHP integrated development environment

Dreamweaver CS6
Visual web development tools

SublimeText3 Mac version
God-level code editing software (SublimeText3)
Hot Topics
 1387
1387
 52
52

 How to use Vue to implement pop-up window effects
Sep 22, 2023 am 09:40 AM
How to use Vue to implement pop-up window effects
Sep 22, 2023 am 09:40 AM
How to use Vue to implement pop-up window effects requires specific code examples. In recent years, with the development of web applications, pop-up window effects have become one of the commonly used interaction methods among developers. As a popular JavaScript framework, Vue provides rich functions and ease of use, and is very suitable for implementing pop-up window effects. This article will introduce how to use Vue to implement pop-up window effects and provide specific code examples. First, we need to create a new Vue project using Vue's CLI tool. open end
 Implement card flipping effects in WeChat mini programs
Nov 21, 2023 am 10:55 AM
Implement card flipping effects in WeChat mini programs
Nov 21, 2023 am 10:55 AM
Implementing card flipping effects in WeChat mini programs In WeChat mini programs, implementing card flipping effects is a common animation effect that can improve user experience and the attractiveness of interface interactions. The following will introduce in detail how to implement the special effect of card flipping in the WeChat applet and provide relevant code examples. First, you need to define two card elements in the page layout file of the mini program, one for displaying the front content and one for displaying the back content. The specific sample code is as follows: <!--index.wxml-->&l
 HTML, CSS and jQuery: Techniques for achieving image folding and expanding effects
Oct 24, 2023 am 11:05 AM
HTML, CSS and jQuery: Techniques for achieving image folding and expanding effects
Oct 24, 2023 am 11:05 AM
HTML, CSS and jQuery: An introduction to techniques for implementing image folding and expanding special effects. In web design and development, we often need to implement some dynamic special effects to increase the attractiveness and interactivity of the page. Among them, the image folding and unfolding effect is a common but interesting technique. Through this special effect, we can make the image fold or expand under the user's operation to show more content or details. This article will introduce how to use HTML, CSS and jQuery to achieve this effect, with specific code examples. realize thoughts
 Steps to turn off mouse track effects in Windows 10
Dec 31, 2023 pm 09:53 PM
Steps to turn off mouse track effects in Windows 10
Dec 31, 2023 pm 09:53 PM
When we use the win10 system, we can make many personalized settings, including mouse track special effects. However, many users do not know how to turn off the mouse track special effects in win10. For this reason, we have provided detailed methods. How to turn off the mouse track effects in Windows 10: 1. First, right-click on a blank space on the desktop, and then click "Personalize". 2. Then click "Theme" on the left and select "Mouse Cursor" on the right. 3. After entering the properties, you can see and select "Pointer Options". 4. Then scroll down to see the visibility, and the √ is checked at this time. 5. Uncheck, then click Apply and OK.
 Learn the canvas framework and explain the commonly used canvas framework in detail
Jan 17, 2024 am 11:03 AM
Learn the canvas framework and explain the commonly used canvas framework in detail
Jan 17, 2024 am 11:03 AM
Explore the Canvas framework: To understand what are the commonly used Canvas frameworks, specific code examples are required. Introduction: Canvas is a drawing API provided in HTML5, through which we can achieve rich graphics and animation effects. In order to improve the efficiency and convenience of drawing, many developers have developed different Canvas frameworks. This article will introduce some commonly used Canvas frameworks and provide specific code examples to help readers gain a deeper understanding of how to use these frameworks. 1. EaselJS framework Ea
 uniapp implements how to use canvas to draw charts and animation effects
Oct 18, 2023 am 10:42 AM
uniapp implements how to use canvas to draw charts and animation effects
Oct 18, 2023 am 10:42 AM
How to use canvas to draw charts and animation effects in uniapp requires specific code examples 1. Introduction With the popularity of mobile devices, more and more applications need to display various charts and animation effects on the mobile terminal. As a cross-platform development framework based on Vue.js, uniapp provides the ability to use canvas to draw charts and animation effects. This article will introduce how uniapp uses canvas to achieve chart and animation effects, and give specific code examples. 2. canvas
 How to use Vue to implement video player special effects
Sep 20, 2023 pm 03:43 PM
How to use Vue to implement video player special effects
Sep 20, 2023 pm 03:43 PM
How to use Vue to implement video player special effects Summary: This article will introduce how to use the Vue.js framework to implement a video player with various special effects. We will use Vue directives and components to implement play/pause buttons, progress bars, volume controls, and full screen functionality. At the same time, we will also add some animation effects to enhance the user experience. Different special effects will be introduced in detail below, including code examples. Play/pause button effects: It is very simple to use Vue instructions to implement play/pause button effects. first,
 Demystifying the Canvas API: everything from simple drawing to advanced special effects
Jan 17, 2024 am 09:44 AM
Demystifying the Canvas API: everything from simple drawing to advanced special effects
Jan 17, 2024 am 09:44 AM
CanvasAPI is a powerful drawing tool provided by HTML5, which can implement various functions from basic drawing to advanced special effects. This article will give you an in-depth understanding of how to use CanvasAPI and provide specific code examples. Basic drawing The most basic part of Canvas API is to draw simple graphics, such as rectangles, circles, straight lines, etc. Here is a code example that creates a rectangle and fills it with color: constcanvas=document.getElementB
