
This article mainly introduces you to the method of solving the gap between the top and bottom of the img tag. Because I encountered this problem at work recently, I wanted to record it. For your convenience or for friends in need, let’s take a look below.
In our normal development process, we often need to use multiple pictures, and when using multiple pictures, we usually use a list to host our img.
<!DOCTYPE html>
<html lang="en">
<head>
    <meta charset="UTF-8">
    <title>Document</title>
    <style type="text/css">
        img{
            height: 200px;
            margin: 0;
            padding: 0;
            border-bottom: 1px solid red;
        }
        ul{
            border: 1px solid blue;
            list-style: none;
            padding: 0;
            margin: 0;
        }
    </style>
</head>
<body>

    <ul>
        <li>
            <img src="lipeng.png">
        </li>
    </ul>
</body>
</html>But this time we discovered a problem, why is there an extra line under my picture?

what is going on?
Have I not cleared all the outer margins and inner margins of the img?
Actually, this is actually caused by the inline element.
Any visible element that is not a block-level element is an inline element, and its performance characteristics are in the form of "row layout". ----"CSS Definitive Guide"
What does it mean?
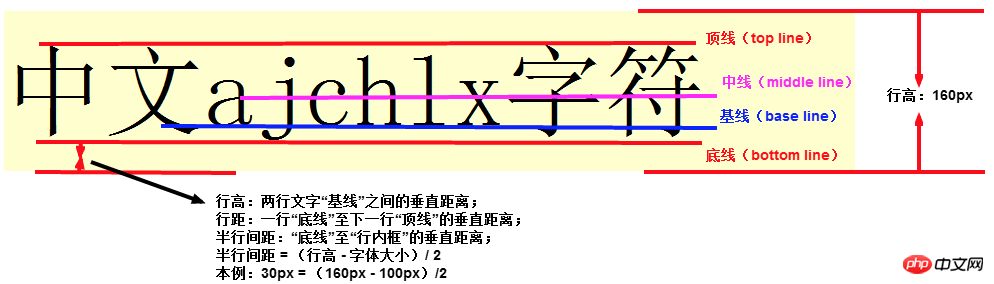
means that in fact, inline elements such as pictures and text, their default alignment is aligned with the baseline of its parent, but what you align is the baseline, and it is the element that expands the height. The overall height (bottom line) will definitely cause a certain gap, which is the problem we had above.
Now that we know the cause of this problem, it will be much simpler to solve it.
1. The first solution
Since this problem only occurs with inline elements, we can naturally solve this problem simply and crudely, then Isn't it enough to "change personality" to our elements and change them from inline to block?
<style type="text/css">
        img{
            height: 200px;
            margin: 0;
            padding: 0;
            border-bottom: 1px solid red;

            display: block;
        }
        ul{
            border: 1px solid blue;
            list-style: none;
            padding: 0;
            margin: 0;
        }
</style>2. The second solution
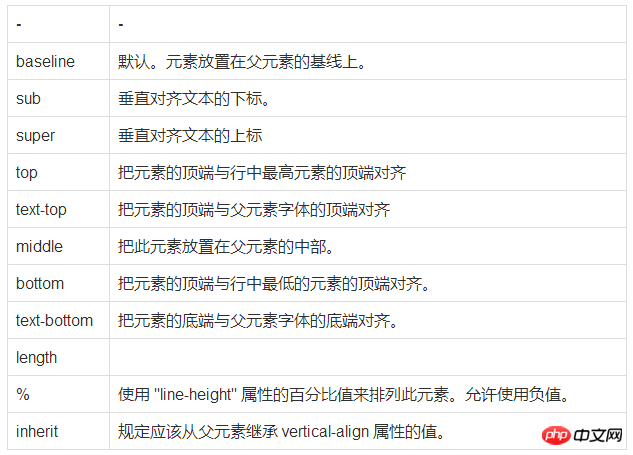
This is too rough, change the gender, and return it later How fun it is to play, so we have to try curve rescue. We can modify its vertical alignment. Is this okay?
   <style type="text/css">
        img{
            height: 200px;
            margin: 0;
            padding: 0;
            border-bottom: 1px solid red;

            vertical-align: middle;
        }
        ul{
            border: 1px solid blue;
            list-style: none;
            padding: 0;
            margin: 0;
        }
</style>It can be seen that this can also achieve the desired effect.
The reason is that the default attribute of vertical-align is baseline. As long as we set an attribute different from baseline, we can avoid this problem.
3. The third solution
#But the alignment is modified, which may also cause problems. , can we make this element float? Since you are no longer in the current document flow, you will naturally not refer to this text for alignment when laying out.
We can use floats.
<style type="text/css">
        img{
            height: 200px;
            margin: 0;
            padding: 0;
            border-bottom: 1px solid red;

            float: left;
        }
        ul li {
            overflow: hidden;
        }
        ul{
            border: 1px solid blue;
            list-style: none;
            padding: 0;
            margin: 0;
        }
</style>This can also solve this problem, but please note that "floating is good, but don't be greedy."
You must be able to correctly solve the impact of floating, and if you originally planned to do a text wrapping effect, then using floating must be your best choice.
4. The fourth solution
If none of the above solutions can solve your problem, then the only option is to use my killer weapon .
You can set the text size to 0 for your parent element.
<style type="text/css">
        img{
            height: 200px;
            margin: 0;
            padding: 0;
            border-bottom: 1px solid red;
        }
        ul li {
            font-size: 0px;
        }
        ul{
            border: 1px solid blue;
            list-style: none;
            padding: 0;
            margin: 0;
        }
</style>Since you are aligning according to the baseline of the text, I will directly set the text to you so that you can't position it, but this method, It is only recommended to use it when you are "too anxious to get it out".
The above is the detailed content of How to solve the gap between the top and bottom of the img tag. For more information, please follow other related articles on the PHP Chinese website!


![[Web front-end] Node.js quick start](https://img.php.cn/upload/course/000/000/067/662b5d34ba7c0227.png)


