
 Operation and Maintenance
Windows Operation and Maintenance
Share a graphic example of Win2003 IIS installation method
Operation and Maintenance
Windows Operation and Maintenance
Share a graphic example of Win2003 IIS installation method
Share a graphic example of Win2003 IIS installation method

Win server2003 IIS installation method, whether it is uninstalling and reinstalling, or installing for the first time, you need to know. By default, iis is not installed.
Generally everyone installs the win2003 system first, graphic tutorial Win2003 server system installation graphic tutorial
It must be installed through the control panel. The specific method is:
1. Enter the "Control Panel".
2. Double-click "Add or RemovePrograms".
3. Click Add/Remove Windows Components.
4. In the "Components" list box, double-click "Application Server".
5. Double-click "Internet Information Services (IIS)".
6. Select "World Wide Web Service" and "File Transfer Protocol (FTP) Service".
7. Double-click "World Wide Web Service" and select "Active Server Pages" and "World Wide Web Service".
After installing IIS, then set up the Web server. The specific method is:
1. Select "Administrative Tools→Internet Information Services (IIS) Manager" in the "Start" menu.
2. Double-click "Local Computer" in "Internet Information Services (IIS) Manager".
3. Right-click "Website", select "New → Website" in the pop-up menu, and open the "Website Creation Wizard".
4. Fill in the "Website Description", "IP Address", "Port Number", "Path" and "Website Access Permissions" in sequence. Finally, default documents (Index.asp, Index.htm) should also be set for easy access.
The above settings are basically the same as the Windows 2000 Server website settings, but at this time the Web service is only applicable to static content, that is, static pages can be browsed normally, and the commonly used Active Server Pages (ASP) function is not enabled. . Therefore, you should also select to allow "Active Server Pages" in the "Web Service Extensions" of "Internet Information Services (IIS) Manager".
a. Install IIS
If the IIS server has not been installed in the operating system, you can open the "Control Panel" and click to start "Add/Remove" Programs", select "Add/Remove Windows Components" in the pop-up dialog box, select "Internet Information Services (IIS)" in the Windows Component Wizard dialog box, then click "Next" and follow the wizard instructions to complete the IIS installation. (Illustrations such as Figure 1 and Figure 2 below. Since Baicha 123 uses the Windows Server 2003 operating system, it is slightly different from your installation interface, but it is generally the same)
Related to this topicPictures are as follows :
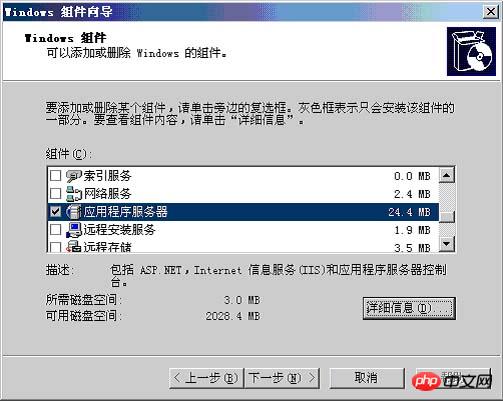
Figure 1—Windows Component Wizard 1
Relevant pictures for this topic are as follows:
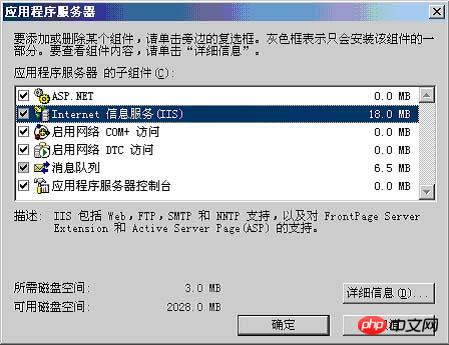
Figure 2—Windows Component Wizard 2
b. Start Internet Information Services (IIS)
Internet Information Services is referred to as IIS, click Windows Start Menu---All Program---Management Tools---Internet Information Services (IIS) Manager, you can start the "Internet Information Services" management tool (Figure 3)
Relevant pictures for this topic are as follows:
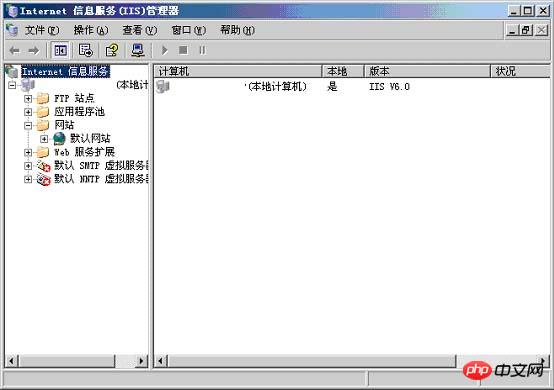
Figure 3 - Internet Information Services (IIS) Manager
c. Configure IIS
After IIS is installed, the system automatically creates A default Web site is created, and the home directory of the site defaults to C:\\Inetpub\\www.root.
Right-click the "Default Web Site" and select "Properties" in the pop-up shortcut menu. At this time, you can open the site property settings dialog box, (Figure 4) In this dialog box, complete the configuration of the site.
Related pictures for this topic are as follows:
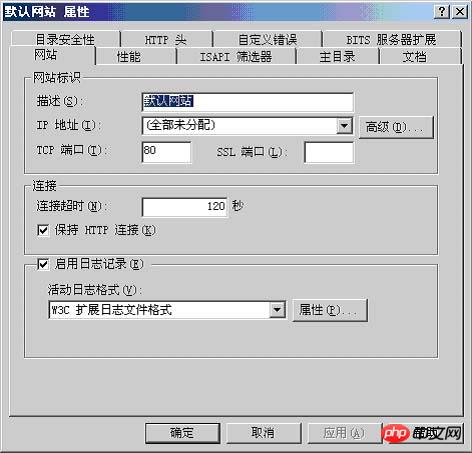
Figure 4—Default Web site properties
Home directory and enabled parent path
Click the "Home Directory" label to switch to the home directory setting page (as shown in Figure 5). This page allows you to change or set the home directory. Pay attention to check whether the Enable parent path option is checked. If it is not checked, it will have some impact on future program operation. (As shown in Figure 6), Home Directory—Configuration—Options.
Related pictures of this topic are as follows:
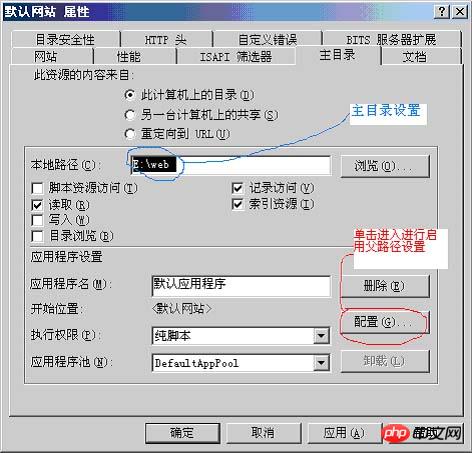
Figure 5 - Default Web site home directory settings
Related pictures of this topic are as follows:
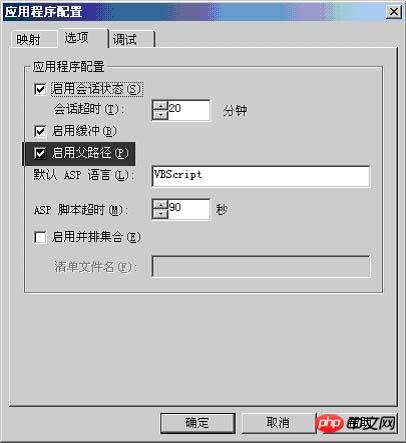
Figure 6—Default Web site enables parent path setting
Set homepage document
Click the "Document" tab to switch to the settings page for the home page document. (As shown in Figure 7) The home page document is accessed by the system by default when the website domain name is entered in the browser and the web page file to be accessed is not specified. Page file. Common homepage file names include index.htm, index.html, index.asp, index.php, index.jap, default.htm, default.html, default.asp, etc.
The default homepage document of IIS is only default.htm and default.asp, as needed, use the "Add" and "Delete" buttons to set the homepage document that can be parsed for the site.
Start and stop the IIS service
The toolbar of the Internet Information Service provides the function of starting and stopping the service. Click to start the IIS server; click to stop the IIS server.
============================================== =========================
1. Enable Asp support
WindowsServer2003 is installed by default and IIS6 is not installed. It is required Install separately. After installing IIS6, you need to enable ASP support separately.
The first step is to enable Asp and go to: Control Panel->Administrative Tools->IIS (Internet Server)-Web Service Extension->ActiveServerPages->Allow
Control Panel->Administrative Tools->IIS (Internet Server)-Web Service Extension->Include files on the server side->Allow
Second step ,enable parent path support.
IIS-Website-Home Directory-Configuration-Options-Enable Parent Path
The third step, permission allocation
IIS-Website-(Specific site)-(right-click) Permissions-Users Full Control
2. Solve the limitation that windows2003 can only upload a maximum of 200K.
First close the iisadminservice service in the service
Find metabase.xml,
Open it, find ASPMaxRequestEntityAllowed and modify it to the required value,
Then restart the iisadminservice service
1. Allow activeserverpages and include files on the server side in the web service extension
2. Modify the properties of each site
Home Directory-Configuration-Options-Enable Parent Path
3. Make it possible to upload files larger than 200k (just change it to the size you want. If you add two 0s at the end, 20m is allowed)
c:\WINDOWS \system32\inetsrv\MetaBase.xml
(Enterprise version of windows2003 is on line 592, the default is AspMaxRequestEntityAllowed="204800", which is 200K
Add two 0s to it, that is, change it to, Now you can upload up to 20M
AspMaxRequestEntityAllowed="20480000"
Some points to note when configuring IIS on WIN2003
Configuring WindowsServer2003--IIS6
MicrosoftKnowledgeBaseArticle-324742
This article Information in applies to:
MicrosoftWindowsServer2003,DatacenterEdition
MicrosoftWindowsServer2003,EnterpriseEdition
MicrosoftWindowsServer2003,StandardEdition
MicrosoftWindowsServer2003,WebEdition
MicrosoftWindowsServer2003,64-BitDatacenterEdition
MicrosoftWindowsServer2003,64-BitEnterpriseEdition
MicrosoftInternetIn
for
mationServicesversion6.0
This step-by-step guide describes how to set up a WWW server for anonymous access in a Windows Server 2003 environment.
Install Internet Information Services
Microsoft Internet Information Services (IIS) is a Web service integrated with Windows Server 2003.
To install IIS, add optional components, or remove optional components, follow these steps:
1. Click Start, point to Control Panel, and then click "Add or Remove Programs."
The "Add or Remove Programs" tool will start.
2. Click Add/Remove Windows Components.
Display the "Windows Components Wizard".
3. In the Windows components list, click Web Application Server.
4. Click Details and then Internet Information Services (IIS).
5. Click Details to view a list of IIS optional components.
6. Select the optional components you want to install. By default, the following components are selected:
---Public Files
---FrontPage2002ServerExtentions
---Internet Information Services Snap-in
---Internet Information Services Manager
---NNTP Service
---SMTP Service
---WorldWideWeb Service
7. Click "WorldWideWeb Service" and then click Details to view IIS optional subcomponents (such as ActiveServerPages components and "Remote Administration (HTML) Tools") list. Select the optional subcomponents you want to install. By default, the following components are selected:
---WorldWideWeb Service
8. Click OK until you return to the "Windows Component Wizard".
9. Click Next and complete the "Windows Components Wizard".
Configure anonymous authentication
To configure anonymous authentication, follow these steps:
1. Click Start, point to Administrative Tools, and then click Internet Information Services (IIS).
2. Expand "*Server Name" (where server name is the name of the server), right-click the Web site, and then click Properties.
3. In the Web site properties dialog box, click the Directory Security tab.
4. Under Authentication and Access Control, click Edit.
5. Click the "Enable anonymous access" checkbox to select it.
Note: The user account in the "Username" box is only used for anonymous access through the Windows guest account.
By default, the server creates and uses the account IUSR_computername. Anonymous user account passwords are used only in Windows; anonymous users do not log in with a username and password.
6. Under Authenticated Access, click the Integrated Windows Authentication check box to select it.
7. Click OK twice.
Basic Web Site Configuration
1. Click Start, point to Administrative Tools, and then click Internet Information Services (IIS).
2. Expand "*Server Name" (where the server name is the name of the server), and then expand the Web site.
3. Right-click Default Web Site and click Properties.
4. Click the Web site tab. If you have assigned multiple IP addresses to your computer, click the IP address that you want to assign to this Web site in the IP address box.
5. Click the Performance tab. Use the Web Site Properties - Performance dialog box to set properties that affect memory, bandwidth usage, and the number of Web connections.
By configuring the network bandwidth on a specific site, you can better control the traffic to that site. For example, by limiting bandwidth on a low priority Web site, you can relax restrictions on the amount of traffic to that site. Likewise, when you specify the number of connections to a Web site, you free up resources for other sites. Settings are site-specific and should be adjusted based on changes in network traffic and usage.
---Click the "Limit the bandwidth available to this Web site" checkbox and select it to configure IIS to adjust the network bandwidth to the selected maximum amount of bandwidth, measured in kilobytes per second (KB/ S) is the unit.
---Click the Web service connection check box and select it to select a specific number or an unlimited number of Web service connections. Limiting connections makes computer resources available for other processes.
Note: Each client browsing a Web site typically uses approximately three connections.
6. Click the Home Directory tab.
---If you want to use web content stored on your local computer, then click "Directory on this computer" and then type the path you want in the Local Path box. For example, the default path is C:\Inetpub\wwwroot.
Note: For added security, please do not create web content folders in the root directory.
---If you want to use web content stored on another computer, click "Shared location on another computer" and then type the desired location in the network directory box that appears.
---If you want to use web content stored at another web address, click "Redirect to URL" and then type the desired location in the "Redirect to" box. Under Customer Delivery, click the appropriate checkbox to select it.
7. Click the Document tab. Please note the list of documents that can be used by IIS as the default startup document. You must add Index.html if you want to use it as the startup document. The adding method is:
a. Click Add.
b. In the Add Default Document dialog box, type Index.html, and then click OK.
c. Click the up arrow button until Index.html is displayed at the top of the list.
8. Click OK to close the Default Web Site Properties dialog box.
9. Right-click the Default Web Site and click Permissions.
10. Please pay attention to the user accounts that have operating permissions on this website. Click Add to add additional user accounts that can operate this website.
11. Click OK to return to the "Internet Information Services" window.
12. Right-click the Default Web Site and click Stop.
13. Right-click Default Web Site and click Start.
Note when installing the OA system on WINDOWS2003:
How to enable ASP support:
WindowsServer2003 is installed by default and IIS6 is not installed. Requires additional installation. After installing IIS6, you need to enable ASP support separately. The method is:
Control Panel->Administrative Tools->Web Service Extensions->ActiveServerPages->Allow.
Q: When the ASP file contains files, it prompts ActiveServerPages error_ASP0131_Parent path not allowed. How to solve it?
A: Select Home Directory-Configuration-Application Options in the site properties and select "Enable Parent Directory".
Q: When logging into the OA system, it prompts "No necessary files for OA found". How to solve the problem?
A: Select Properties - Security - Select the USER group on the OASERVER folder, turn on all permissions, click "Advanced", check "Reset all object permissions and allow propagation of inheritable permissions", and click "OK" "Twice, you can log in later
4. The solution to the problem that IIS cannot download files is to change the properties of the website. Check the execution permissions in the home directory. Set it as a pure script
runas /profile /user:ourcomputeradministrator "mmc gpedit.msc""
[Related recommendations]
1. win2003 Solution to CD-KEY (serial number) failure to verify when installing SQL2000
2. win2003 How to install sqlserver 2005
3. 64-bit How to install Mysql5.7.11 on Win10 system (detailed case explanation)_MySQL
The above is the detailed content of Share a graphic example of Win2003 IIS installation method. For more information, please follow other related articles on the PHP Chinese website!

Hot AI Tools

Undresser.AI Undress
AI-powered app for creating realistic nude photos

AI Clothes Remover
Online AI tool for removing clothes from photos.

Undress AI Tool
Undress images for free

Clothoff.io
AI clothes remover

Video Face Swap
Swap faces in any video effortlessly with our completely free AI face swap tool!

Hot Article
Hot Tools

Notepad++7.3.1
Easy-to-use and free code editor

SublimeText3 Chinese version
Chinese version, very easy to use

Zend Studio 13.0.1
Powerful PHP integrated development environment

Dreamweaver CS6
Visual web development tools

SublimeText3 Mac version
God-level code editing software (SublimeText3)
Hot Topics
 1386
1386
 52
52

 How to install Android apps on Linux?
Mar 19, 2024 am 11:15 AM
How to install Android apps on Linux?
Mar 19, 2024 am 11:15 AM
Installing Android applications on Linux has always been a concern for many users. Especially for Linux users who like to use Android applications, it is very important to master how to install Android applications on Linux systems. Although running Android applications directly on Linux is not as simple as on the Android platform, by using emulators or third-party tools, we can still happily enjoy Android applications on Linux. The following will introduce how to install Android applications on Linux systems.
 How to open iis application pool
Apr 09, 2024 pm 07:48 PM
How to open iis application pool
Apr 09, 2024 pm 07:48 PM
To open an application pool in IIS: 1. Open IIS Manager; 2. Navigate to the "Application Pools" node; 3. Right-click the target application pool and select "Manage"; 4. Click "Advanced Settings" Tab; 5. Application pool configuration can be viewed and modified here.
 How to install Podman on Ubuntu 24.04
Mar 22, 2024 am 11:26 AM
How to install Podman on Ubuntu 24.04
Mar 22, 2024 am 11:26 AM
If you have used Docker, you must understand daemons, containers, and their functions. A daemon is a service that runs in the background when a container is already in use in any system. Podman is a free management tool for managing and creating containers without relying on any daemon such as Docker. Therefore, it has advantages in managing containers without the need for long-term backend services. Additionally, Podman does not require root-level permissions to be used. This guide discusses in detail how to install Podman on Ubuntu24. To update the system, we first need to update the system and open the Terminal shell of Ubuntu24. During both installation and upgrade processes, we need to use the command line. a simple
 How to Install and Run the Ubuntu Notes App on Ubuntu 24.04
Mar 22, 2024 pm 04:40 PM
How to Install and Run the Ubuntu Notes App on Ubuntu 24.04
Mar 22, 2024 pm 04:40 PM
While studying in high school, some students take very clear and accurate notes, taking more notes than others in the same class. For some, note-taking is a hobby, while for others, it is a necessity when they easily forget small information about anything important. Microsoft's NTFS application is particularly useful for students who wish to save important notes beyond regular lectures. In this article, we will describe the installation of Ubuntu applications on Ubuntu24. Updating the Ubuntu System Before installing the Ubuntu installer, on Ubuntu24 we need to ensure that the newly configured system has been updated. We can use the most famous "a" in Ubuntu system
 Detailed steps to install Go language on Win7 computer
Mar 27, 2024 pm 02:00 PM
Detailed steps to install Go language on Win7 computer
Mar 27, 2024 pm 02:00 PM
Detailed steps to install Go language on Win7 computer Go (also known as Golang) is an open source programming language developed by Google. It is simple, efficient and has excellent concurrency performance. It is suitable for the development of cloud services, network applications and back-end systems. . Installing the Go language on a Win7 computer allows you to quickly get started with the language and start writing Go programs. The following will introduce in detail the steps to install the Go language on a Win7 computer, and attach specific code examples. Step 1: Download the Go language installation package and visit the Go official website
 How to generate URL from html file
Apr 21, 2024 pm 12:57 PM
How to generate URL from html file
Apr 21, 2024 pm 12:57 PM
Converting an HTML file to a URL requires a web server, which involves the following steps: Obtain a web server. Set up a web server. Upload HTML file. Create a domain name. Route the request.
 How to install Go language under Win7 system?
Mar 27, 2024 pm 01:42 PM
How to install Go language under Win7 system?
Mar 27, 2024 pm 01:42 PM
Installing Go language under Win7 system is a relatively simple operation. Just follow the following steps to successfully install it. The following will introduce in detail how to install Go language under Win7 system. Step 1: Download the Go language installation package. First, open the Go language official website (https://golang.org/) and enter the download page. On the download page, select the installation package version compatible with Win7 system to download. Click the Download button and wait for the installation package to download. Step 2: Install Go language
 Can iis log files be deleted? How to delete them?
Apr 09, 2024 pm 07:45 PM
Can iis log files be deleted? How to delete them?
Apr 09, 2024 pm 07:45 PM
Yes, it is possible to delete IIS log files. Removal methods include selecting the website or application pool through IIS Manager and deleting the log file in the Log Files tab. Use a command prompt to go to the log file storage directory (usually %SystemRoot%\System32\LogFiles\W3SVC1) and use the del command to delete the log file. Use third-party tools such as Log Parser to automatically delete log files.
